The latest versions of ProSelect (from 2051r1 and newer) include some great new default templates, mats (with high-resolution graphics), frames, room view images and more. These are automatically added into ProSelect on a new install but not when upgrading from an earlier version, to avoid making unexpected changes to your existing setup.
This article explains how you can add these resources to your existing setup after upgrading to these newer versions of ProSelect. This article is based on using the 2017r1 version. Note, that from release 2018r1, "Styles" are now replaced by "Mats".
What are the New Resources?
See the What's Included page for details about all of the Resources included with the latest version that you can add to your existing ProSelect setup.
Just getting started?
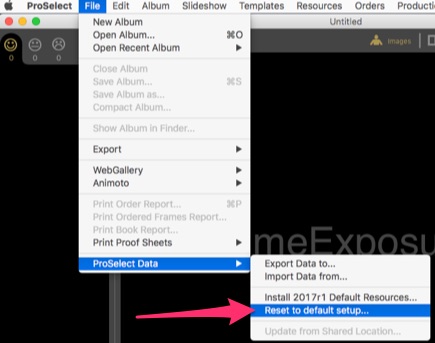
If you are just getting started and haven't made many or only a few changes to your setup, you can reset everything back to a "clean install" setup by simply using ProSelect Data -> Reset to default setup (under the File Menu in ProSelect). Note: This will also clear out any prices and price list items that you added so make sure that you re-enter these.
Adding to your existing setup
If you have your custom resources and prices already setup then you can add the new items using ProSelect Data -> Install XXXX Default Resources (under the File Menu).
ProSelect will check your existing templates, styles, library rooms, music etc to see which resources you do not already have installed and will display a list of the additional resources available and how many of each one.
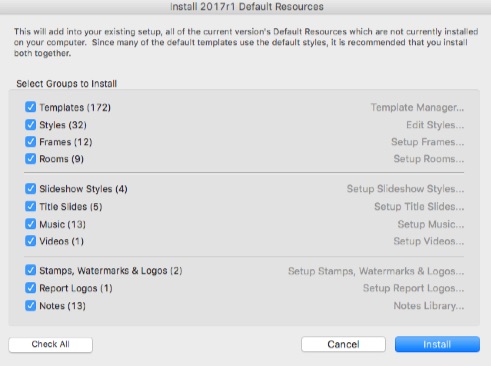
Check the areas that you wish to add then click the Install button. If you have previously used this command then they won't be added again unless you have deleted or changed some of them.
Templates will be in a new category called "Default templates (XXXX)". Style groups (Mats in 2018r1 and newer) added will have "(XXXX)" after their name and the new room will have "(XXXX)" appended. Where XXXX is the version of ProSelect that you are using.
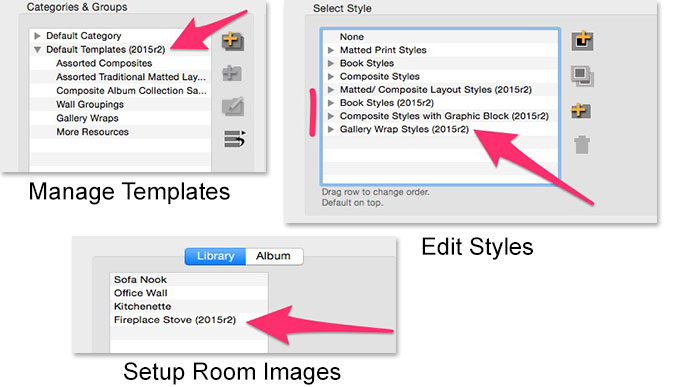
After adding these you can use the respective windows to delete any that you don't wish to keep, re-arrange them into your own groups or rename the added items.
Default Templates with Styles (or Mats in 2018r1 and newer) and Frames
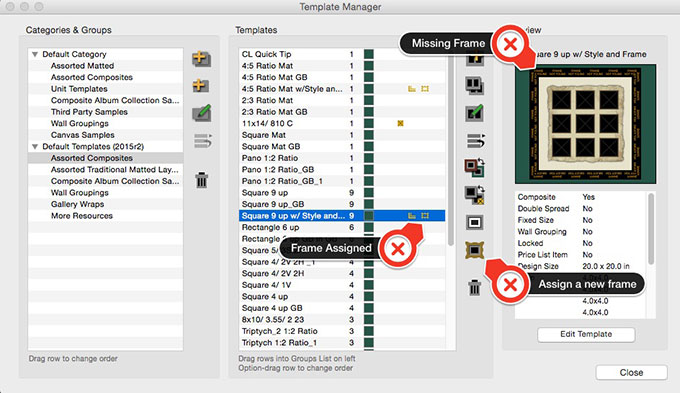
Some of the new default templates have some of ProSelect's default styles and frames assigned to them. So it is recommended that you install templates, styles and frames together. Otherwise, you will see a "Frame Not found" image around the template when you display it.
To fix this:
- Open the Template Manager (under the Templates menu).
- Select each template group in the new Default Templates (XXXX) category.
- Select each template which has a frame assigned (look for the frame icon next to the name and check if it is shown correctly in the Preview box.
- If not, the click the Set Template Frame button and choose a new frame.
Adding New Frames
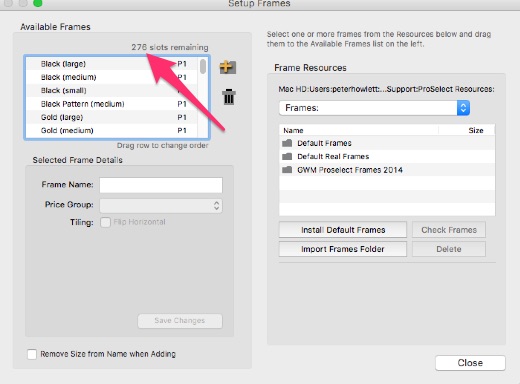
When adding new default frames, ProSelect will check that you have enough empty frame slots available to take the new frames. If you have ProSelect Basic (with a maximum of 12 free slots) then you will likely need to remove all previous frames before installing the default new ones. If you have ProSelect Pro (with 300 frame slots) you will need to make sure that you have at least 12 free slots. You can check this in the Setup Frames window.
KnowledgeBase Article: Adding the new ProSelect included resources


