 Traditional Matted Products
Price your traditional matted products by selecting a template, and clicking on the Pricing button. Traditional matted products can be priced as either "Sum of Parts" or "Fixed Price by Presentation Option". It is important to note that traditional matted products are always fixed-size. If multiple sizes are available, use Stacked Sizing to group them together.
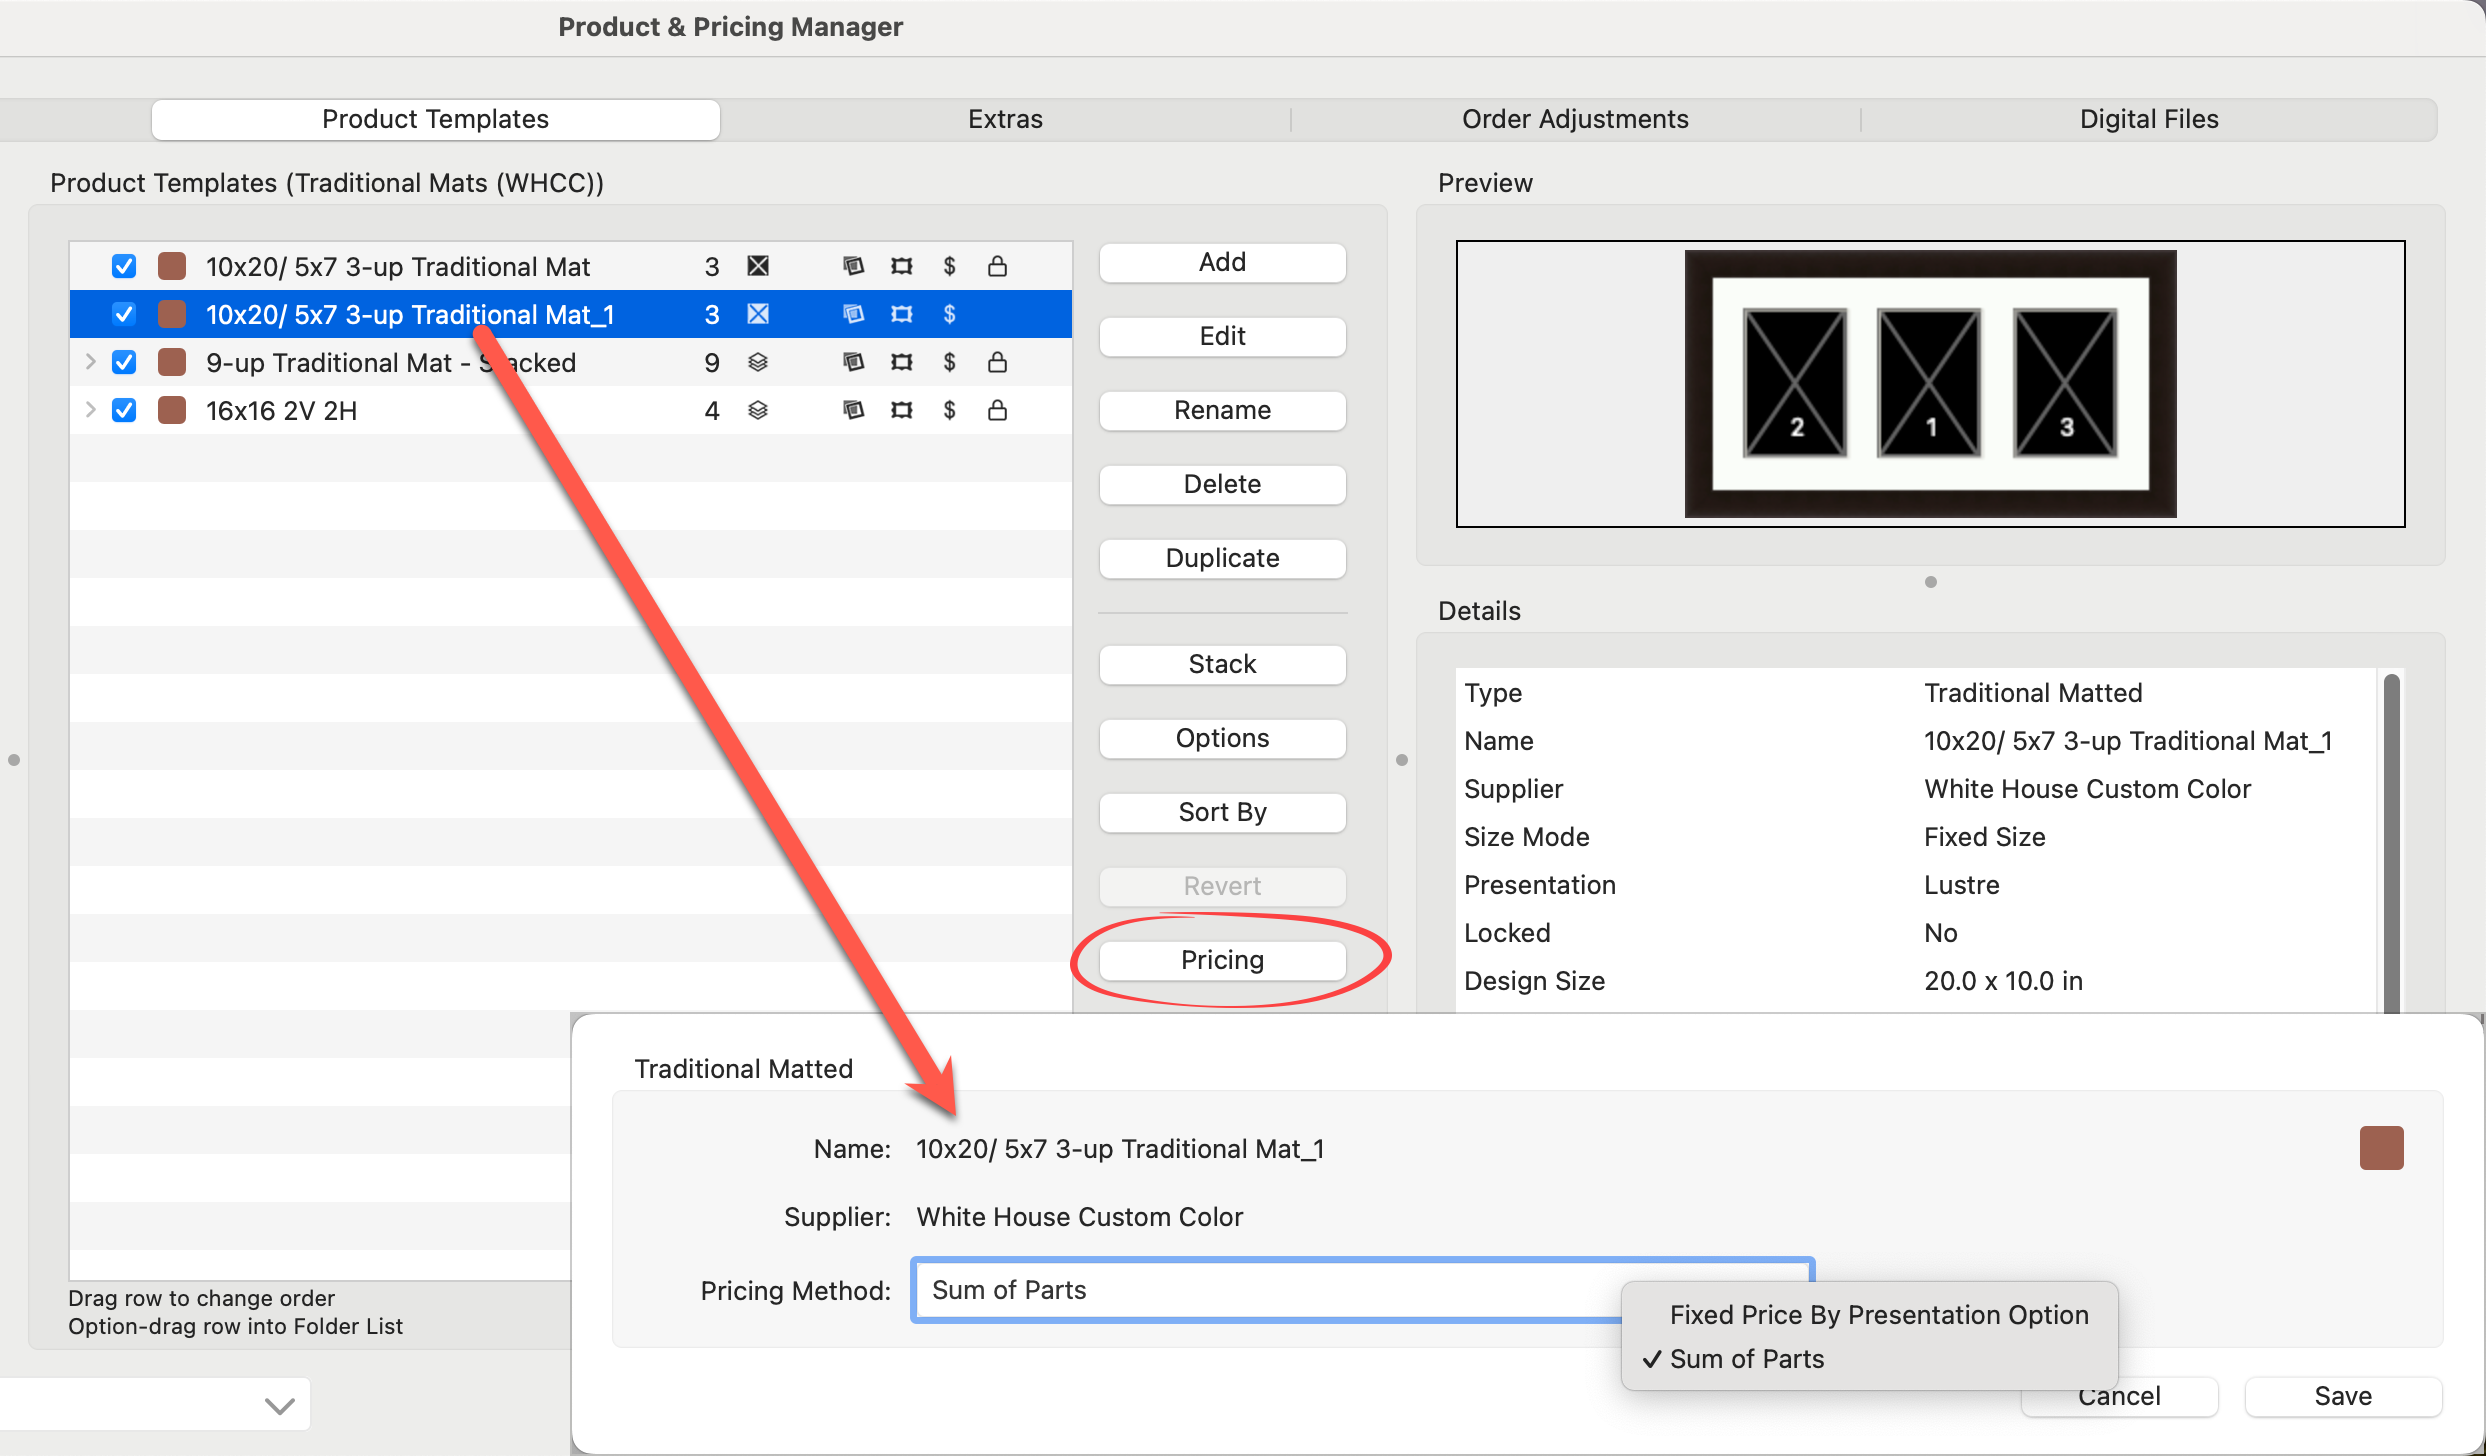
- Choose a Supplier from the drop-down list on the Bottom Bar to exclusively display products associated with a particular supplier.
Before you start pricing your products, be sure you have selected the applicable price list from the drop-down menu on the bottom left.
There are two different pricing methods available for traditional matted products.
- Fixed Price by Presentation Option: With this method, you set a specific price for each presentation option available for your product.
- Sum of Parts: This method works by matching the individual prints that make up the product to prints you've already priced. Essentially, once you have priced your standard prints, the pricing for each print in the matted product is automatic. Important note: this pricing method does not include assembly costs. If required, add those costs as an Extra.
Practical Example
We have a traditional matted product whose overall design size is 20x10. There are 3, 5x7 openings. Below you will see the difference between pricing methods.
Method 1: Fixed Price by Presentation Option
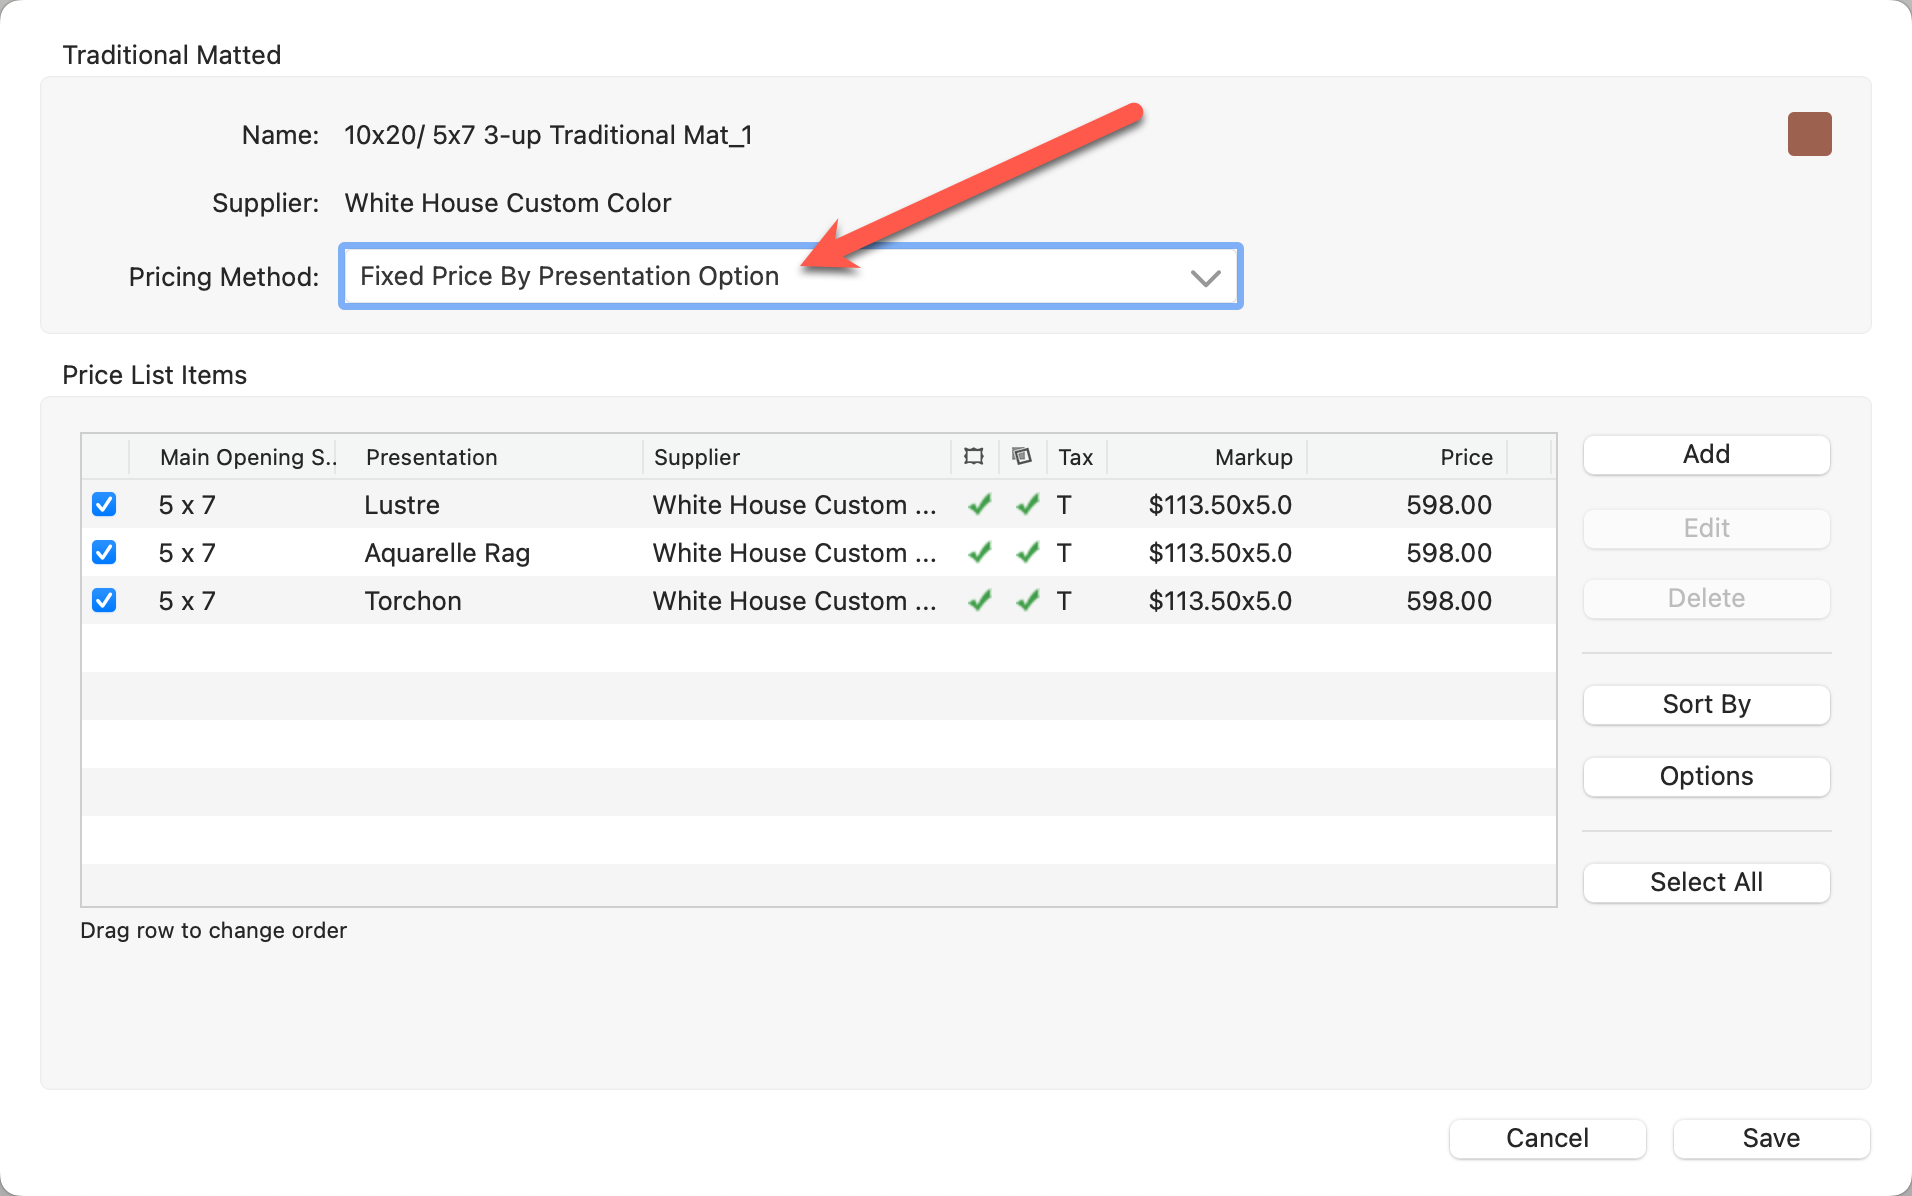
A price must be entered for each presentation option the product is being offered in, even if the prices are the same.
Now that we have set up our pricing, we can see the options we created in the main working area of ProSelect.
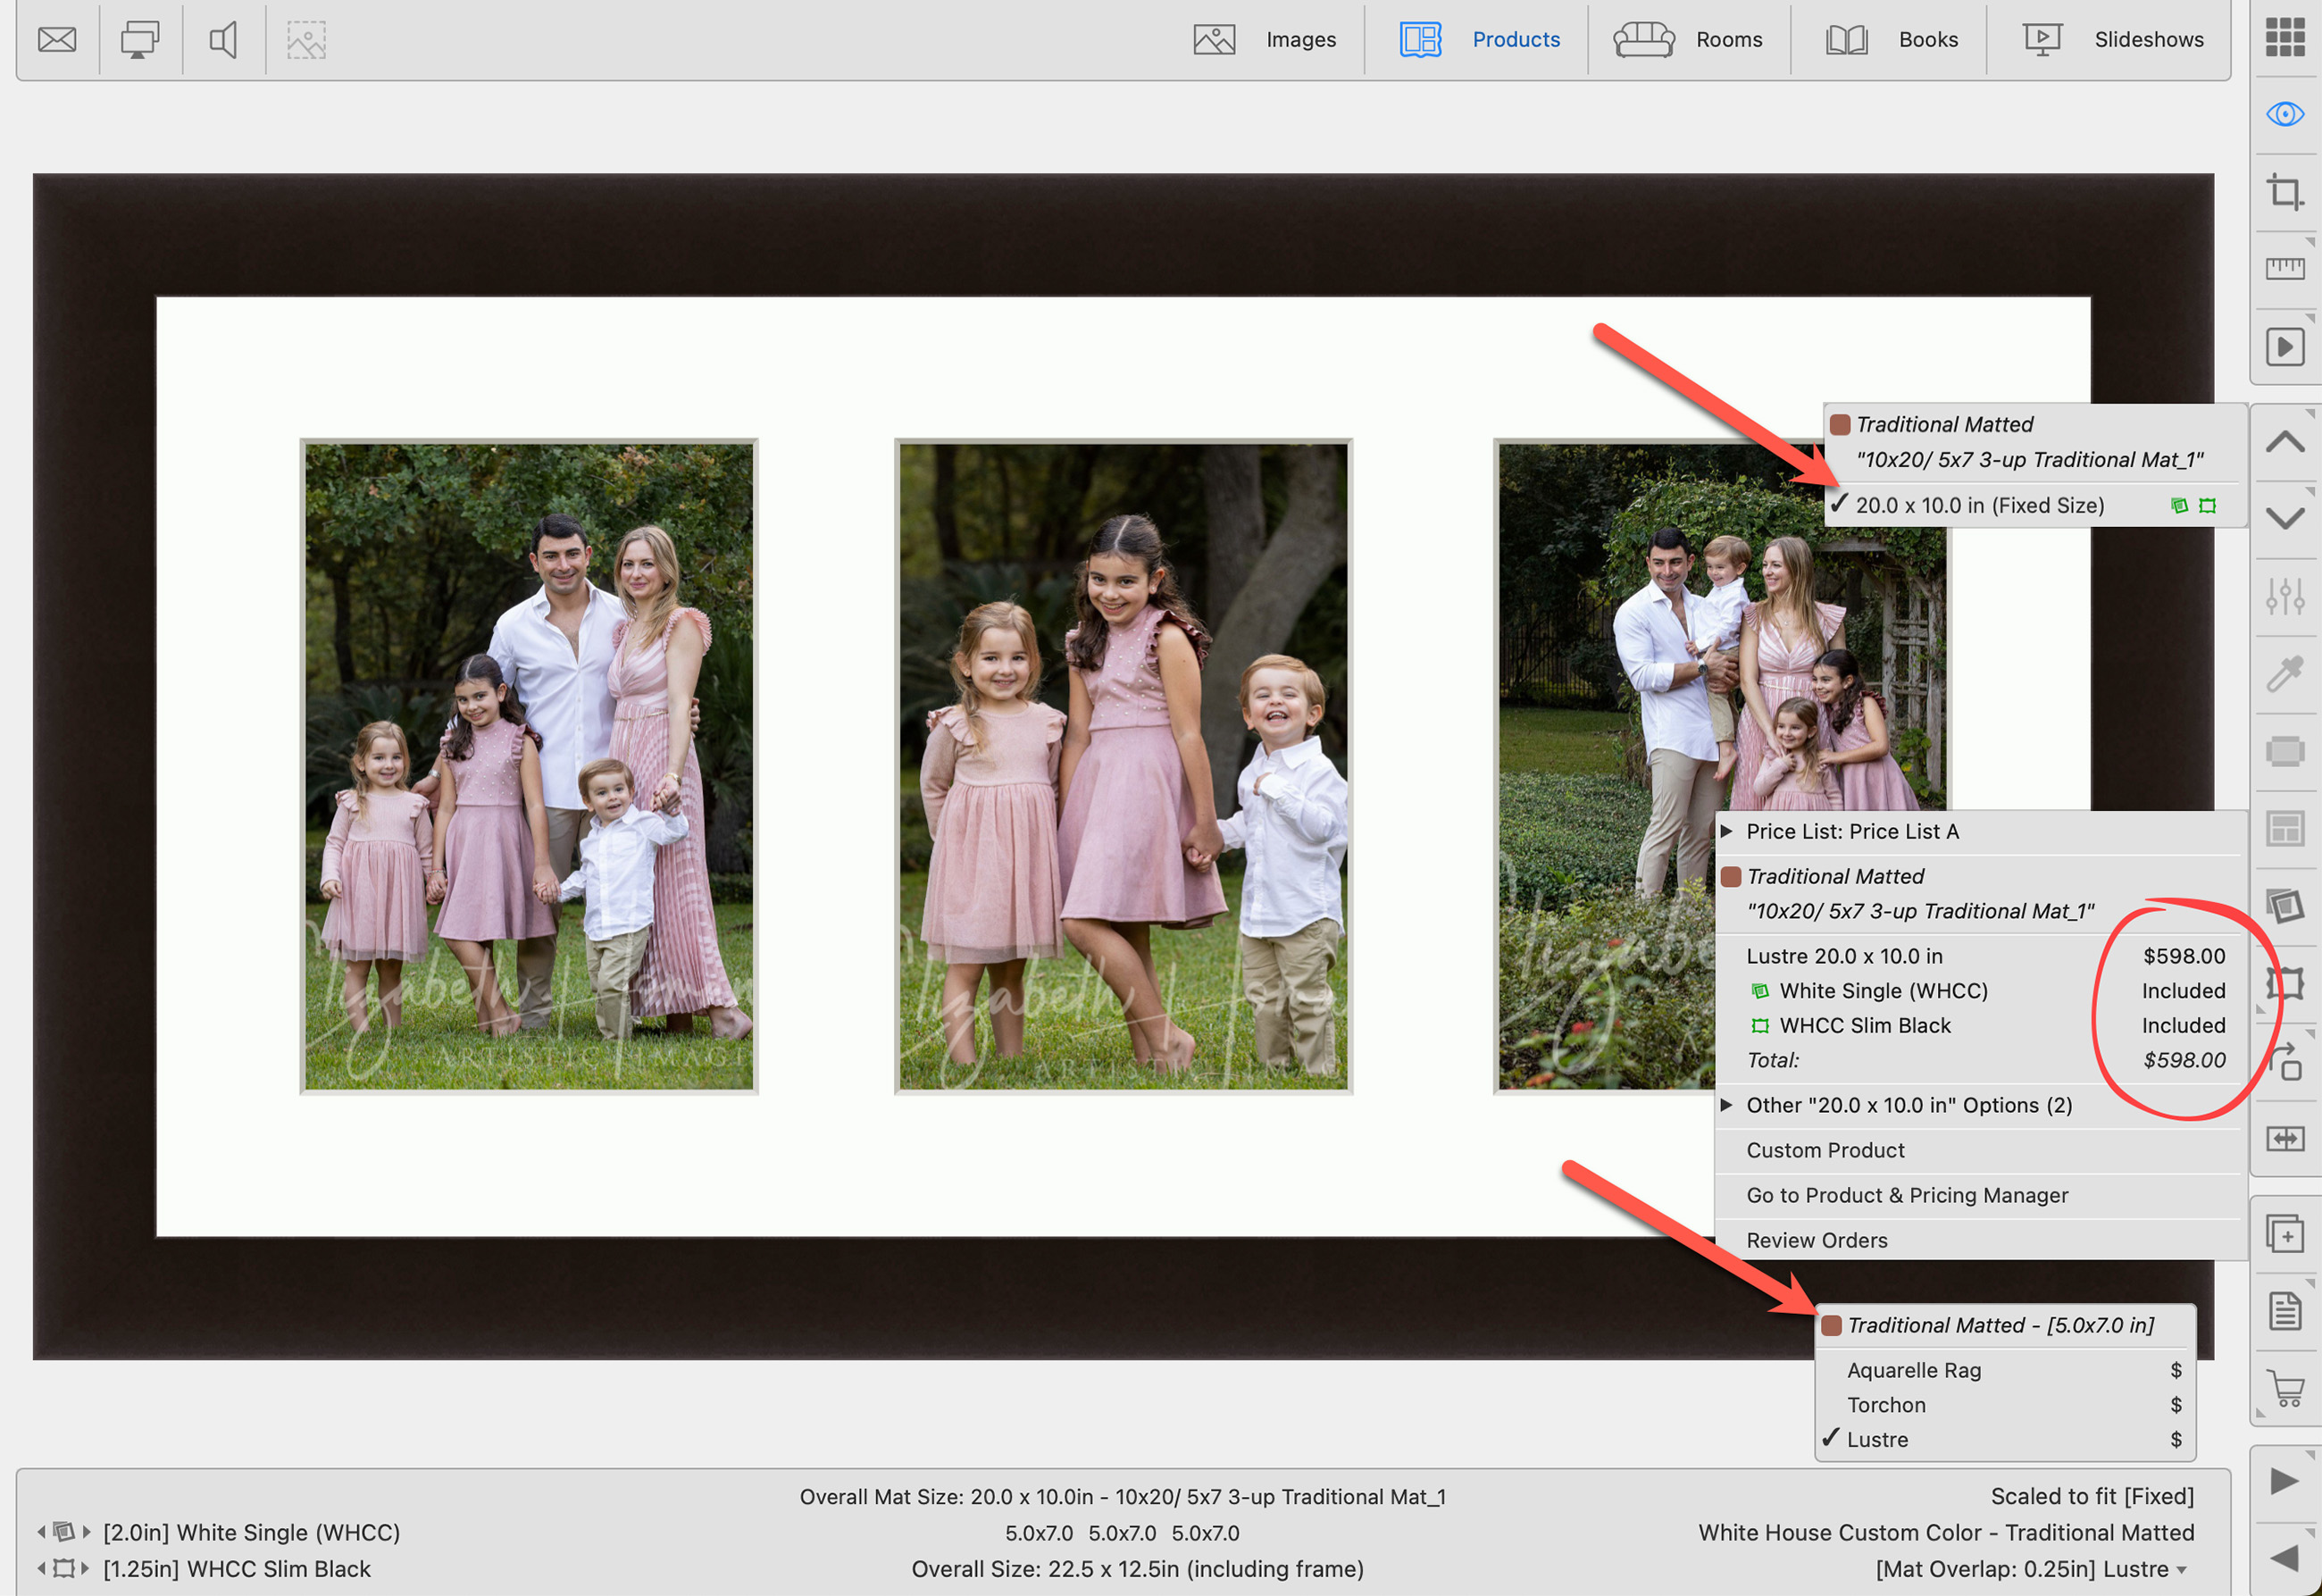
- Traditional matted products are "fixed-sized." 20x10 is the only sizing option.
- The product is available in 3 different presentation options.
- When you order the product, all of the elements are priced together as one. The frame and mat prices are included (this is a preference, you do not have to price them this way).
Option 2: Sum of Parts
There is no need to manually enter any pricing. The pricing is taken directly from the print prices already set up.

Now that we have selected Sum of Parts pricing, we can see the options we created in the main working area of ProSelect.

- Once again, our product is a "fixed-size," so the only sizing option is 20x10.
- By selecting "Sum of Parts" pricing, ProSelect will list ALL presentation options that have a 5x7 available. Important note: not all presentation options listed are appropriate for a matted product. For example, a metal print may have a 5x7 option, but this would not work behind a mat.
- When you order the traditional matted product, the Order Menu looks different for "Sum of Parts."
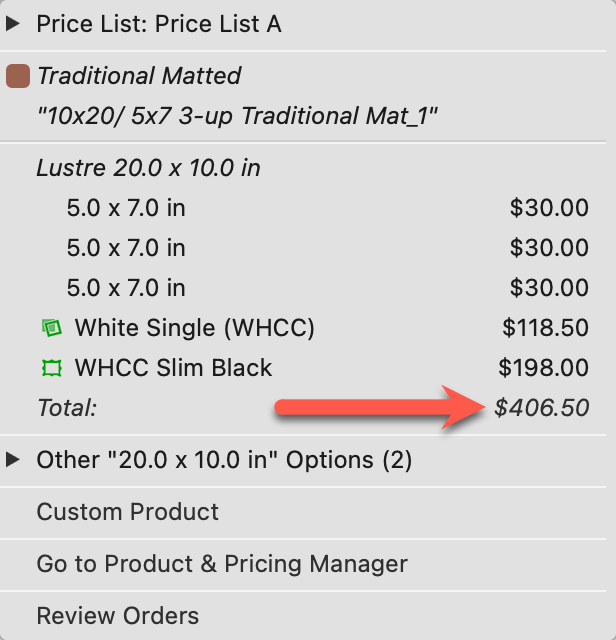
- Each item within the product is listed separately, with the total price at the bottom.
- It is very important to double-check your pricing before entering a sales session. It is possible that not all of the elements being used in product have been priced. If certain elements have 0.00 next to them, you will need to go back and price them.
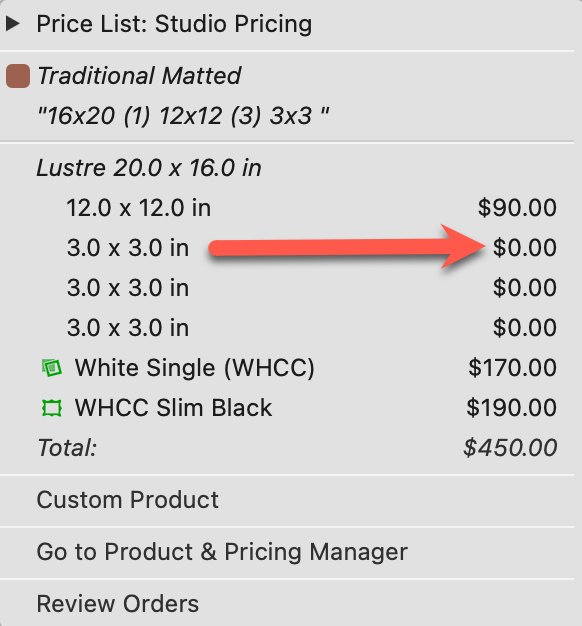
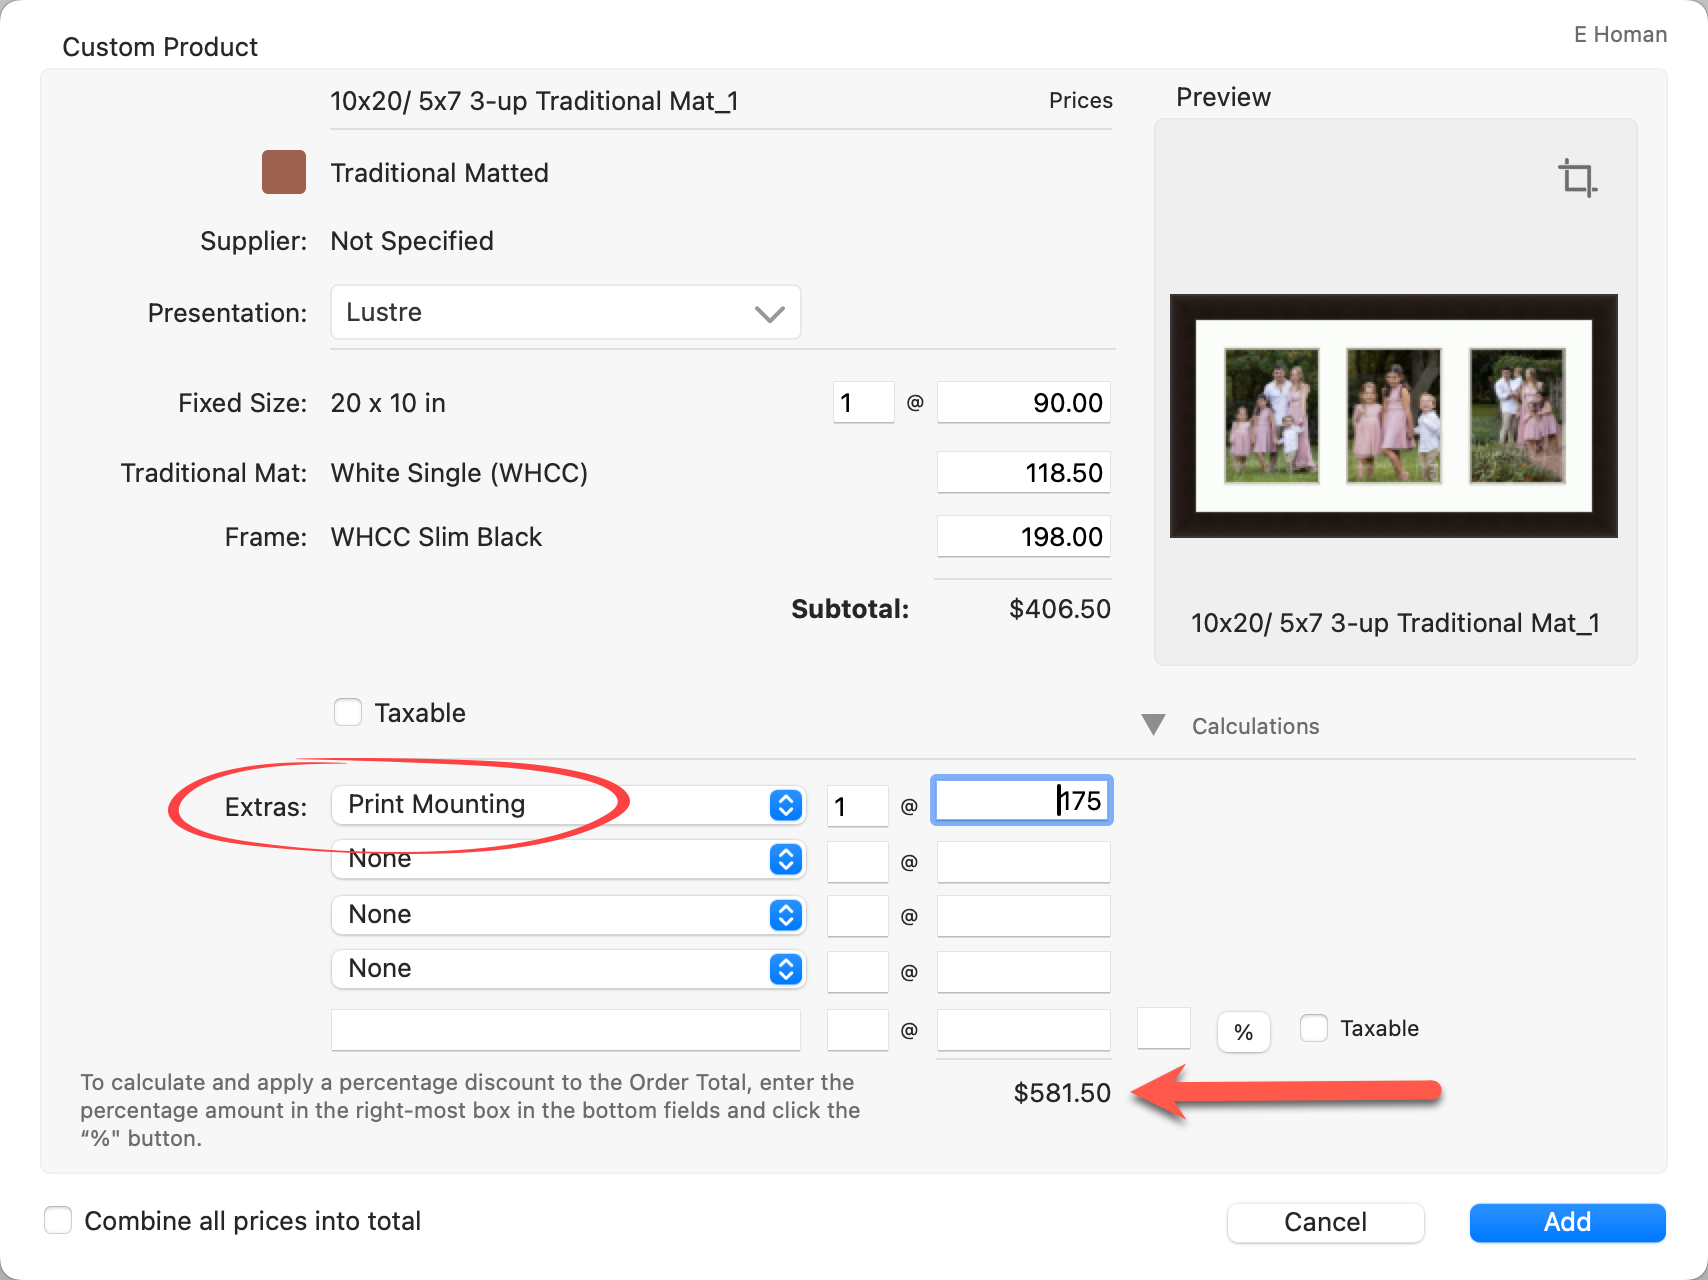
- Note the pricing difference when using "Sum of Parts" compared to "Fixed Price by Presentation Option." The price difference is likely the assembly costs. You can easily add these costs by ordering the product as a "Custom Product," and then adding an "Extra."
When using the "Fixed Price by Presentation Option" method, each product template can have multiple price list items. Traditional matted products are always fixed-size, so each price list item will be the same size, but it is important to add each presentation option you wish to offer.
- The name of the product template appears at the top as well as the Supplier if one has been assigned.
- Select "Fixed Price by Presentation Option" as your pricing method.

 : This checkbox indicates that the product is "turned on" and available in the current price list. Uncheck this box if you do not want a particular product to appear.
 - Main Opening Size: This column lists the main opening size of the product, not the overall design size.
- Presentation: This column lists the presentation option associated with the product.
- Supplier: This column indicates the Supplier if one has been assigned.
 Frame: A checkmark will appear in the column if a frame has been assigned to the product.
 Traditional Mat: A checkmark will appear in the column if a traditional mat has been assigned to the product.
- Prod. Code: If you have enabled product codes in your Settings, this is where they appear.
- Tax: a T indicates the item is taxable. An N indicates the item is non-taxable.
- Markup: If you choose to price your product using "Supplier Cost x Markup", it will display here.
- Price: This column indicates the selling price of your product.
- You can change the order of the products by selecting a row and dragging it to where you want it to be.
Stacked Sizes
For stacked sizes, use the drop-down menu at the bottom of the dialog to select which size you want to work with. You will need to price each size separately. Click on Pricing Stacked Templates for more information.
The steps for adding a price list item which is fixed-sized, are the same for both Composite and Traditional Matted Products.
- Select a Product Template you wish to price from the Product Templates Panel.
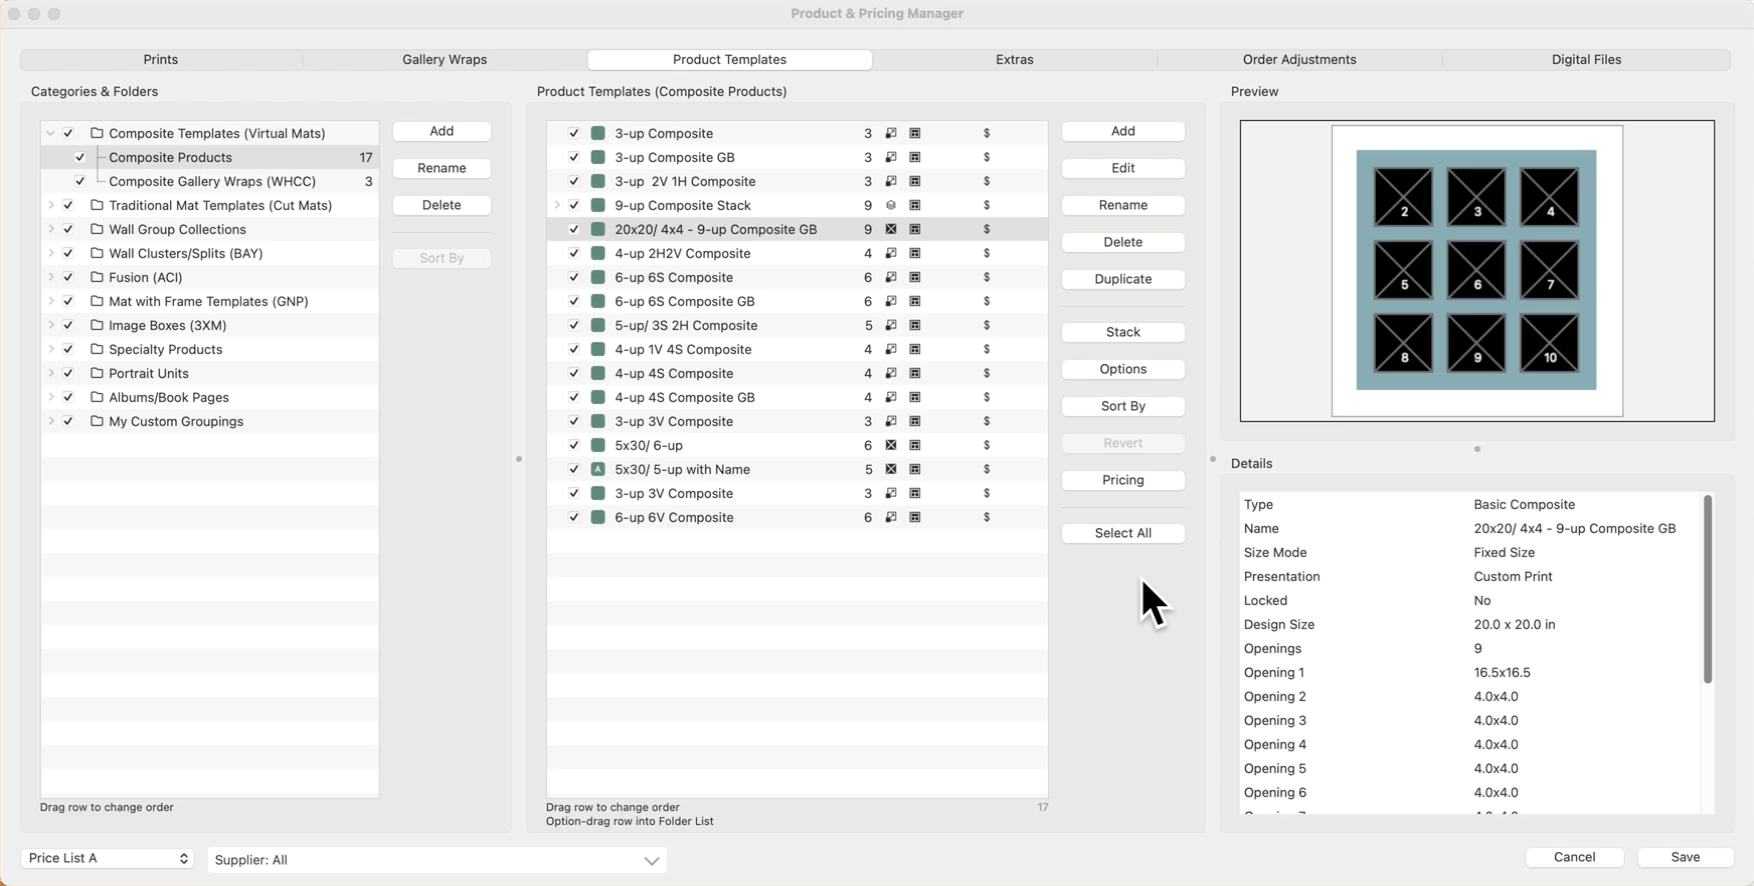
- Click the Pricing button to open the Price List Items dialog. This dialog is where all of your priced items will appear.
- Click the Add button on the right-hand side of the Price List Items dialog. This will open a new dialog where you can add a new presentation option (print finish) for the product.
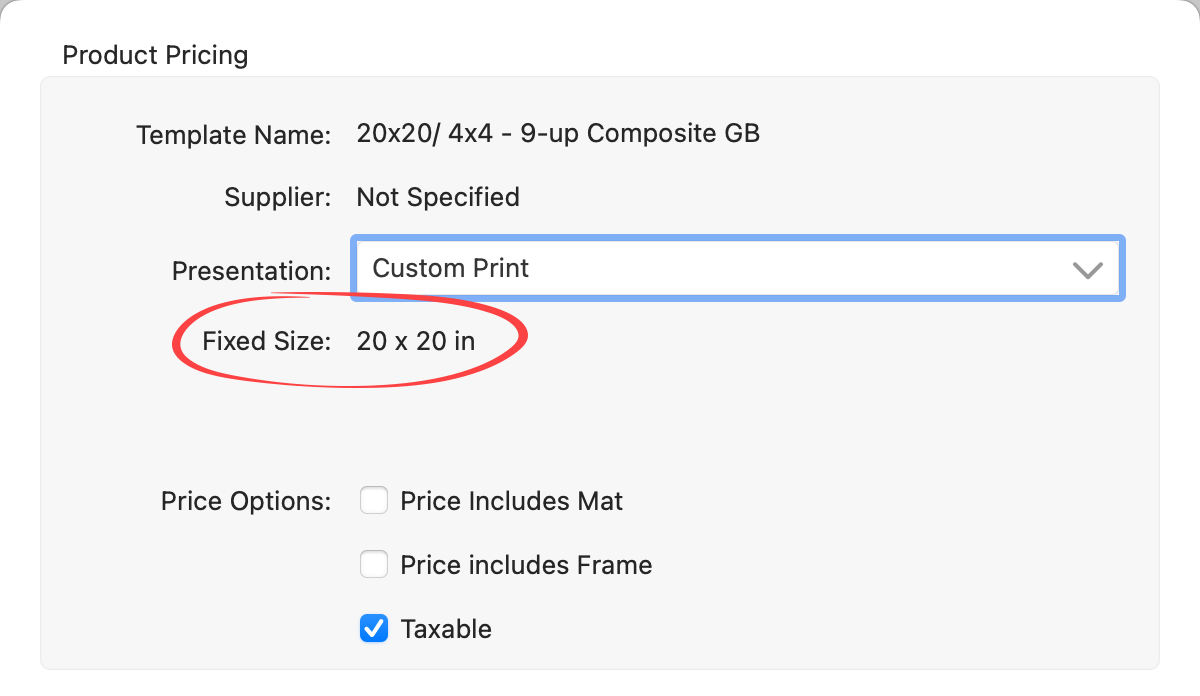
- Template Name: The name of the template is listed here.
- Supplier: If a supplier has been assigned to the product, the supplier name is listed here.
- Presentation: Select the presentation option for the new price list item you would like to add. If the presentation option you want is not listed, select "manage" from the list. (this will take you to the Presentation Options dialog).
- Size: For a fixed-size template, the size will already be listed. It cannot be changed.
- Wrap (Advanced Gallery Wraps only): Select the wrap size from the drop-down list. If the wrap size you want is not listed, click on the Setup button to manually add it (this will take you to the Gallery Wrap dialog).
- Product Code: If enabled, one will be auto-generated.
- Price Options: Check the box if you want the price to include a mat or frame.
- Check the taxable box if you wish the product(s) to be taxed.
Price
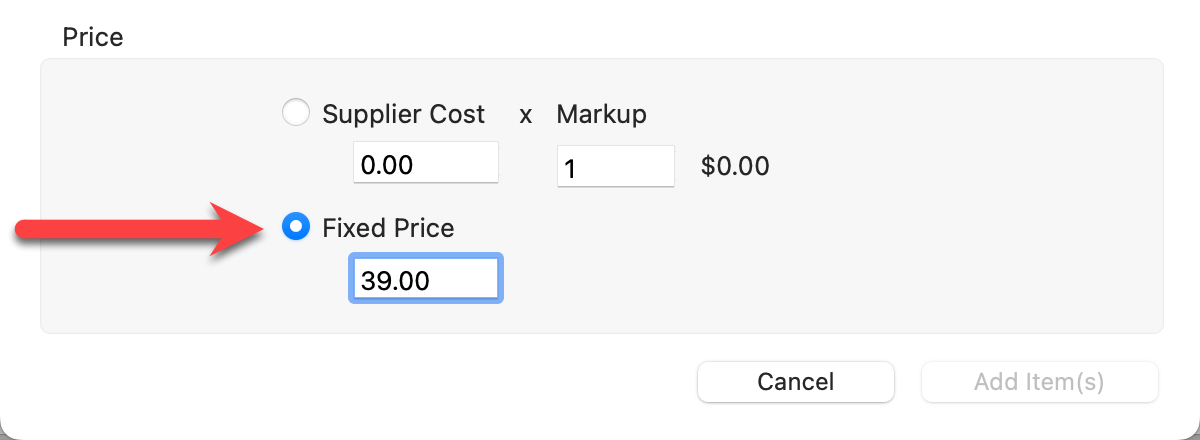
Choose Either Supplier Cost x Markup or Fixed Price.
- Supplier Cost x Markup: This pricing method is best used when Importing Pricing From a Spreadsheet.
- Enter the Supplier Cost and markup in this dialog.
- If you choose this method of pricing, price rounding (if enabled) will be shown.
- Profit Margins are also shown when using this pricing method.
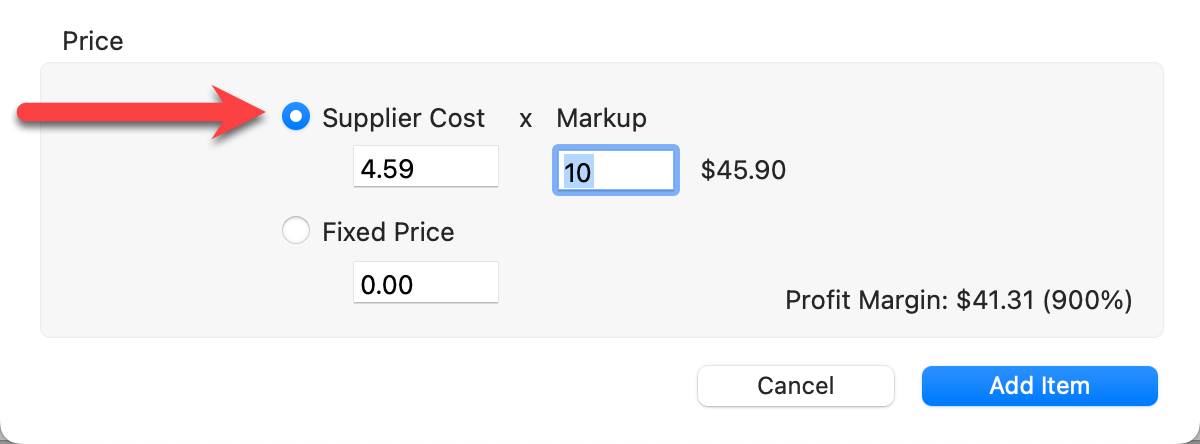
- Fixed Price: Select this option to enter a fixed price.
- If you elect to use a fixed price, you can still have the Supplier Cost listed (just not selected).
- Profit margins will be shown if the Supplier Cost is entered.
- Click the Add Item button.
- Tip: Hold down the OptionAlt key while clicking the Add Item button to add the item and keep the dialog open.
- Repeat the above process for each presentation option you wish to offer for the product. For example, an 11x16 Vertical Composite Template could have numerous price list items based on print finishes. Even if the pricing is the same, you will need different price list items for Lustre, Custom Print, Acrylic, Metal, etc.
- Your new price list item will appear in the Price List Items dialog.
- Click the Save button when finished.
- You can manage and update your prices using CSV file spreadsheets.
- Use the Select All button to make changes to all of the products at the same time. This works well when you are adding a universal markup.
- When entering a price, hold down the OptionAlt key while clicking the Save button. This will save that price across ALL price lists.
Stacked templates can also be priced using either "Sum of Parts" or "Fixed Price by Presentation Option". The method is the same for all products using stacked sizing.
- Select a Product Template you wish to price from the Product Templates Panel.
- Then click the Pricing button to open the Price List Items dialog.
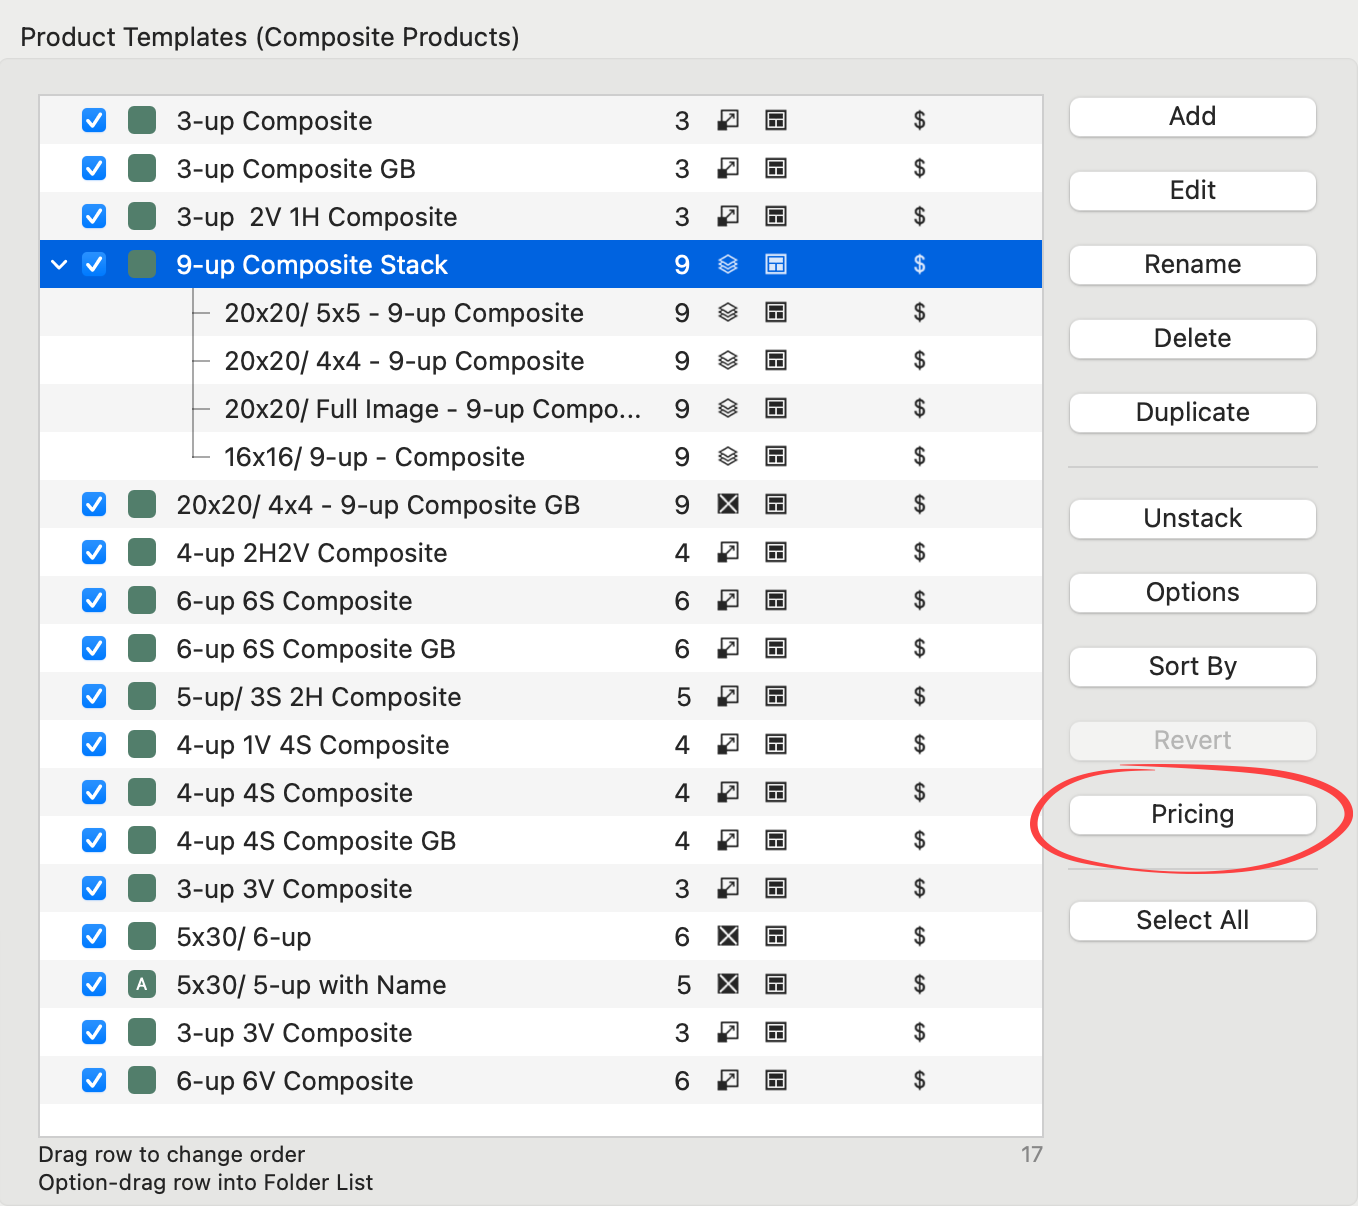
- Choose a pricing method for your product.
- If you select "Sum of Parts," you are done. ProSelect will use the print pricing you have set up. For example, if you select Sum of Parts pricing for the "9-up Composite Stack," each of the 4 templates within this stack will be based on your print pricing. If you offer a 20x20 Lustre print for $498, then the 20x20 "9-up Composite Stack" with a "Lustre" presentation option applied will also be $498.
- If you select "Fixed Price by Presentation Option," you must add price list items to each stacked size. Continue with step 4.
-
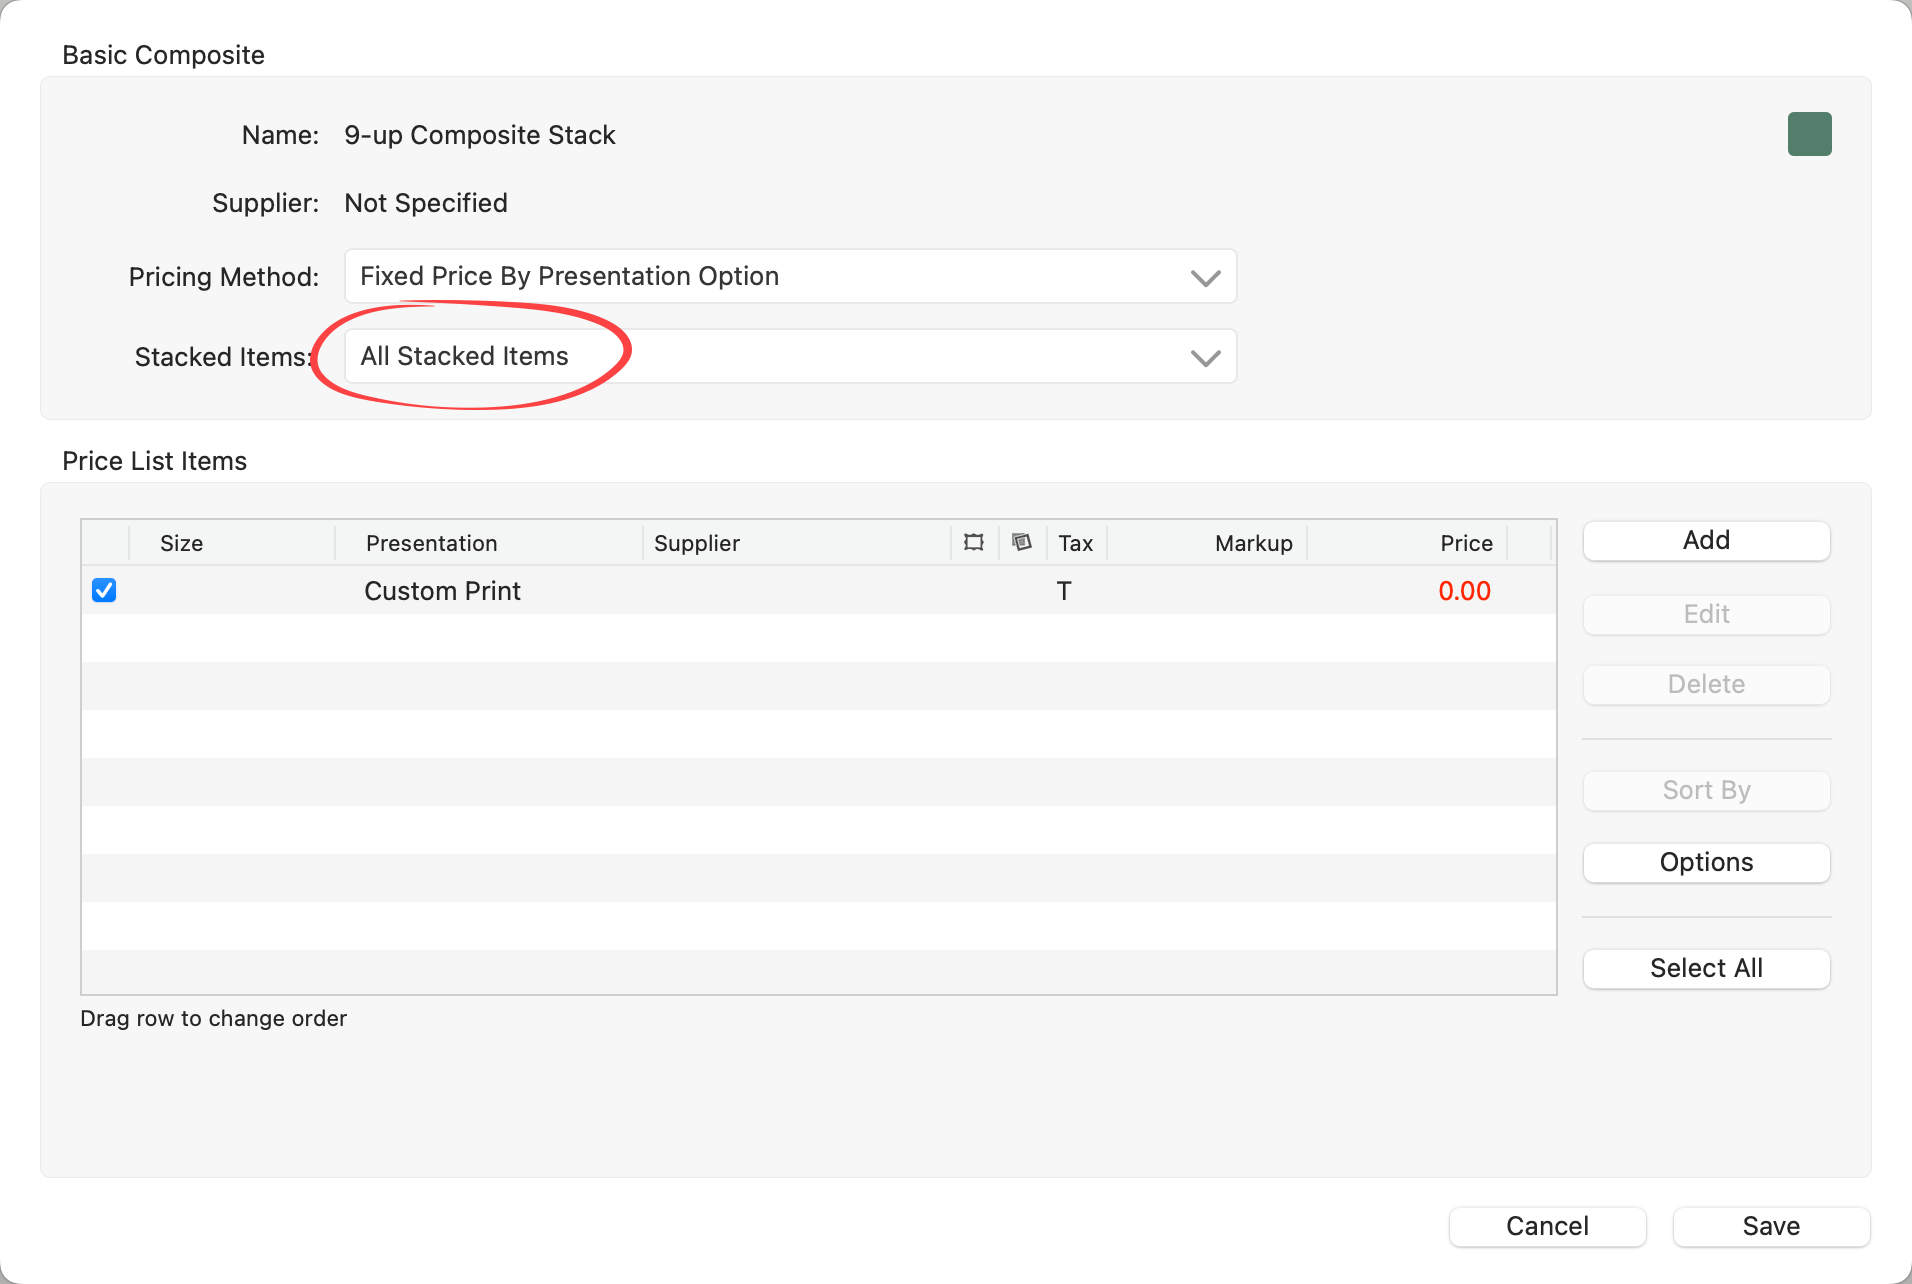
Select "All Stacked Items" from the drop-down list. Any modifications here will automatically filter down to every template within the stack. *To make modifications to a single stacked item, you must first select that item from the list.
- Click the Add button.
- From here, select all the Presentation Options you want to offer using the check boxes. It is best to leave the pricing area alone for the time being. Adding prices at this stage would filter down to each item within the stack - potentially pricing some items incorrectly.
- Click the Add Item button.
- Each added presentation option will filter down and be applied to each stacked item.
- Now that you have added the price list items, cycle through each item within the stack and ensure each price list item has a price assigned.
- Click on the line item to price it. You can either use the Edit button to add a price or type a fixed price in the pricing box at the bottom of the dialog.
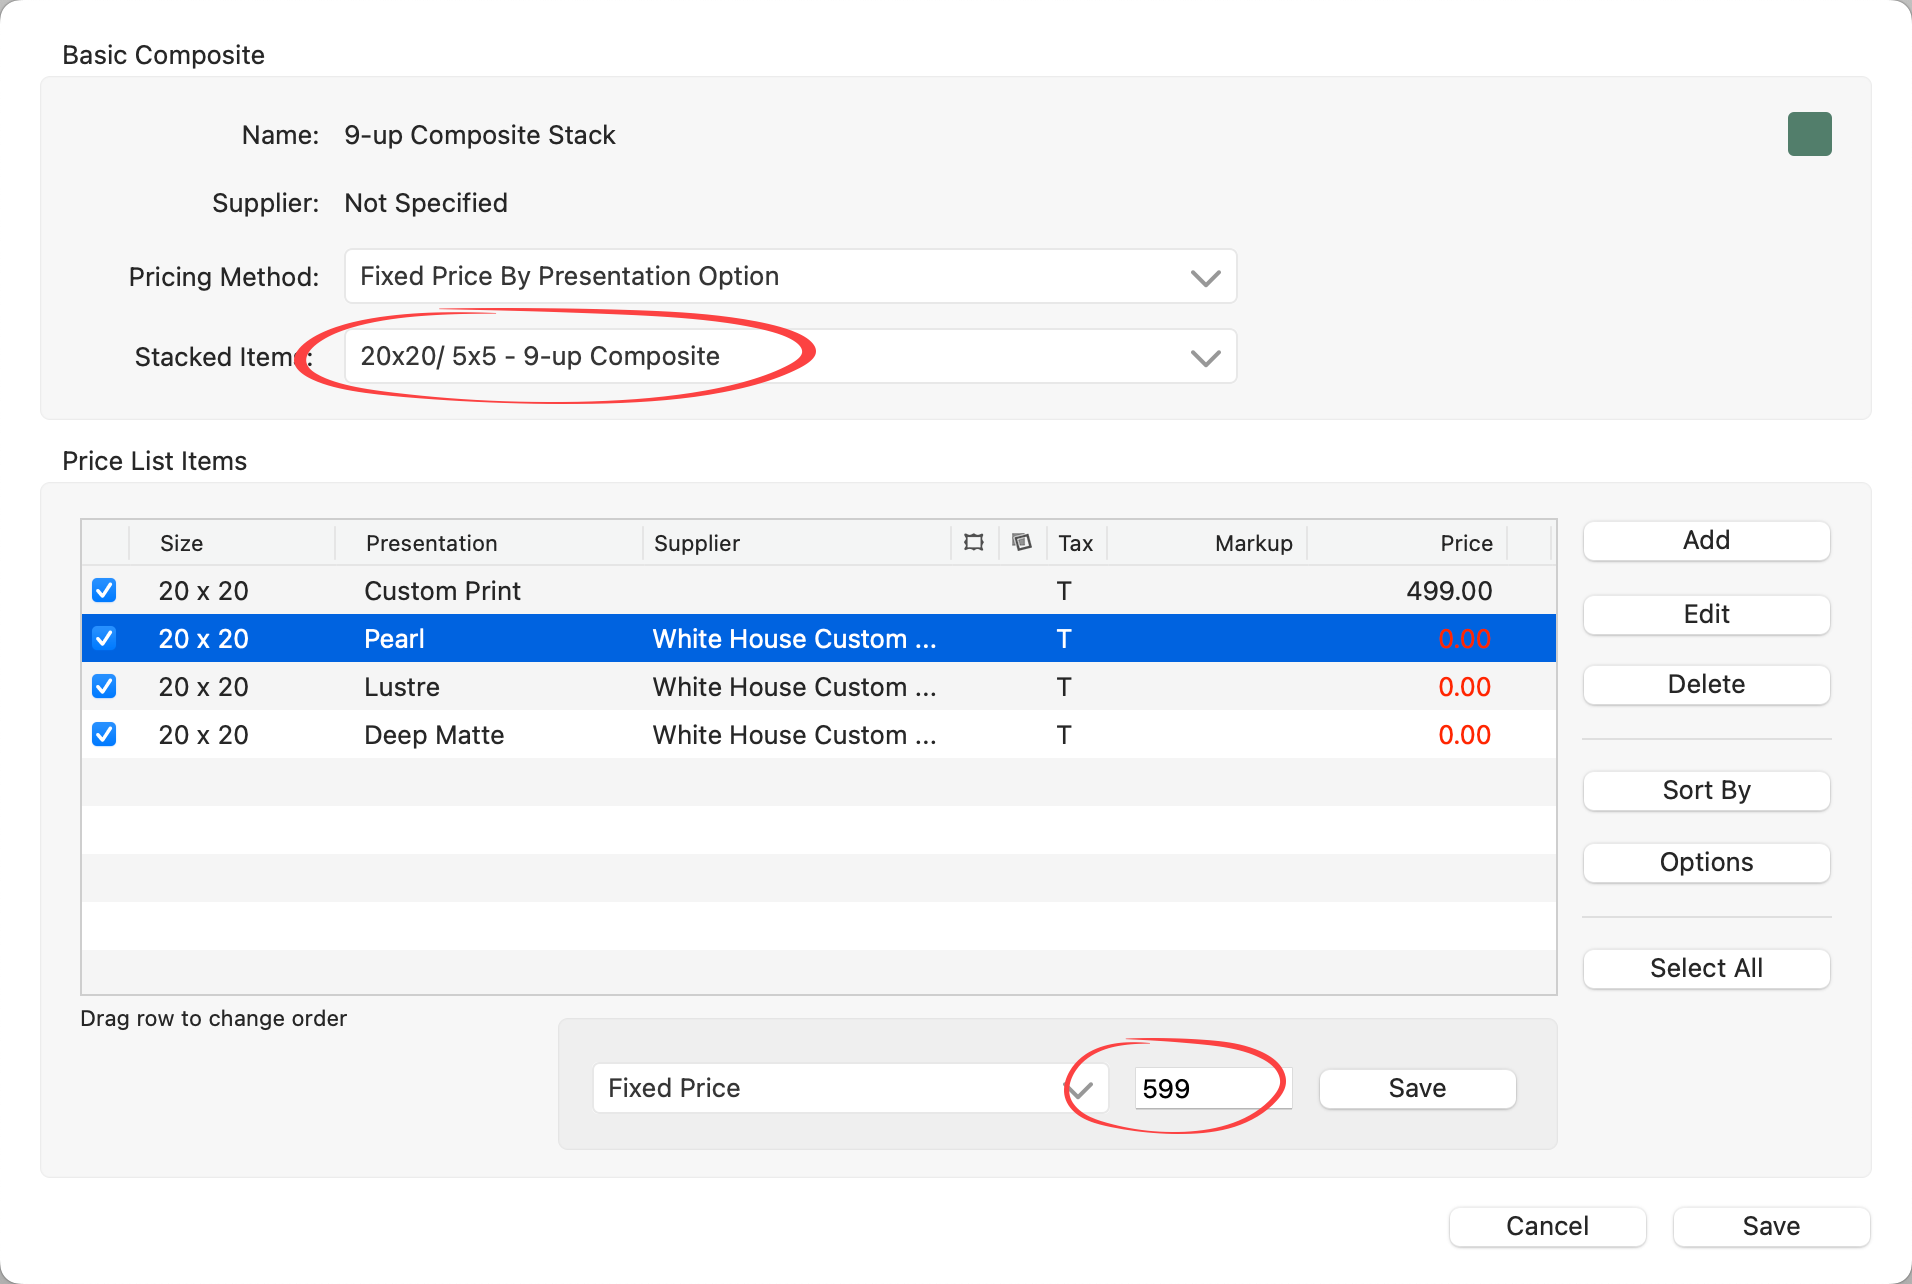
- Click the Save button when you have finished pricing each stacked size.
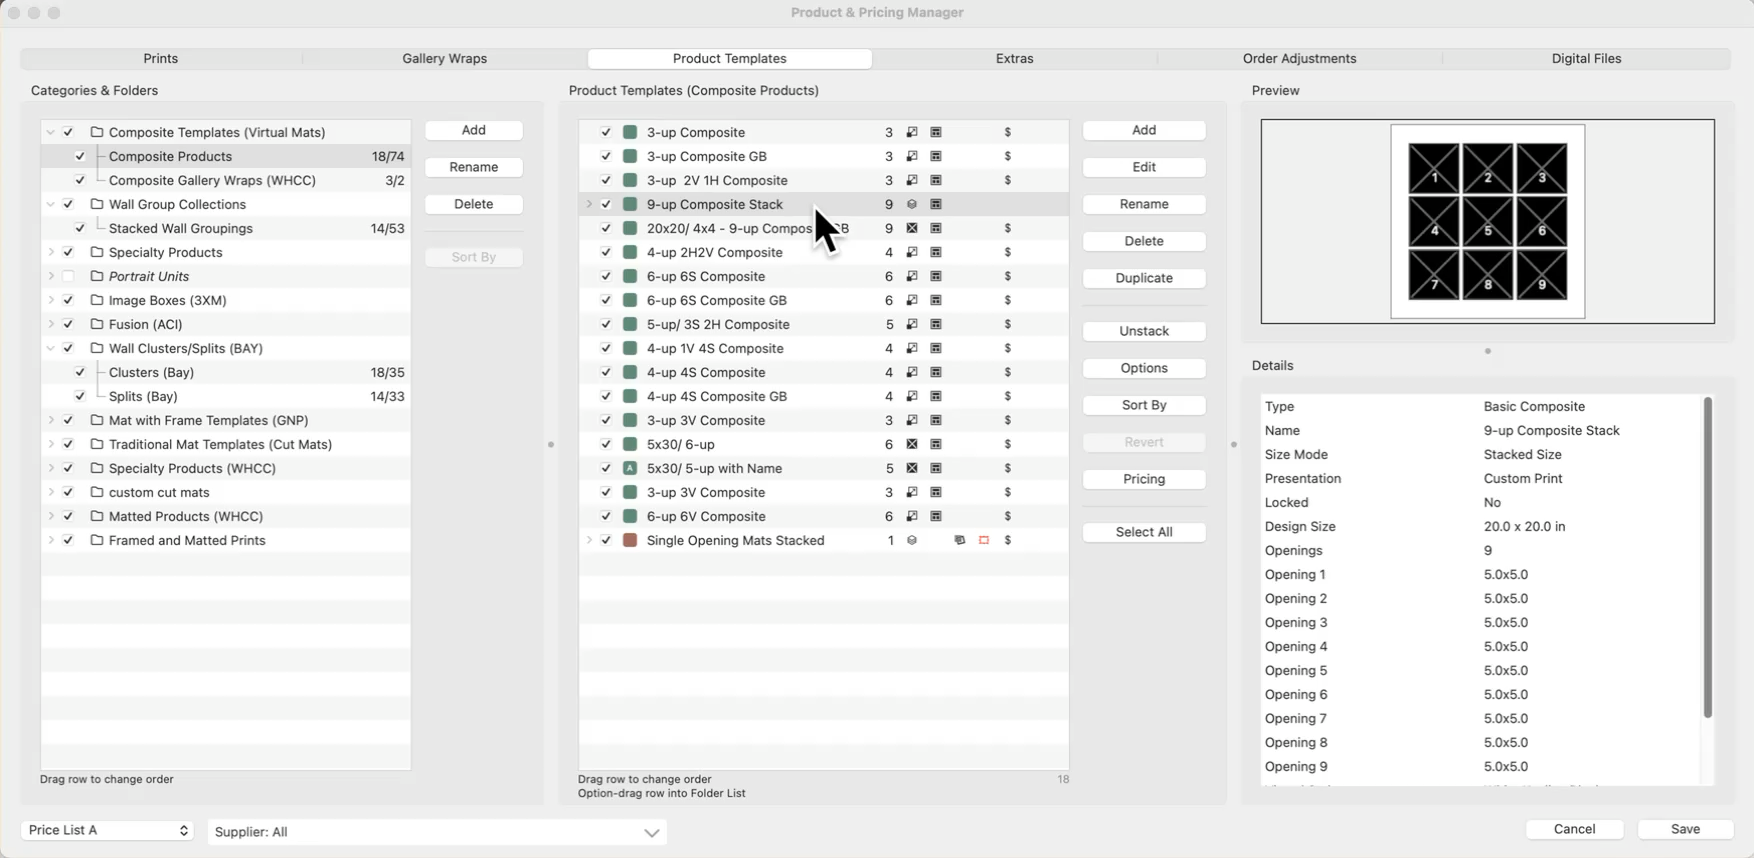
These are the options available within the Price List Items dialog.
- Generate Price List Item Import Spreadsheet/Import: Use these options to import prices from a CSV spreadsheet.
- Export/Update Prices: Use these options to update your pricing using a CSV spreadsheet.
- Copy Price to All Price Lists: Use this button to copy the selected item(s) prices across all price lists. To copy the entire folder, click on the Select All button first, and then "Copy Price to All Price Lists."
- Select the product template you wish to work with.
- Click on the Pricing button.
- Click the Edit button on the right-hand side of the Price List Items dialog.
- The Product Pricing dialog will appear.
- Make changes to the presentation option, size, price, etc.
- You will notice the Reset Changes tool
 appear next to each line item that was edited. To clear your changes for that particular line item, click the Reset Changes tool.
 - Click the Change Item button when you are finished.
Products from Supplier Collections cannot be modified (except for price). They are locked.
Deleting a price list item does NOT delete the template. It removes the price list Item you have created. The original product template still exists in the Product Templates folder.
- Select the product template you wish to work with.
- Click on the Pricing button.
- Select the price list item you wish to delete.
- Click the Delete button on the right-hand side.
- A confirmation window will open, click Yes to remove the price list item.
Hold the OptionAlt key down while clicking the Delete button. This will delete the price list item immediately without asking for confirmation first.
The Sort By button is contextual. This means that depending on which type of product you are working with, different options will appear in your sort button. Sorting takes place within the individual folders. Some common ways of sorting are:
- Width
- Height
- Presentation Option
- Price
- Available To
- Display Name
If you have manually moved your products around by dragging them, the Sort By button will override this. In case you accidentally sort your products and wish to reverse it, click the Cancel button. Using the Undo button will not undo sorting.