Setup Rooms
In order to show your images and products in a room, you first need to setup the background room images. Each background room image must be calibrated so that images and products appear at the correct size within the room. Room backgrounds can be either Library Rooms or Album Rooms.
- Library Rooms: Generic room background images that you can use in all Albums.
- Album Rooms: Room background images taken by you or your client in their home. These are only available in that specific client's album. Album rooms are often created using SendMyRooms™. SendMyRooms™ is a mobile friendly website that your clients can use to easily send images of their rooms to you for the viewing session. It features:
- Password-protected access.
- Can be branded with your Studio details.
- Has a short movie you can send to your clients informing them how to take room image photos.
- Allows the use of a phone or tablet to take the photos. Photos can also be imported from a folder of camera files on a computer.
- Uploading of images to the SendMyRooms™ server where you can then download them directly into a ProSelect album file.
For more information on setting up and using SendMyRooms™ please refer to the SendMyRooms™ User Guide.
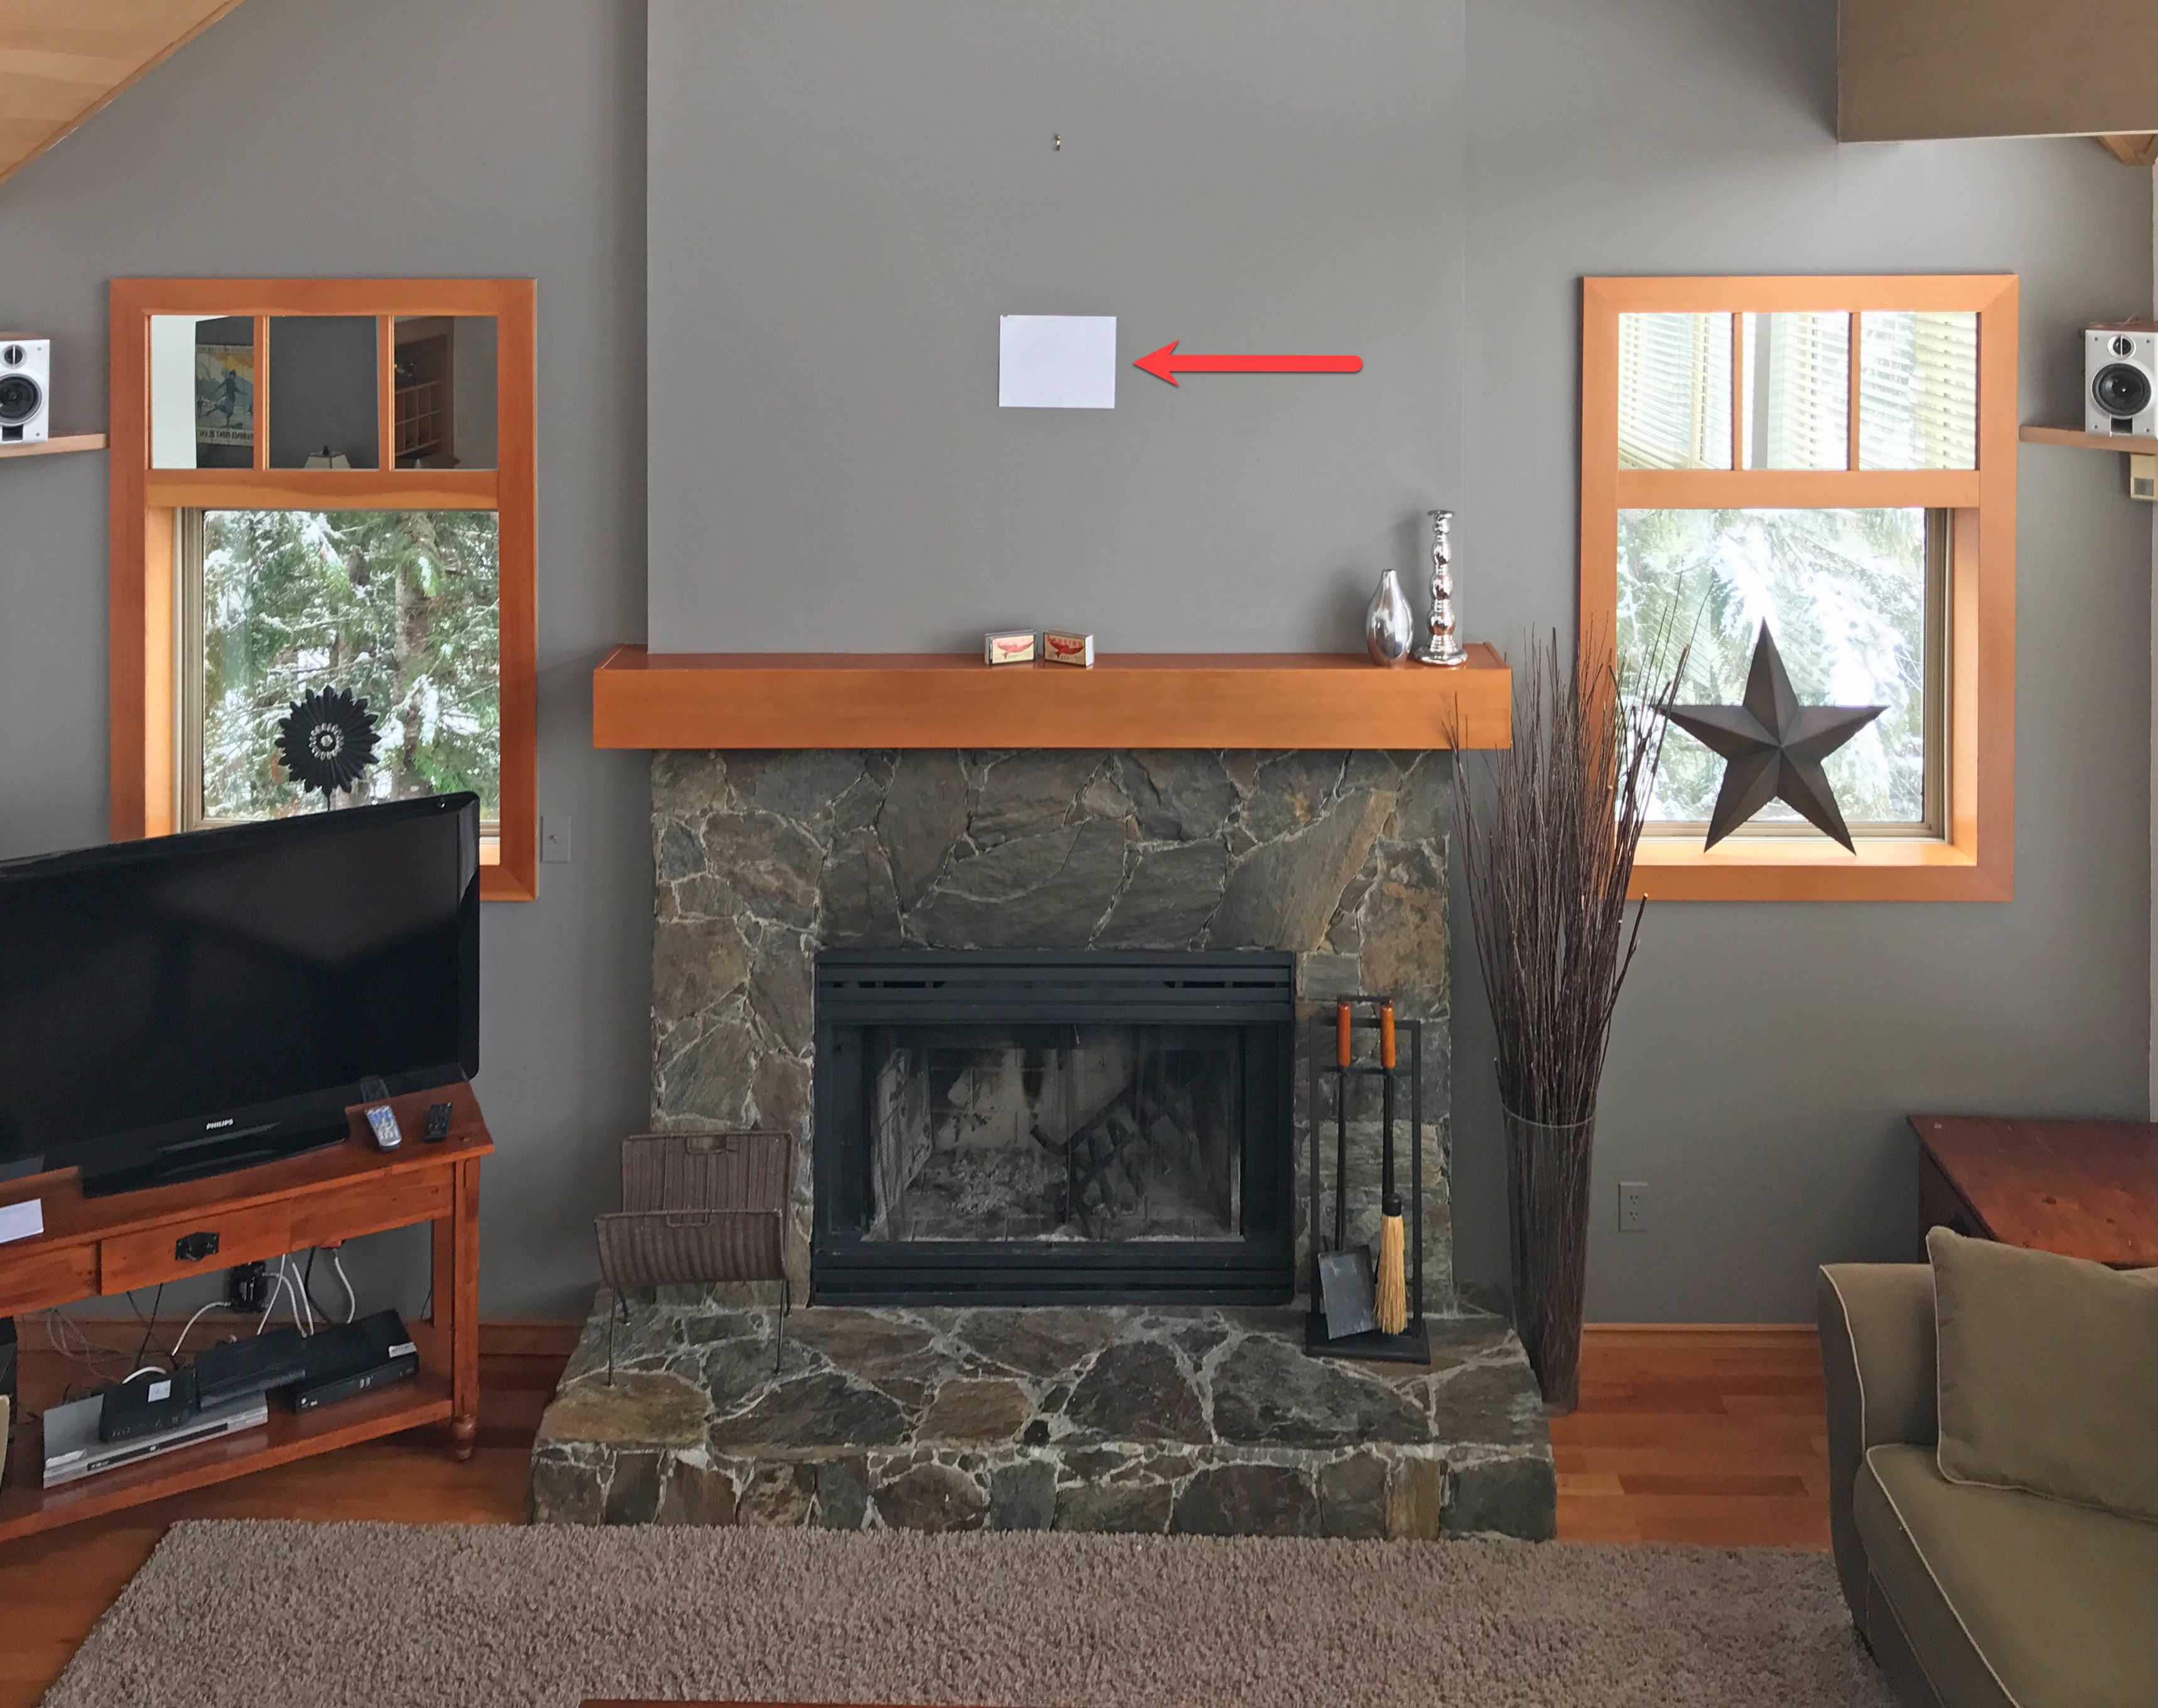
In order to quickly and accurately calibrate each room, it is important to know the size of an object in the room that is on the same vertical plane as, or as close as possible to, the wall that you will be using. Taping a piece of paper horizontally on the wall when photographing is the simplest method. Letter paper is 11” and A4 paper is 29.7cm (on their long sides).
- Remove any current hangings from the wall where you wish your new artwork to go.
- Take a piece of Letter (or A4) sized paper and tape it to the wall in approximately the center of the wall space.
- Move directly back from that location with your camera until, through the camera, you can include both the room’s skirting board (floor to wall junction) and ceiling cornice (wall to ceiling junction) in the photo.
- When taking the photo, make sure that you are square to the wall and the camera is horizontal.
- Open the Setup Room Images window by going to the top menu, Resources > Setup Rooms.
- Select either the Library Tab or the Album Tab.

- Multiple options exist for adding a new background room image. In each case, the location where the image copy is saved depends on the active tab: If in the Library Tab, the image will be saved in the ProSelect Resources folder. If in the Album Tab, it will be saved in the currently open ProSelect album.
- Drag a .jpg image file from your computer and drop it into the left-hand list.
- Click the Image File button. Find and select the image file you wish to add on your computer.
- Click the Resources button to add an image that is already in your ProSelect Resources folder.
- Use the Album Image button to use the currently selected image that you have imported into the client's album file. This is similar to earlier versions of ProSelect and is for legacy use only.
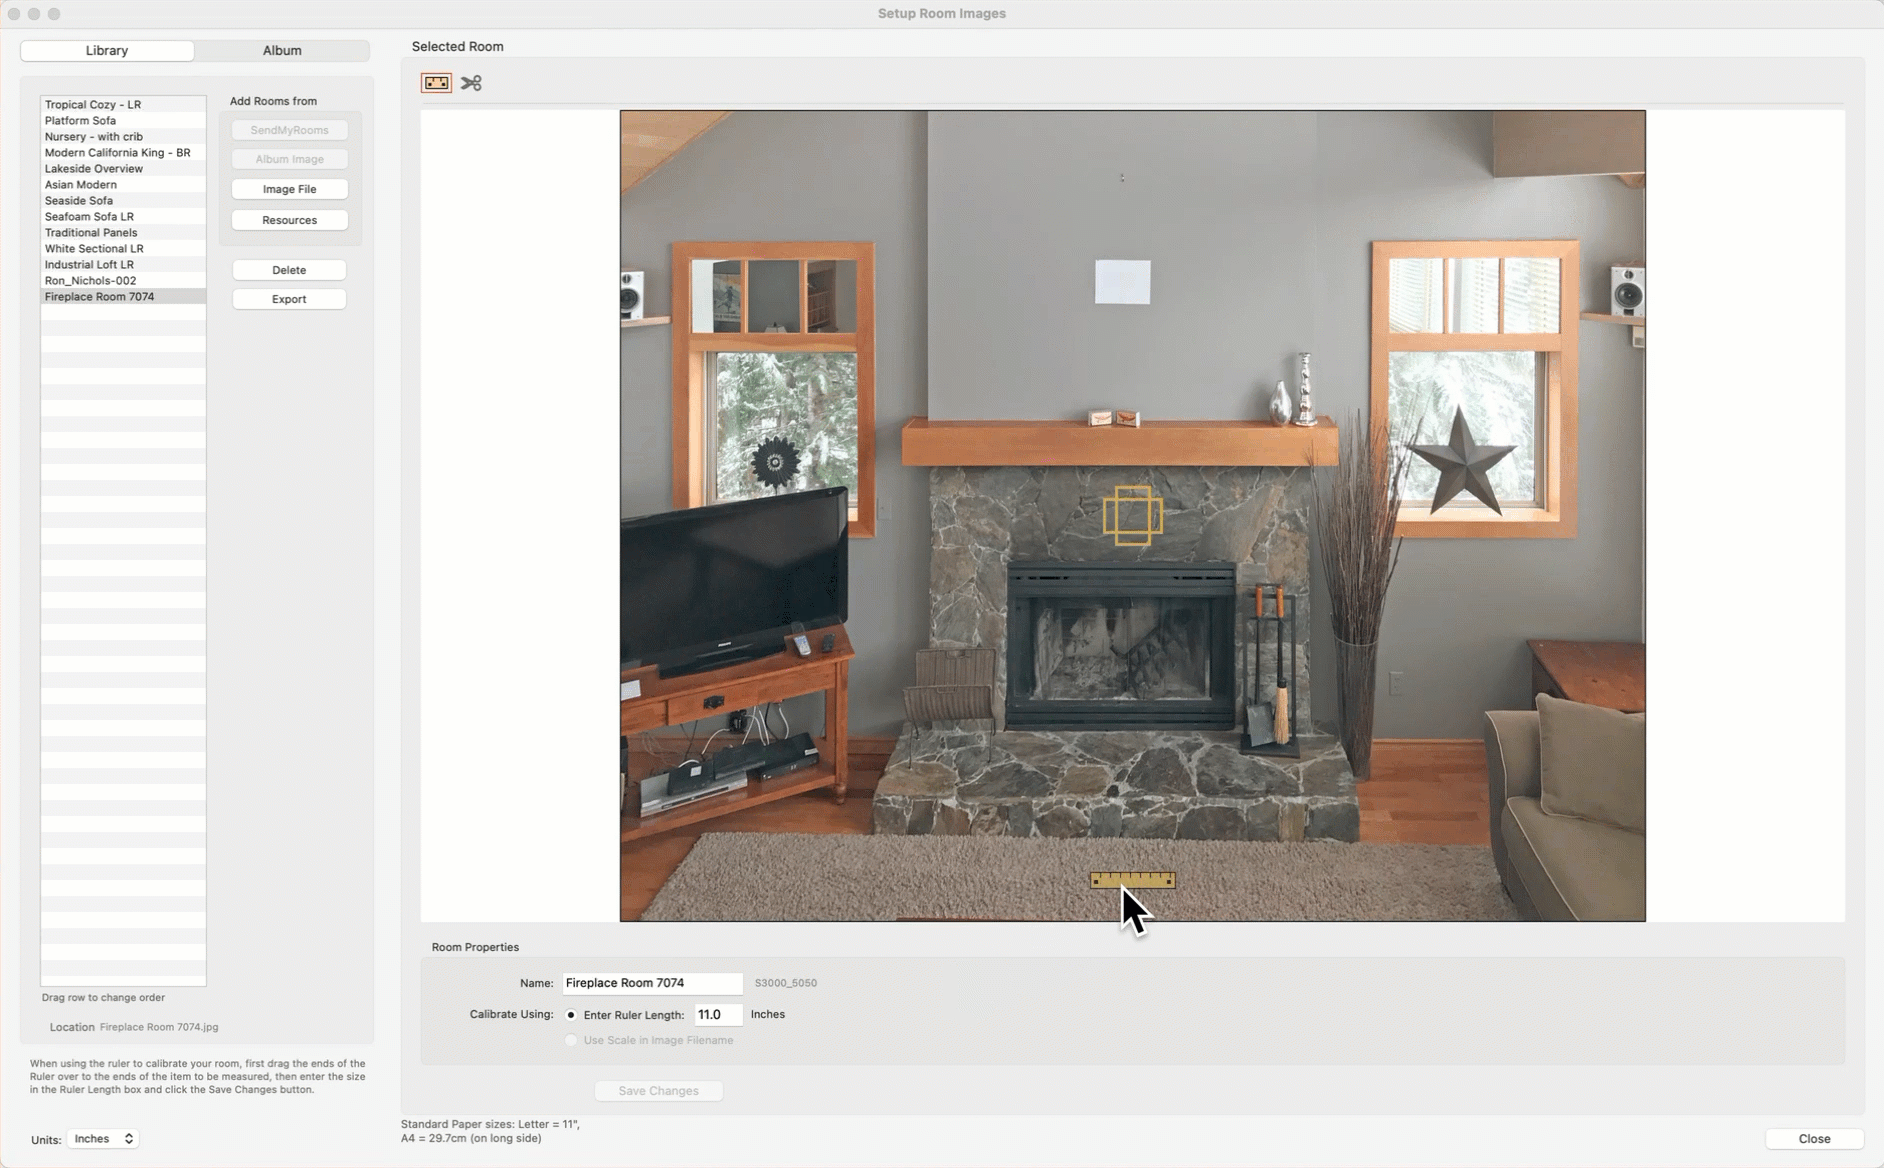
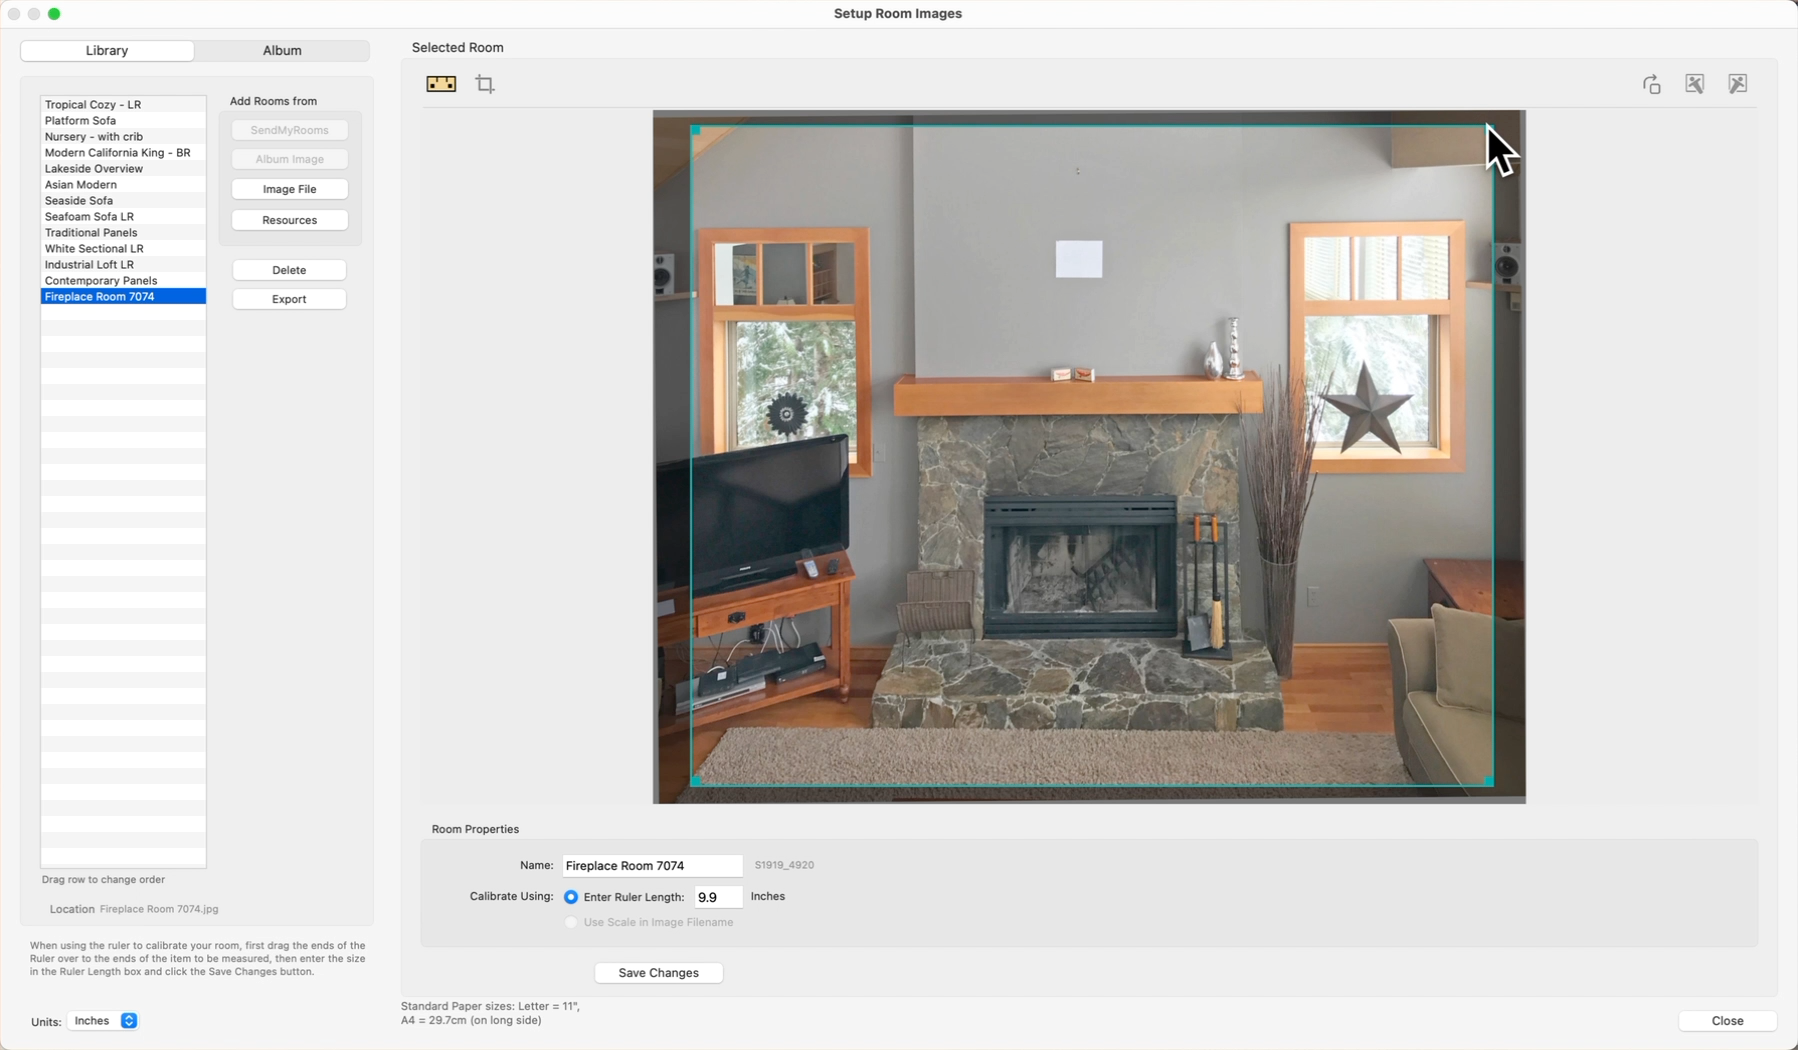
- Name: Once your room image has been added, you can adjust the room properties. By default, the image name will be used. You can type in a new name if you wish.
- Crop and Tilt: You can adjust the crop and tilt of a room by clicking on the Cropping
 tool. See Cropping/Adjusting Room Images for more information.
 - Calibrate Using: The calibration ruler
 will appear at the bottom of the room image. Drag the ends of the ruler so they align with the object in the image that you are measuring and enter the length of the object into the Ruler Length box. You have the option of using inches or centimeters. To change the measurement unit, use the drop-down menu on the bottom-left of the window. If the image has scaling already built in, you can choose "Use Scale in Image Filename."
 - Drag the default image location box
 to where you would like to initially have the images placed (you can drag them to other positions when in Actual Size view or when Working with Rooms.
 - Click Save Changes.
- Enlarging the Setup Room Images window will make calibration much easier.
- Library Room details are saved in your ProSelect data file so they can be used with all albums or shared with other workstations if you are using one of the Sharing options.
- Open the ProSelect album file you wish to add rooms to.
- Open the Setup Room Images window by going to the top menu, Resources > Setup Rooms.
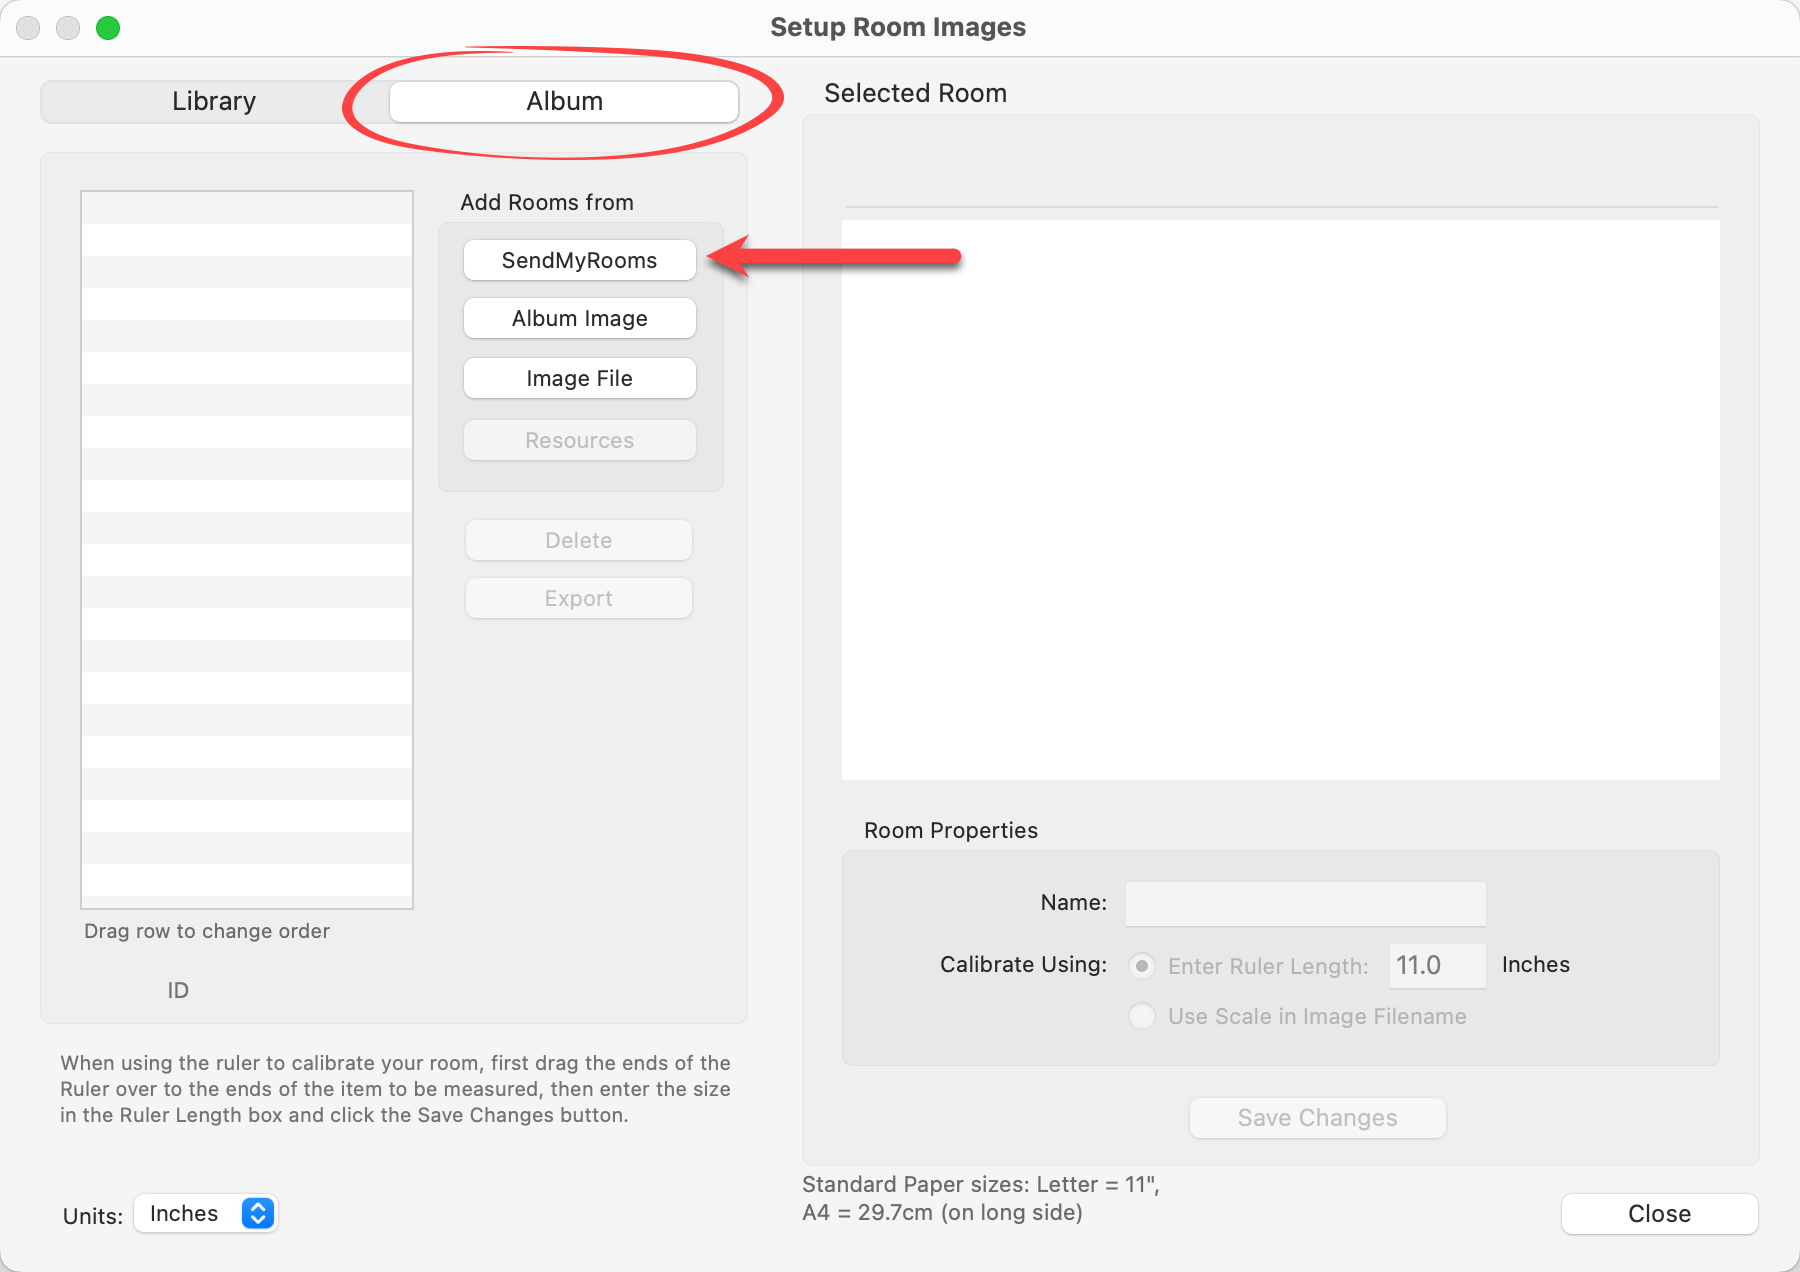
- Select the Album Tab at the top.
- Click on the SendMyRooms button.
- Using the Search SendMyRooms.com window, you can search for a client's images in three different ways:
- All Viewings: All clients will be listed. Click the Search button. The results will be displayed below.
- Client from this album: If you have already entered one or more client’s names for this album (using the Setup Clients window), you can select their name from the drop-down menu. Click the Search button. The results will be displayed below.
- Another Name: Enter a full or partial name into the search boxes. Click the Search button. The results will be displayed below.
- In the results box on the left, click on a client name to preview the room images that they have uploaded.
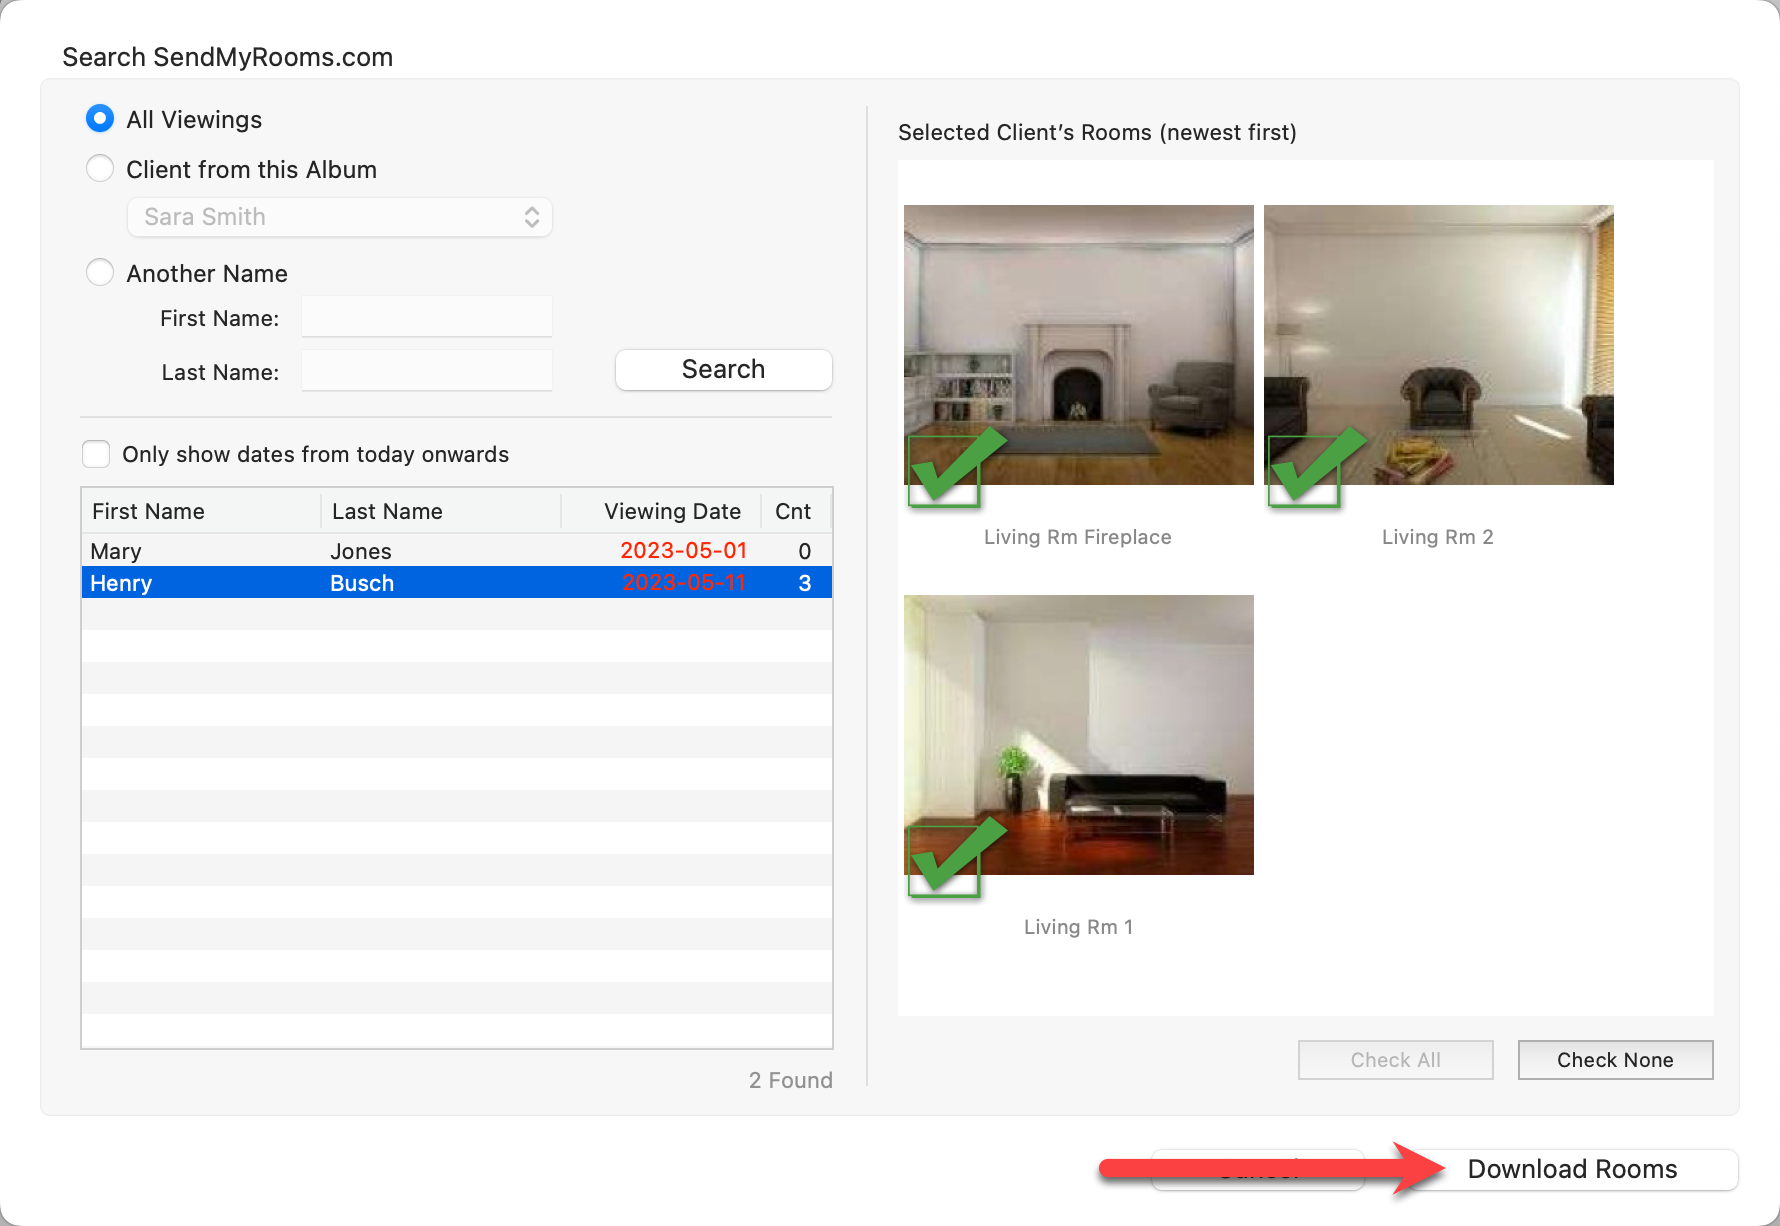
- Click on some or all of the images to select them (or use the Check All button to select all room images).
- Click the Download Rooms button to add the room images to your currently open ProSelect Album file.
- The rooms have now been downloaded into the client album. Follow the calibration steps as you would for an Album room.
Click on the Cropping tool ![]() to enter cropping mode. This can be useful if the images you are using need to be adjusted slightly. When cropping, you can also adjust the tilt of the room.
to enter cropping mode. This can be useful if the images you are using need to be adjusted slightly. When cropping, you can also adjust the tilt of the room.
- Remember to Save Changes before closing the window.
If you are using one of ProSelect’s sharing options, all of your Library Rooms are automatically available on all computers at your studio. Album Rooms are saved in the client’s album file (.psa) and can be accessed by anyone opening that file.
Exporting Room Images
You can send a pre-calibrated Room Image to someone outside of your studio using the Export button.
- Select the room you wish to export from the list.
- Click the Export button.
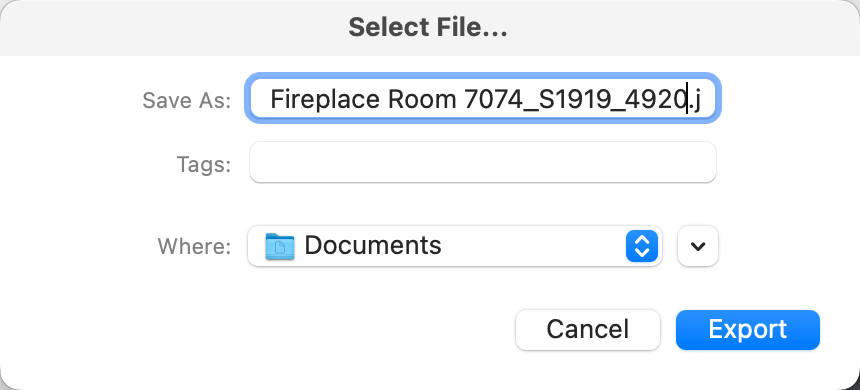
- ProSelect automatically adds the scale and default position data to the end of the filename e.g. “Kitchenette_S2547_6135.jpg”.
- Choose where you want to save the file.
- Click the Export button.
When this image file is imported into the Setup Rooms windows on another computer, it will automatically detect the scale information in the file name and allow you to use that.
Library Rooms can also be exported as a Collection (in ProSelect Pro) using the Export Collection function.