 Presentation Mode
Computers easily allow the use of multiple monitors or displays to optimize working efficiency. When using more than one display, your operating system lets you decide the information shown on the second display. There are two basic modes for the second display. Mirrored mode (Mac) or Duplicate (Windows) which shows the exact same information on each screen. Extended Display creates an additional working area on the second monitor.
For presentation purposes, the second display would normally be a digital projector or large screen TV, set to Extended mode, where clients would review their images and products. ProSelect’s Presentation Mode offers many advantages for both the client and the photographer.
- Displays only images and products and, if enabled, thumbnails.
- Elimination of distractions from tools and controls.
- Orders can be created on the control screen and then moved to the presentation screen for review.
- Private note-taking capabilities.
- Maximization of screen space for an Actual Size view.
- Facilitation of Zoom meetings by sharing the presentation screen to keep clients focused on the artwork.
Using ProSelect’s Presentation Mode requires the secondary display (projector, TV, or monitor) to be set up in the computer operating system as an Extended Display.
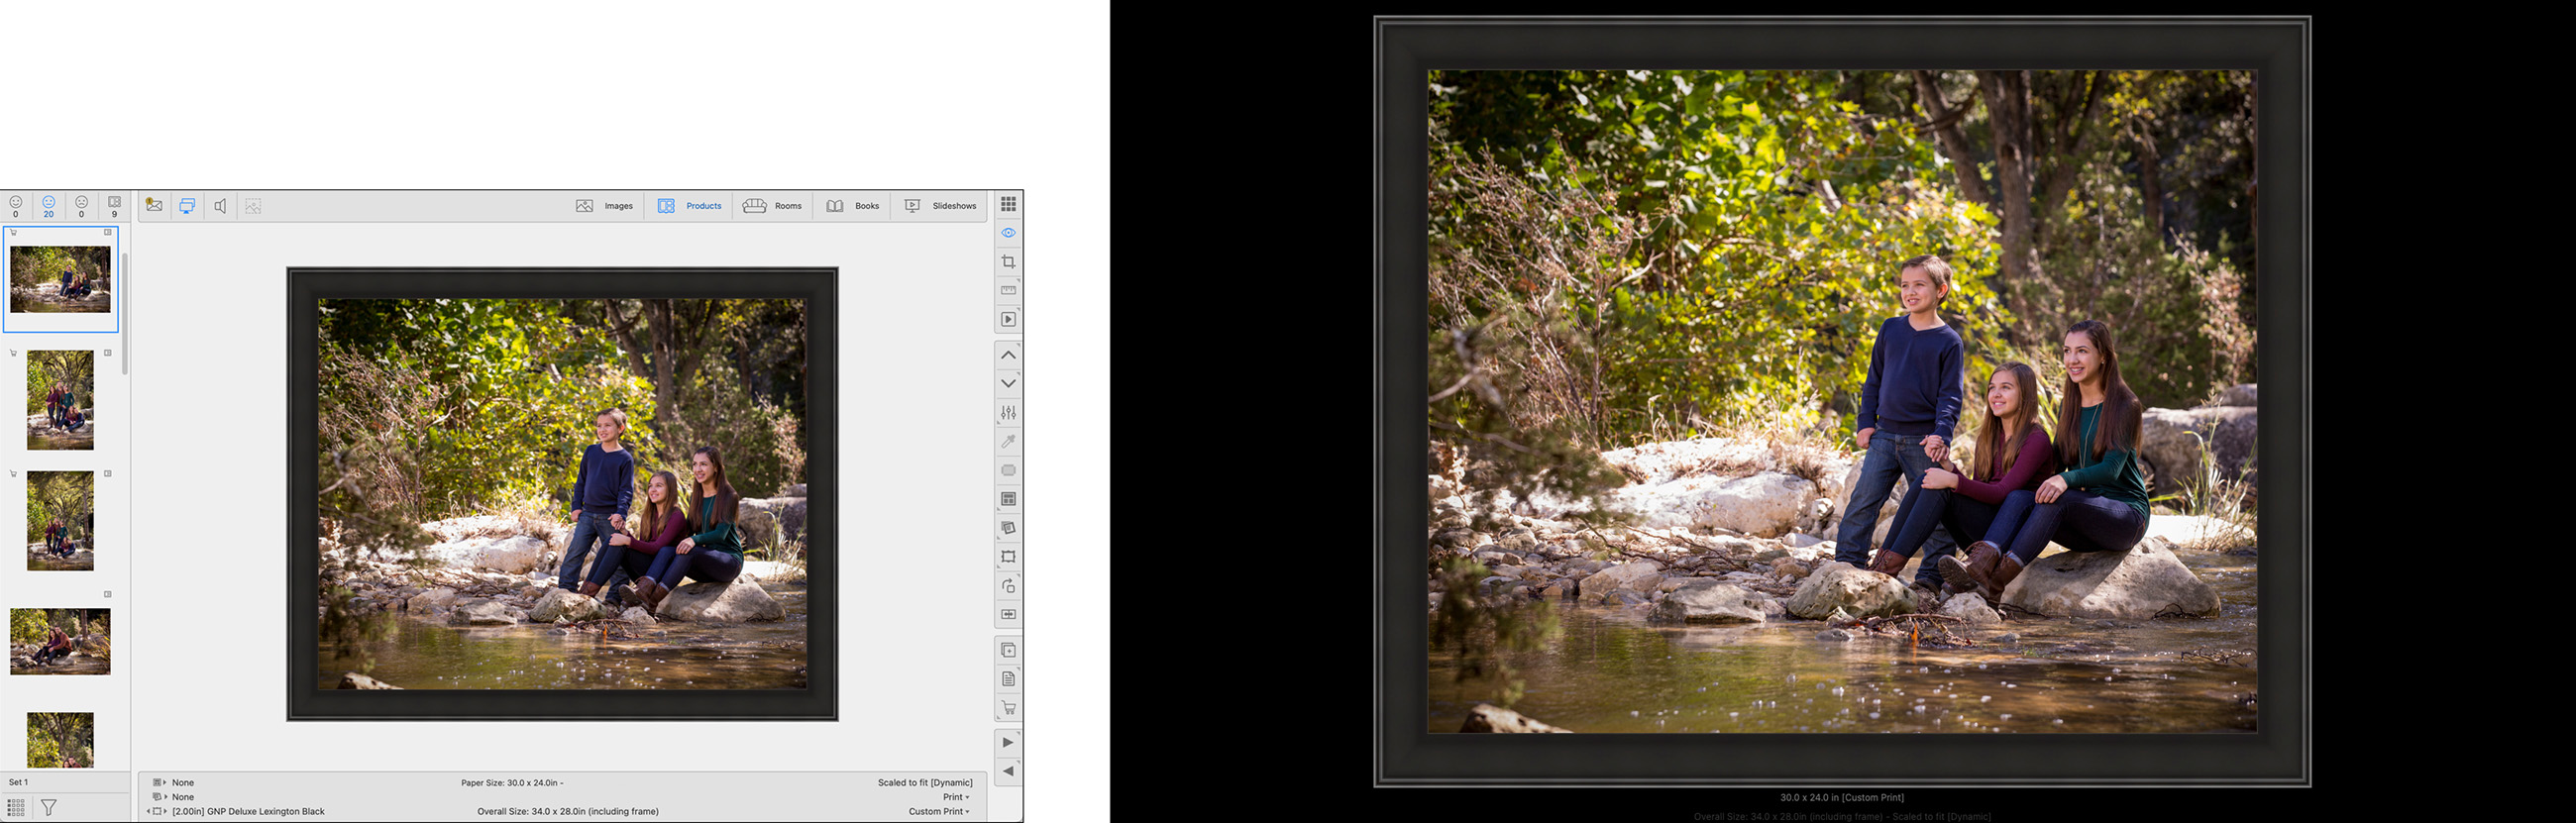
- In the above example, you can visually see the difference between the Main/Control screen (Left) and the Presentation Screen (Right).
Setup
Before you can start using Presentation Mode, steps need to be taken to enable Extended Display, set the resolution of the Presentation Screen, as well as a calibration of the Presentation Screen. These steps are crucial for providing your client with high-quality images and precise sizing.
Follow these steps to setup the Extended Display:
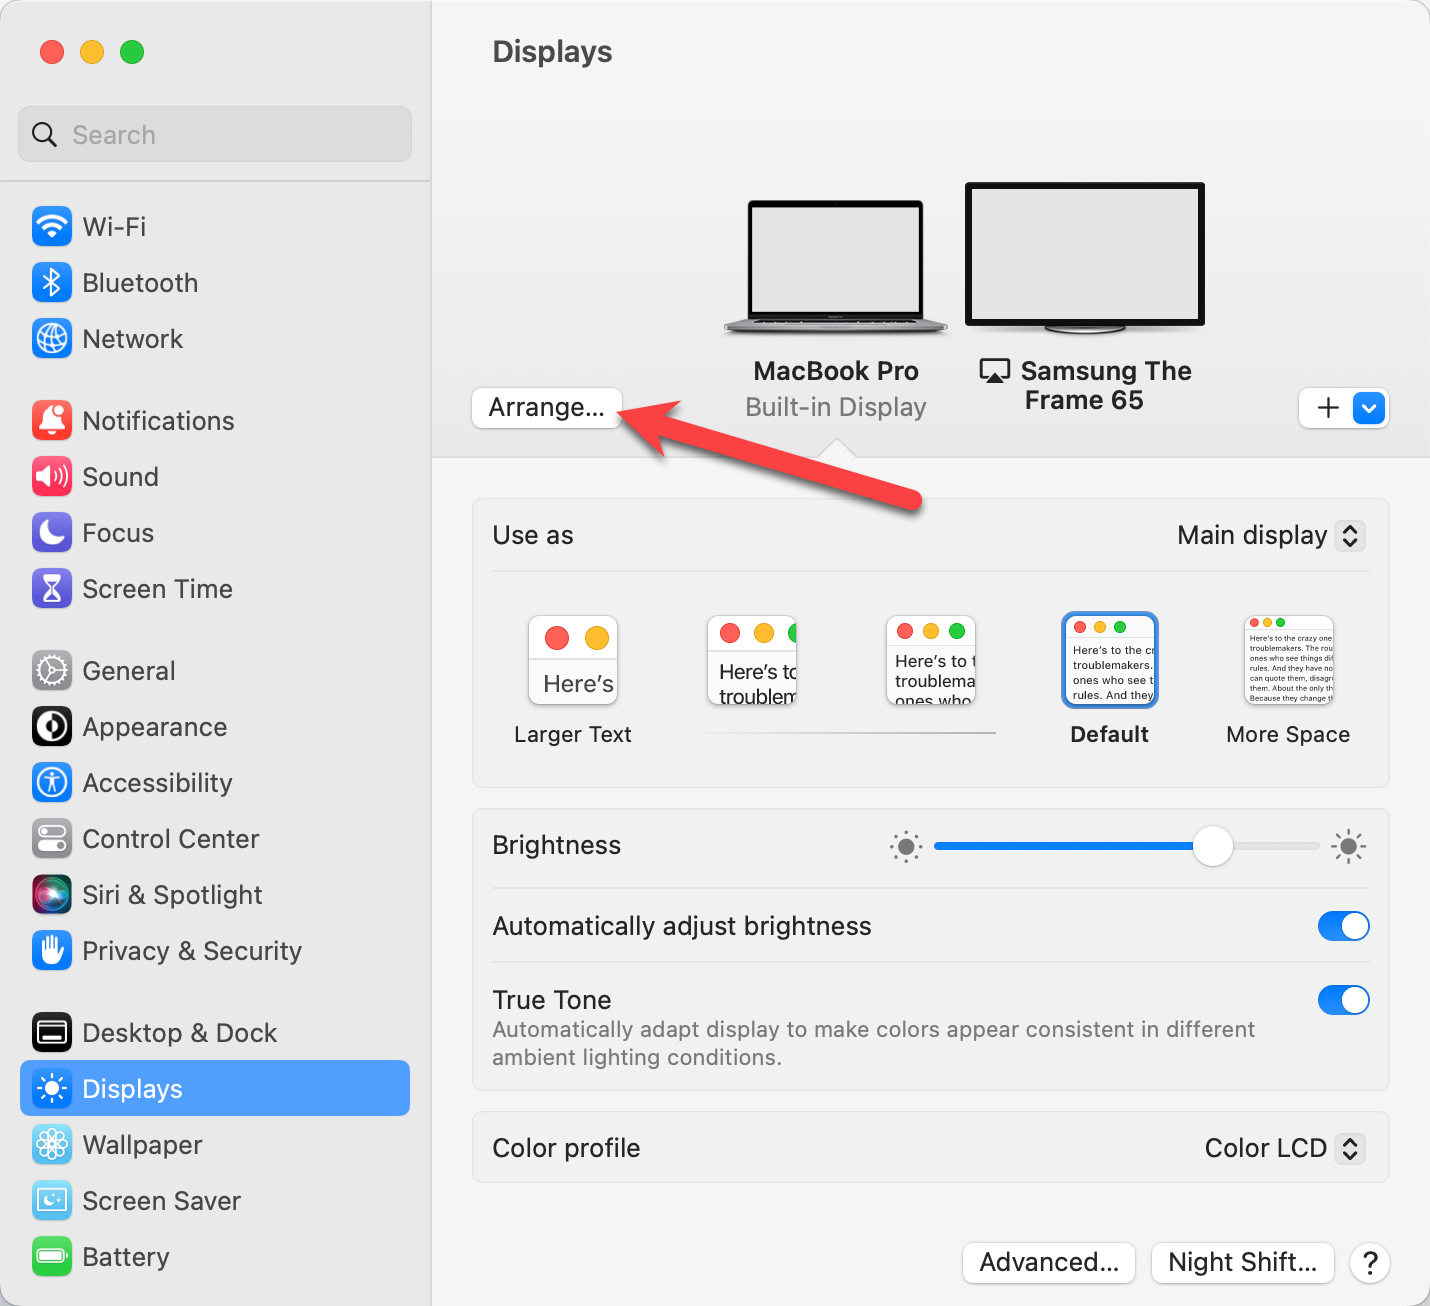
- Open your System Settings (The Apple icon in the top left corner of your screen).
- Navigate to "Displays". You should be able to see your main computer as well as the second screen you have connected. In this example, the main computer is a laptop and the second screen is a Samsung Frame TV. Use the + button which has a drop-down arrow to see other secondary screen options.

- Underneath the laptop and TV you will see the "Use as" section. This is where you can choose which screen to use as your Main Display and which one will be used for your Extended Display. Each computer/monitor/screen has the option of being either your Main Display, or Extended Display. Do not select "Mirror for Built-in Display."

- Click on the picture of the computer or screen, and then select either Main Display or Extended Display. In the example here, the Samsung TV has been selected as our Extended Display.
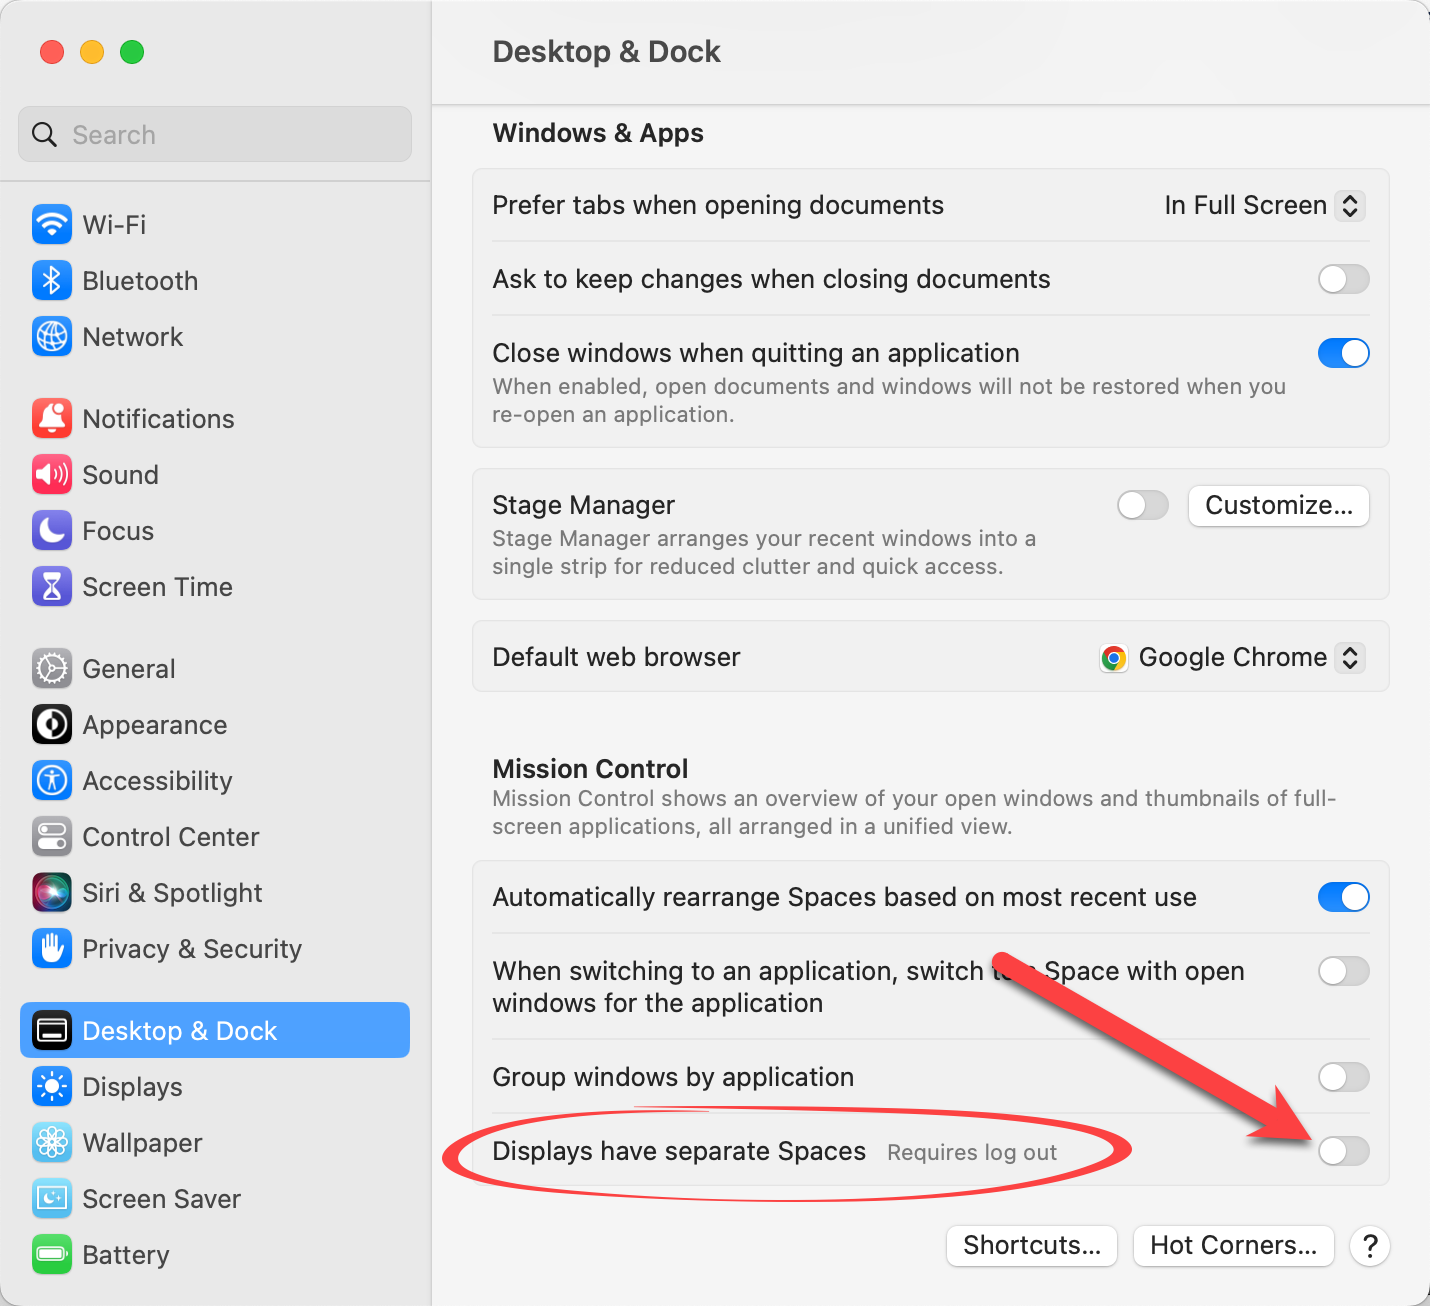
- Now that your Extended Display has been setup, we need to turn off the setting "Displays Have Separate Spaces." If left on, this will show the menu bar on your Presentation Screen. Navigate to Desktop & Dock. Scroll to the bottom to find Mission Control, and turn off "Displays have separate Spaces." Note that this requires a log out before taking effect.
If left on, you will see the menu bar on your Presentation Screen: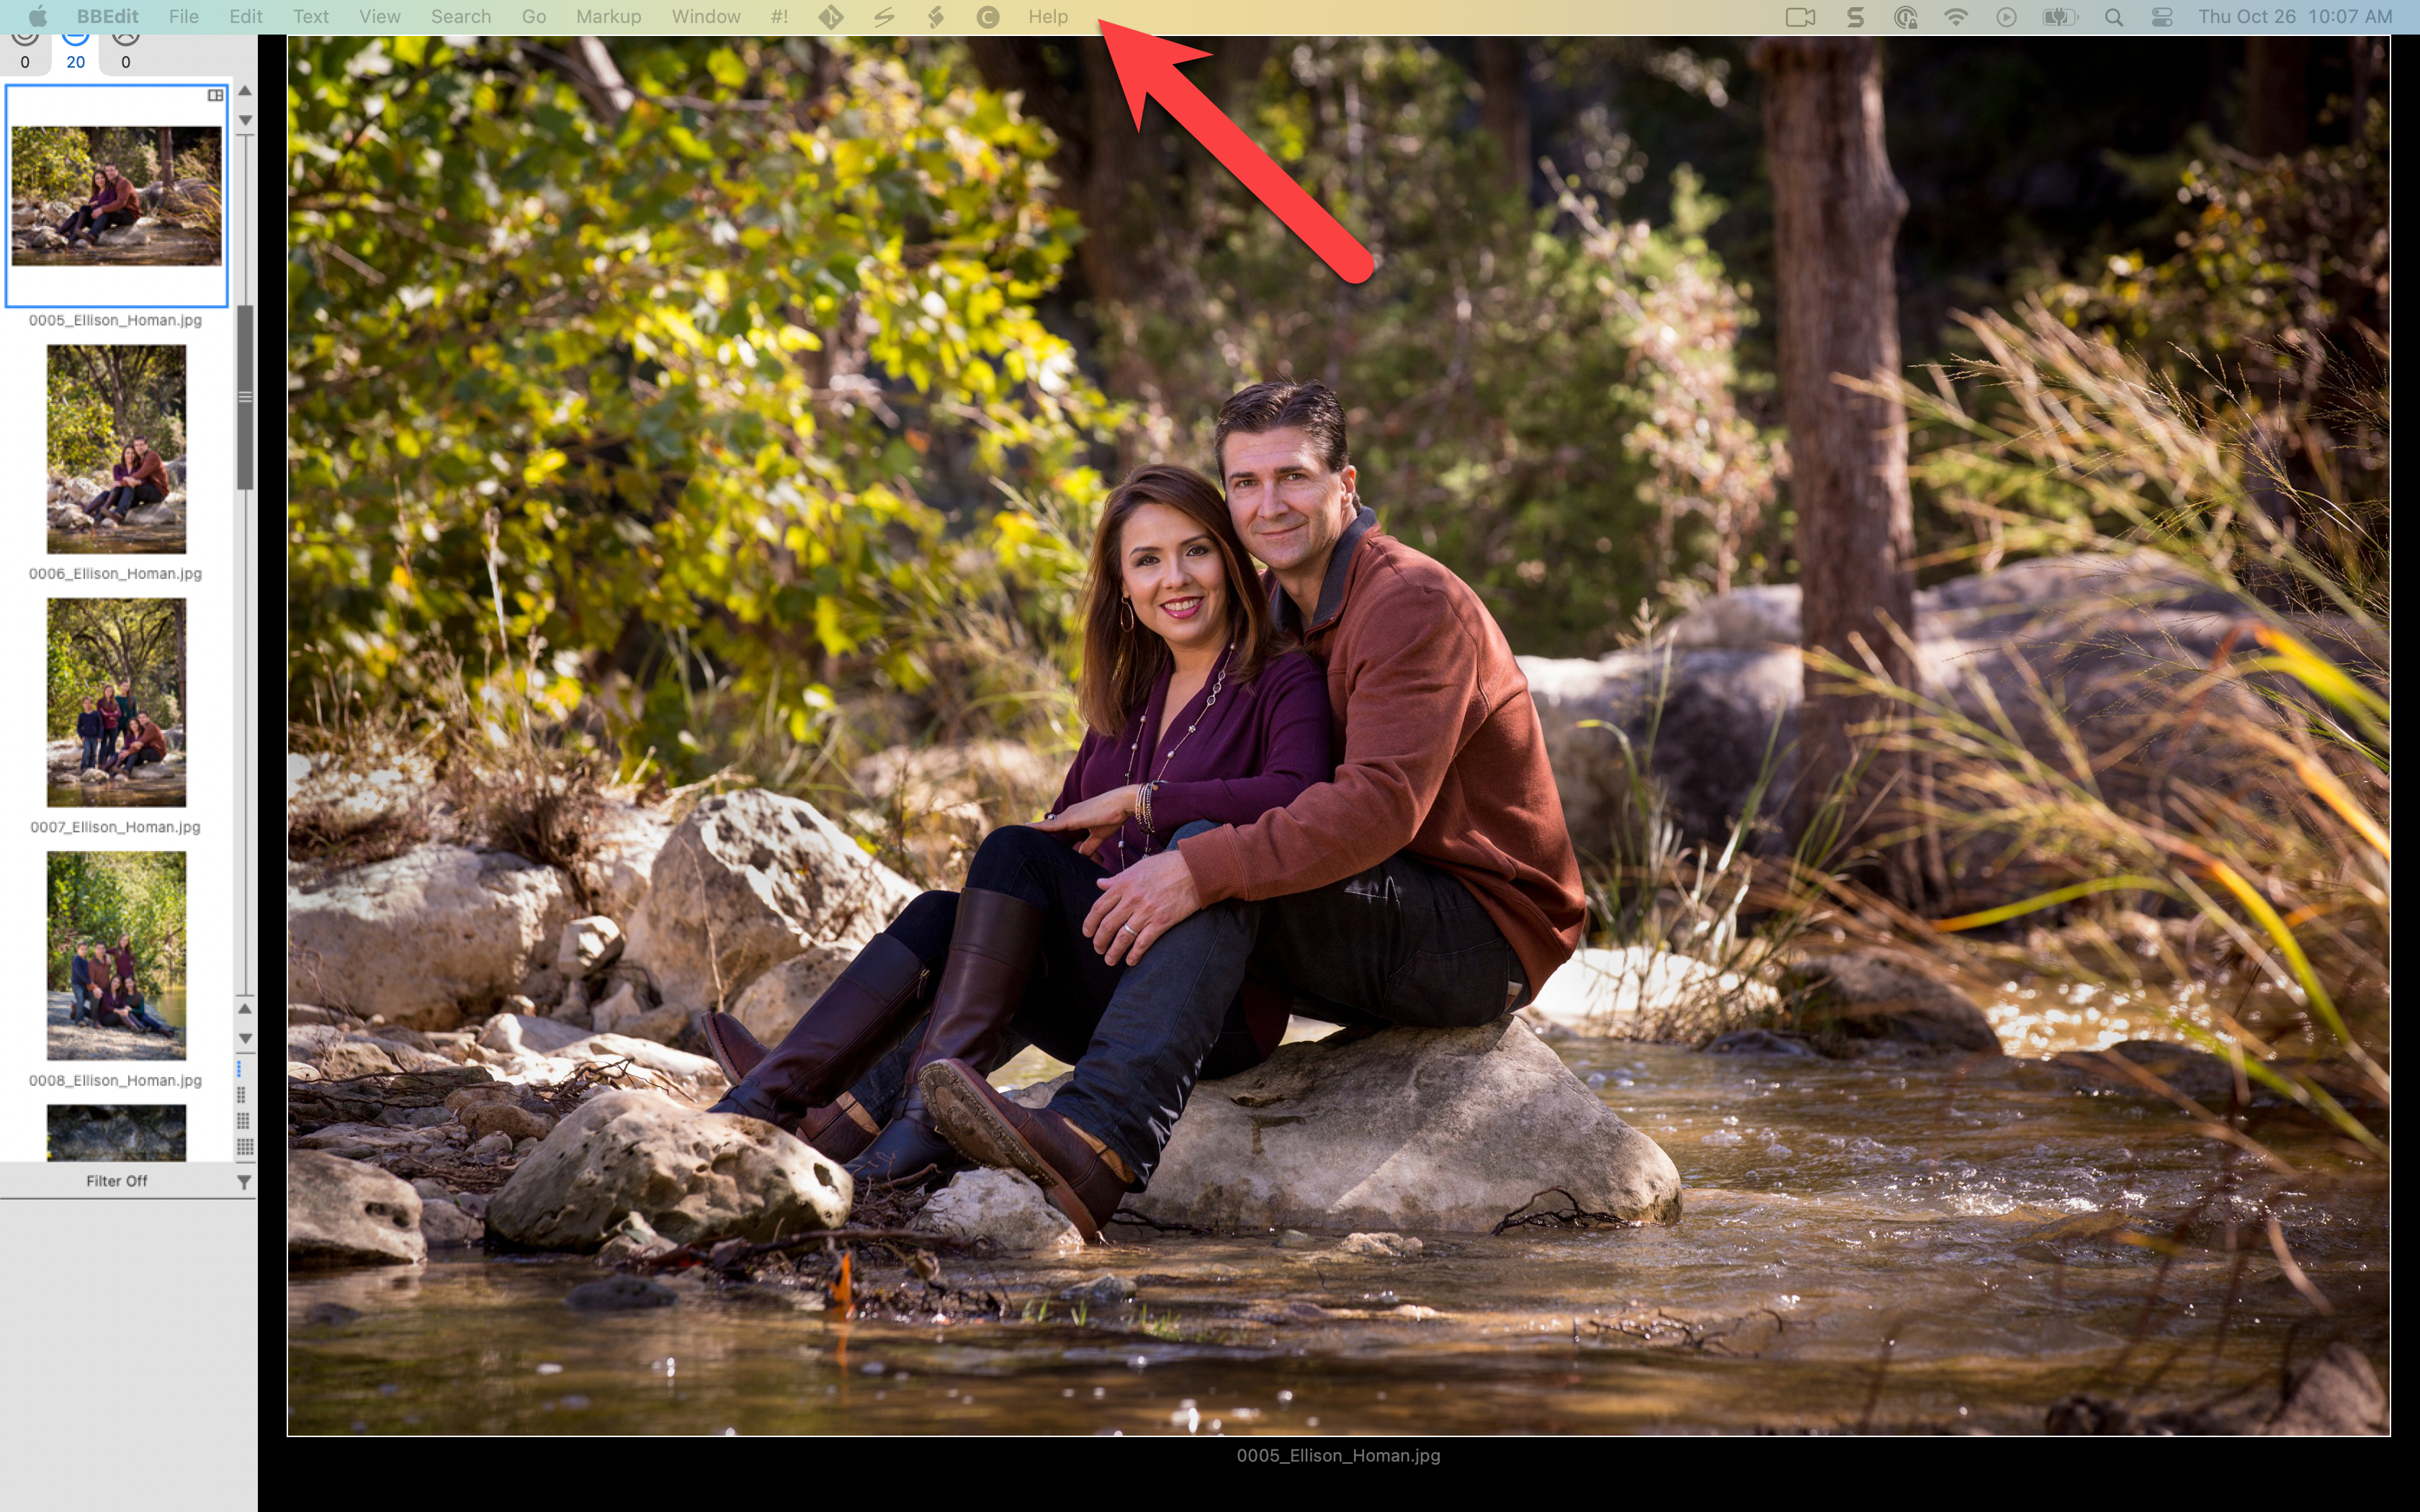
Extended Display Setup for Windows 11
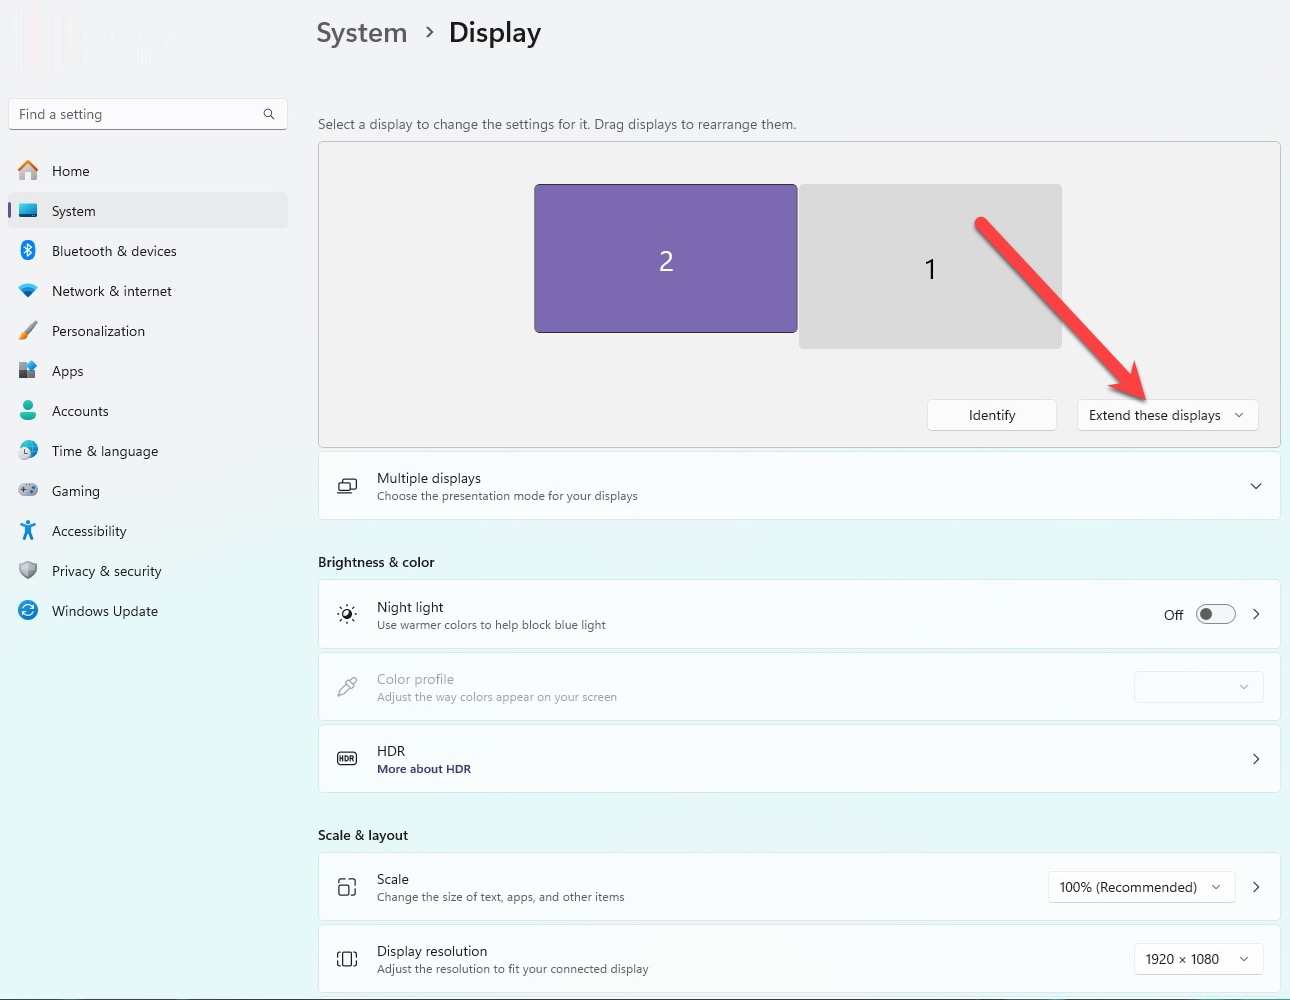
Right-click on your desktop and select Display Settings from the pop-up menu to open the window below:
Extended Display Setup for Windows 10
Right-click on your desktop and select Display Settings from the pop-up menu to open the window below:
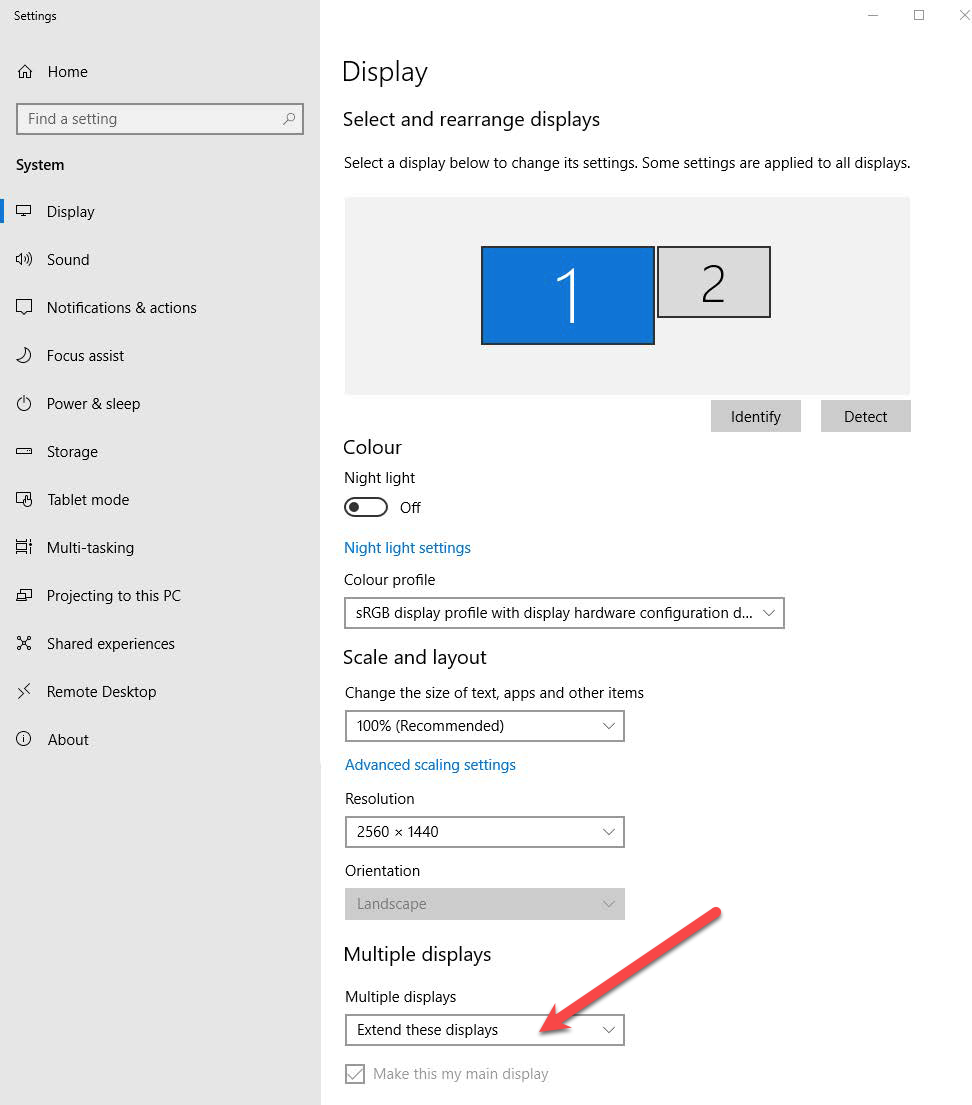
- Scale and Layout: it is usually best to use the recommended screen scaling setting for each monitor. This will be 200% for Hi-DPI screens and 100% for regular screens.
- Multiple Displays: Select "Extend these displays" from the drop-down menu.
To set the calibration of the Presentation Screen, navigate to the top menu, ProSelectEdit > Settings > Display > Calibration & Options.

Arrange Displays on a Mac
Thoughtfully arranging your screens ensures that as you move the cursor from one screen to another, the transition is seamless and natural. This eliminates abrupt jumps or misalignments. If you have positioned your Main/Control Screen to your left and your Presentation Screen to your right, make sure they are arranged that way in the Arrangement window. If your Presentation Screen is a TV on the wall in front of you, consider arranging your screens so that the TV is above the Main/Control Screen.
- On your computer, go to System Settings > Displays.
- Click on the Arrange button.
- Click and drag the selected screen to move it. Position the screens so that they make sense for your workflow.
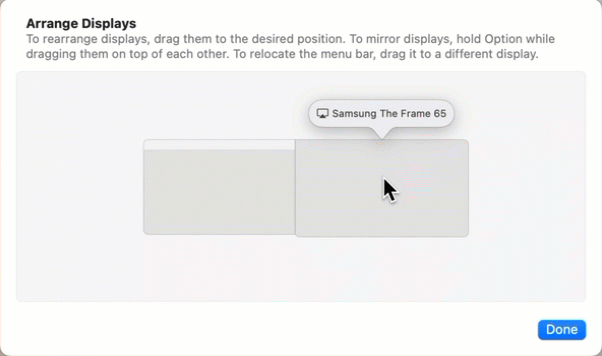
- When you are finished, click the Done button.
There are numerous reasons why you might need to adjust the resolution of your presentation screen. The main reason is to keep your main screen and presentation screen resolutions similar in size. This will help Presentation Mode run smoothly.
Adjusting the Resolution of the Presentation Screen on a Mac
- On your computer, go to System Settings > Displays.
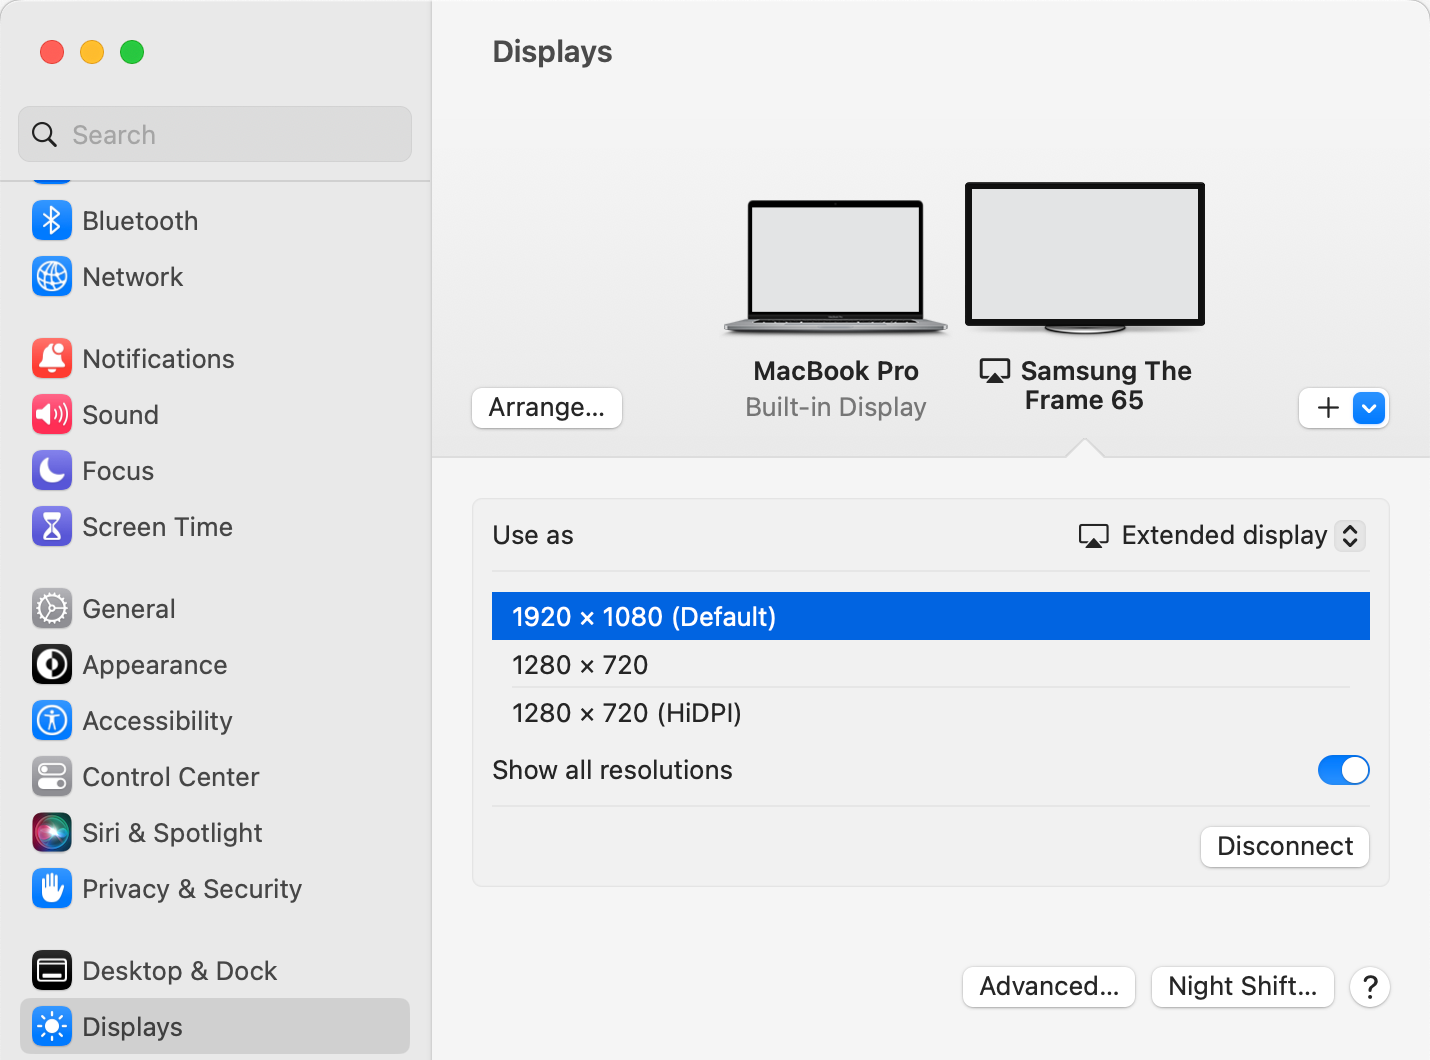
- Be sure to select the presentation screen first before adjusting the resolution.
- If there are few resolution options available (such as with the Samsung TV) they will all be listed. Select the desired size.
- If you are using a second monitor or computer as your presentation screen, more resolutions will be available. They are displayed using text boxes.
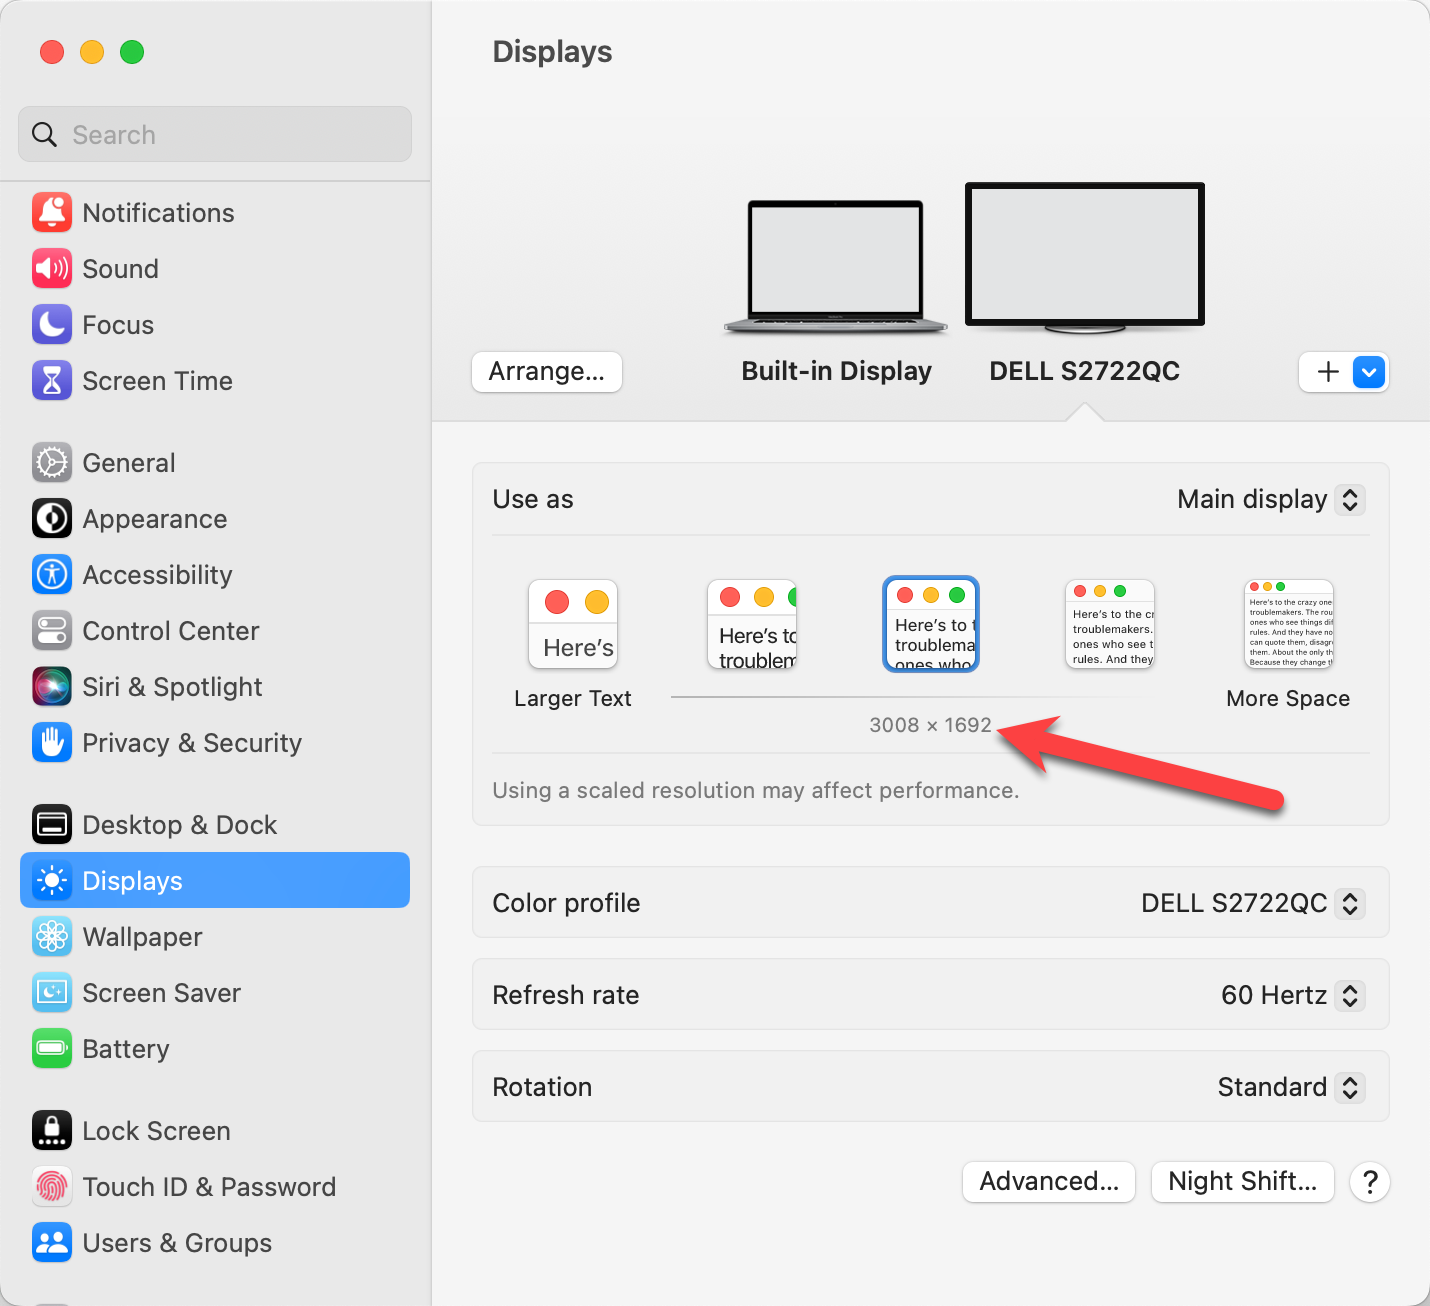
- Mouse over the text boxes to reveal the resolution size in pixels.
- Select the desired size.
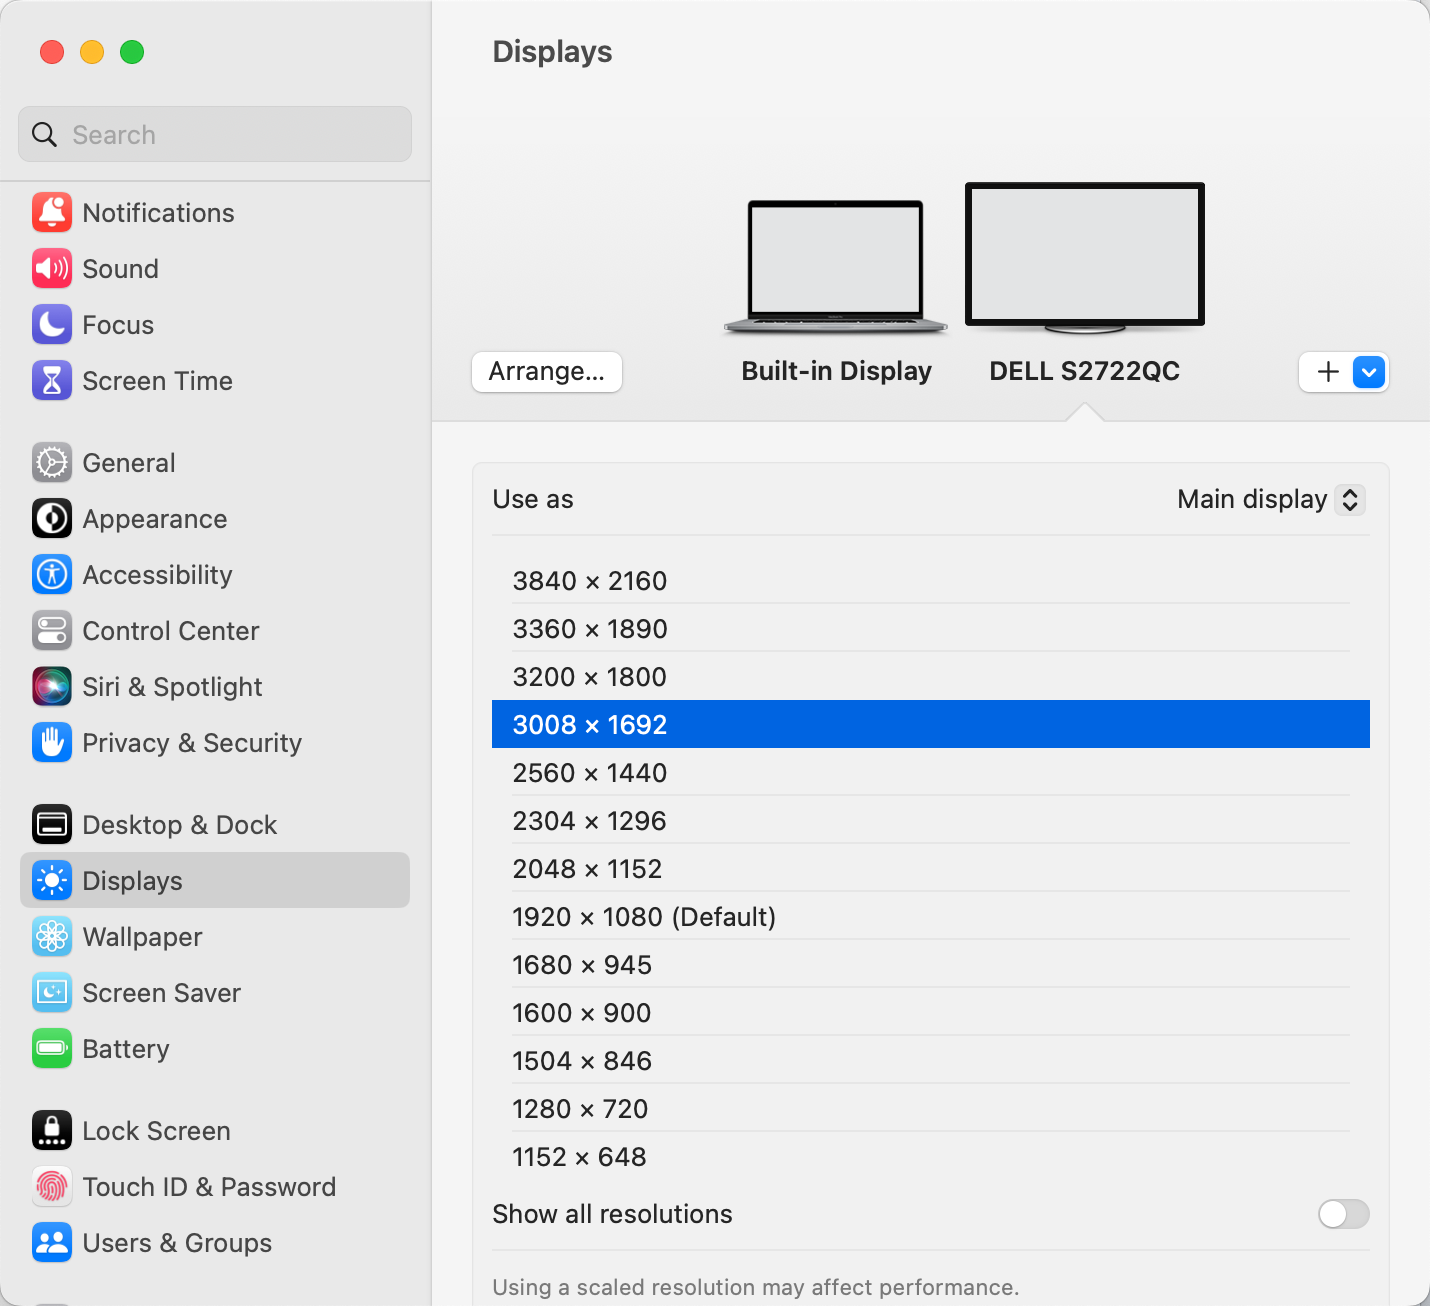
- If you want more size options, hold the Option key down while clicking on a text box. This will reveal more resolution options in list format.
Adjusting the Resolution of the Presentation Screen on a Windows Machine
- On your computer, go to Display Settings > Resolution
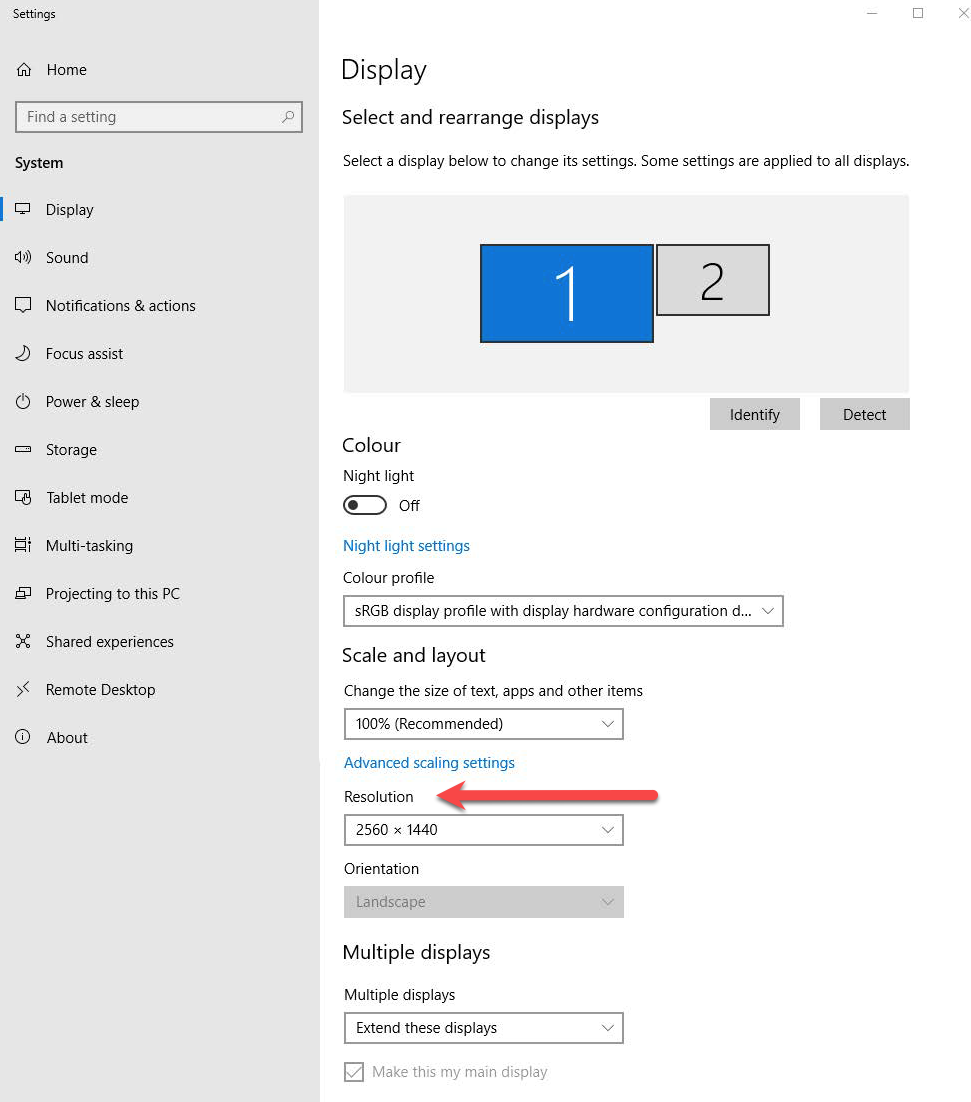
- Be sure to select the presentation screen first before adjusting the resolution.
- Adjust the resolution in the box. It will be a drop-down list.
Using Presentation Mode
- You can turn Presentation Mode on or off using the Presentation Mode button in the top-left of the Display Area.
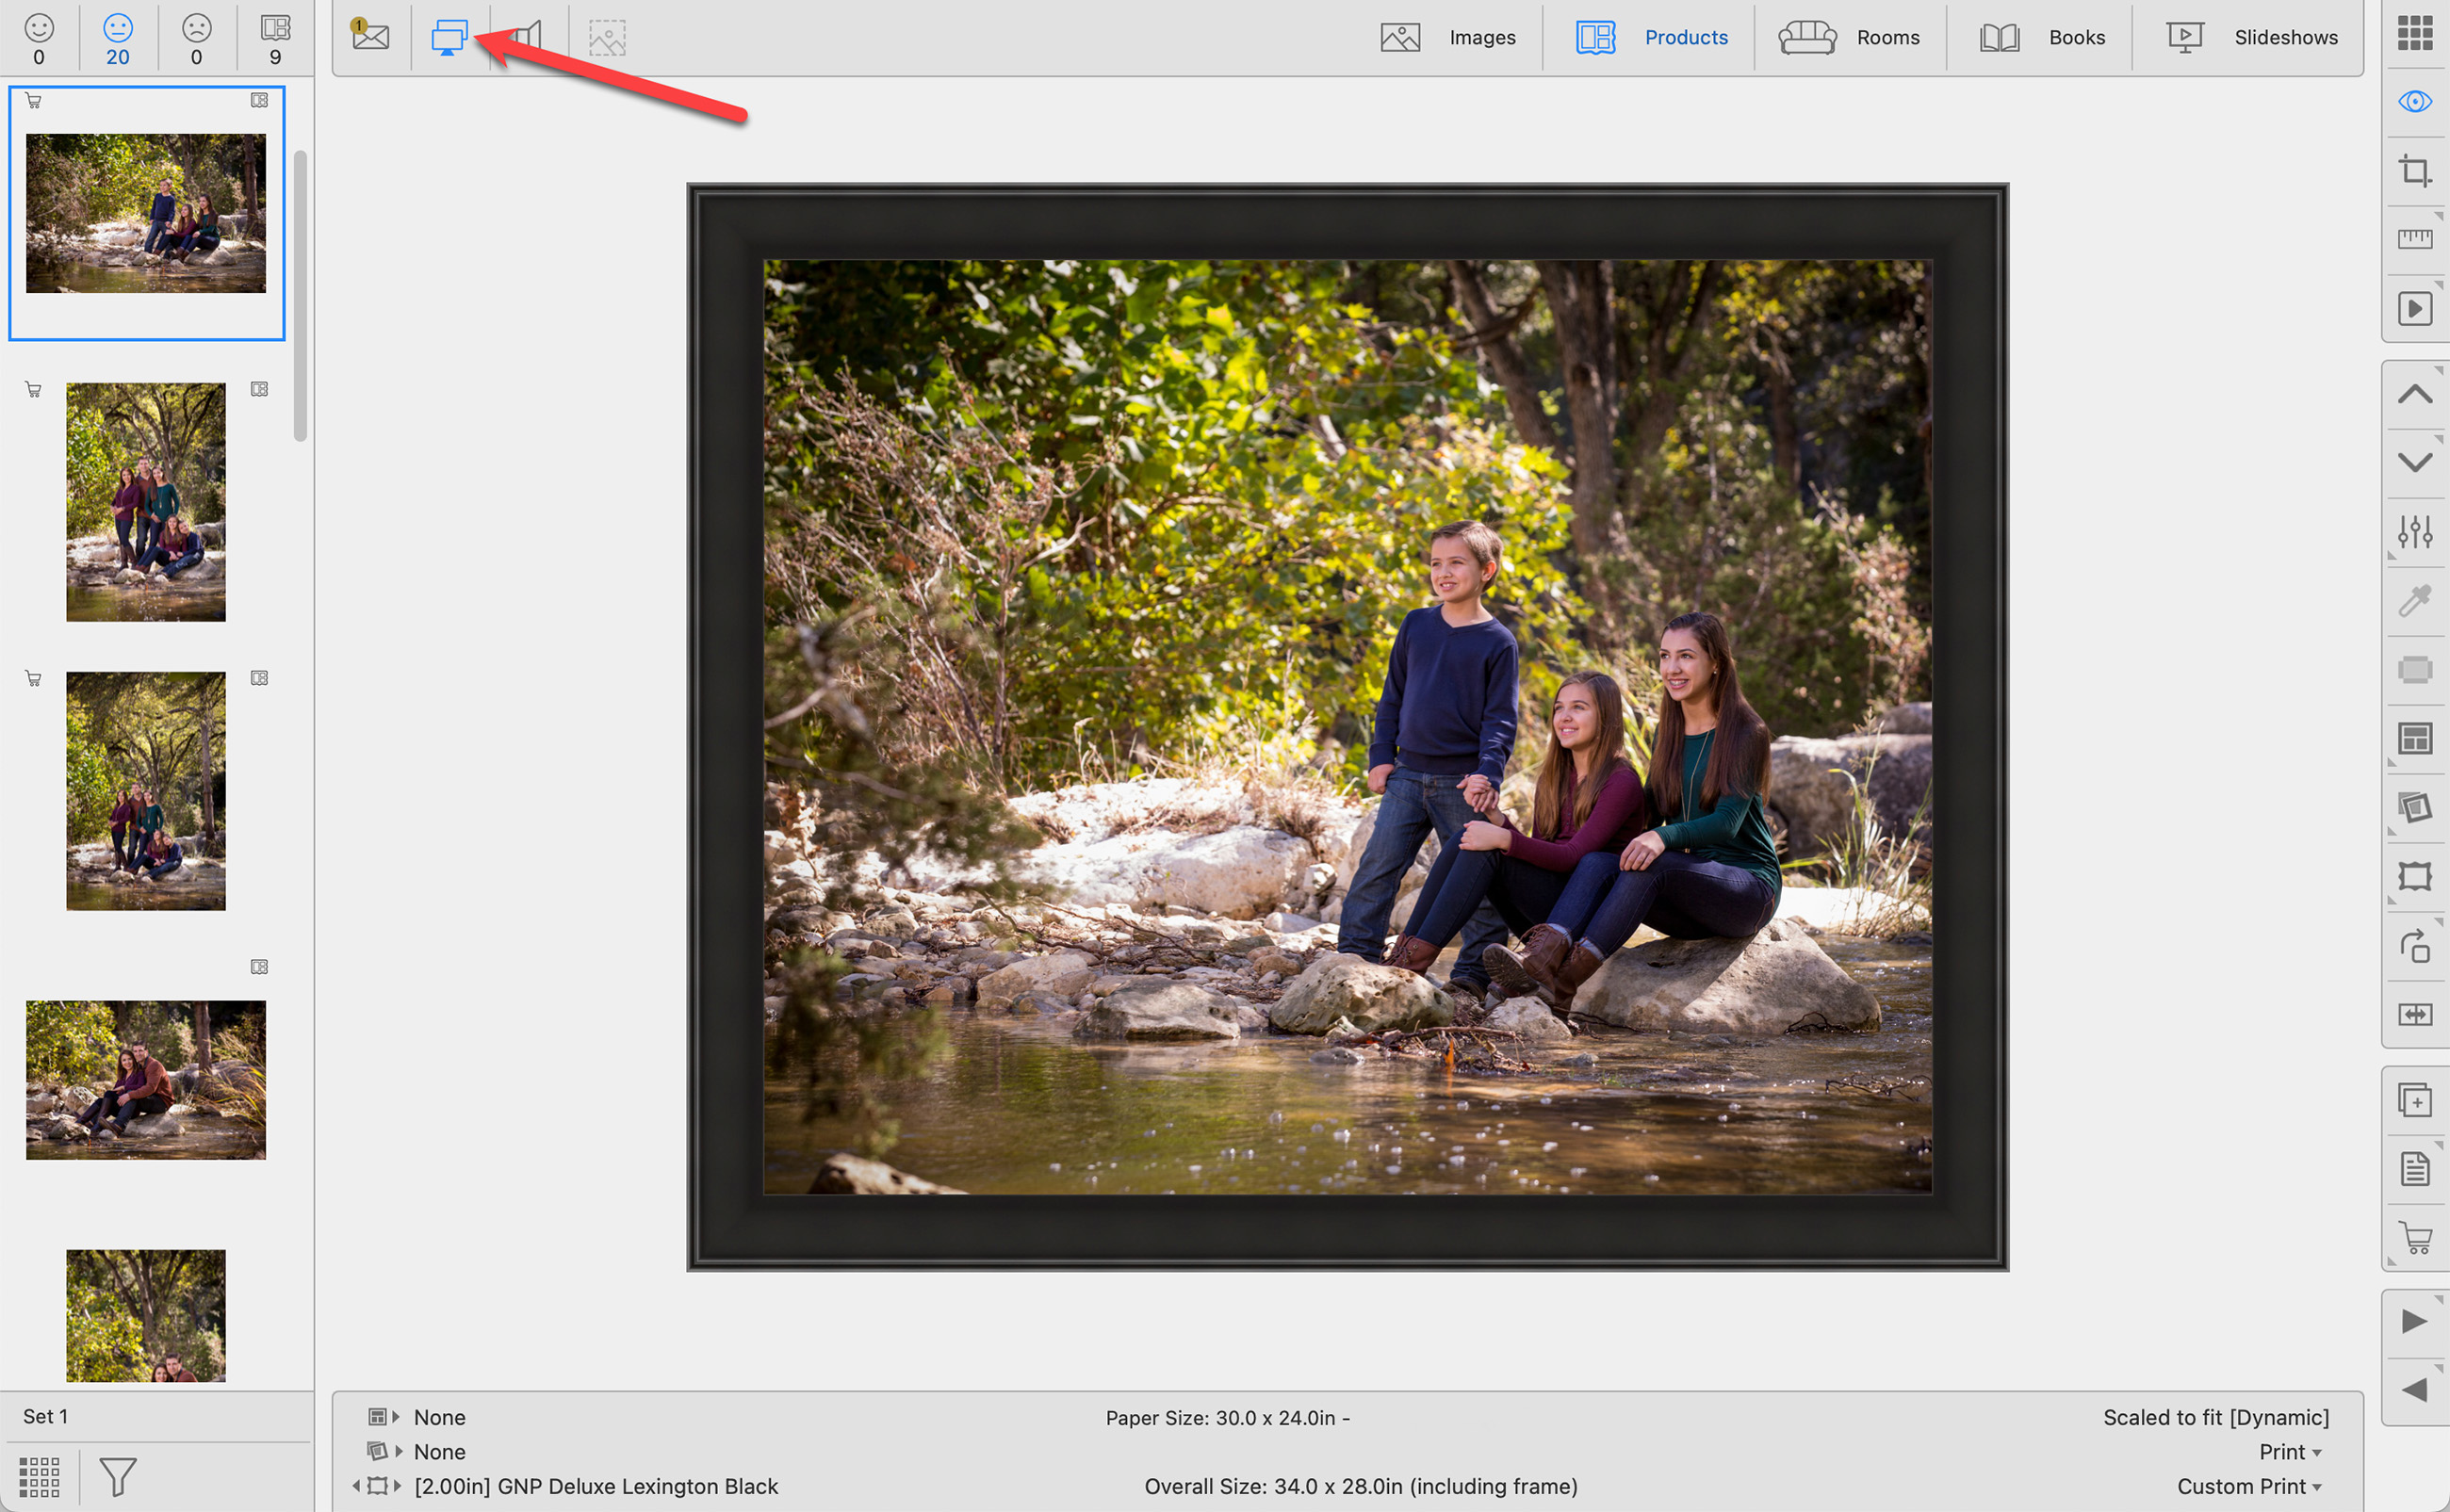
- You can also turn Presentation Mode on or off by going to the top menu, View > Presentation Mode.
- The shortcut Cmd + MCtrl + M will turn Presentation Mode on/off.
Showing the Image List
By default, ProSelect hides the Image List on the Presentation Screen. There are a few ways to hide/show the Image List:
- Once Presentation Mode is activated, hold the OptionAlt key while clicking on the Presentation Mode button to show/hide the Image List.
- Go to the top menu, View > Mirror Image List. Select this option to show the image List.
- Go to the top menu, ProSelectEdit > Settings > Display > Presentation Mode. Use the checkbox "Mirror Image List" to change your default setting.

Presentation Mode Settings
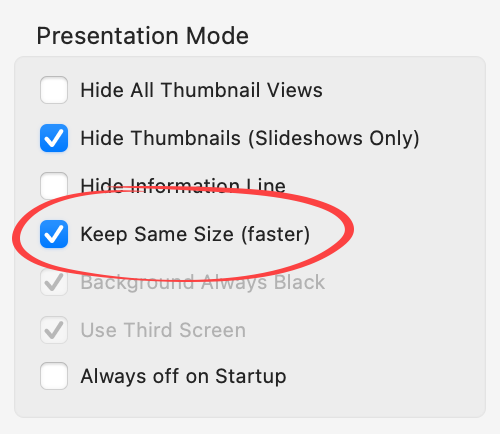
Navigate to the top menu, ProSelectEdit > Settings > Display > Presentation Mode to adjust the following settings:
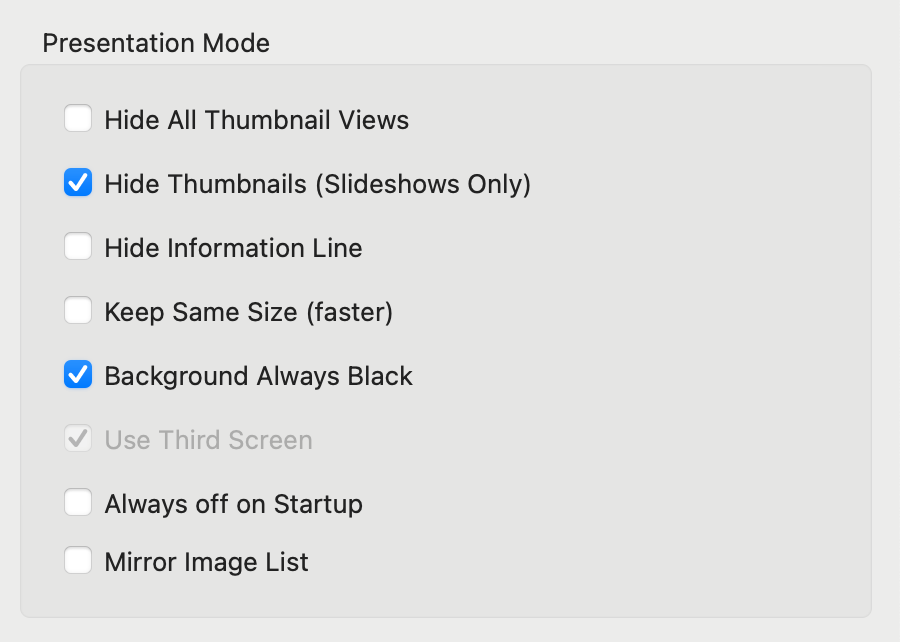
- Hide All Thumbnail Views: Check this box to hide all thumbnails on the Presentation Screen.
- Hide Thumbnails (Slideshows Only): Check this box to hide thumbnails on the Presentation Screen only when playing a slideshow. Otherwise, they will appear.
- Hide Information Line: Check this box to hide the bottom information line on the Presentation Screen.
- Keep Same Size (faster): This checkbox is used to control the method that ProSelect uses when running the Presentation Mode screen. This is generally used when you are working off an older machine and you find Presentation Mode sluggish. Click here for more information.
- Background Always Black: Check this box to override light/dark mode and always have your Presentation Screen black. See Background Always Black for more information.
- Use Third Screen: This checkbox is only enabled when a third screen is connected. Check the box to use the third screen as an additional Presentation Screen.
- Always off on Startup: Check this box if you would like ProSelect to always startup with Presentation Mode OFF. Uncheck this box if you want ProSelect to startup with the same Presentation Mode Display On/Off setting as last used.
- Mirror Image List: Check this box to display the Image List on the Presentation Screen by default. Note that you can always toggle this on/off by going to the top menu, View > Mirror Image List.
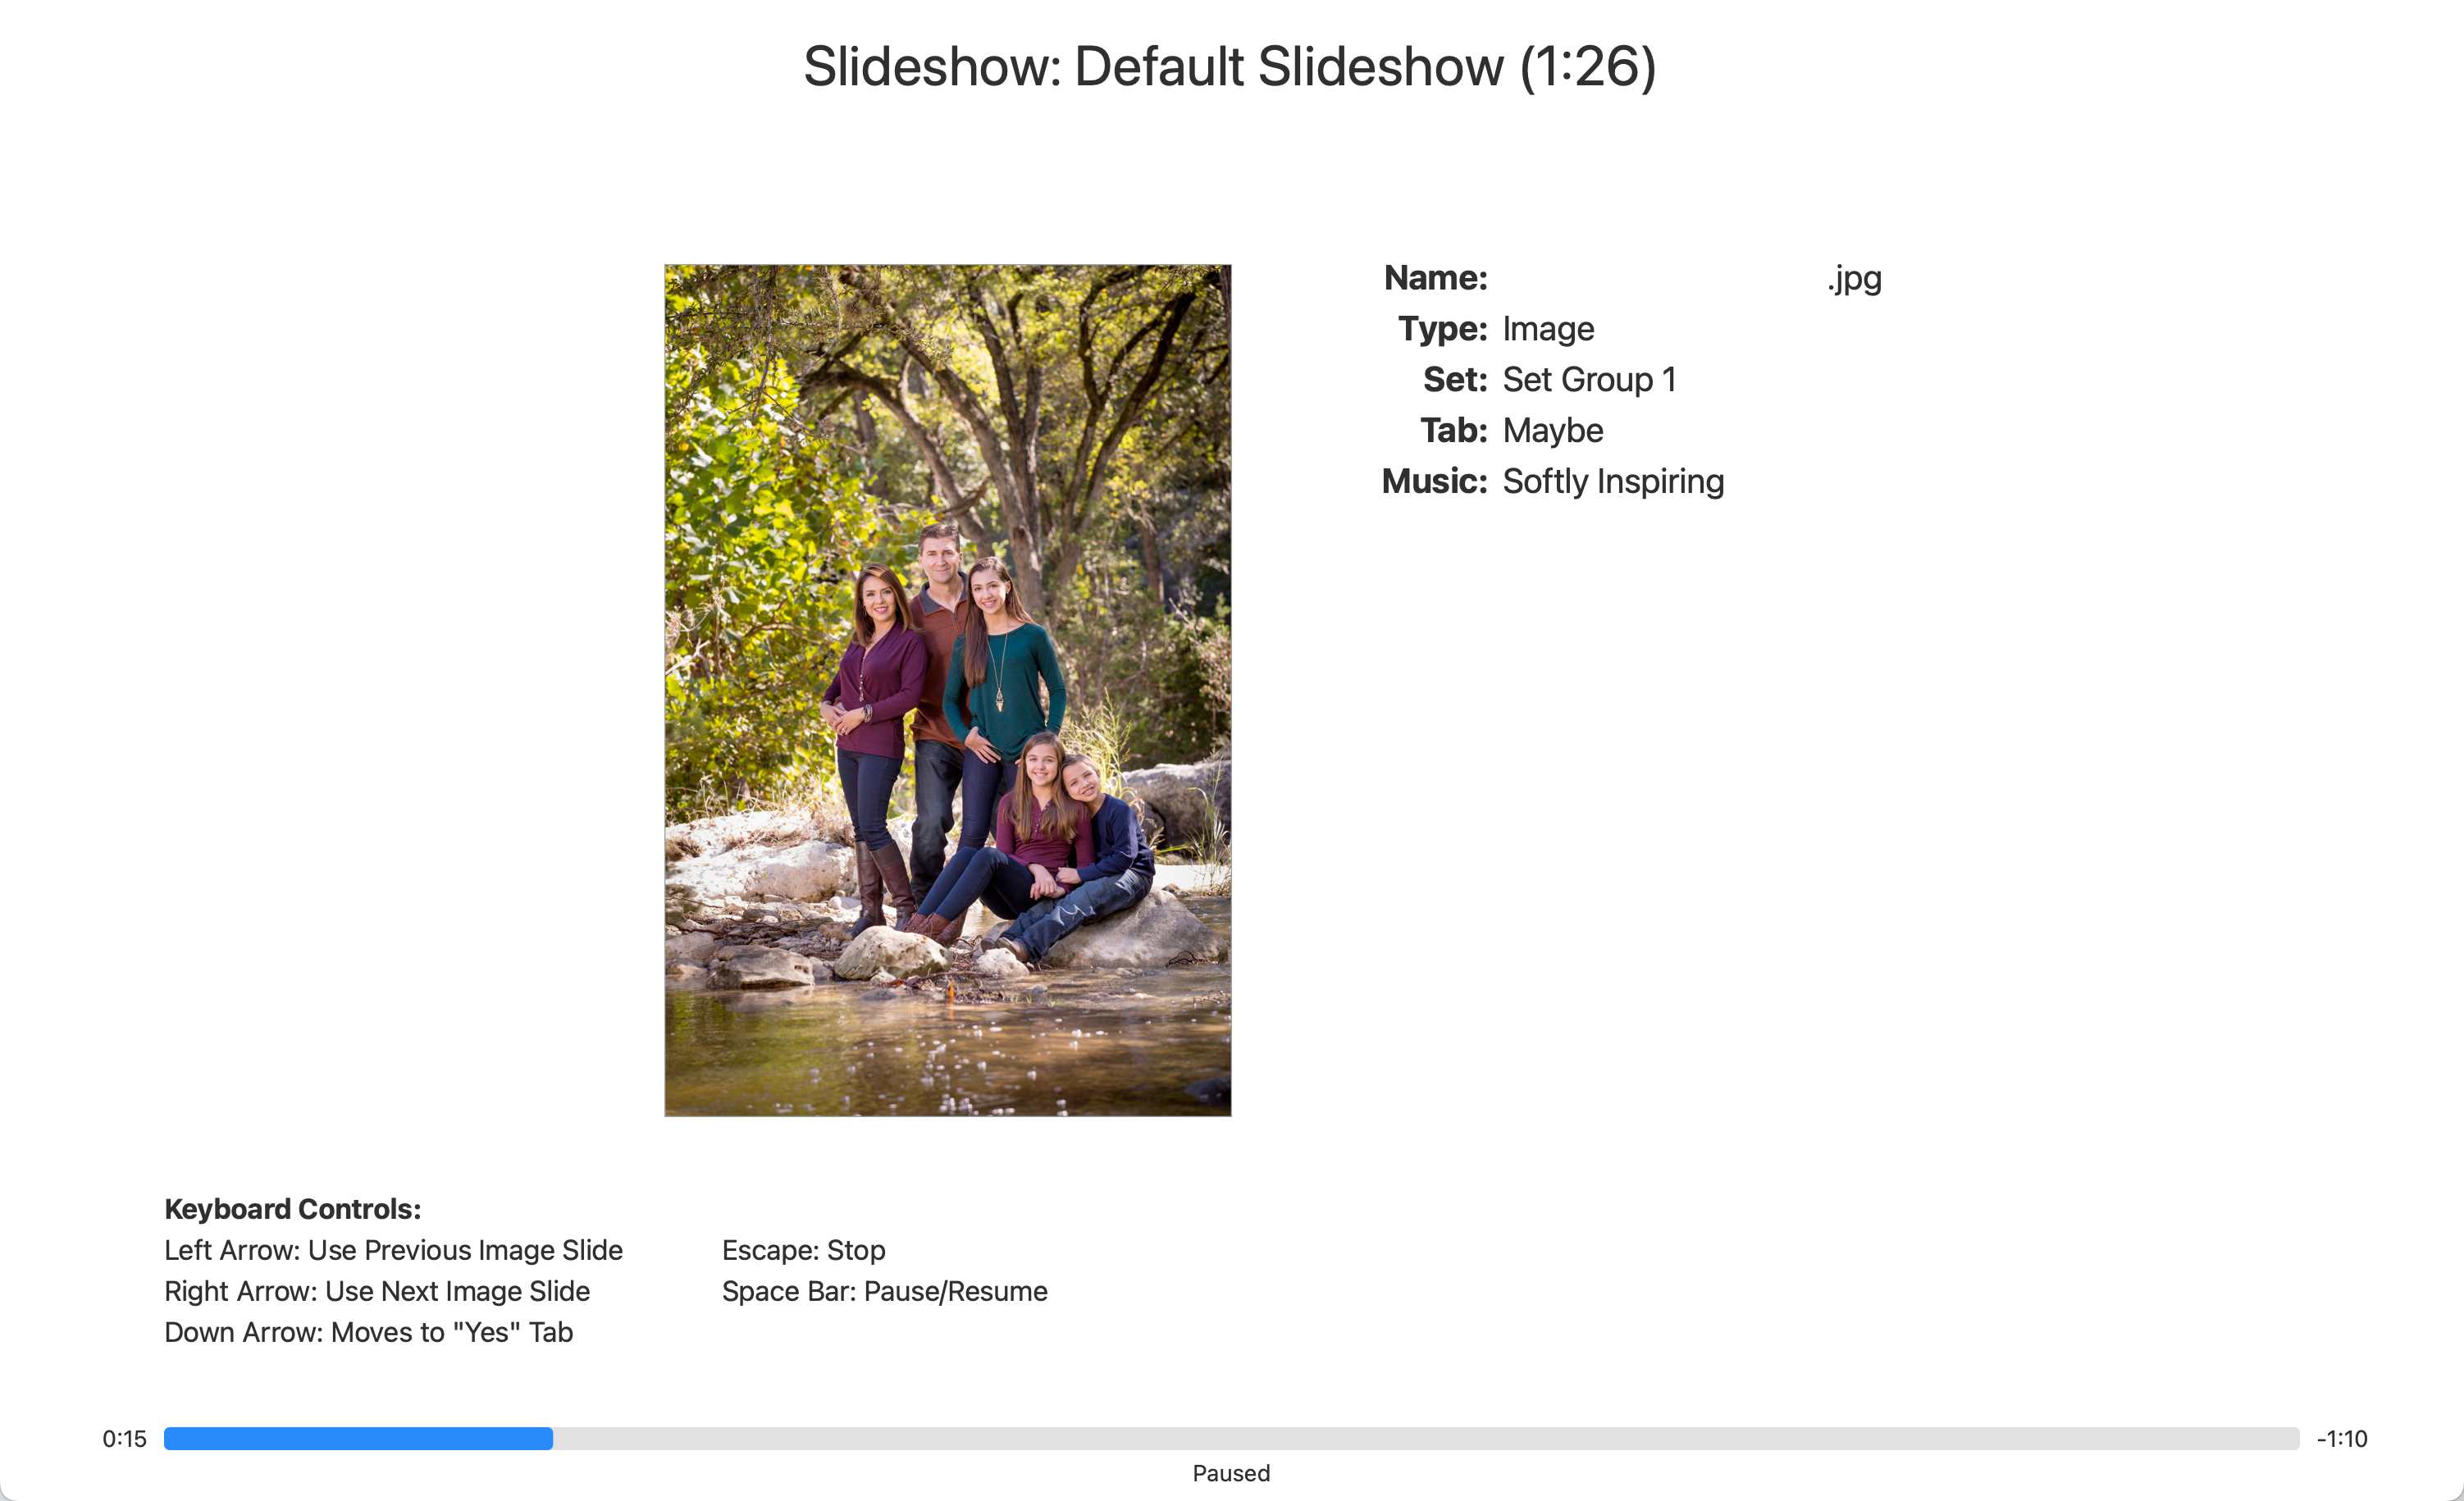
When Presentation Mode is turned on, the Slideshow will play on the Presentation Screen. While it is playing, the slideshow controls will be visible on the Main Screen.
- What the Client sees on the Presentation Screen:

- The Slideshow Control window on the Main/Control Screen:
As a general rule of thumb, Presentation Mode works best when your main computer (laptop etc.) has a higher resolution than your presentation screen (projector, TV, etc.). If you cannot set your main computer to have a higher resolution, try to get it as close as possible.
For example, if you have a laptop with a 1680x1050 sized screen and are connecting to a 4K UHD monitor with a resolution of 3840 x 2160, then your thumbnails will appear centered at around half the size on the 4K monitor. This is because, in order to keep the display layout the same on both screens, thumbnails are copied pixel-by-pixel between the two screens. The display layout MUST be the same on both screens. Clients could potentially reference "the second photo on the left". Thus, "the second photo on the left" must appear in the same place on both the main computer as well as the presentation screen.
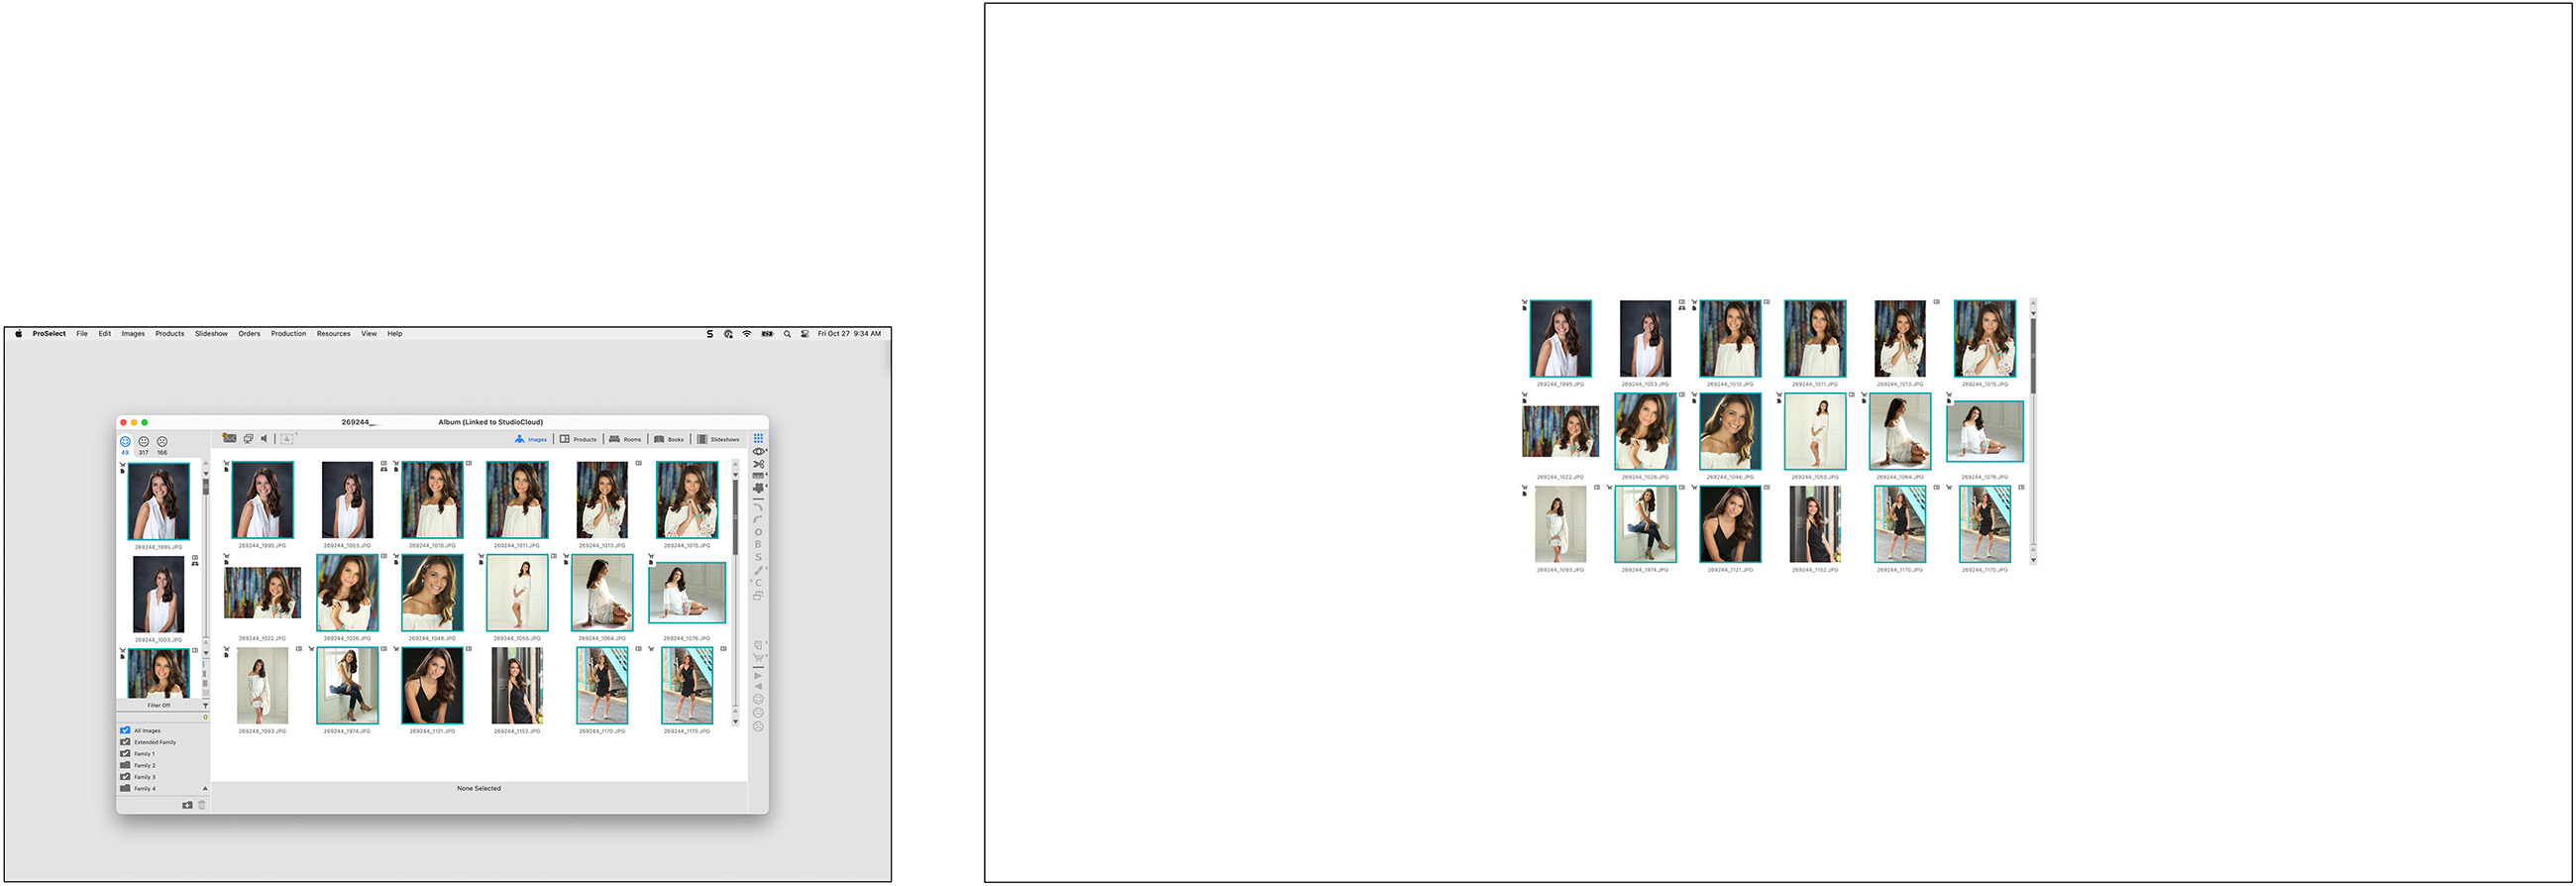
As you can see from the above example, the thumbnail images appear small on the presentation screen. There are three things we can do to make them appear larger while keeping the same display layout.
- Make sure the ProSelect window is maximized on your main screen. This will give your presentation screen access to the largest possible thumbnail size.
- Change the size of your thumbnails to large. Go to the top menu, View > Thumbnail Size > Large.
- Adjust the screen resolution of the main computer and/or presentation screen. Try to equalize the resolutions - get them as close as possible to the same size.
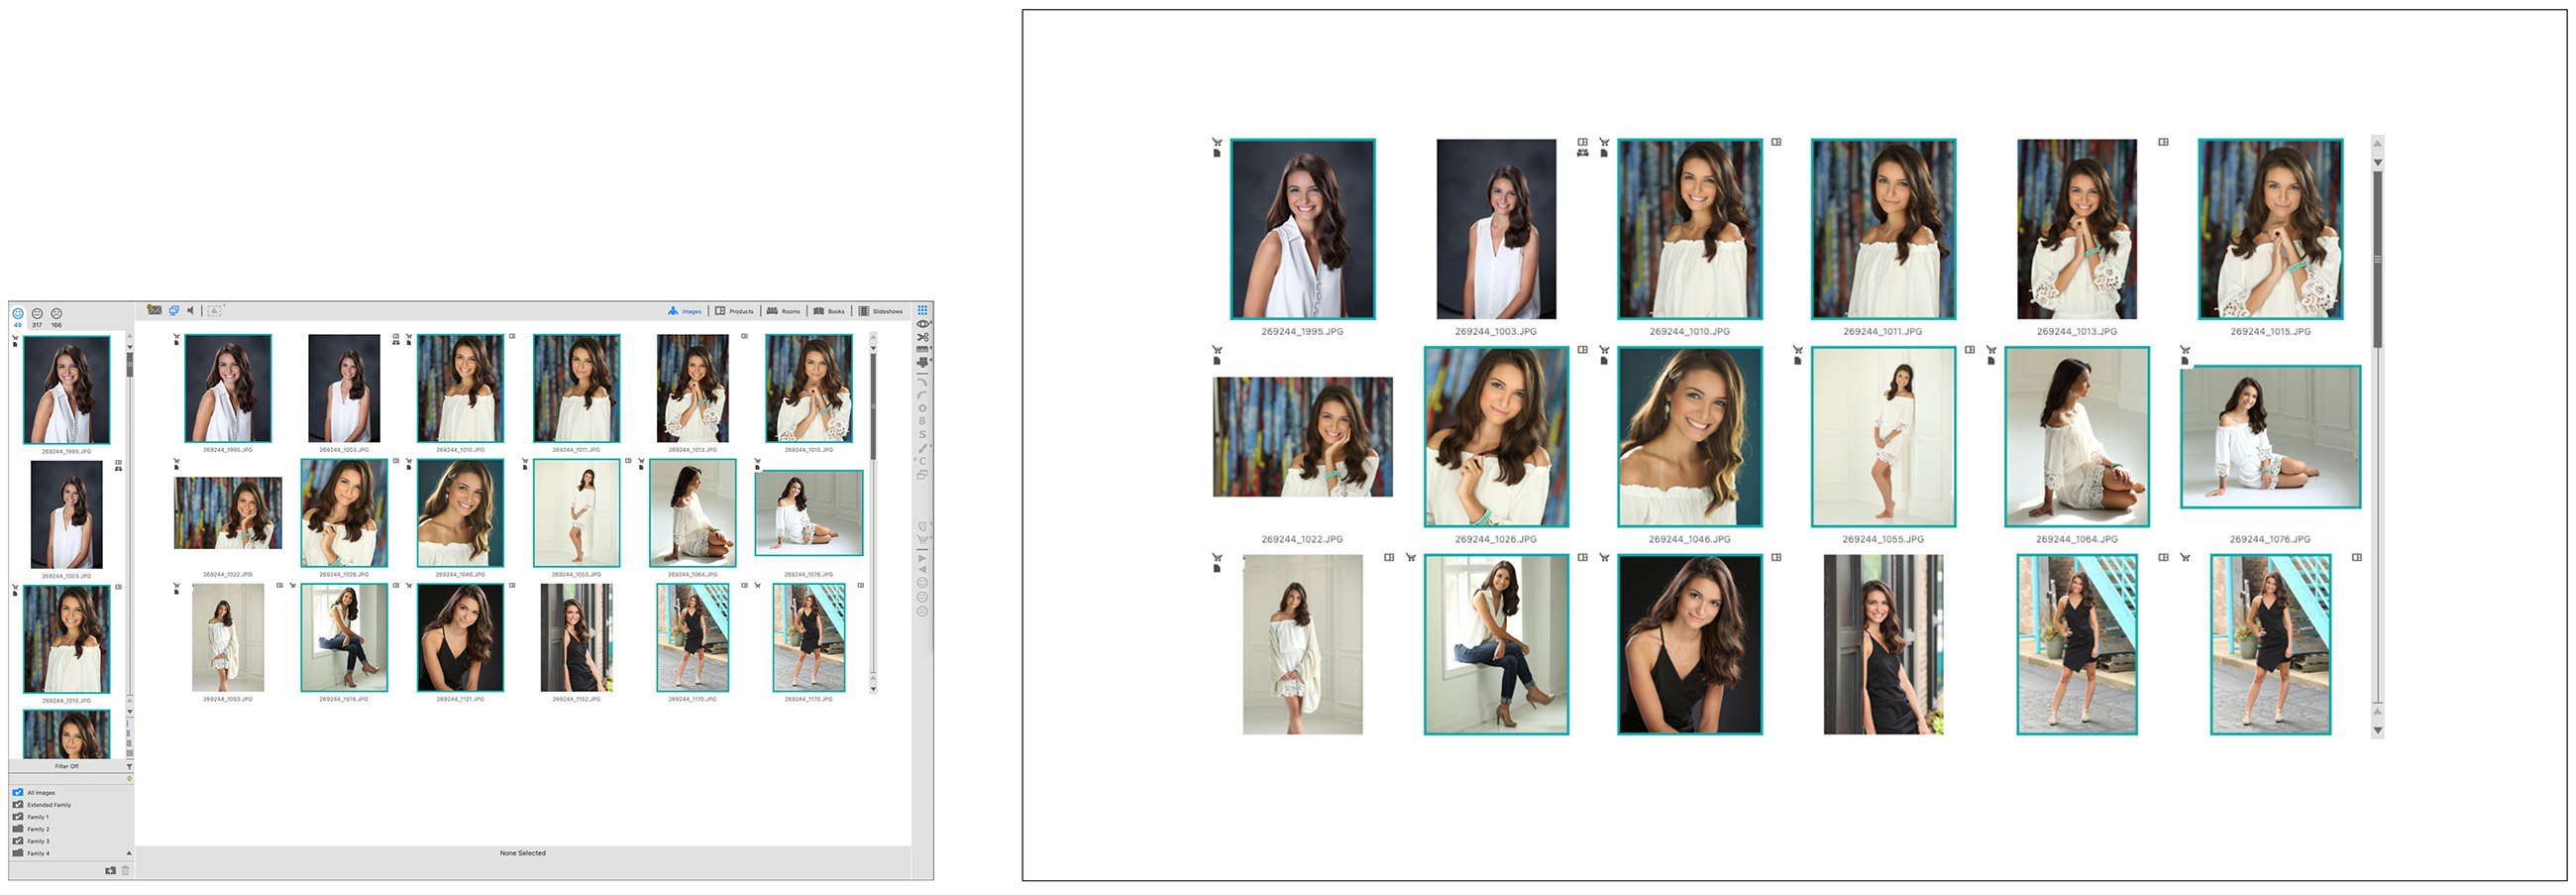
As you can see from the above example, the thumbnail images are now showing far bigger on the presentation screen.
- The ProSelect window was maximized.
- The thumbnail size was changed to large.
- The resolution of the presentation screen was changed to 1680 x 945, which is very similar to the laptop screen set at 1680 x 1050.
Keep in mind as a consequence of adjusting the resolution on the presentation screen, the images and thumbnails may appear slightly blurry. You will need to experiment with different resolutions and thumbnail sizes to find the ideal balance that works for you. If the thumbnails appear blurry, you will need to make the resolution larger and use smaller thumbnails.
When using Presentation Mode, ProSelect transfers images to the client’s screen using one of two methods.
- Pixel Copy Method: This method is used when the Presentation Screen size (in pixels) is the same size or smaller than the Display Area part in the main window. In this case, ProSelect will simply make a copy of the pixels from the Main Screen to the other at the same size for the fastest performance.
- Second Display Area Method: This method is used when the Presentation Screen size (in pixels) is larger than the Display Area part in the Main Window. In this case, ProSelect creates a Display Area image for both screens separately to fill the available space. This method is slower than the Pixel Copy method.
It is recommended to use the Pixel Copy Method if you have an older computer and are finding that Presentation Mode is running slowly. This will allow for a faster performance.
- Go to the top menu, ProSelectEdit > Settings > Display > Calibration & Options > Presentation Mode.
- Check the "Keep Same Size (faster) box.
- ProSelect will now use the Pixel Copy Method when in Presentation Mode.
Because a direct copy is being made from your main screen to the presentation screen, image size is limited to the size they appear on your main screen.
When using this method, the background color of the presentation screen will always match that of the main screen. It is a direct copy.
If you are seeing the top menu bar when Presentation Mode is on, you need to turn off the setting "Displays Have Separate Spaces."
- Open your System Settings (The Apple icon in the top left corner of your screen).
- Navigate to "Desktop & Dock".
- Scroll to the bottom to find Mission Control, and turn off "Displays have separate Spaces." Note that this requires a log out before taking effect.
- A connected HDMI cable is more reliable than wireless or airplay.
- Have your ProSelect Main window at full size when using Presentation Mode. This will allow the Thumbnails to appear as large as they can on your Presentation Screen.
- When presenting to a client, it is highly recommended that you use the extended desktop as a Presentation Screen. While mirroring your screens can also work, using an extended desktop and activating Presentation Mode offers a far cleaner, less distracting display area for your Clients to see.
- If you are not showing images in actual size on a large screen, set your calibration at 12” to 14”. With that, you can show wall portraits with frame detail in Actual Size view. Keep in mind, they will not be actual size, but visually appealing.