 Thumbnail View
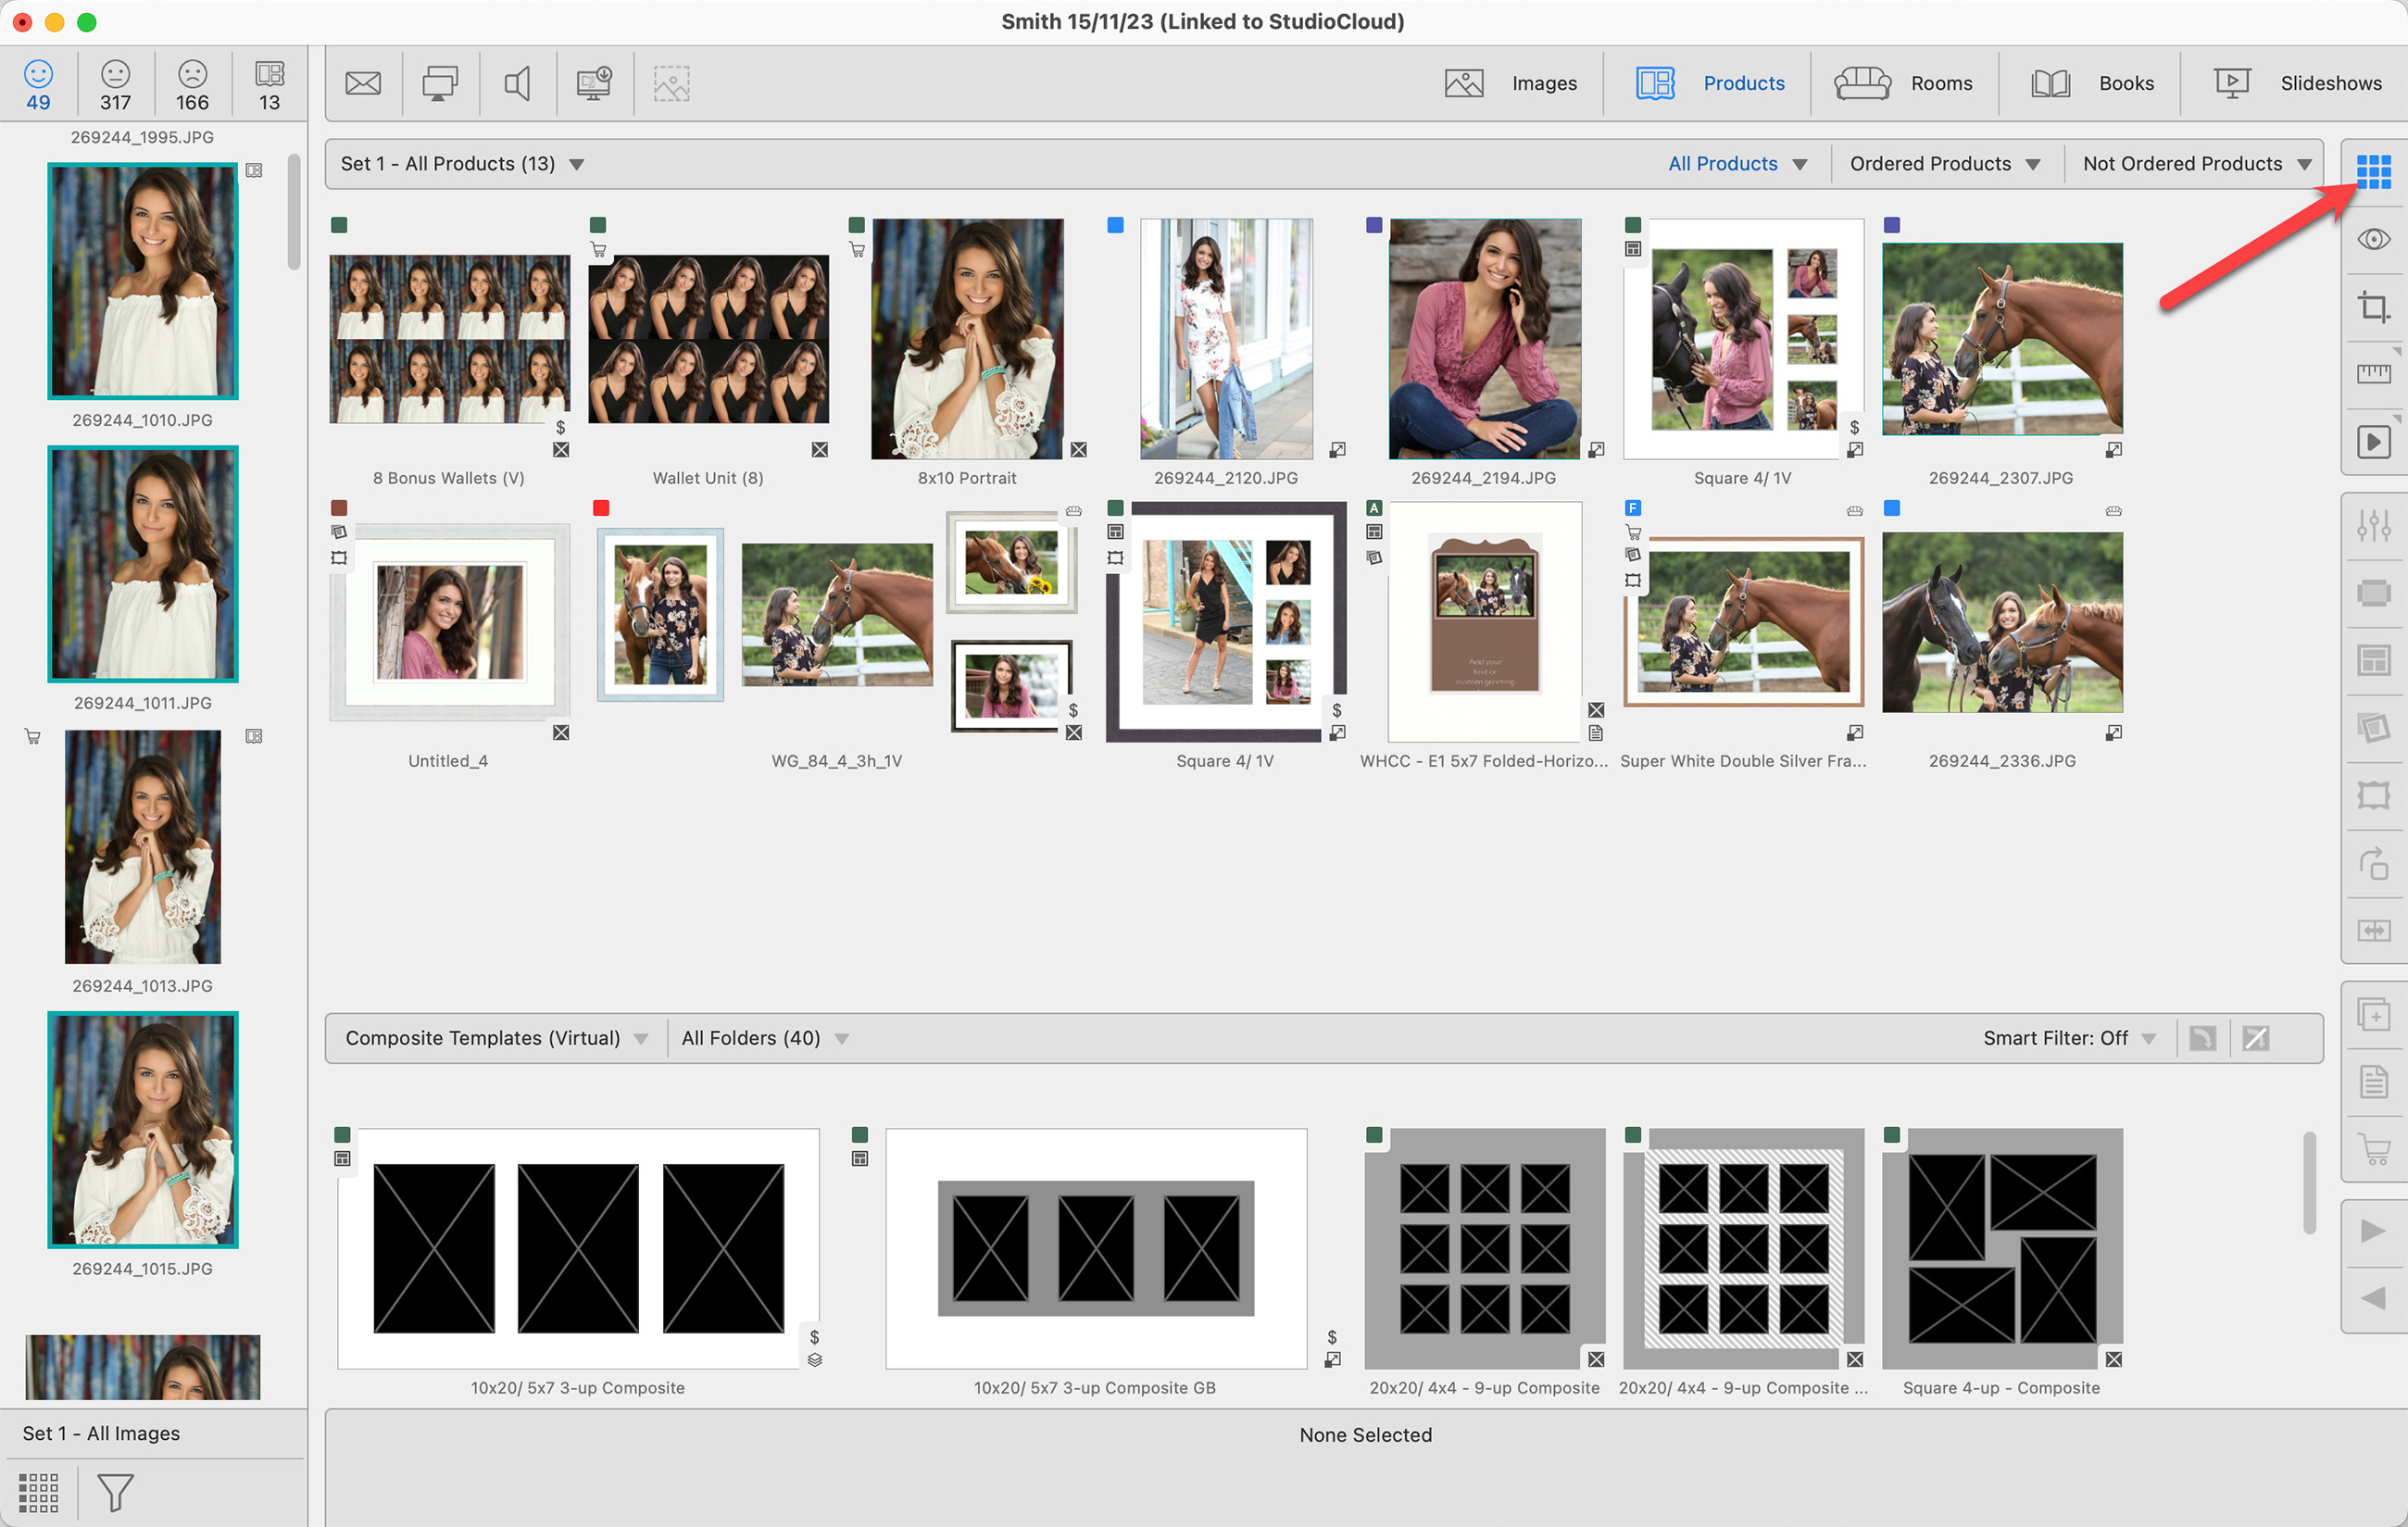
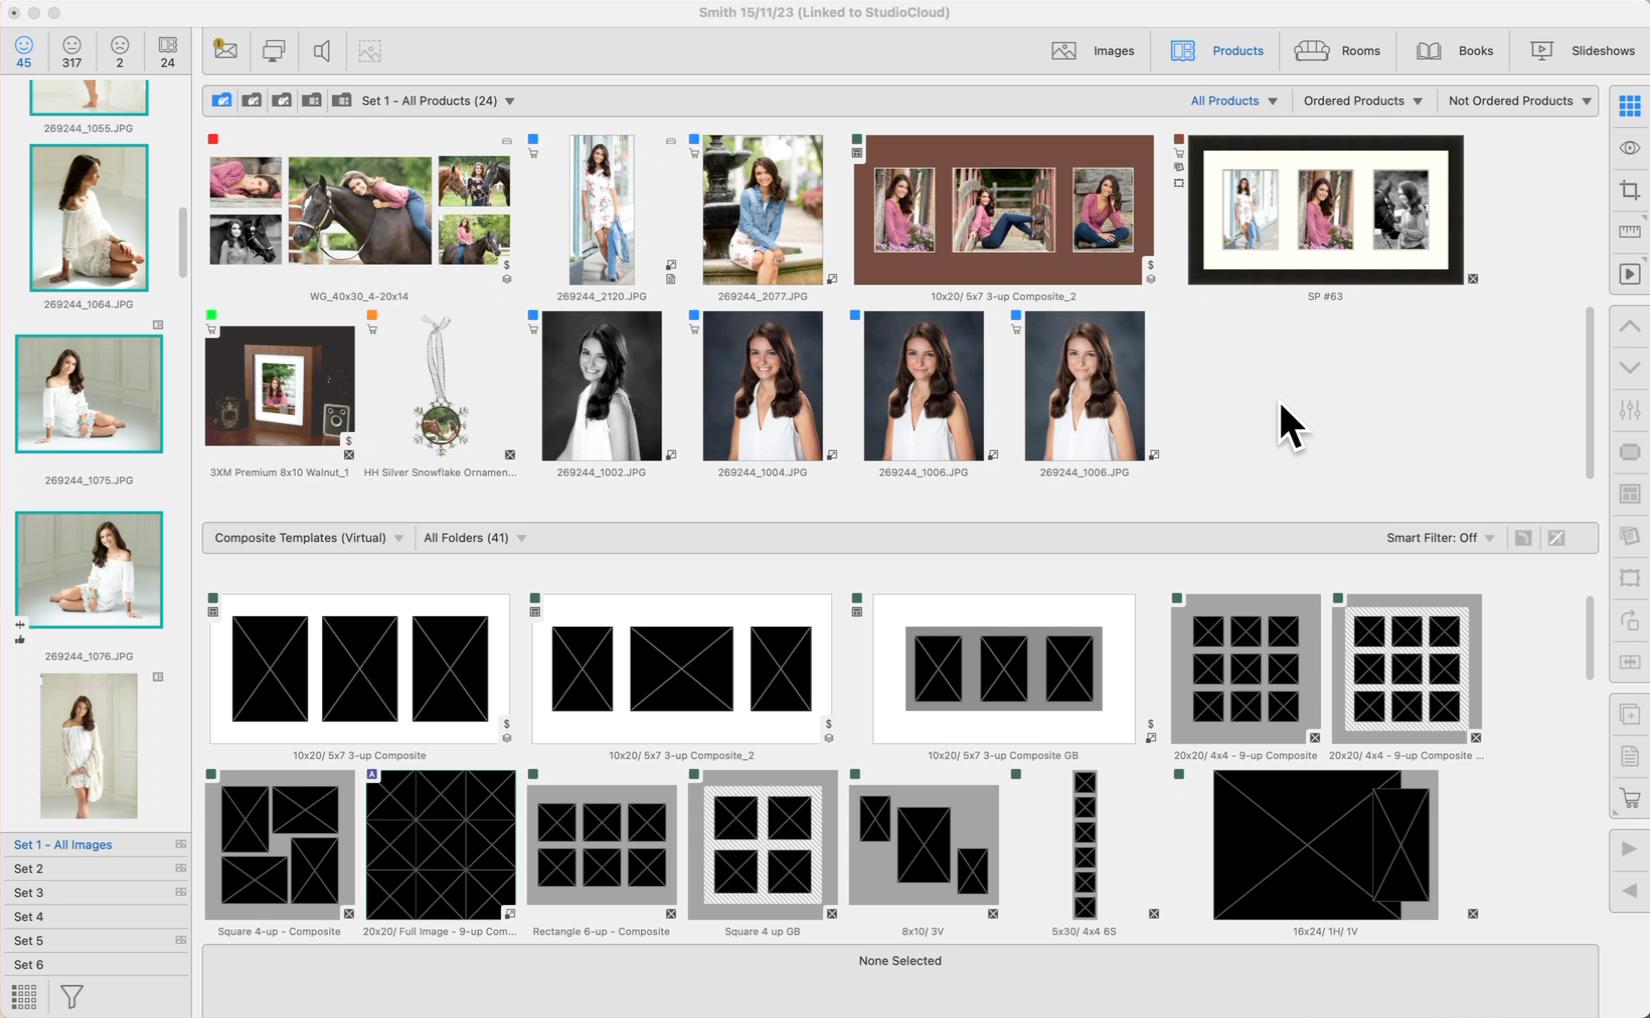
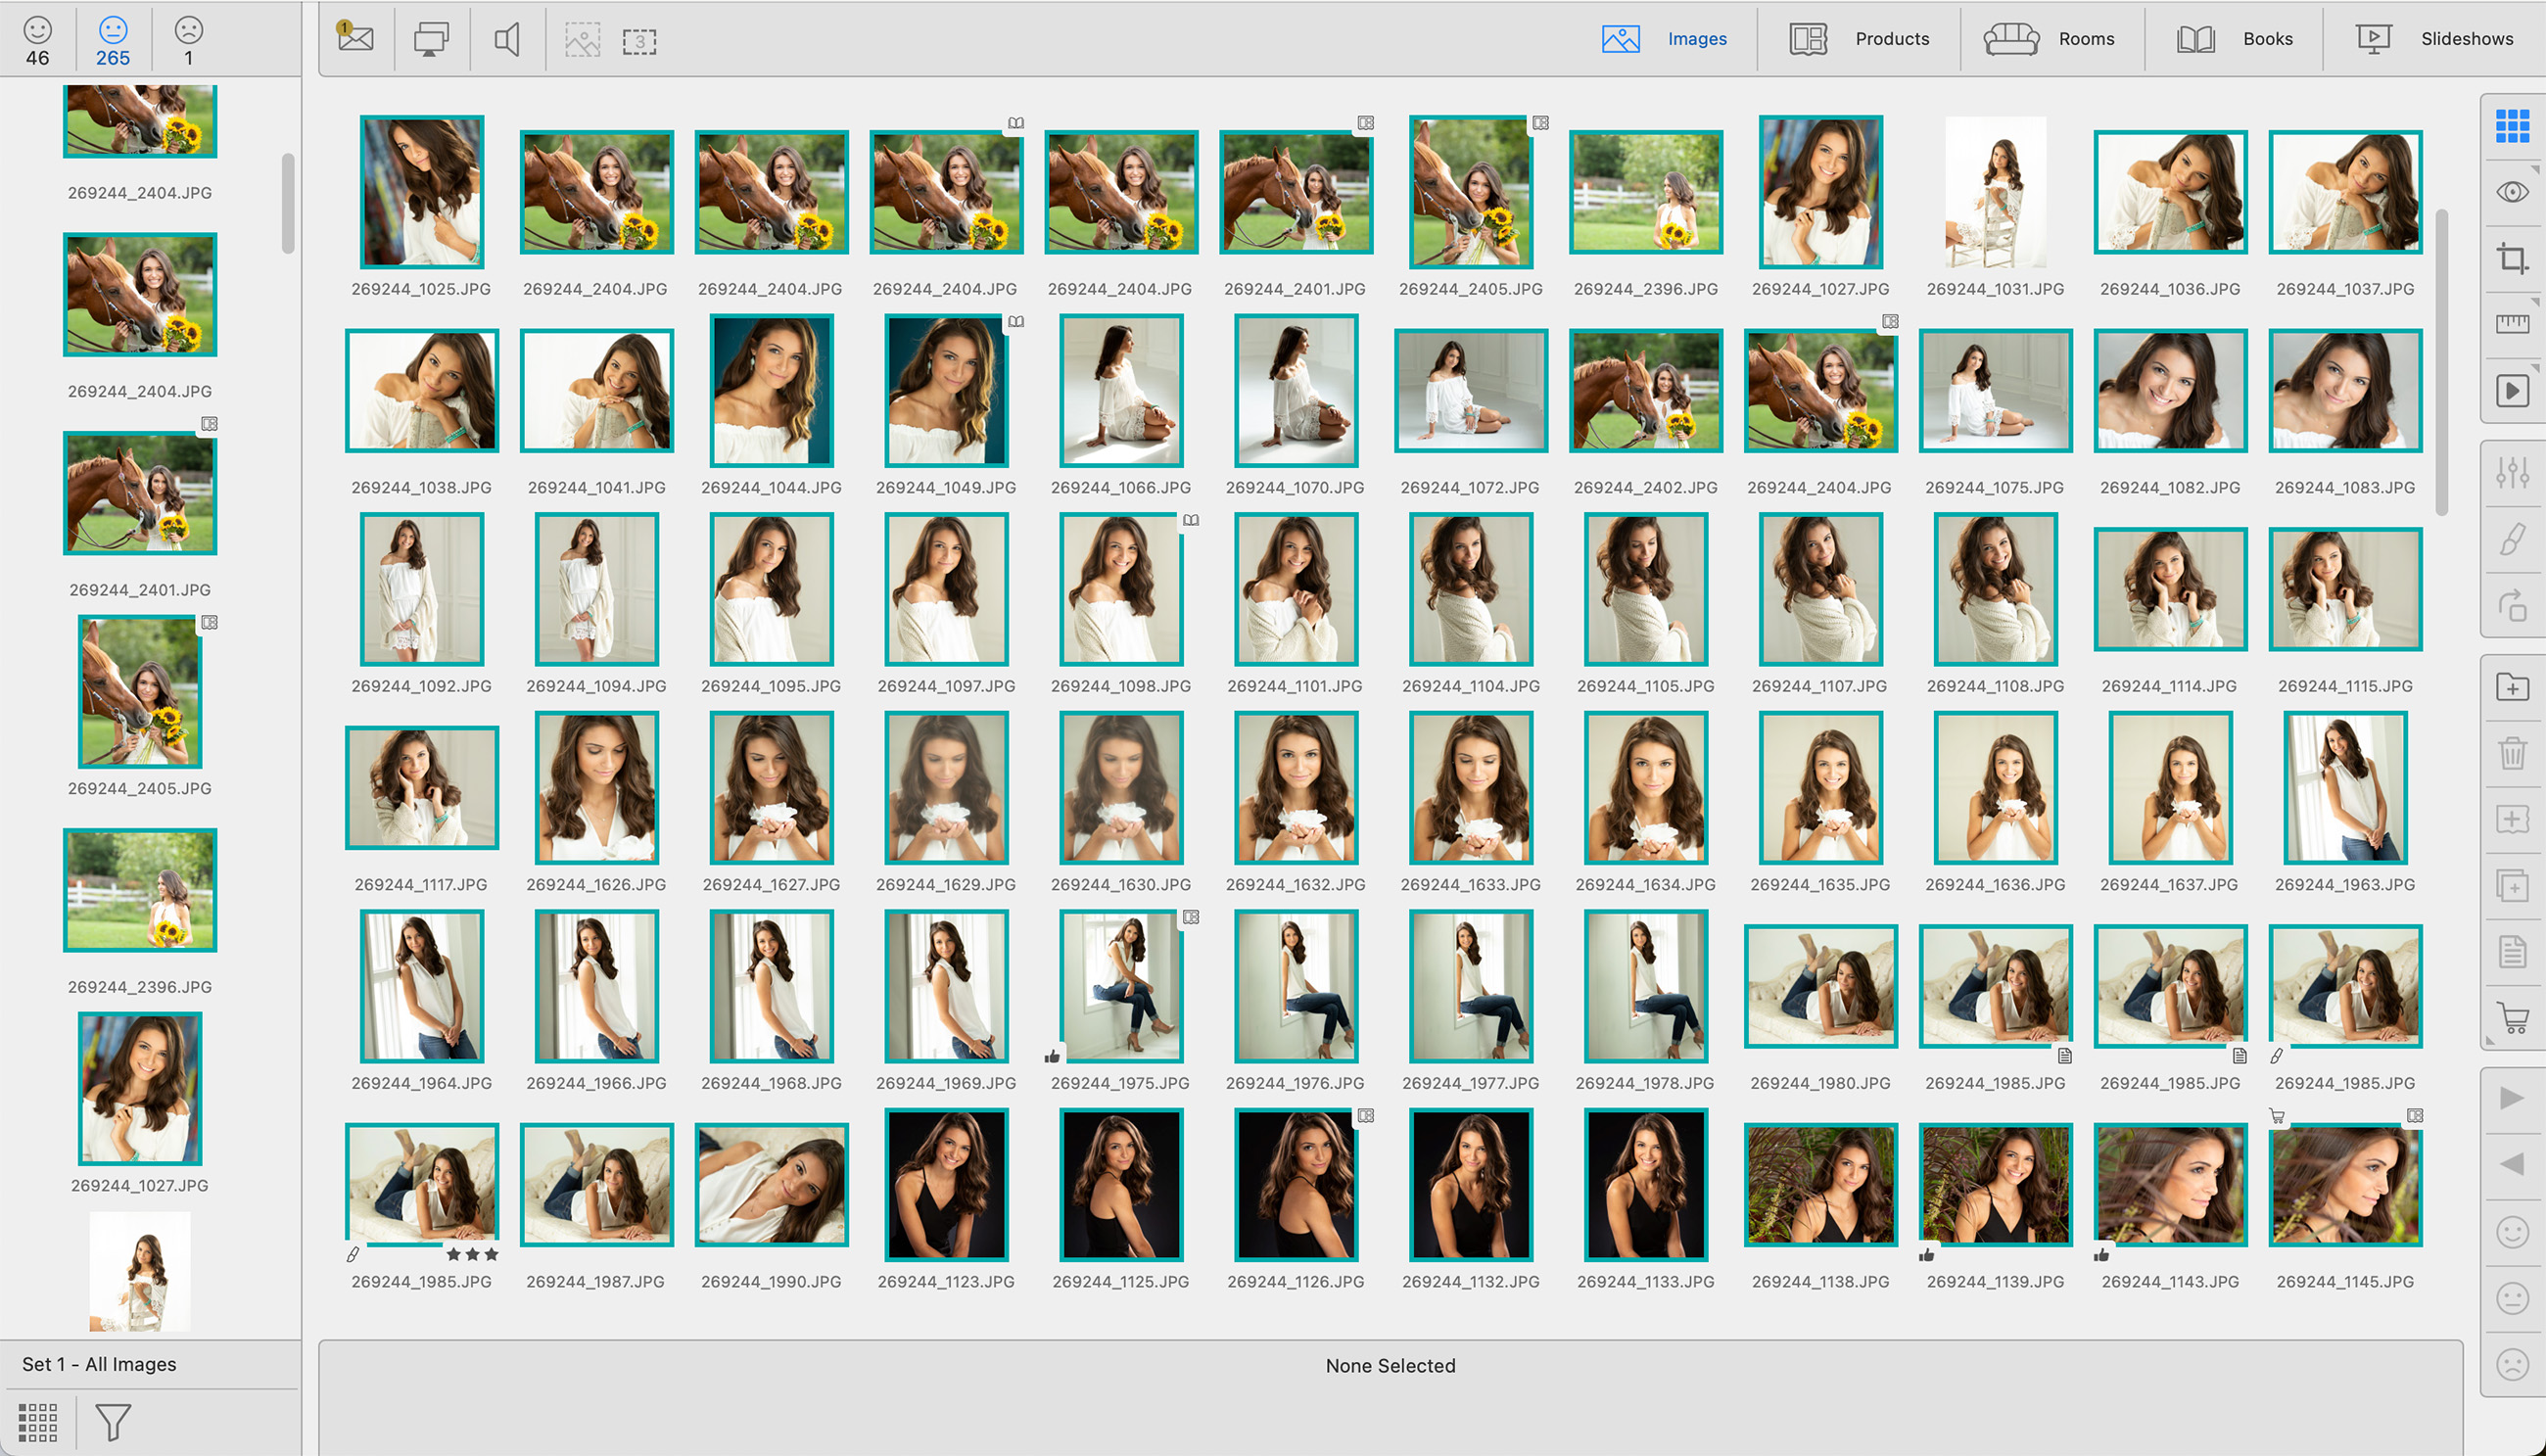
When Working with Products, Thumbnail view will show all the products in the current album in the Display Area and all the available templates in the Template Resource Area.
How to Access Thumbnail View
- Click on the Thumbnail view button . It is the topmost View button located on the right-hand side.
- When in a different View, press the "T" key to toggle between Thumbnail view and Show Products view.
- On the top menu, go to View > Thumbnails.
Using Thumbnail View
- Many of the toolbar tools are available in Thumbnail view. You can add a frame, mat, rotate etc. It is recommended, however, that you use Show Products view for these functions. The product is magnified in Show Products view allowing for more detail.
- There are many right-click functions available in Thumbnail view. These include Add Image Effect, Size, Presentation Option, Go to Pricing, Delete Product, and many more. Click on Right-Click Options to learn more.
- You can rearrange the order of your products by dragging them.
- Order products using the Order Product tool
 . Click on Ordering to learn more.
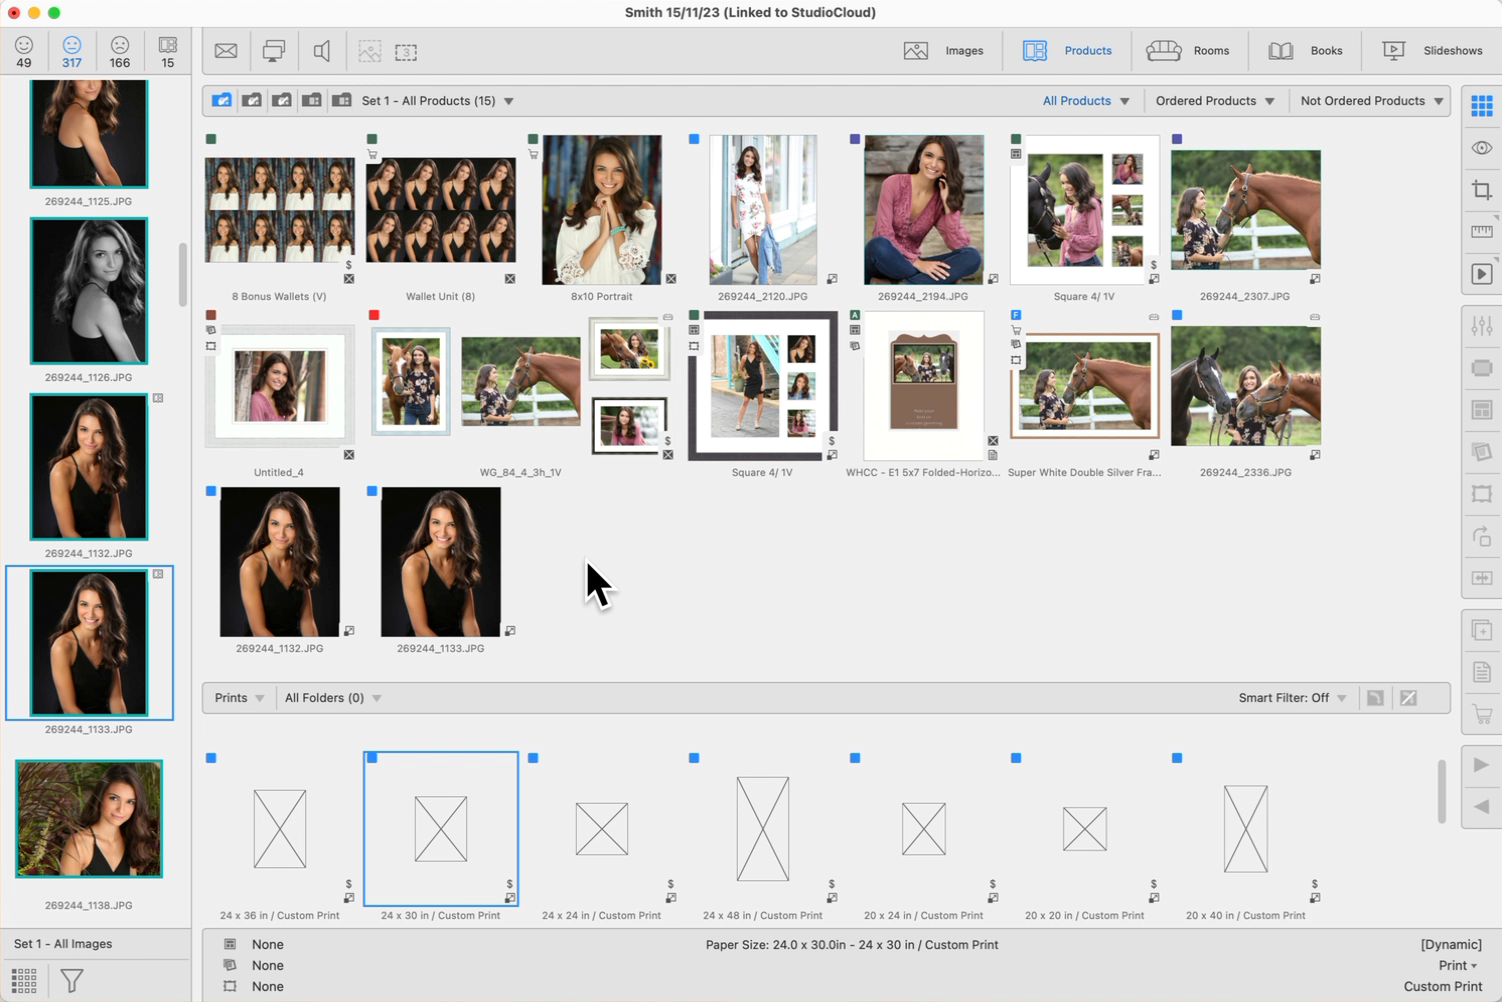
Creating Print Products from Working with Products
- Select an image from the Image List, and drag it into the display area.
- The Print Product will be created using your starting product size.
- Refine the print product using all the tools available.
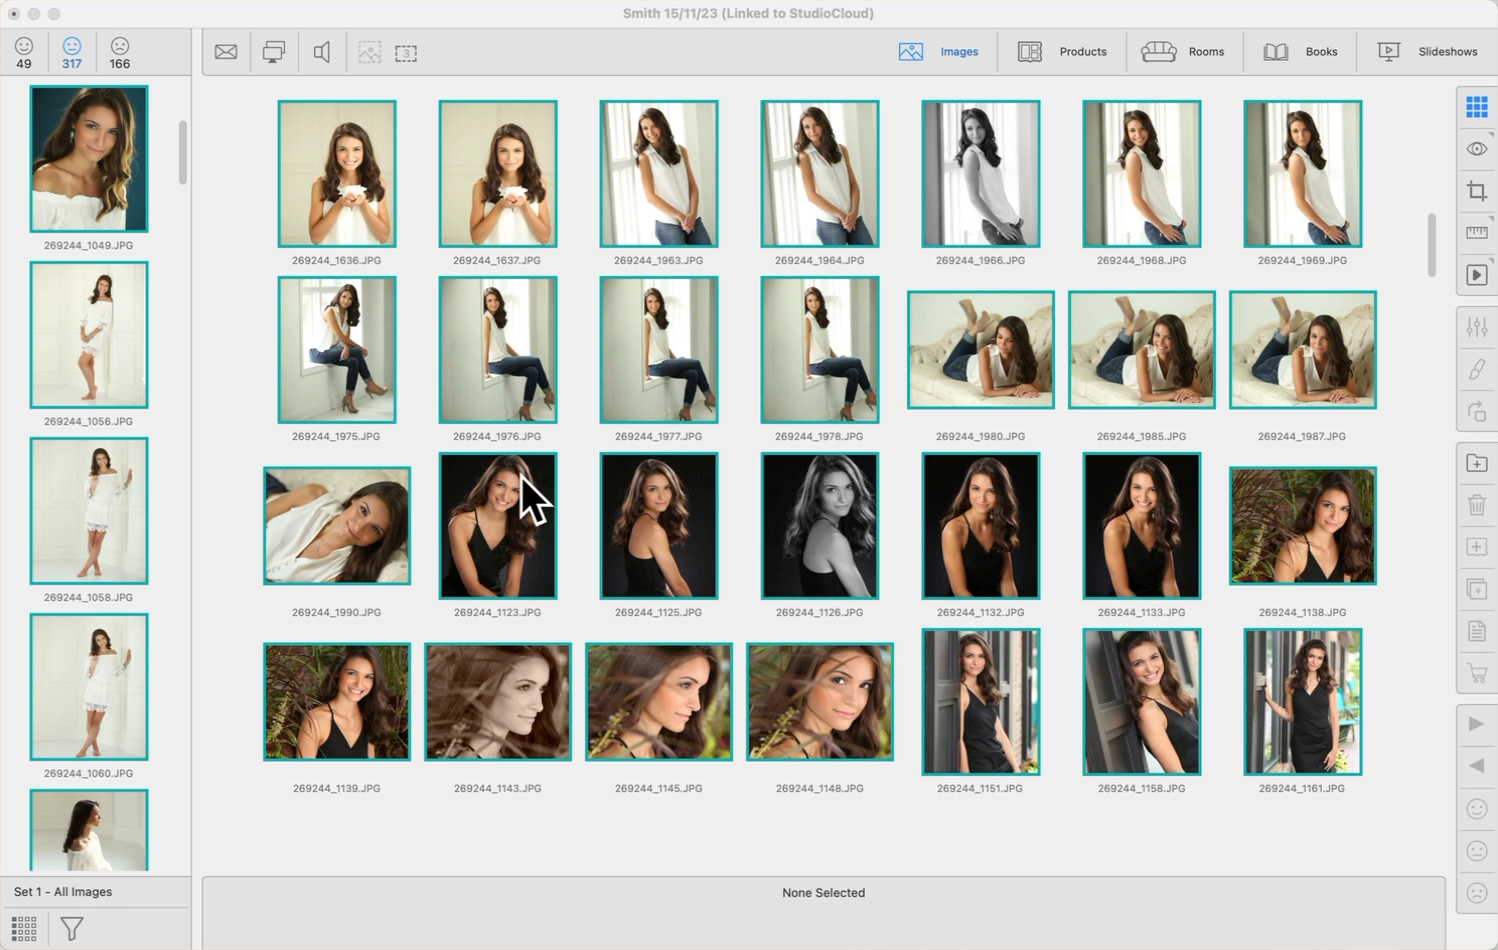
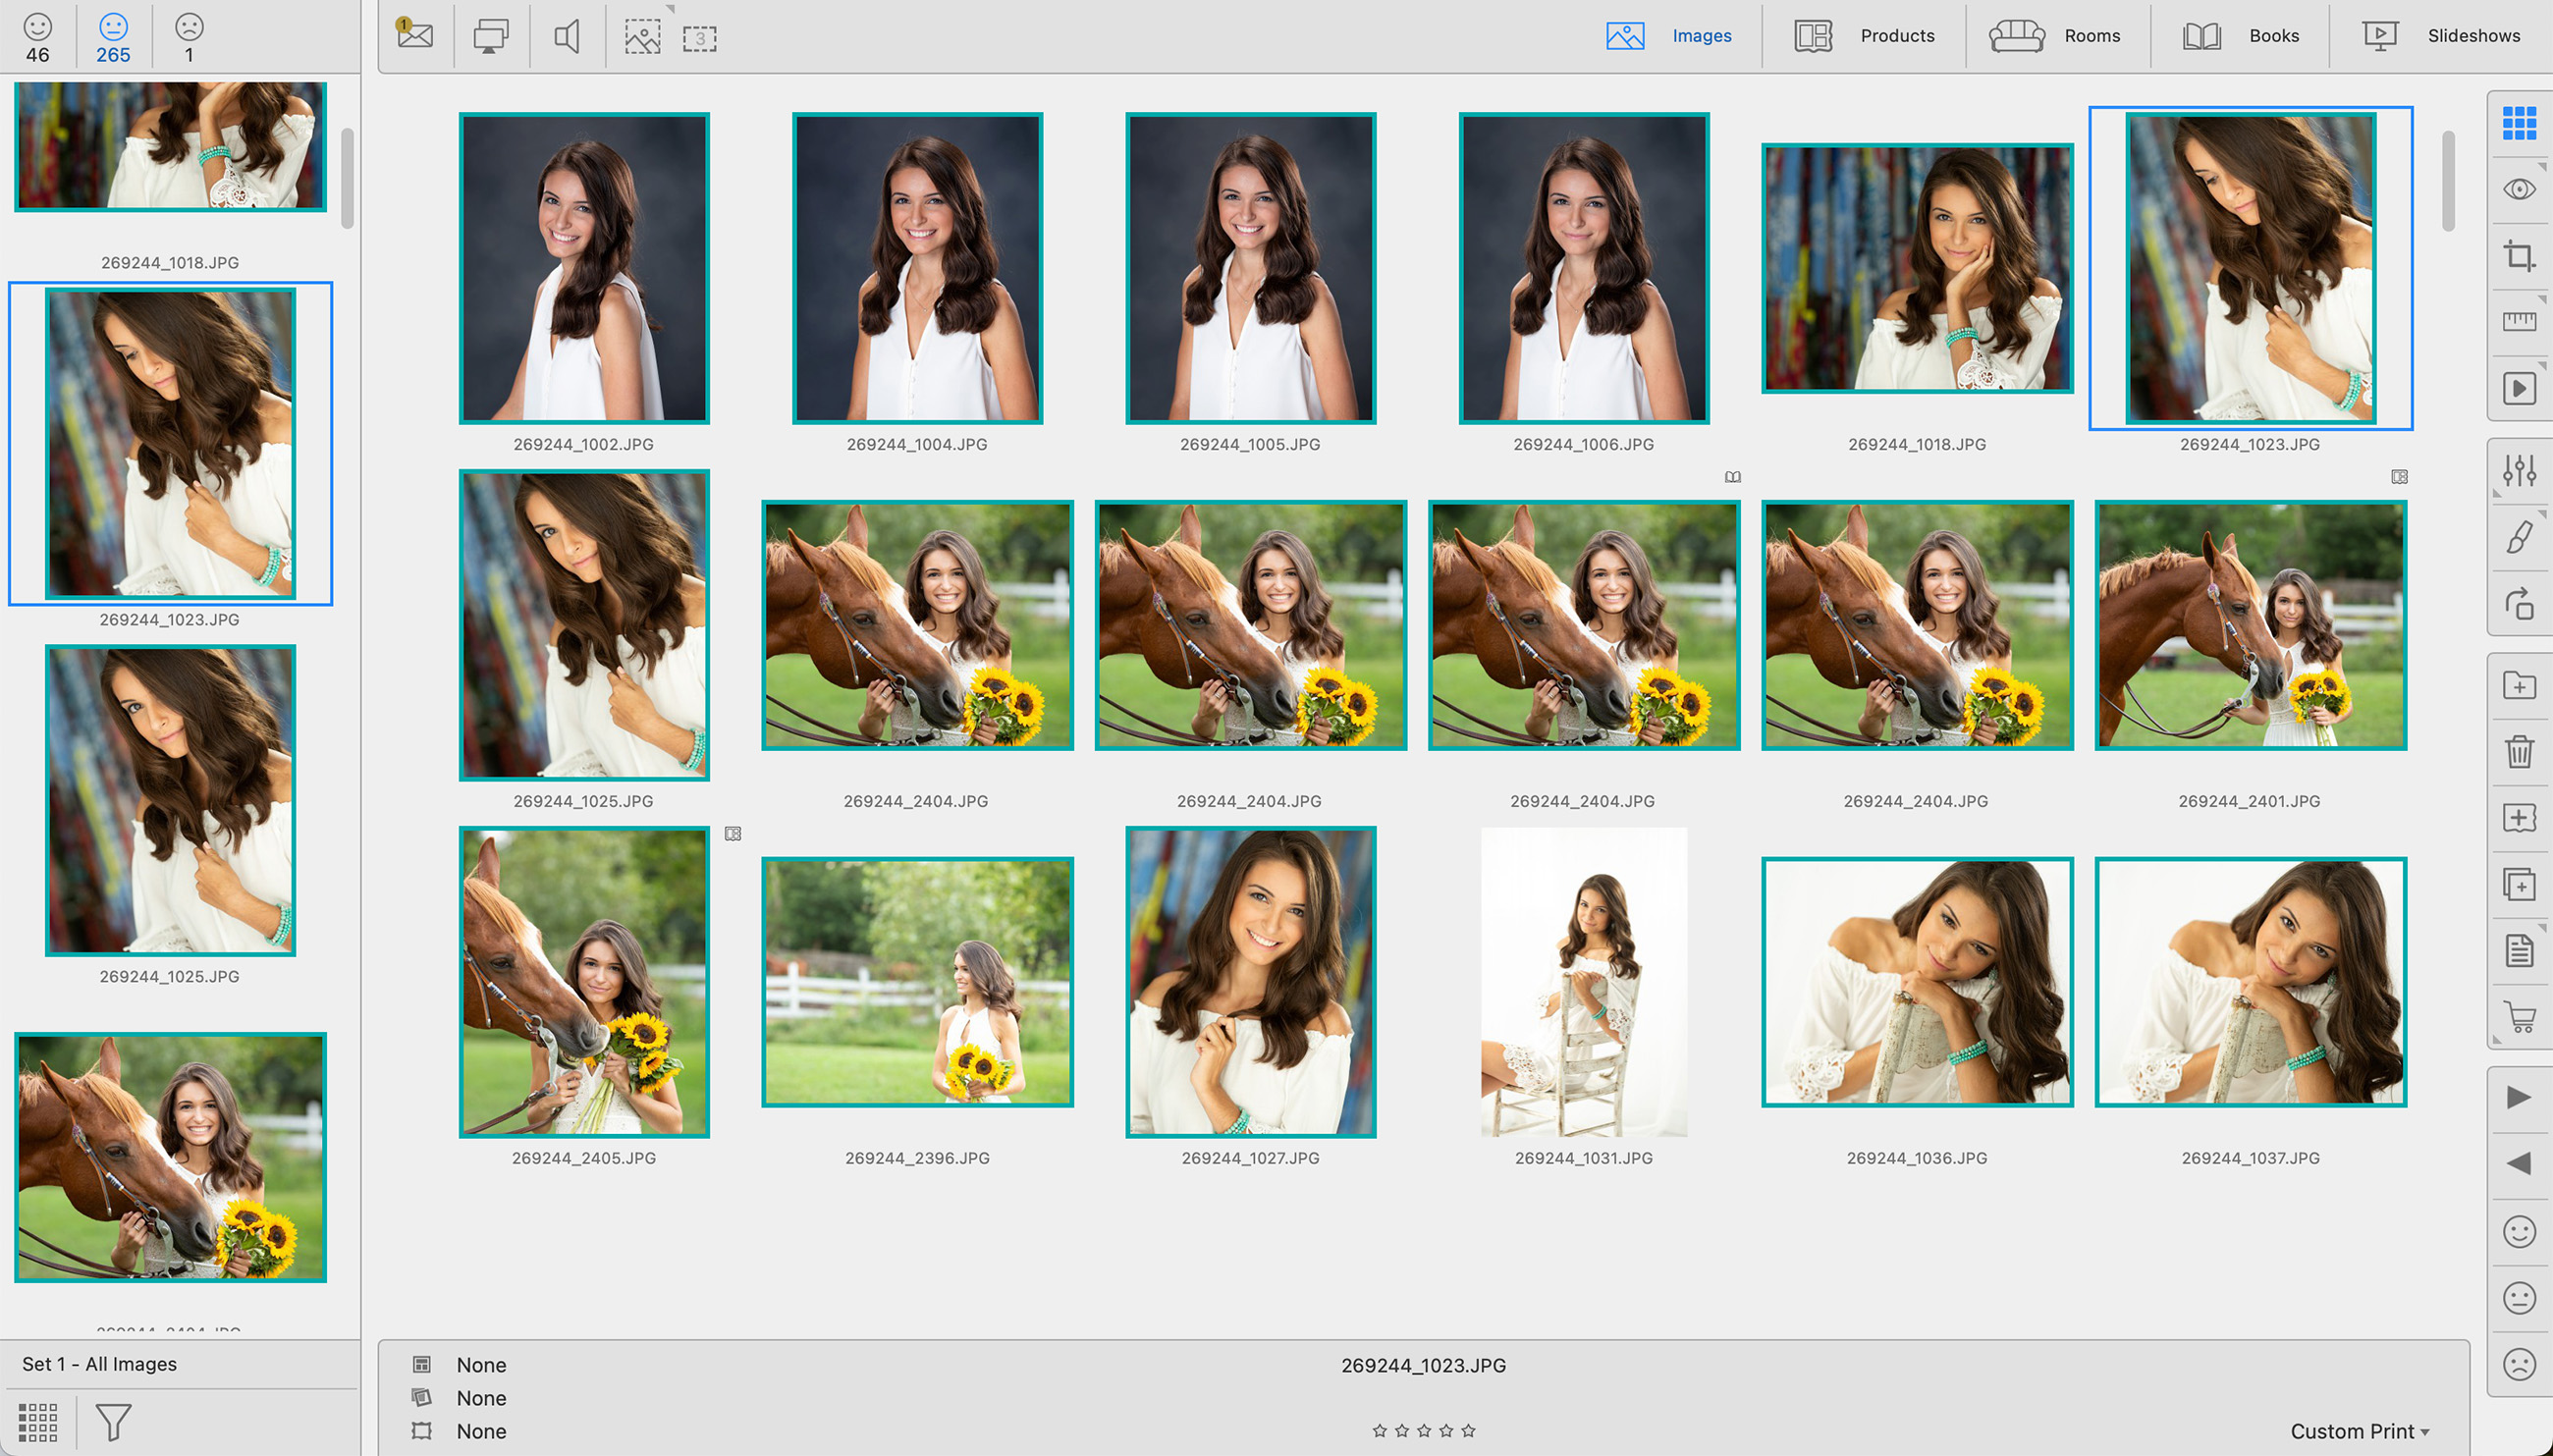
Creating Print Products from Working with Images
- Select an image (or multiple images) and click on the Create Print Product tool
 .
. - The Print Products will be created, and you will be redirected to Working with Products.
- From Working with Products, you can further refine the print product using all the tools available.
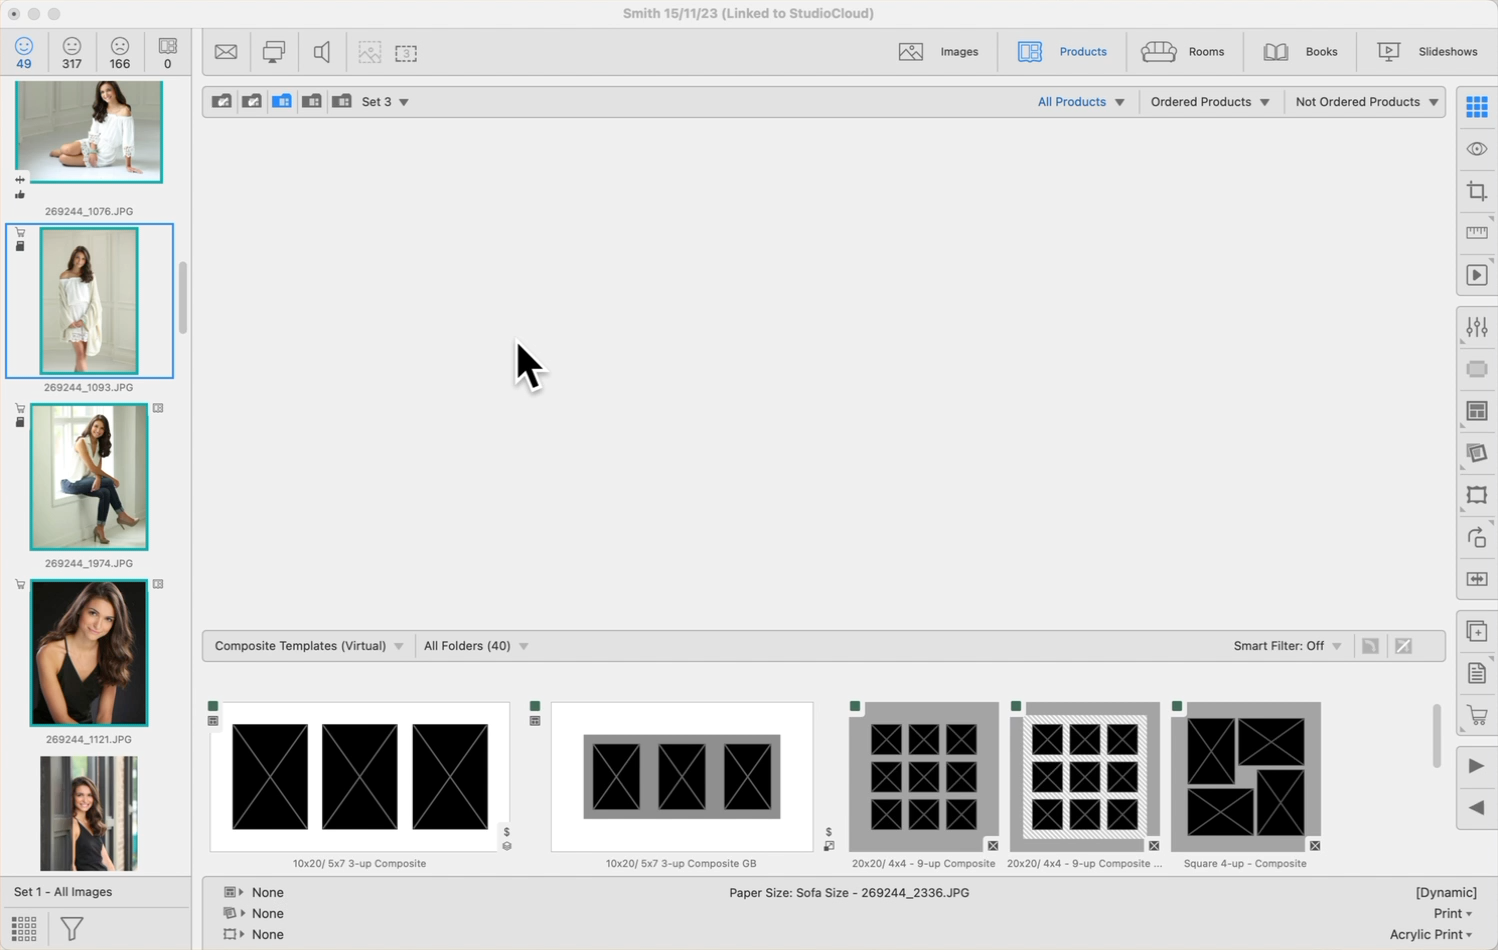
Creating Print Products Using Print Templates
- Find and choose the print product template from the Resource Area.
- Drag the template into the display area.
- Populate the template with an image from the Image List by dragging the image onto the template.
There are a variety of different ways to create products. Products are created by adding images to templates.
- Select a template from the Resource Area and drag it up to the Display Area. A new product based on that template will be added to the album. You can then drag images from the Image List into the product's thumbnail.
- Double-clicking on a template in the Resource Area will take you directly to Show view. From there, you can drag and add images to the selected template.
- You can drag and drop one or multiple images from the image list into a template in the Resource Area. This will automatically add the images to the template in the Display Area.
To remove a product from the album, select the product in Thumbnail view, and press the DeleteBackspace key.
If you make a mistake, go to the top menu, Edit > Undo. Or use the shortcut Cmd + z.Ctrl + z.
Sub-tabs under "Working with Modes" in the Working with Products section help organize and display both ordered and unordered products.

There are 5 sets available when Working with Products, Rooms, Books, and Slideshows. Sets are located on the top left-hand side just above the thumbnails. Sets can be used to group your items together. This may be useful, for example, if you have created a large number of products and want to organize them.
These Sets work in a very similar way to Image Sets. Click on the drop-down arrow next to "Set 1" to reveal all sets.
![]()
- From here you can choose to view the items from a particular set, show all the sets, or edit the set names.
- By default, you will always be working within "Set 1."
- A checkmark appears next to the currently open set.
- The item count is shown next to each set name.
Show All Sets
Selecting "Show all Sets" will reveal all 5 sets. Each set is represented by a folder.

- The currently selected set will be highlighted.
- A checkmark on the folder indicates there are items in that set.
- Clicking on a set will open the folder and show all items in the Display Area below.
Moving Items to a Set
- Select "Show All Sets" from the drop-down menu.
- Select one or more items and drag and drop them into one of the five sets.
- A magenta box will appear around the set you are currently dragging items into.
While in Thumbnail view or Show view, you can quickly move any selected items to another set using the keyboard keys “1” to “5” which correspond to Sets 1 to 5. For example, pressing the “2” key will move the selected item into the second set.
If you hold the OptionAlt key down when dropping an item into a set, then the item will be automatically duplicated, and the duplicate will be placed into the designated set.
Editing Set Names
Select "Edit Set Names" from the drop-down menu. Alternatively, go to the top menu, File > Change Set Names. The Edit Set Name dialog will appear.
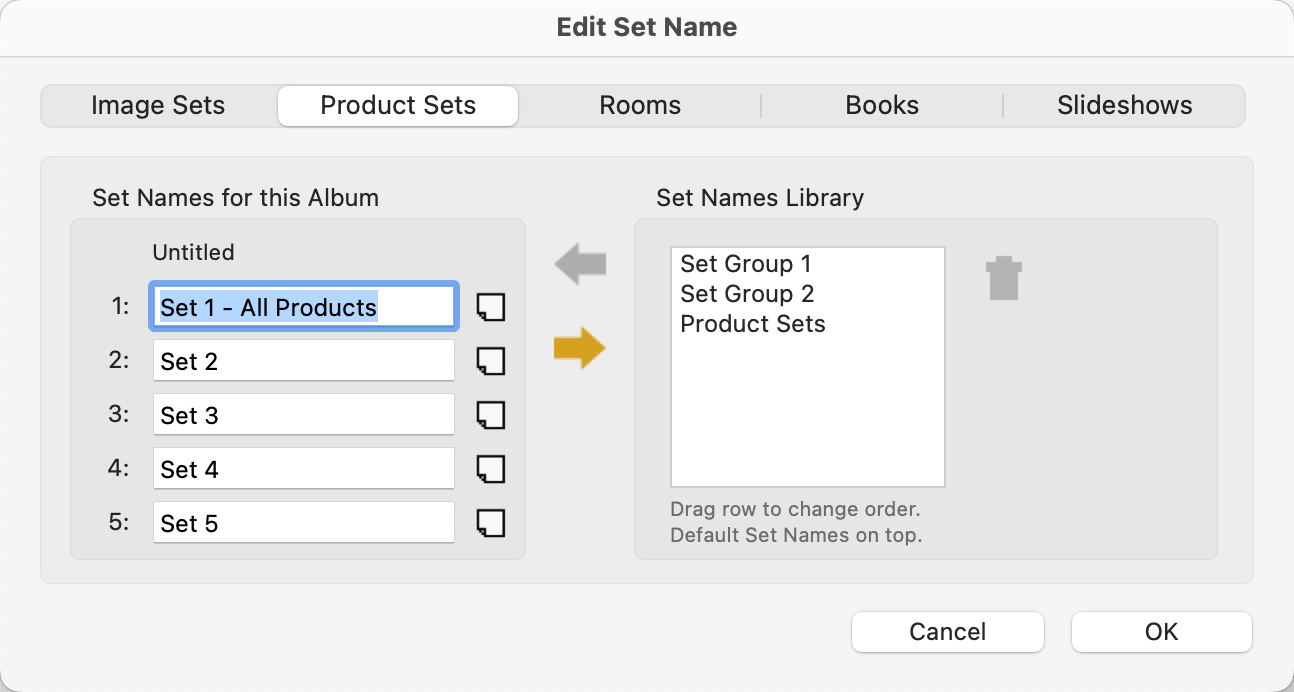
- You can either type in individual names for the sets or select the names from the Set Names Library.
- Remember that "Set 1" will always be the default set in which images are loaded into.
Set Names Library
You can save frequently used Set names into the Set Name Library using the Save Arrow button (the lower one). Clicking on the arrow will make a copy of the set names you have created. You will be prompted to enter a name for the group. This group will then be saved and available to use in other working with modes.
Loading Set Names
By default, the top row of names in the Set Name Library is used when a new Album is started. To change this, drag the row of set names that you wish to use to the top row. To apply set names from the Library to your current Album, select the row of names that you want, click the Load Arrow button (the top one), and click OK.
Deleting Set Names
To delete a set of Set Names from the Library, select the row and click the Trash button![]() . You cannot delete the last set.
. You cannot delete the last set.
Set Notes
You have the option of adding notes to each set. Click on the Notes tag ![]() to open the Set Notes dialog.
to open the Set Notes dialog.
You can adjust the size of all thumbnail images to small, medium, or large. Go to the top menu, View > Thumbnail Size. This will affect the thumbnail size across all working with modes.
Large
Medium
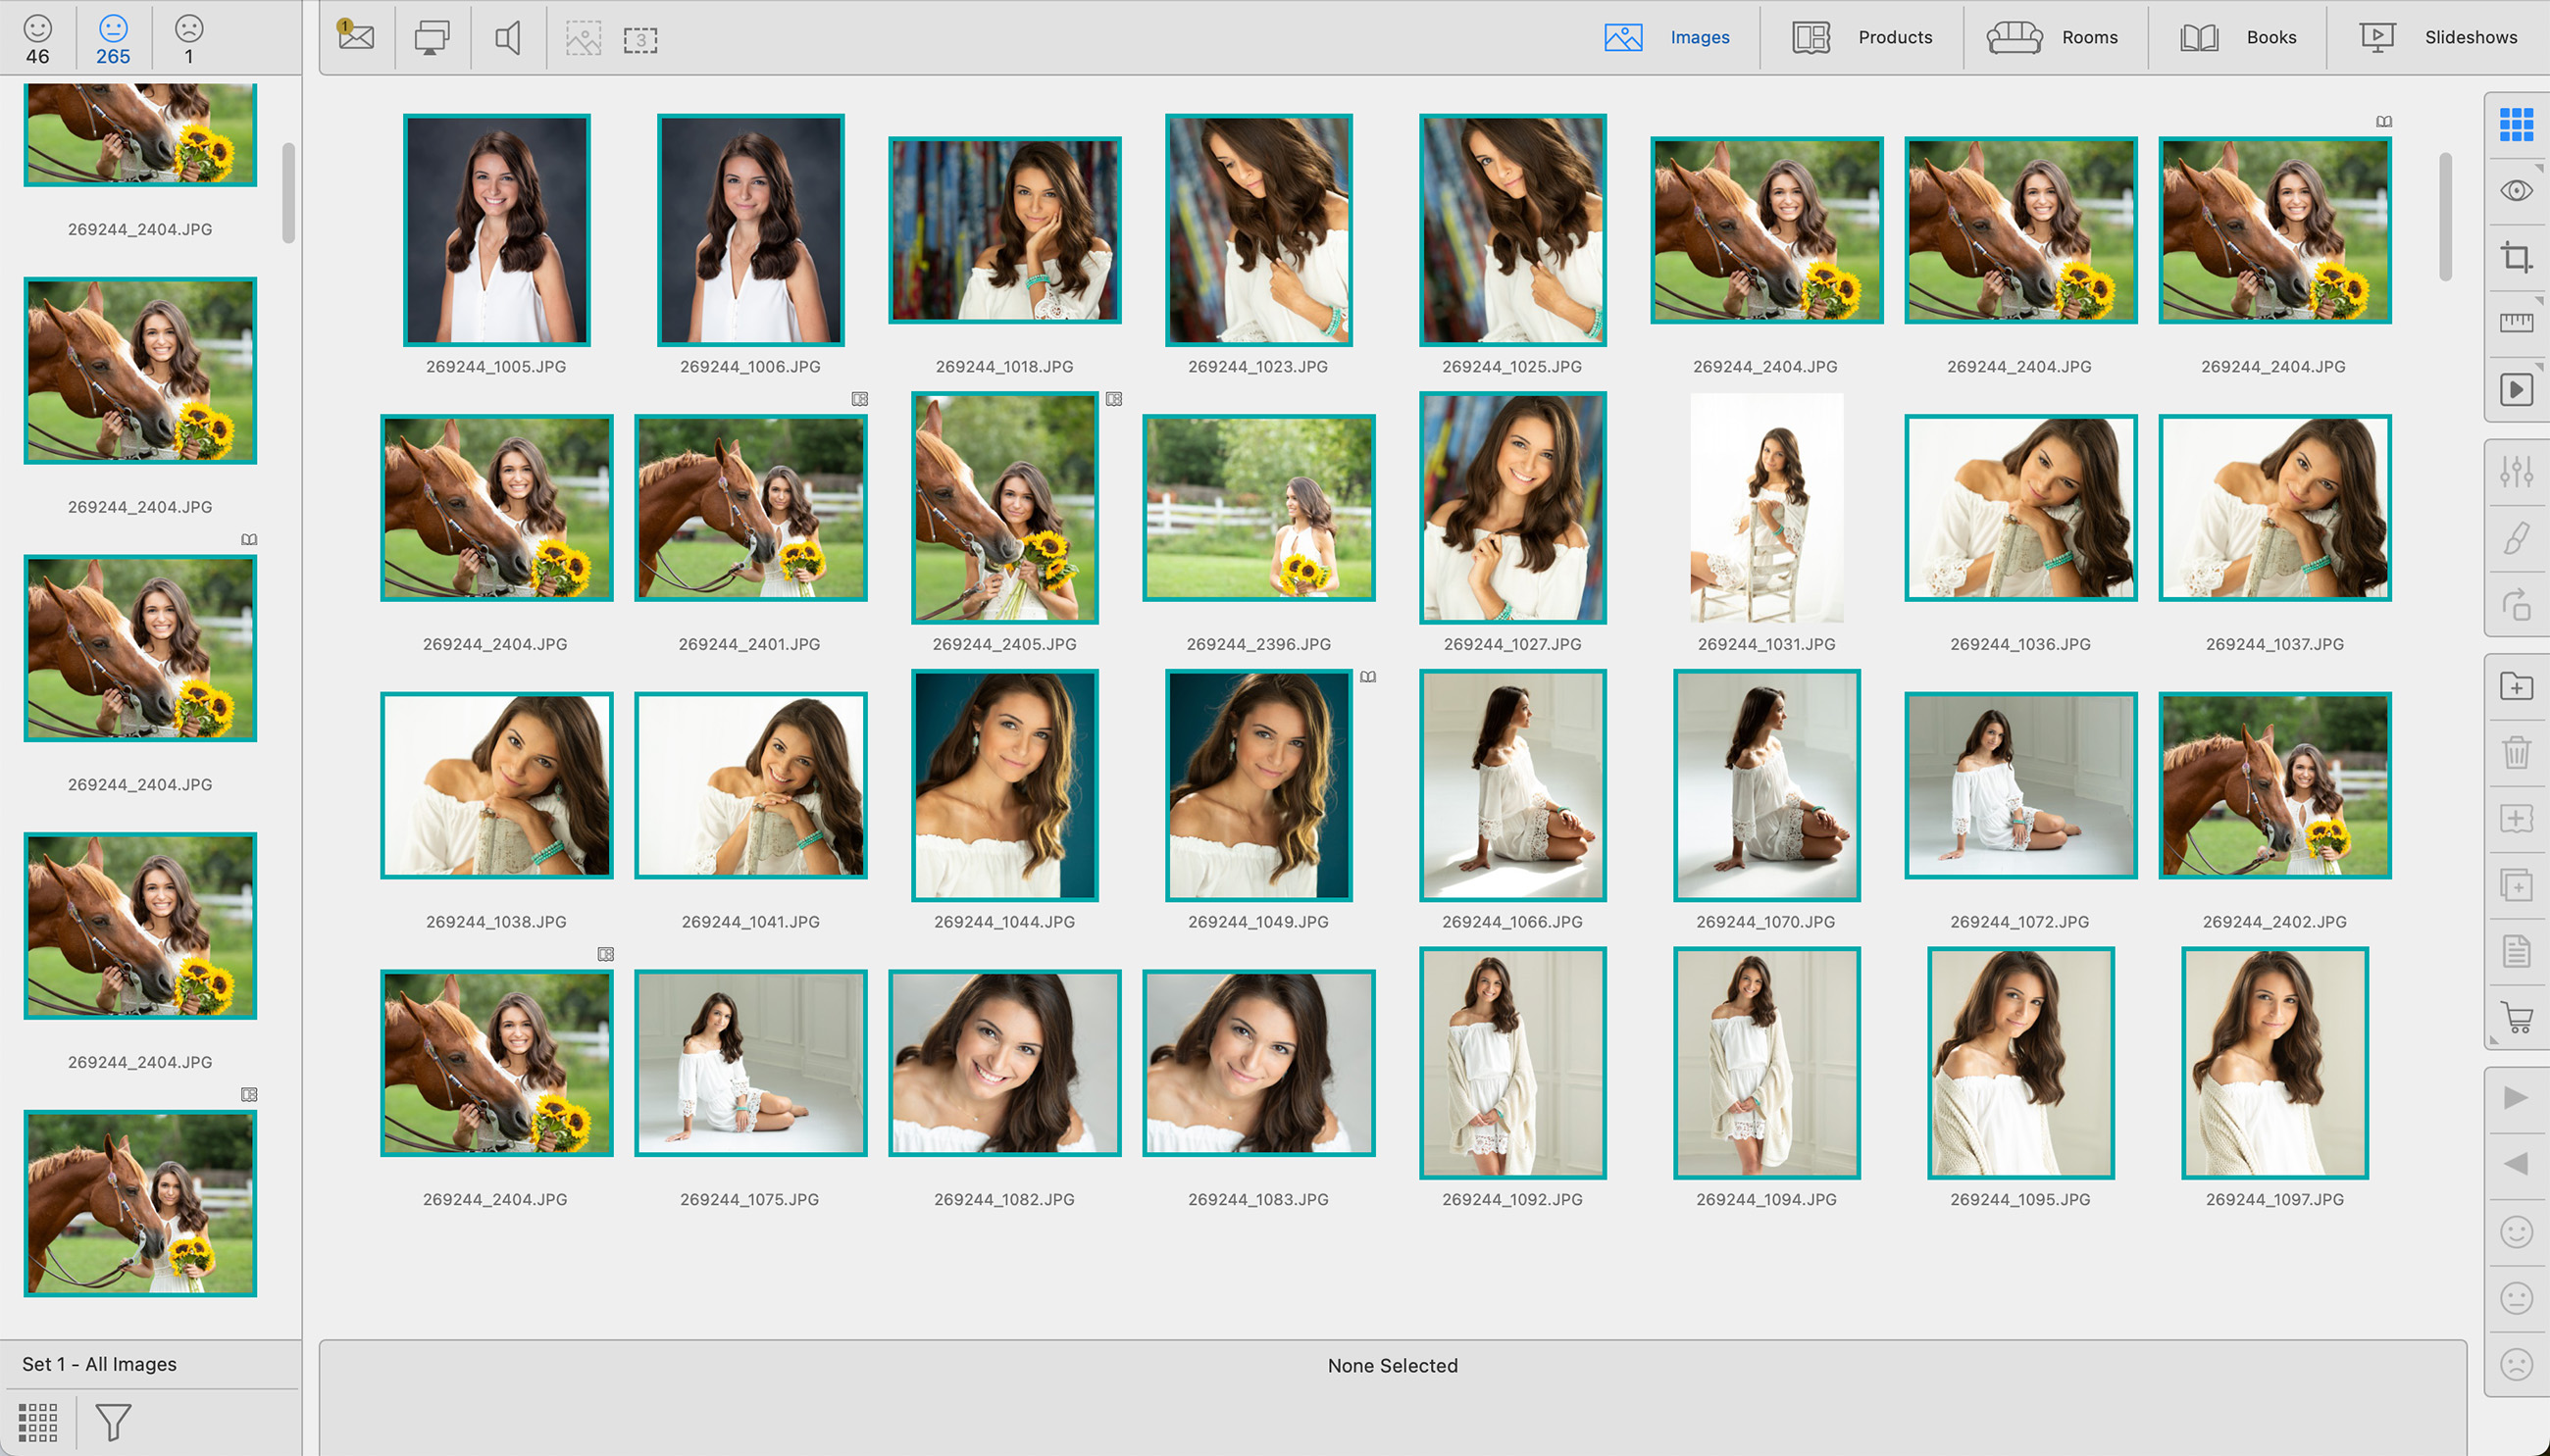
Small
If you have a large number of products or rooms, they may not all be able to fit inside the Display Area. A scroll bar will appear on the right-hand side. If you want to view more of the product/room thumbnails, you may want to increase the Display Area size. Use the up and down arrows ![]()
![]() on the top-right of the Template Resource Area (next to the smart filter) to show more or less rows of available resources. The arrows will remain hidden until you mouse over them. This will increase the Display Area.
on the top-right of the Template Resource Area (next to the smart filter) to show more or less rows of available resources. The arrows will remain hidden until you mouse over them. This will increase the Display Area.
The same concept is used when Working with Rooms. You can view more or less of the library room images below by using the up and down arrows ![]()
![]() .
.

Tools Available in Thumbnail View
Use the Previous/Next Size tools to change the size of a product.
- The sizes available as well as the order in which they appear are based on the setup of your Paper Sizes.
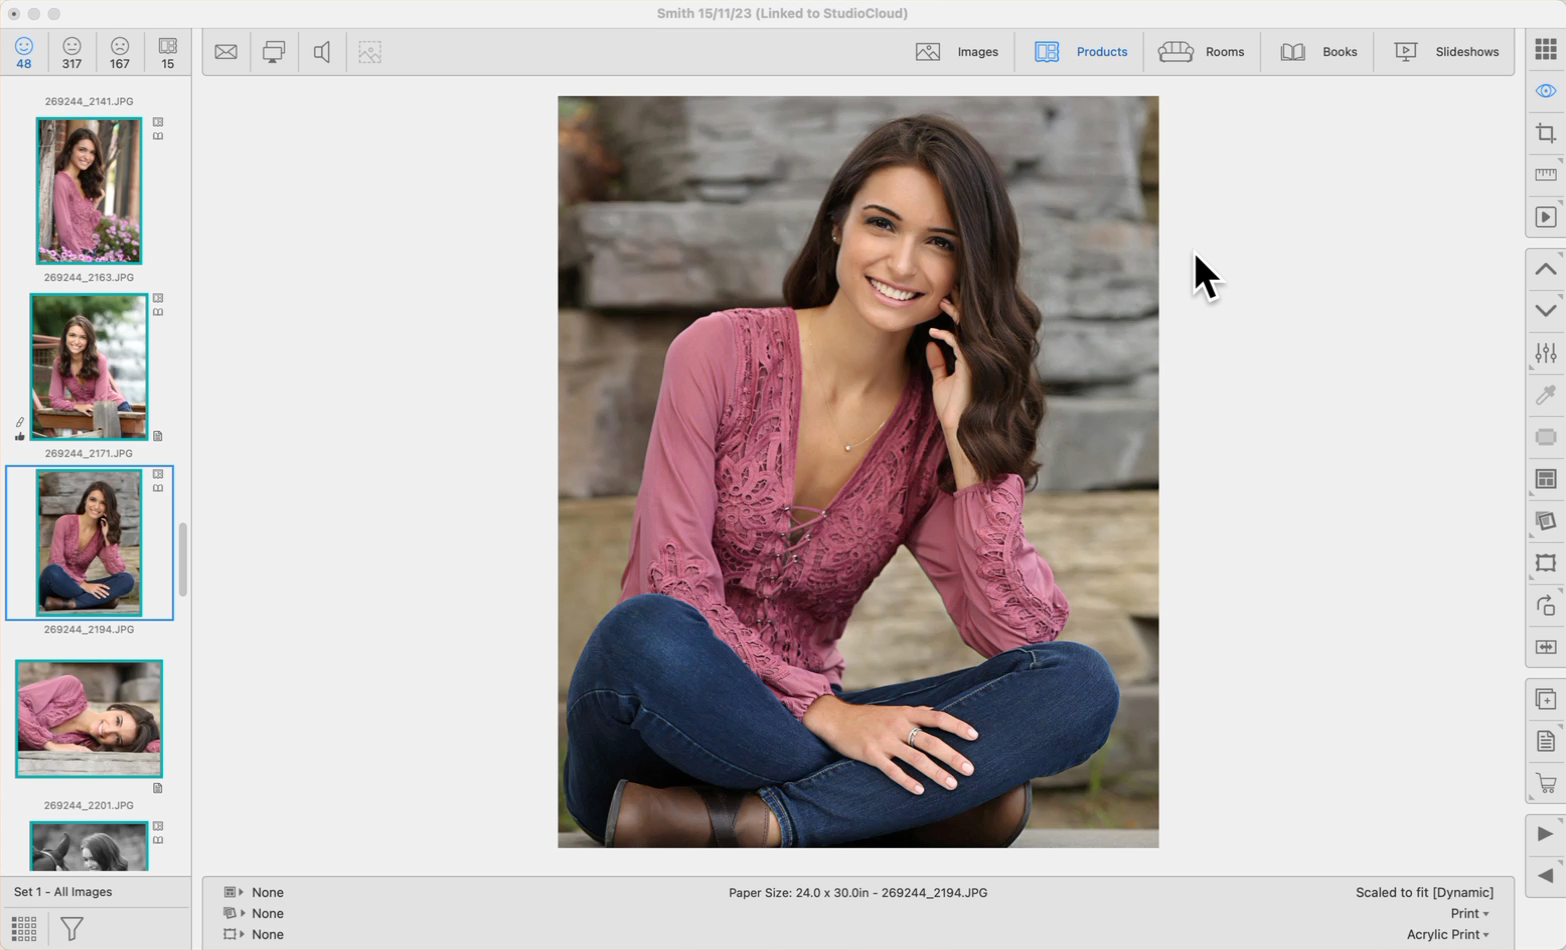
- When first shown in Room view or Actual Size view, prints are sized at the "Starting Product Size" as specified in your Settings.
- Products using a product template will initially be shown at the template’s Design Size. Use the tools to size up or down.
- If you are using a fixed-sized template, the Previous/Next Size tools are inapplicable.
Right-Click Feature - For Prints and Gallery Wraps
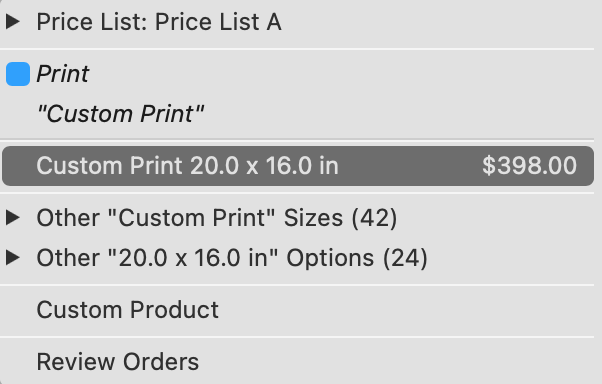
There is a gray triangle in the corner of the Previous/Next Size tools. This indicates you have the option to right-click. When you right-click on either tool, a popup menu appears with a list of all the product sizes available. You can directly choose a size here.
- The sizes shown are based on the available product sizes within the assigned presentation option. This is also known as Product Filtering.
- Alternate sizes (based on Paper Sizes) can be displayed by holding the OptionAlt key and right-clicking on the tool. Sizes shown without a $ would require ordering as a Custom Product.
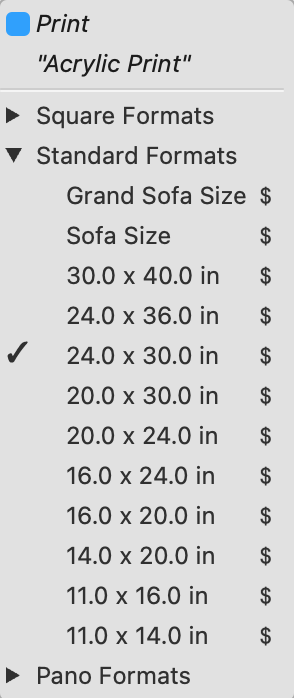
- The Product Type is listed at the top, followed by the Presentation Option.
- Use the drop-down arrow to view sizes within Paper Size folders.
- A checkmark appears next to the currently selected paper size.
Right-Click Feature - For Product Templates
- For Fixed Size Templates, no other sizing options are available.
- For Dynamically Sized Templates, the sizes available will match the aspect ratio of the product. For example, if you are selecting a size for a square product template, only other square sizes will be available.
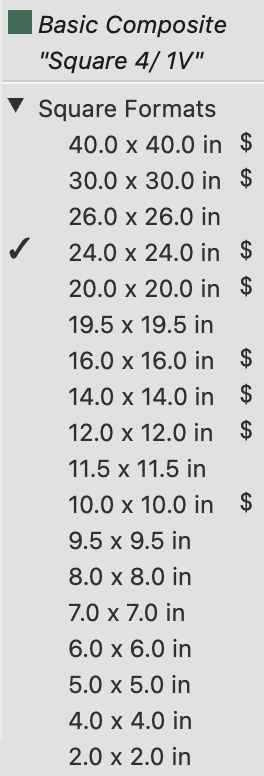
- The Product Type is listed at the top, followed by the Product Template Name.
- All paper sizes with the same aspect ratio will be listed. Those without a $ will need to be ordered as a Custom Product.
- A checkmark appears next to the currently selected paper size.
Want to reverse the order of your paper sizes? Click on Sorting Paper Sizes/Display Order to learn more.
Use the Previous/Next Size tools to change the size of a product.
- The sizes available as well as the order in which they appear are based on the setup of your Paper Sizes.
- When first shown in Room view or Actual Size view, prints are sized at the "Starting Product Size" as specified in your Settings.
- Products using a product template will initially be shown at the template’s Design Size. Use the tools to size up or down.
- If you are using a fixed-sized template, the Previous/Next Size tools are inapplicable.
Right-Click Feature - For Prints and Gallery Wraps
There is a gray triangle in the corner of the Previous/Next Size tools. This indicates you have the option to right-click. When you right-click on either tool, a popup menu appears with a list of all the product sizes available. You can directly choose a size here.
- The sizes shown are based on the available product sizes within the assigned presentation option. This is also known as Product Filtering.
- Alternate sizes (based on Paper Sizes) can be displayed by holding the OptionAlt key and right-clicking on the tool. Sizes shown without a $ would require ordering as a Custom Product.
- The Product Type is listed at the top, followed by the Presentation Option.
- Use the drop-down arrow to view sizes within Paper Size folders.
- A checkmark appears next to the currently selected paper size.
Right-Click Feature - For Product Templates
- For Fixed Size Templates, no other sizing options are available.
- For Dynamically Sized Templates, the sizes available will match the aspect ratio of the product. For example, if you are selecting a size for a square product template, only other square sizes will be available.
- The Product Type is listed at the top, followed by the Product Template Name.
- All paper sizes with the same aspect ratio will be listed. Those without a $ will need to be ordered as a Custom Product.
- A checkmark appears next to the currently selected paper size.
Want to reverse the order of your paper sizes? Click on Sorting Paper Sizes/Display Order to learn more.
Use the Previous/Next Stack tools to cycle through your stacked sizes. Wall Groupings, for example, are always a fixed size. To show different sizing options, you can create Stacked Sizes in the Product Editor. Click on Using Stacked Templates to learn more.
- Click on the Previous
 or Next
  Stack tools to go up or down a size.
 - Right-Click on the Previous or Next Stack tool and choose a size from the list.

Right-Clicking on the Previous/Next Stack tool:
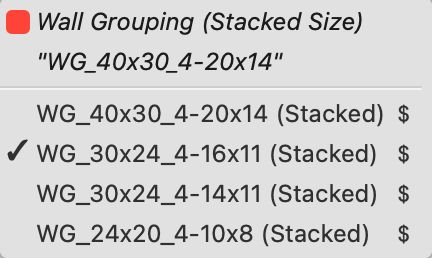
- The Product Type (Wall Grouping) is listed at the top, followed by the template name.
- All available stacked sizes will be listed.
- A checkmark appears next to the currently selected Stack.
Use the Previous/Next Stack tools to cycle through your stacked sizes. Wall Groupings, for example, are always a fixed size. To show different sizing options, you can create Stacked Sizes in the Product Editor. Click on Using Stacked Templates to learn more.
- Click on the Previous or Next Stack tools to go up or down a size.
- Right-Click on the Previous or Next Stack tool and choose a size from the list.
Right-Clicking on the Previous/Next Stack tool:
- The Product Type (Wall Grouping) is listed at the top, followed by the template name.
- All available stacked sizes will be listed.
- A checkmark appears next to the currently selected Stack.
Select an image (or an image within a product) and click on the Apply Effect tool. You can choose to apply an image effect or a custom effect. For more information, click on Applying Effects.
Image Effects
- B&W: Use the keyboard shortcut "B" to apply.
- Special Tint: Use the keyboard shortcut "S" to apply.
- Original: Use the keyboard shortcut "O" to revert to the original.
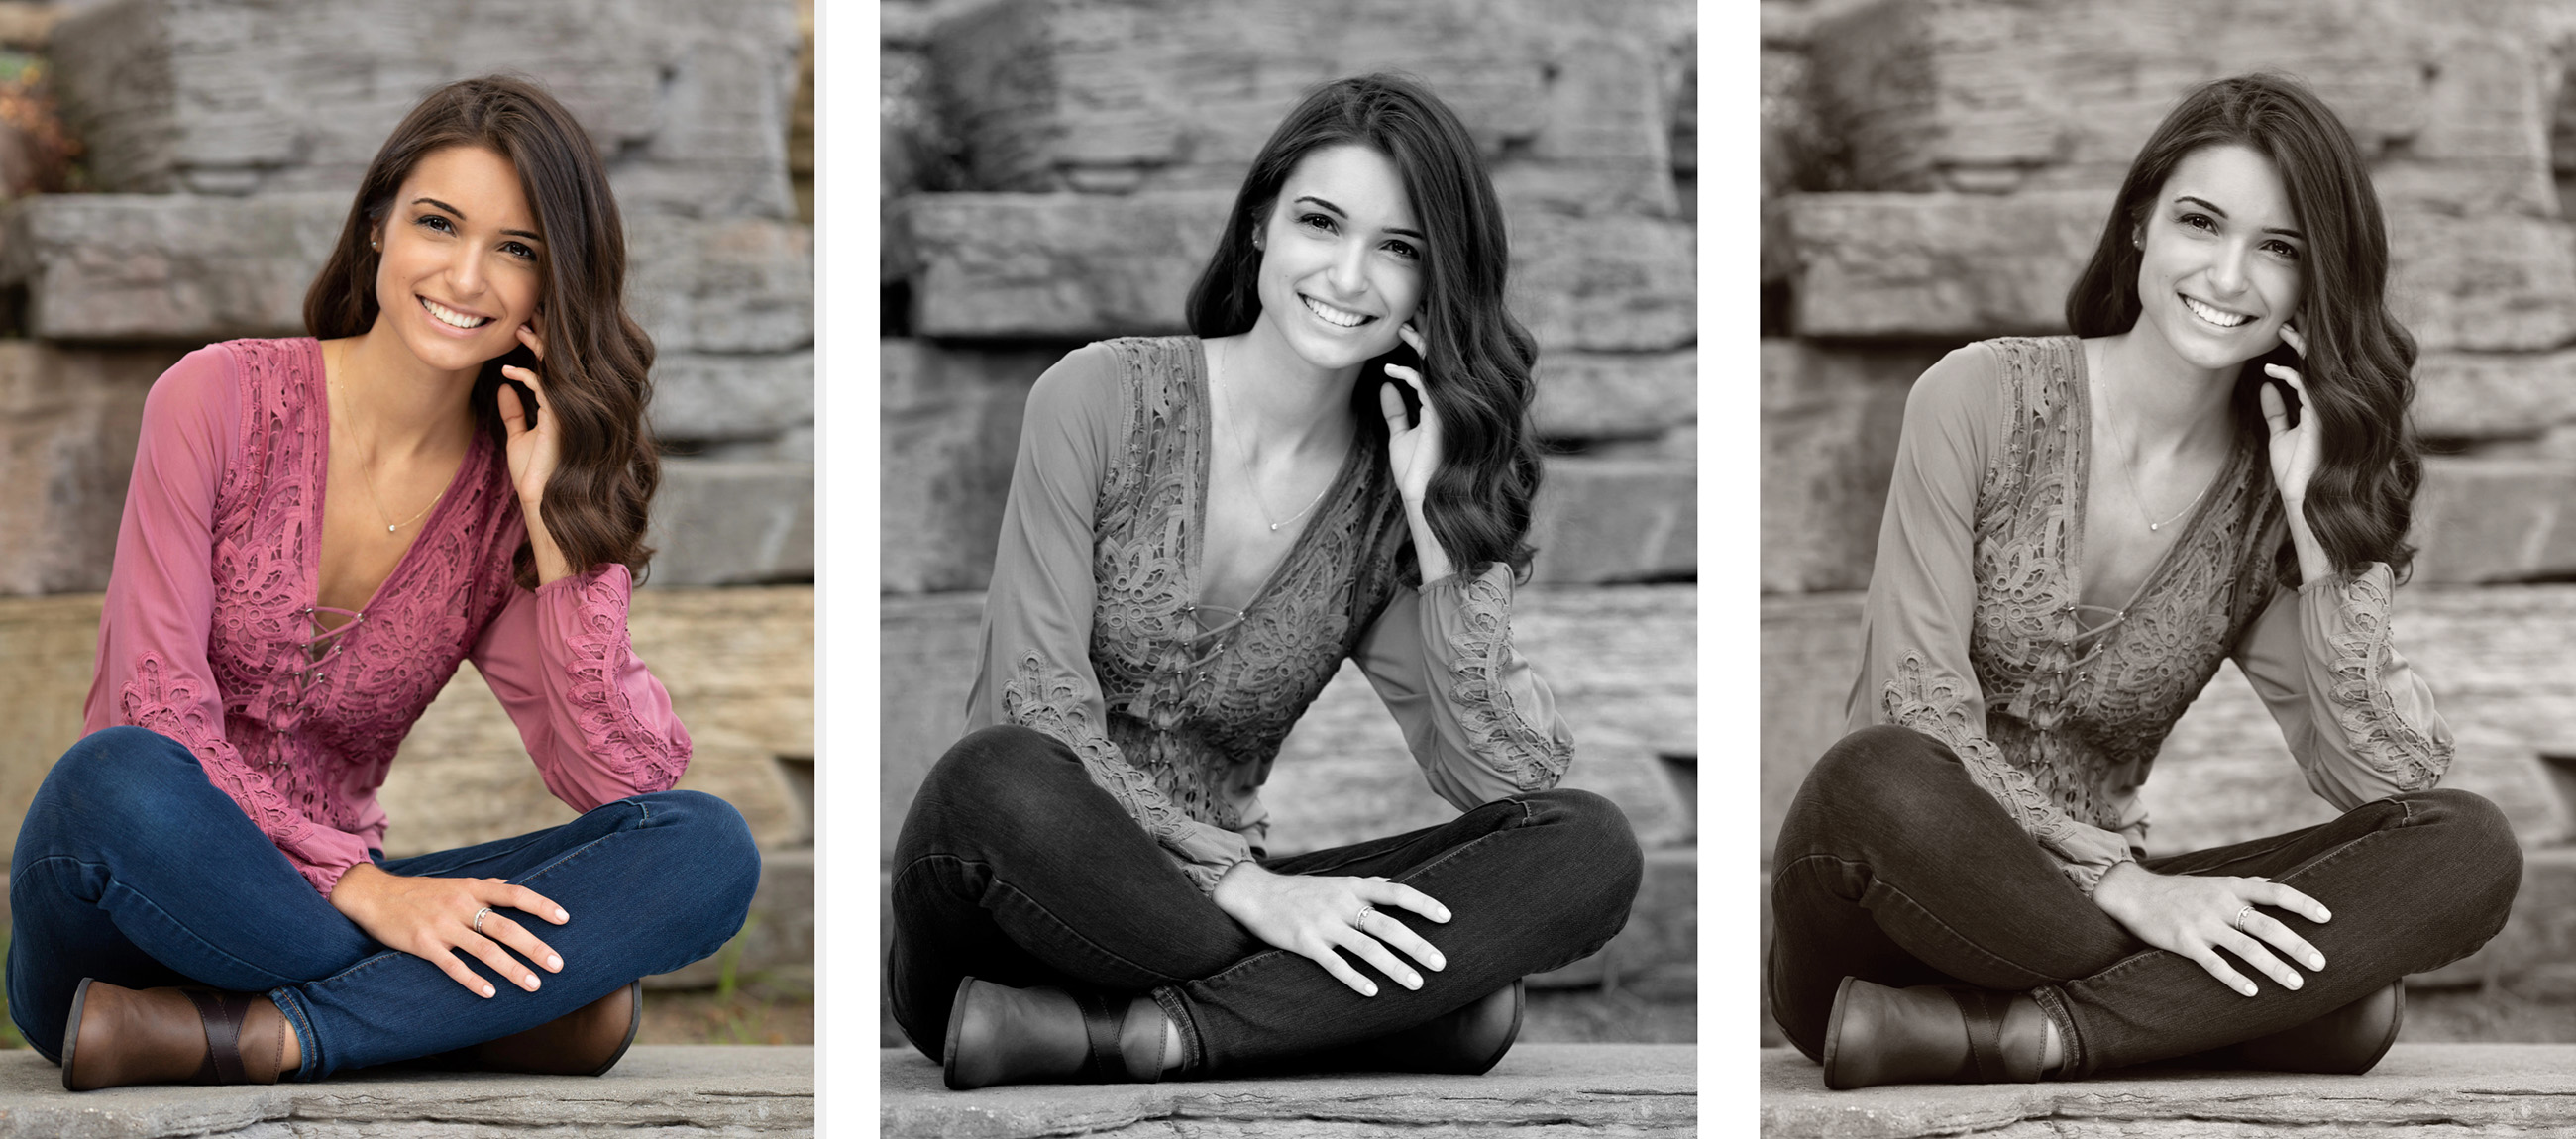
- Low & High-Key Vignette: Size and strength can be adjusted by going to the top menu, ProSelectEdit > Settings > Image Effects > Local Effects > Vignette Adjustments.
Custom Effects
If you have created any custom Photoshop actions, they will be listed below the Image Effects. By default, ProSelect will duplicate the image once an effect has been applied. To configure Custom Effects, click on the "Manage Custom Effects" option. This will take you to Settings, Custom Effects Actions.
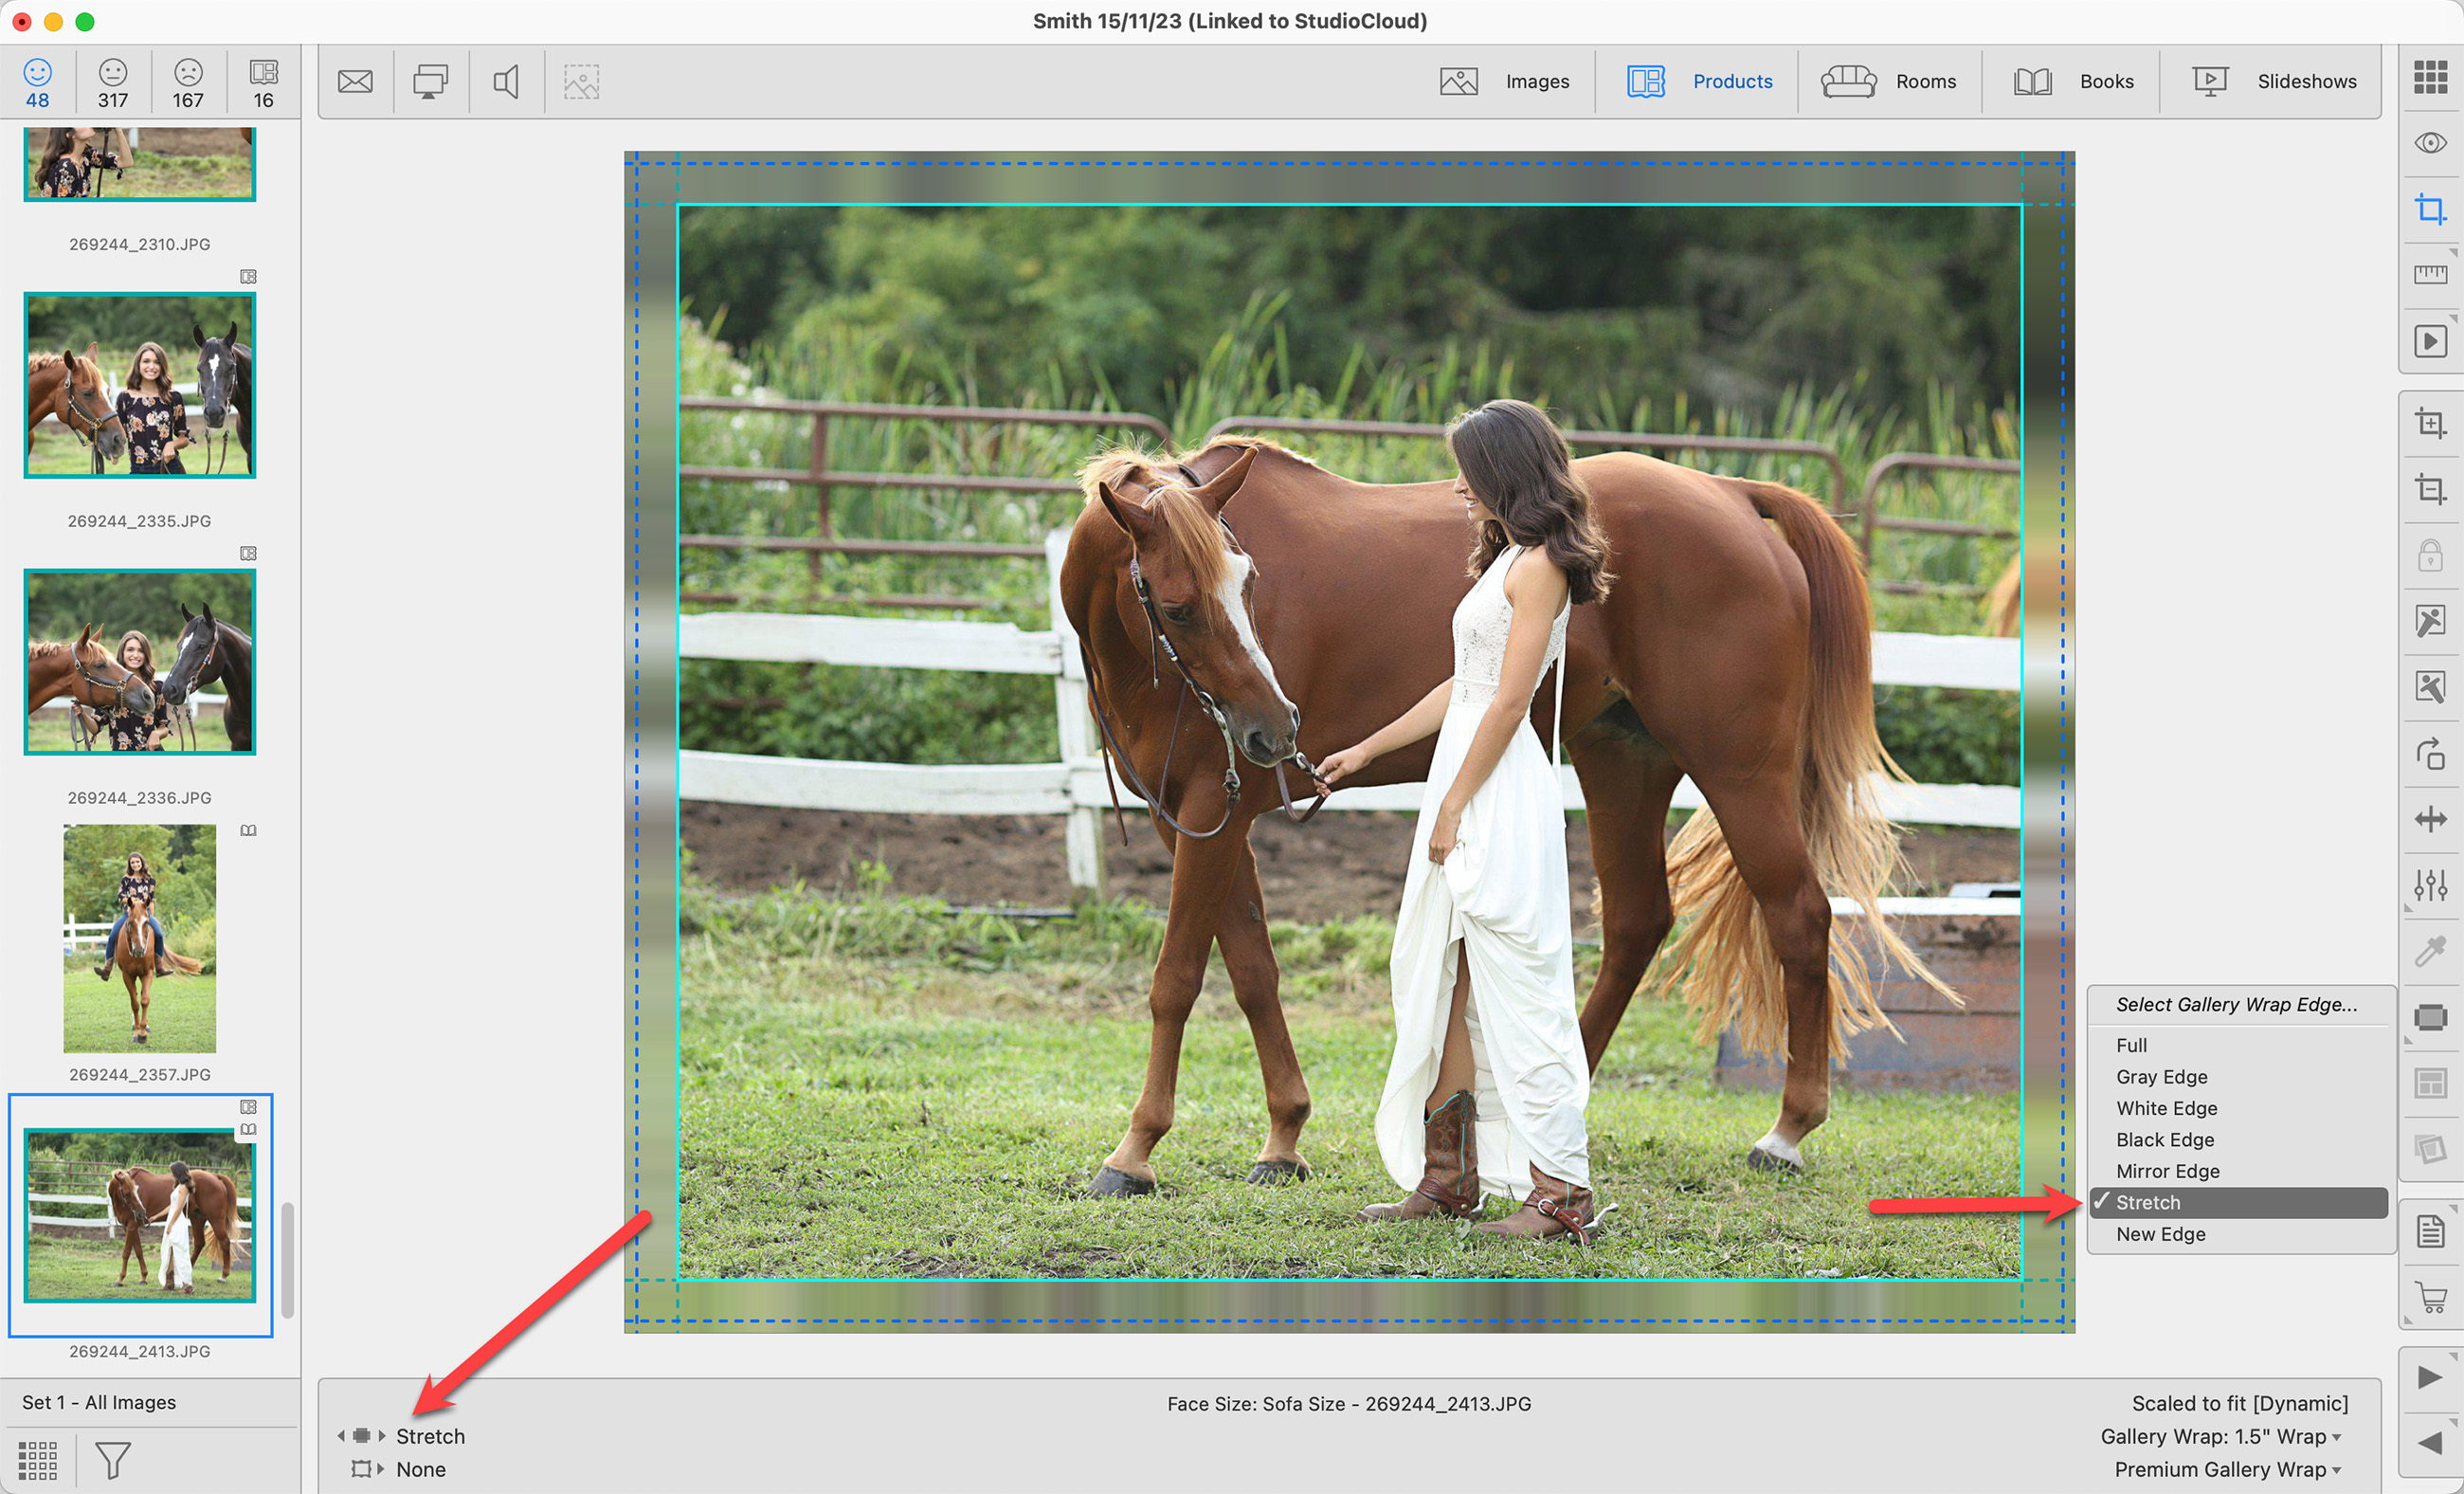
You can apply a gallery wrap edge to your product when in any View mode, but we recommend using Cropping view. In other View modes, only the face of the gallery wrap is visible. When working in Cropping view, the edges are visible as well.
Click on the Select Gallery Wrap Edge tool in the toolbar to see the drop-down menu of available edges. Gallery Wraps must have an edge applied. By default, Gallery Wrap Edges are set to "full." Open the Gallery Wrap Edges dialog by going to the top menu, Products > Gallery Wraps > Edge Treatments to add or edit your edges.
The currently applied Gallery Wrap Edge is shown in the left column of the Info Bar.
The Select Edge / Style Color tool ![]() allows you to customize the color of an applied solid color edge. After creating a custom-colored edge, you can save it for future use. Click here to learn more.
allows you to customize the color of an applied solid color edge. After creating a custom-colored edge, you can save it for future use. Click here to learn more.
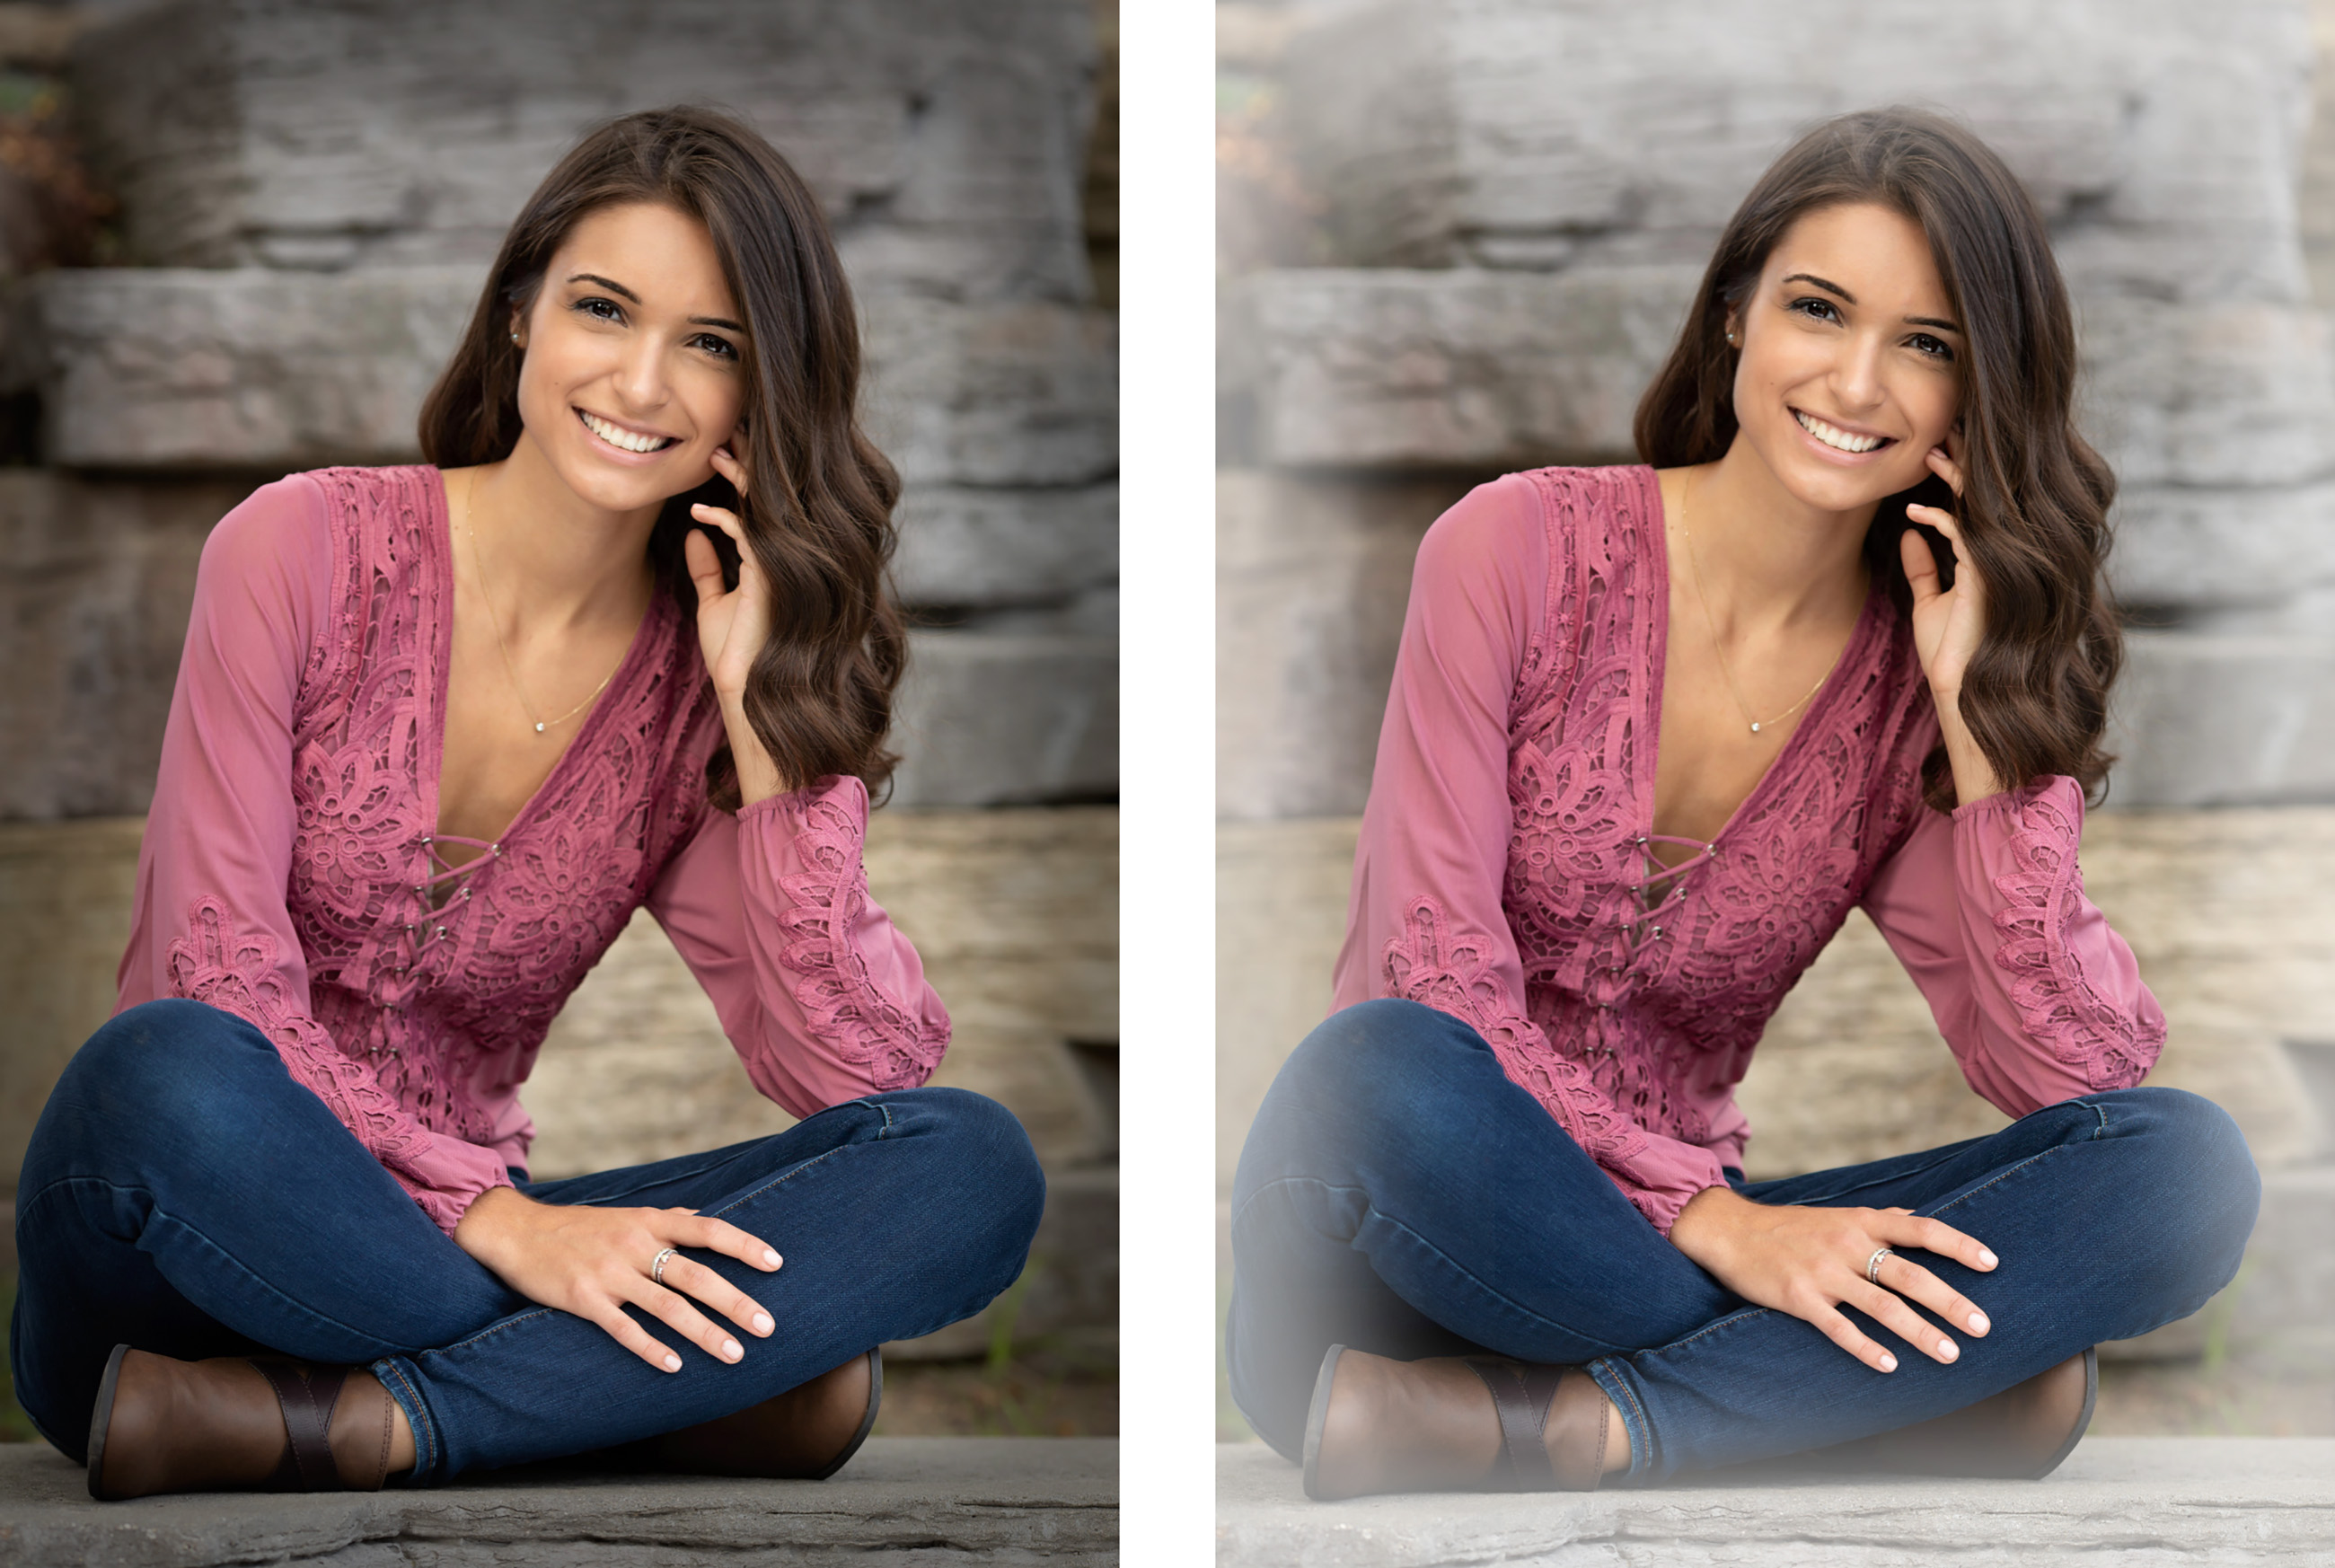
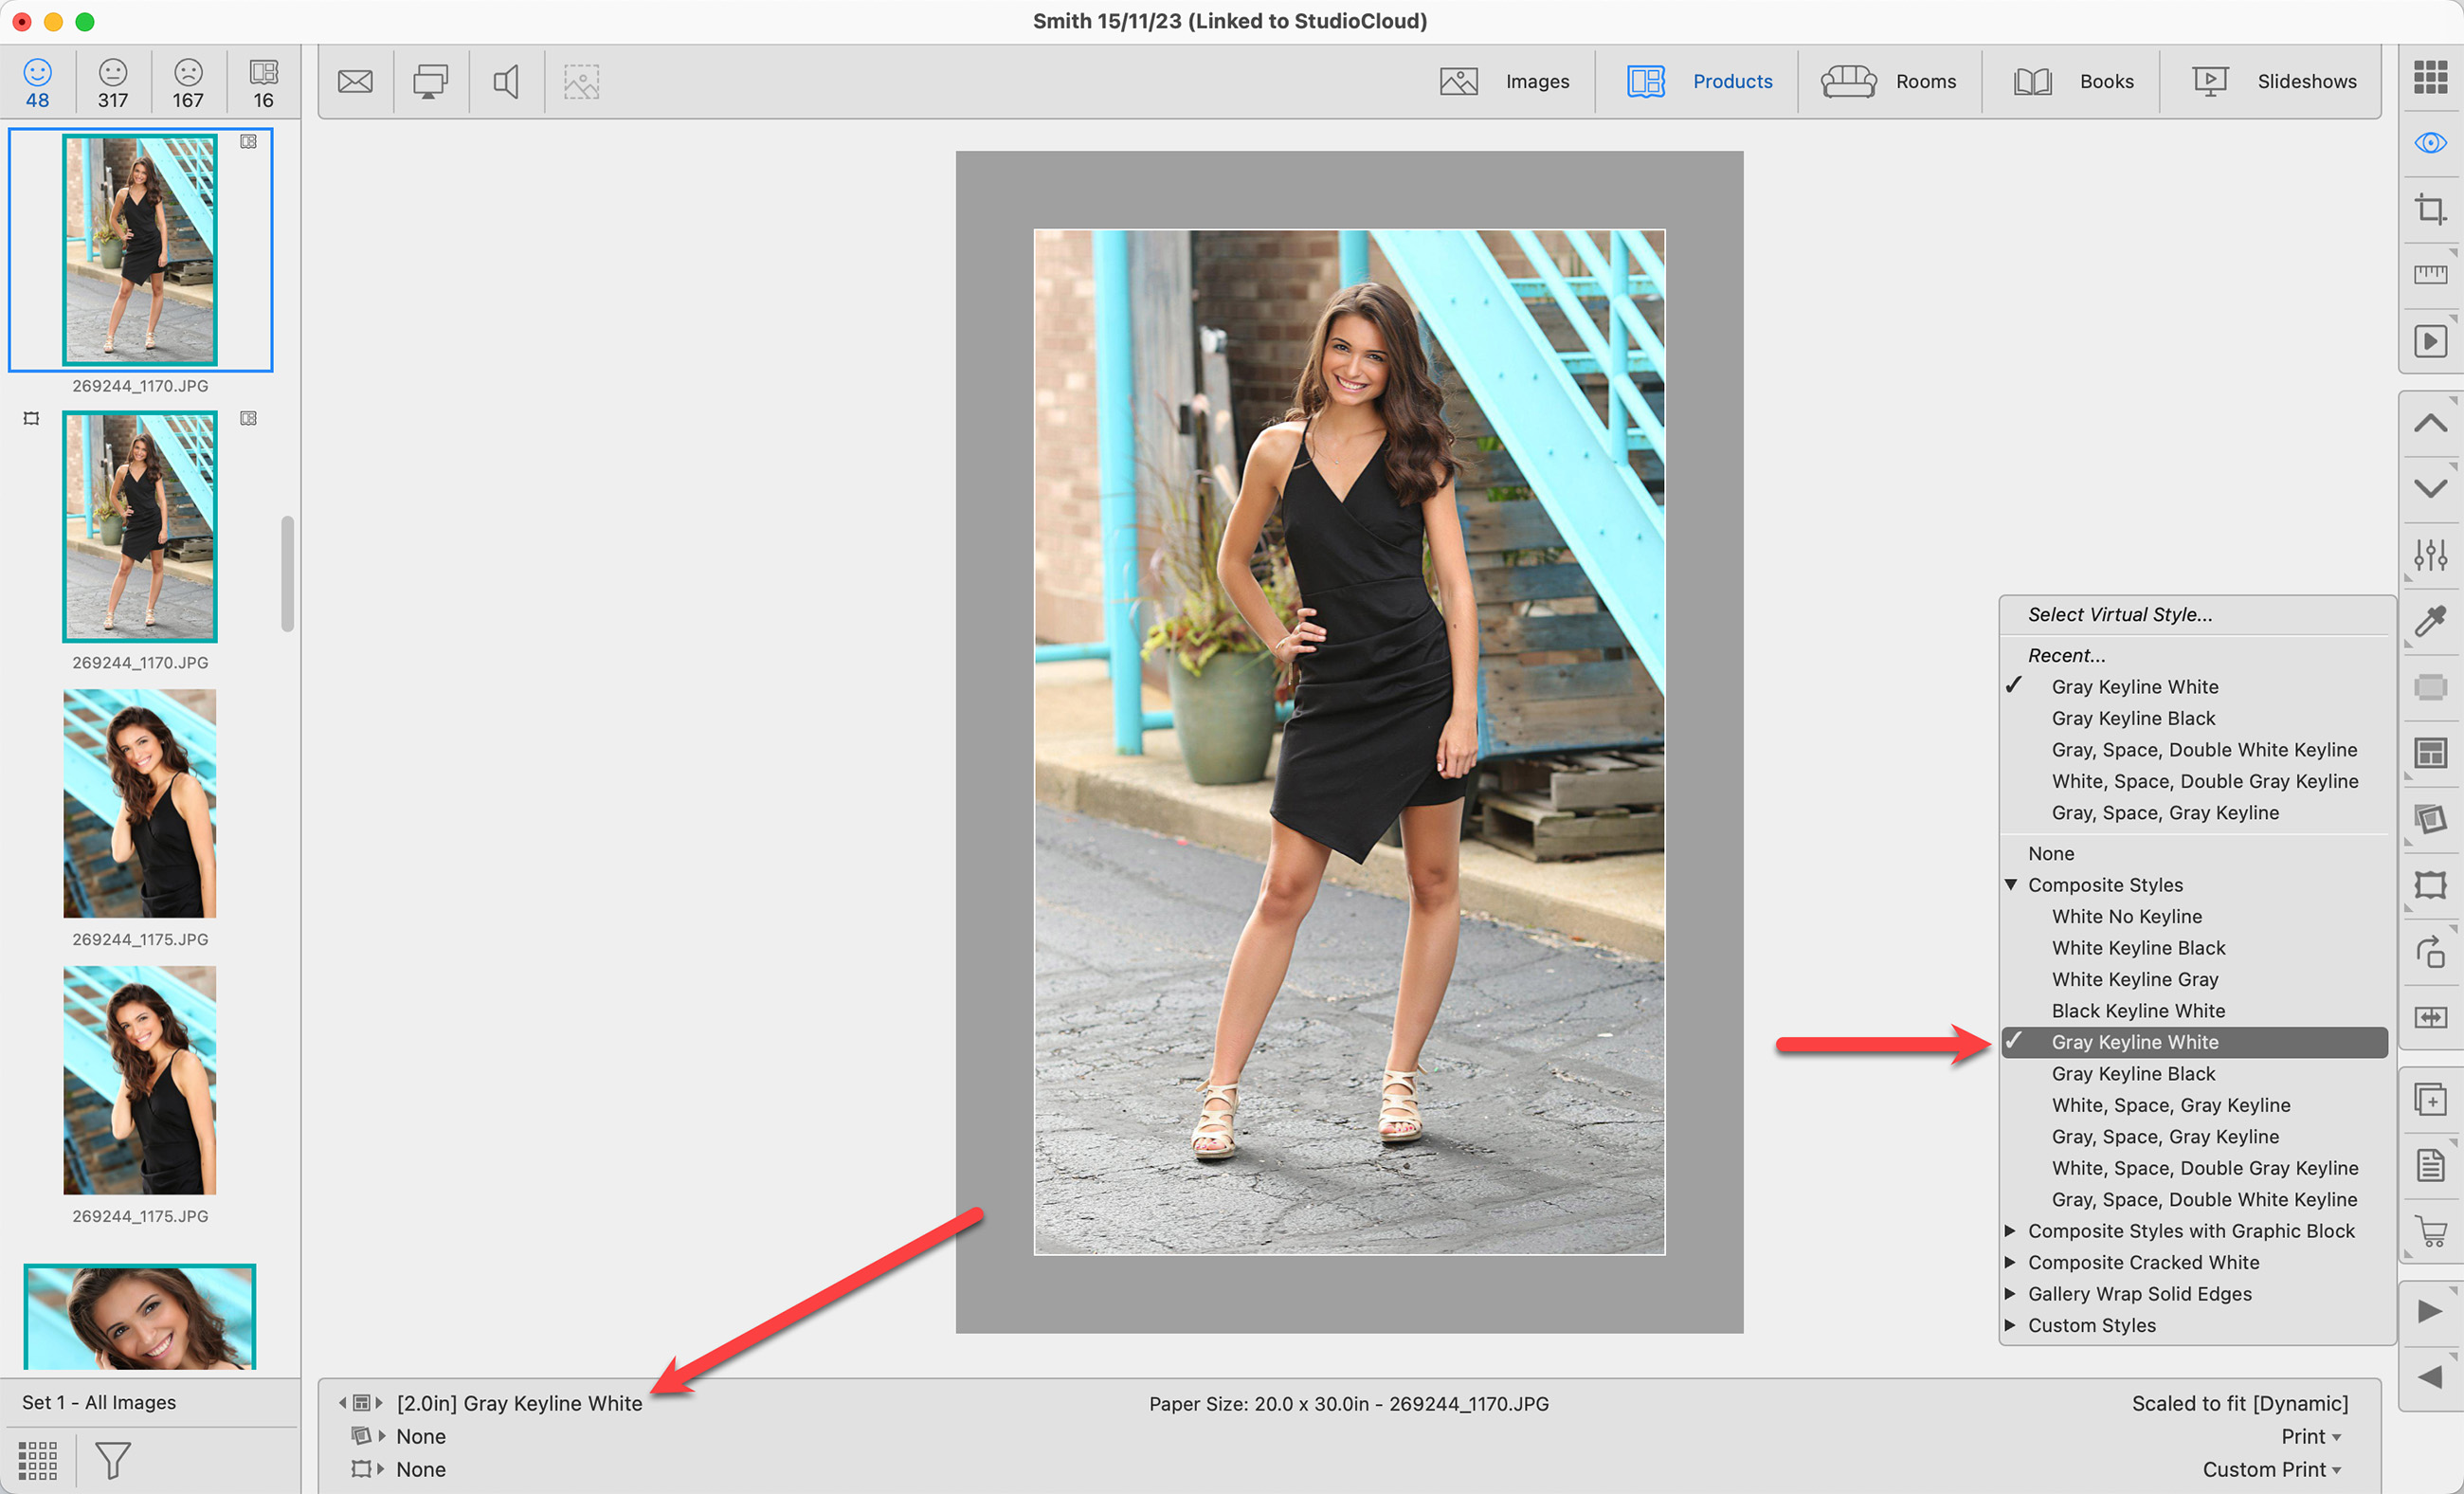
You can apply a Virtual Style to your image or product when in any View mode. Click on the Virtual Style tool in the toolbar to view the drop-down menu of available styles. Recently selected styles appear at the top. To remove the Virtual Style, select "none" from the list.
Virtual Styles are set up in the Designer dialog. Go to the top menu, Products > Traditional Mats & Virtual Styles > Designer.
The currently selected Virtual Style is shown in the left column of the Info Bar. The image is "pushed in" to allow space for the applied Virtual Style. The paper size remains the same. Click on Borders Inwards vs Borders Outwards to learn more about options for composite products with virtual styles applied.
The Select Edge / Style Color tool ![]() allows you to customize the color of an applied Virtual Style. After creating a custom-colored Virtual Style, you can save it for future use. Click here to learn more.
allows you to customize the color of an applied Virtual Style. After creating a custom-colored Virtual Style, you can save it for future use. Click here to learn more.
You can remove all applied mats, frames, & virtual styles simultaneously by holding the OptionAlt key and then pressing the DeleteBackspace key on your keyboard.
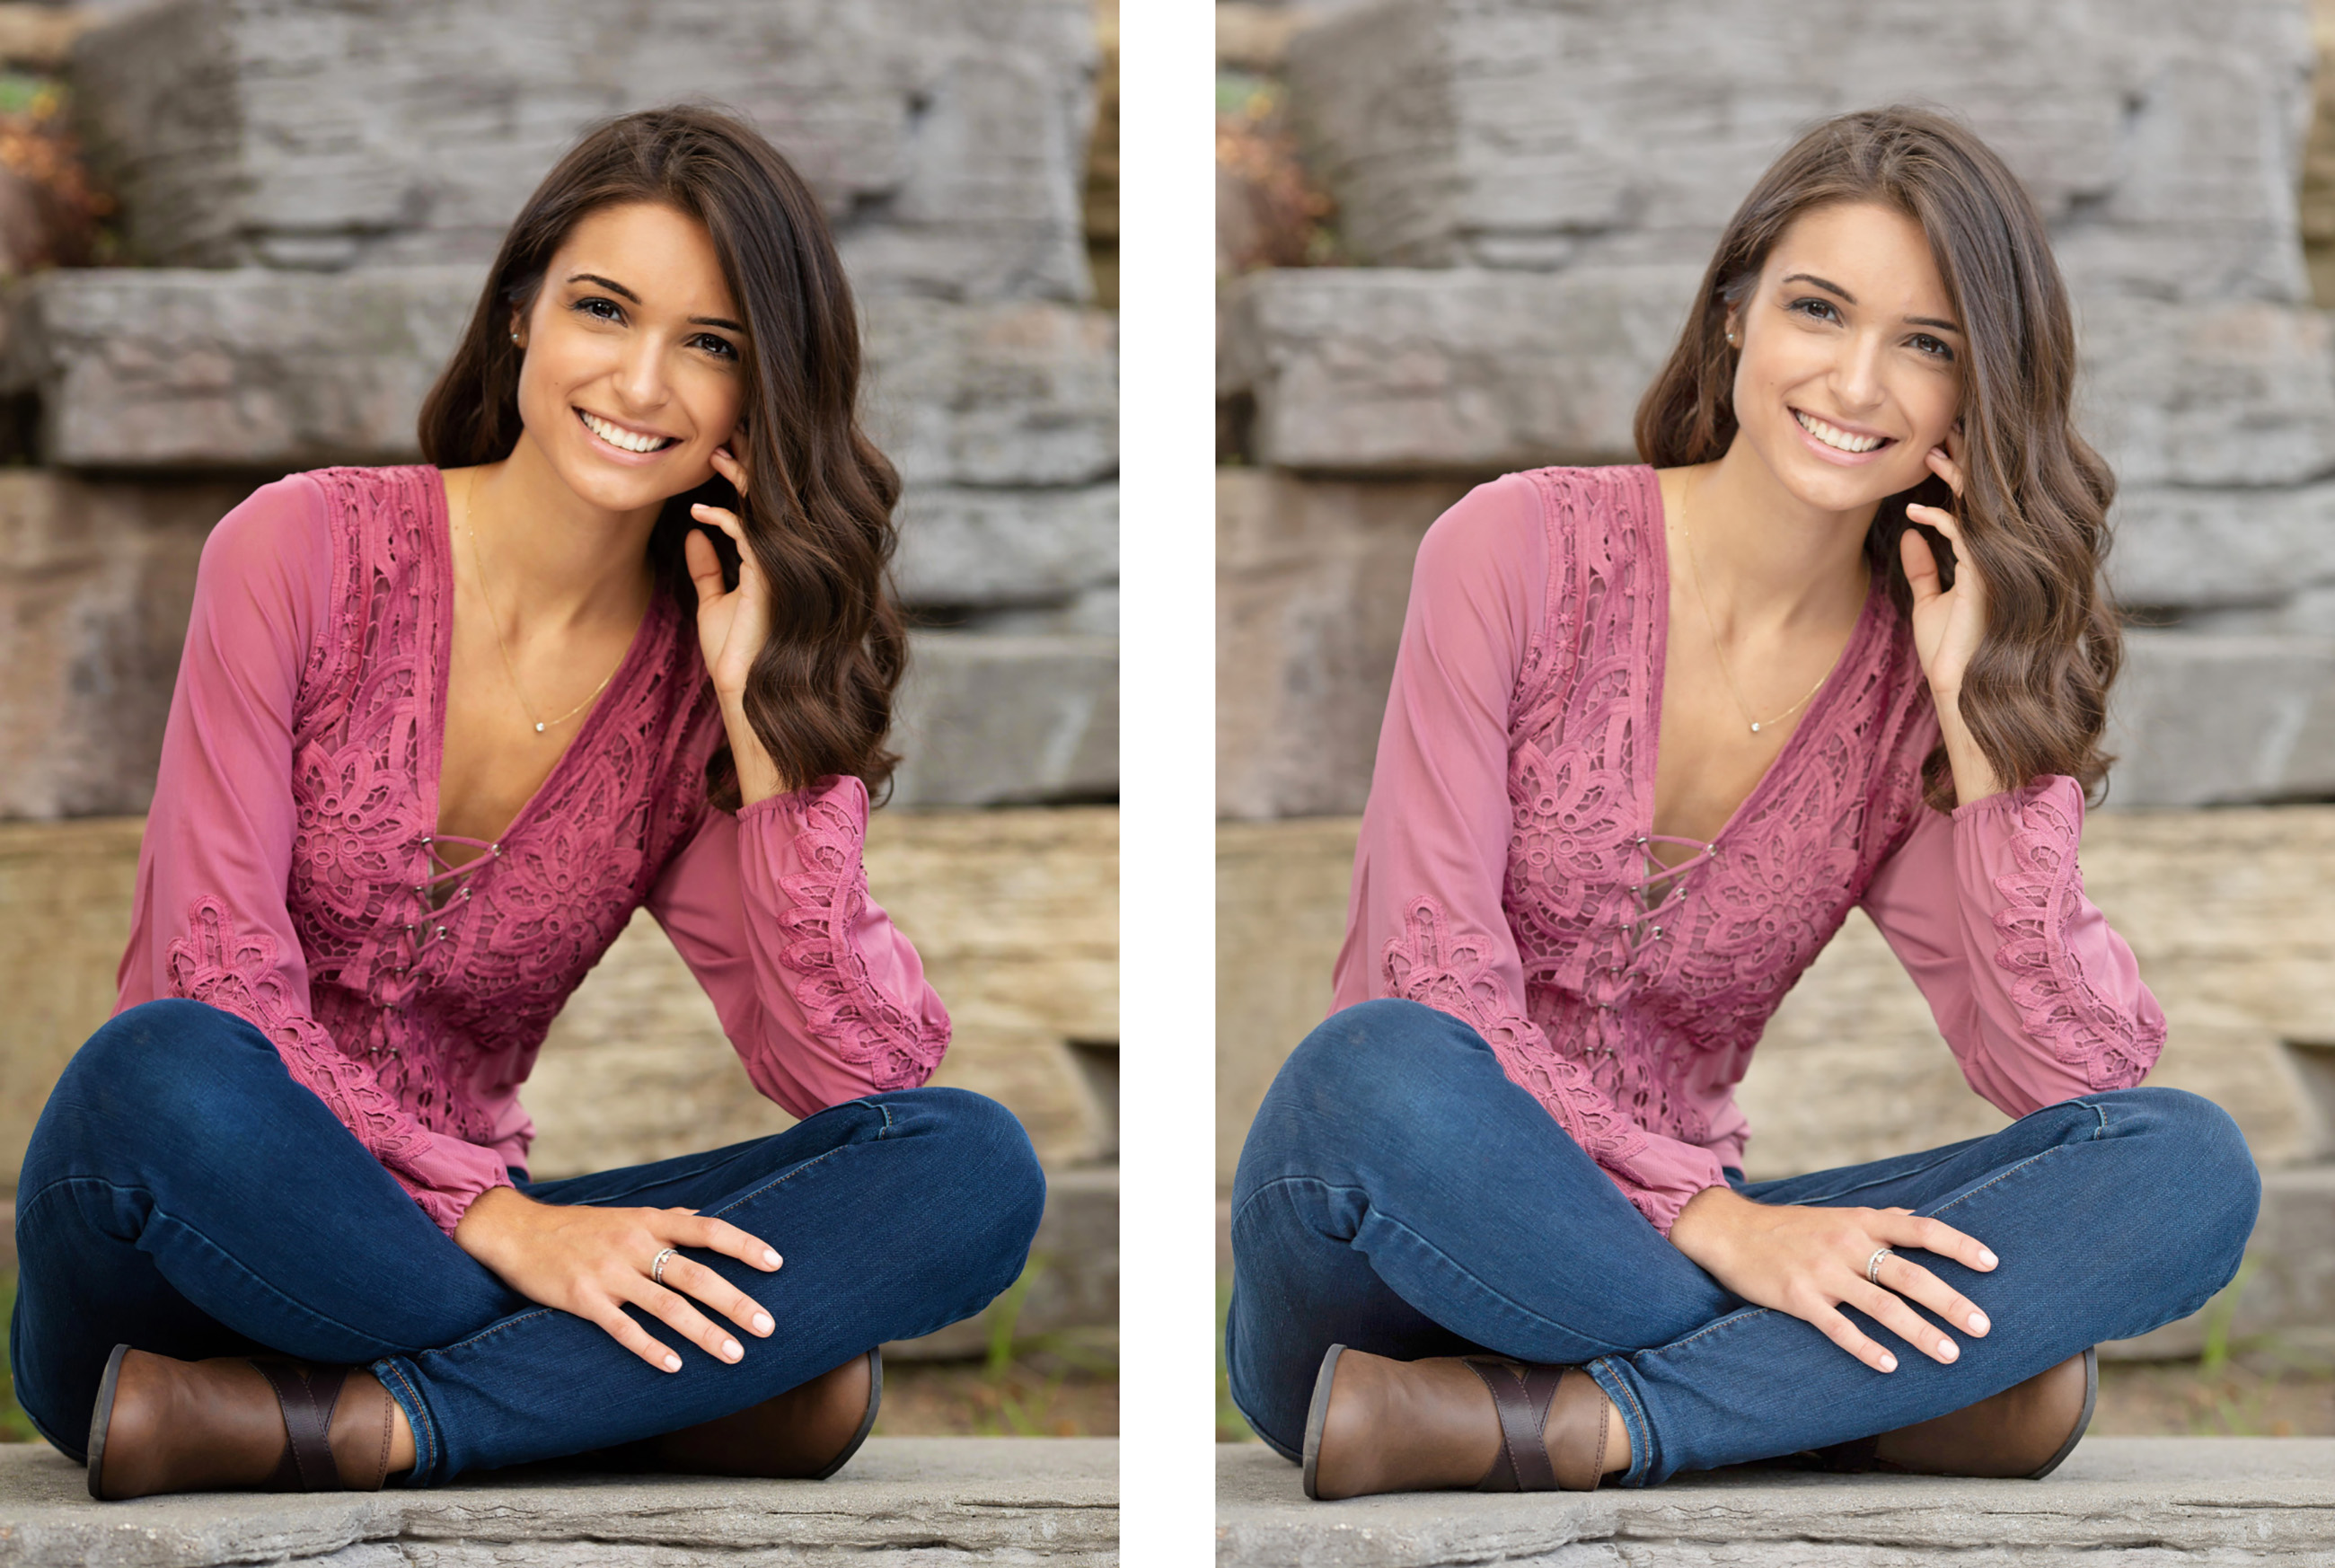
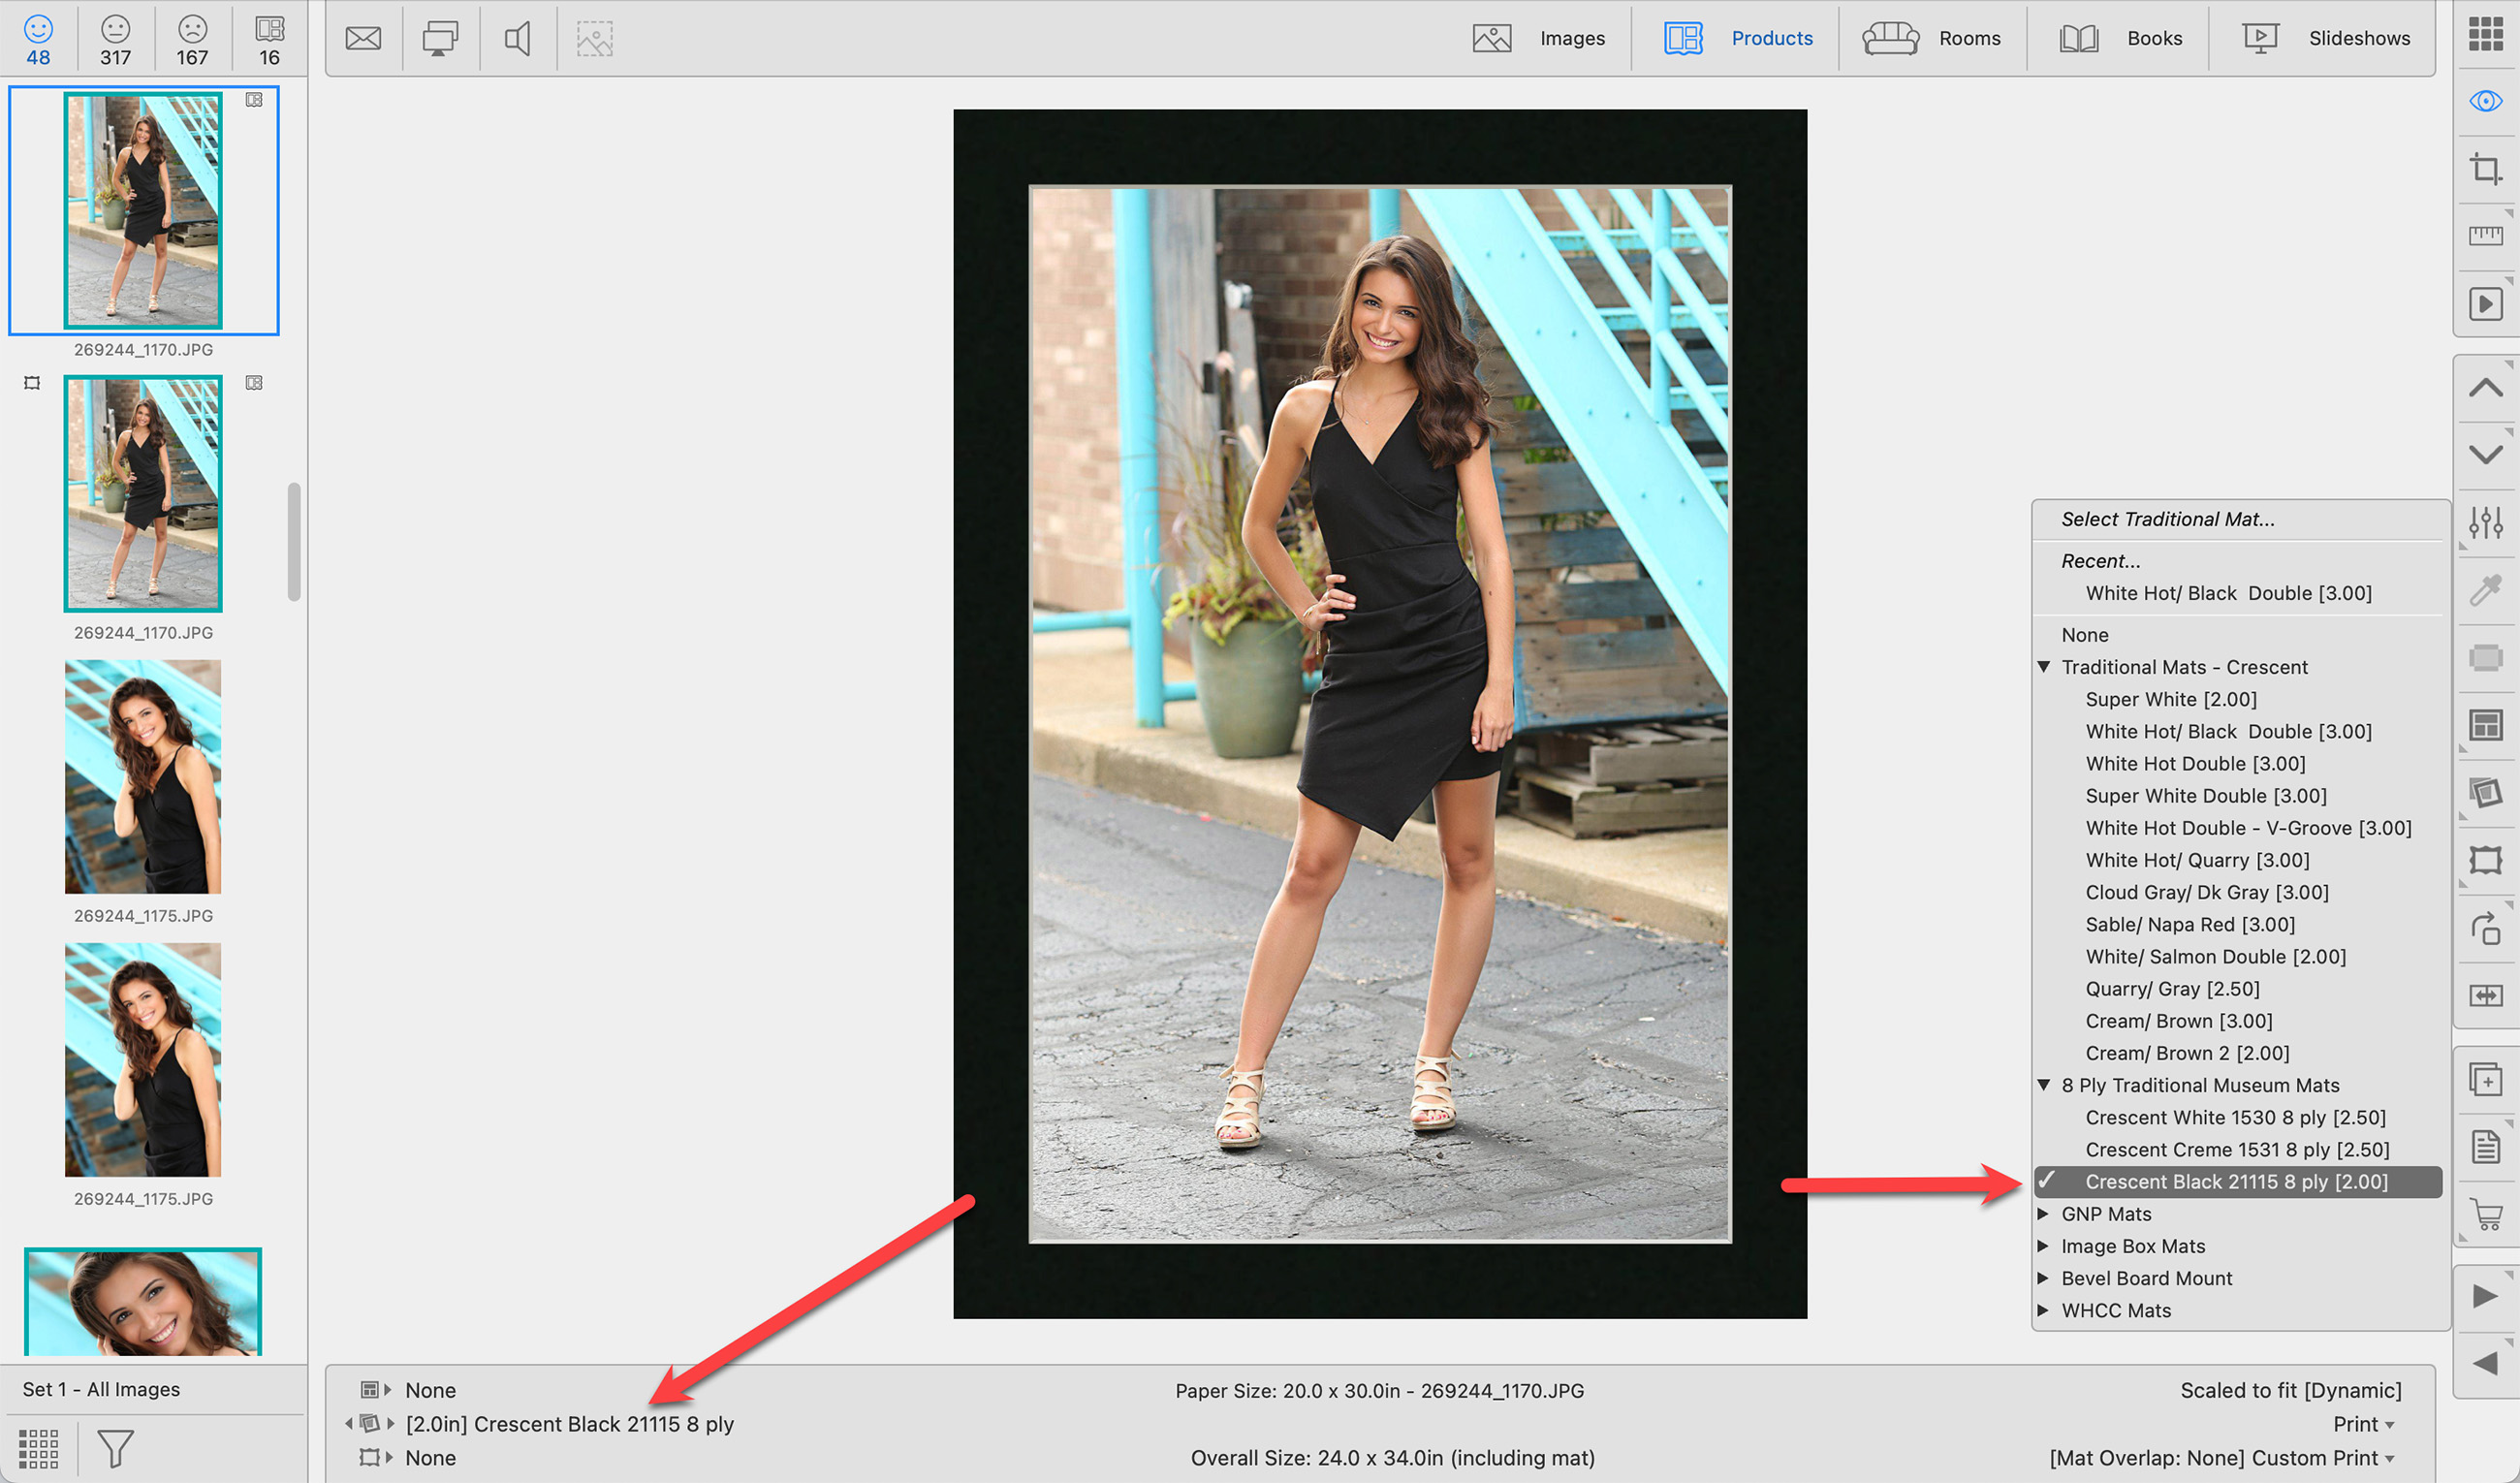
You can apply a Traditional Mat to your image or product when in any View mode. Click on the Traditional Mat tool in the toolbar to view the drop-down menu of available mats. Recently selected mats appear at the top. To remove a mat, select "none" from the list.
Mats are set up in the Mat Designs dialog. Go to the top menu, Products > Mats > Mat Designs. By default, ProSelect uses standard mat overlap settings of 0.25" for sizes up to 30 inches. For larger sizes, a mat overlap of 0.375 is applied. To adjust these settings, go to the top menu, Products > Traditional Mats & Virtual Styles > Traditional Mat Overlap.
- The currently selected mat is shown in the left column of the Info Bar.
- The overall size, including the mat, is listed in the center column. Traditional Mats are set on top of the print, so the overall size of the product is the paper size + the mat size.
- If a mat has been applied to a product, the Traditional Mat tag
 will appear on the thumbnail.
If you notice red mat tags ![]() next to your mats, a detailed explanation can be found by clicking Frame Validation - Frame and Mat Selection Tags.
next to your mats, a detailed explanation can be found by clicking Frame Validation - Frame and Mat Selection Tags.
You can remove all applied mats, frames, & virtual styles simultaneously by holding the OptionAlt key and then pressing the DeleteBackspace key on your keyboard.
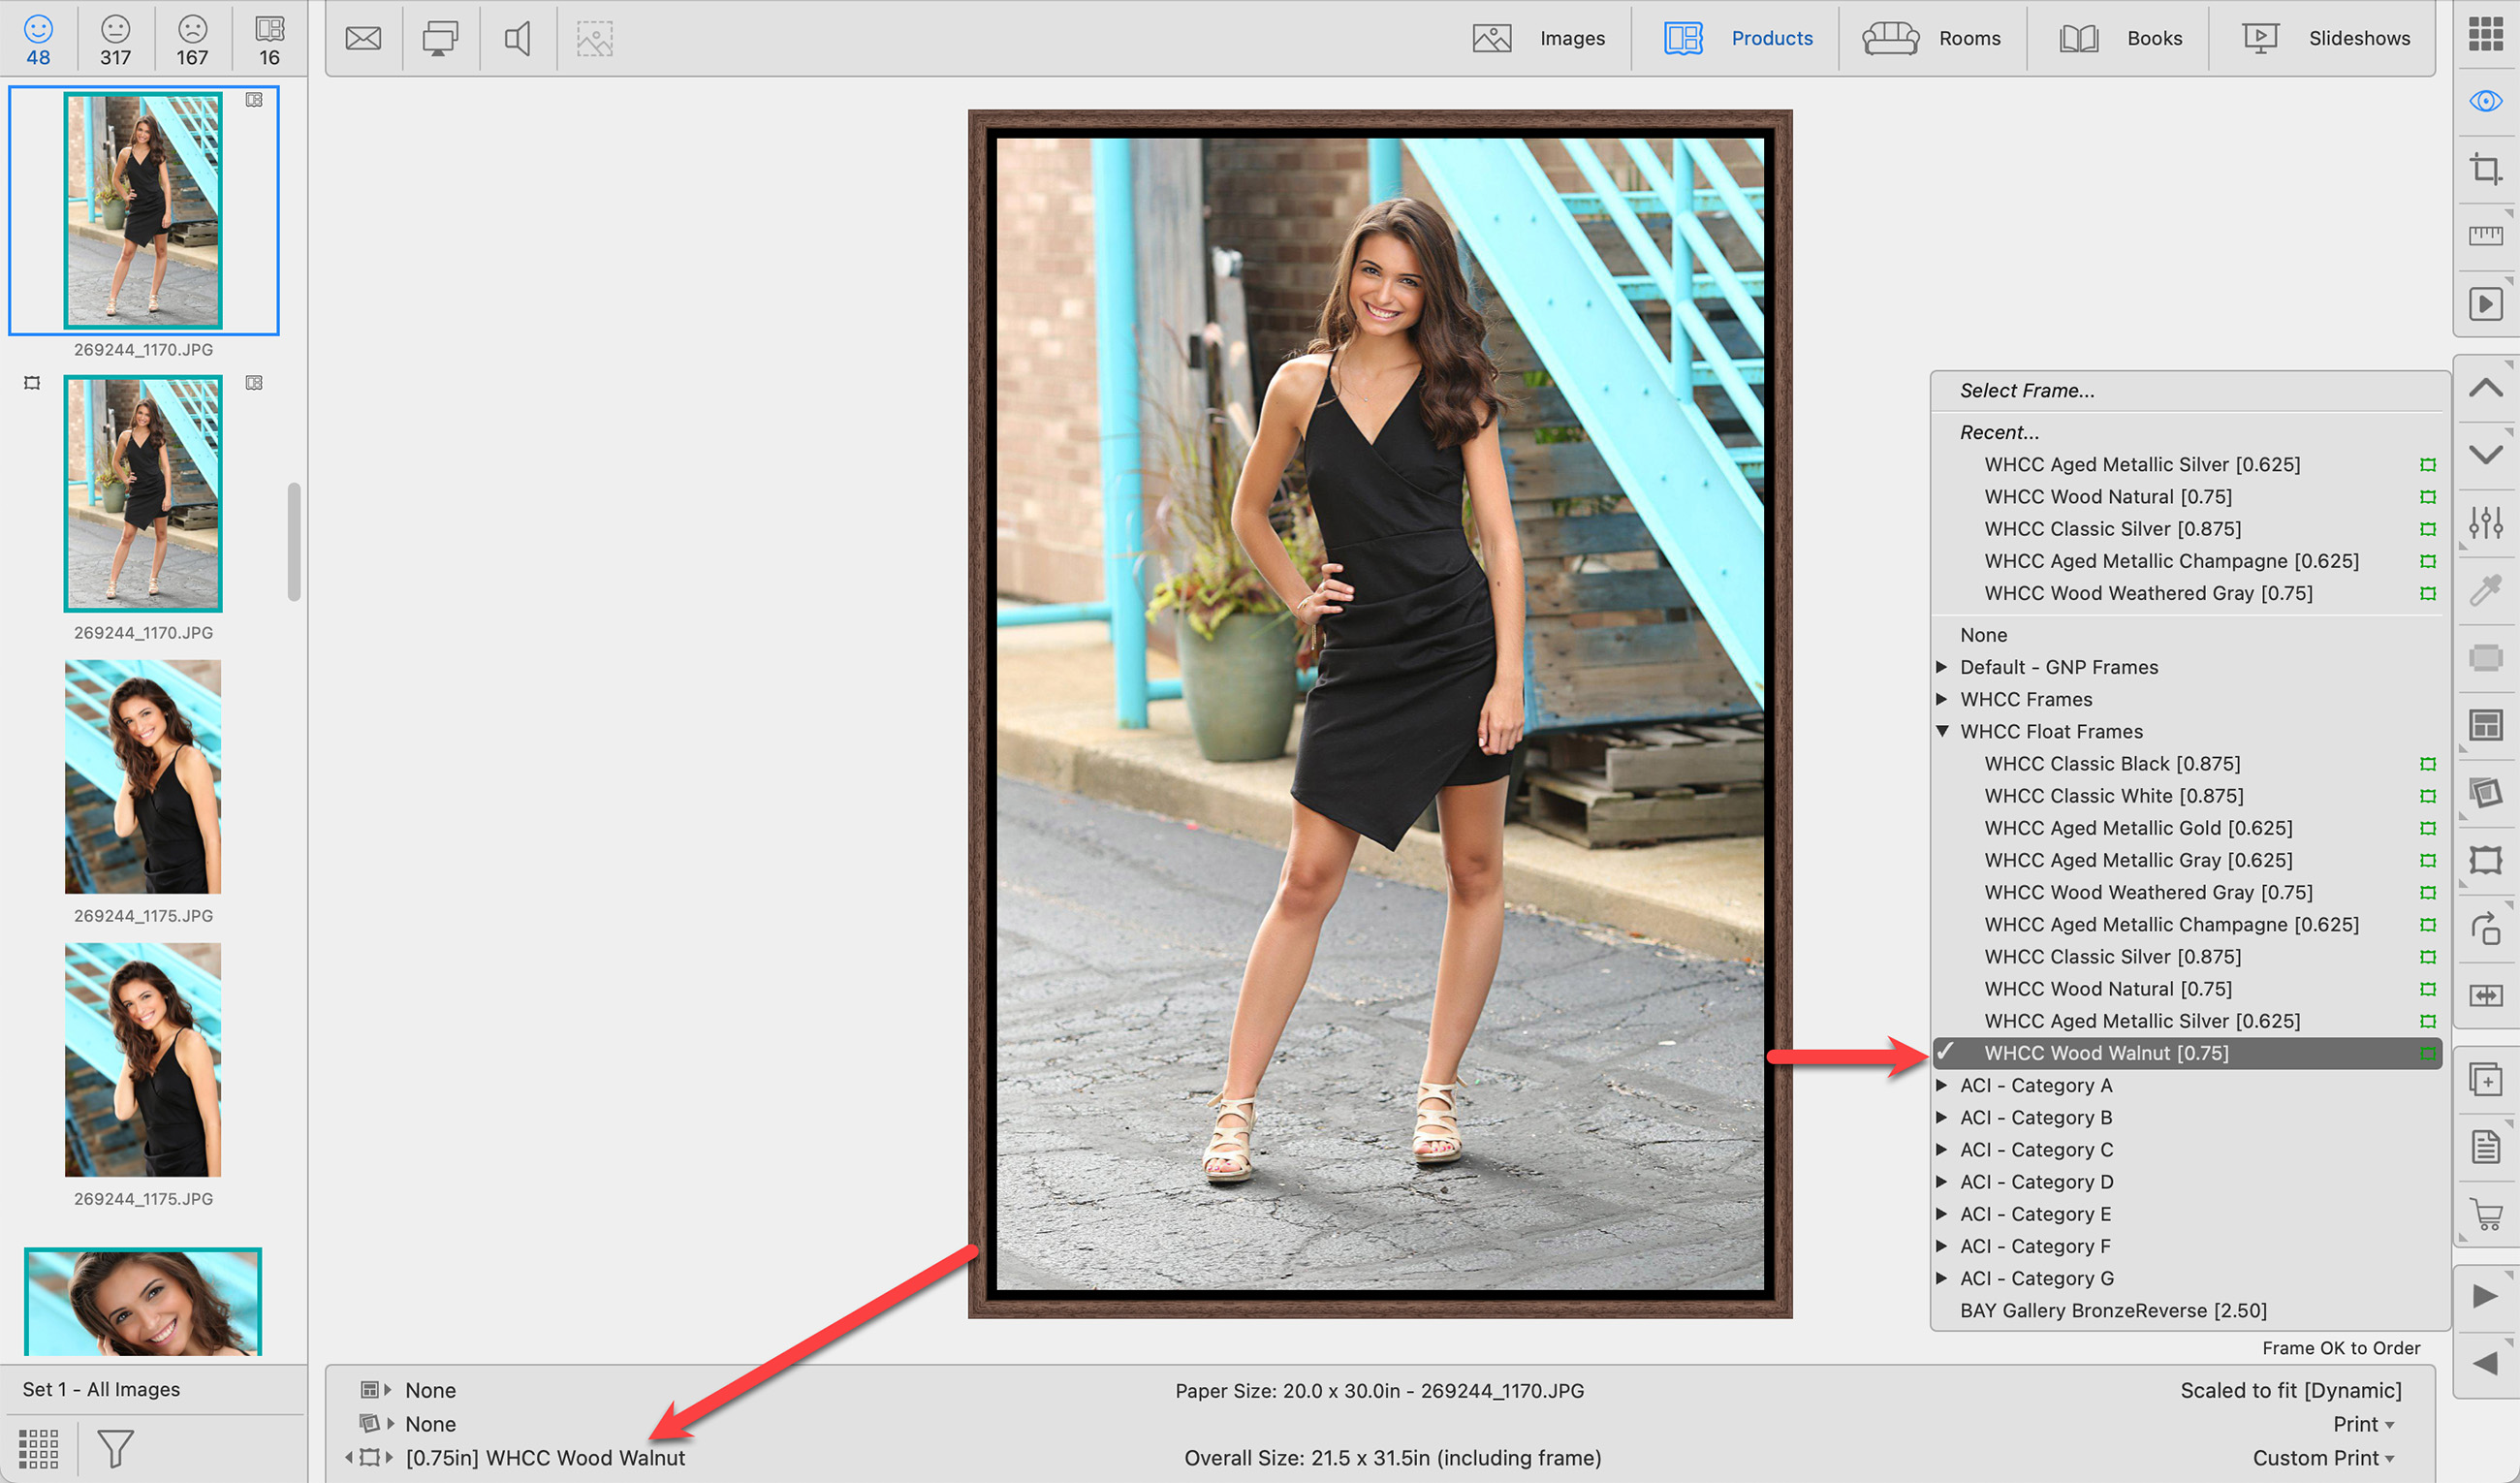
You can apply a Standard Frame to your image or product when in Thumbnail, Show, or Actual Size view. Click on the Frame tool in the toolbar to view the drop-down menu of available frames. Recently selected frames appear at the top. To remove a frame, select "none" from the list.
- Frames are set up in the Manage Frames dialog. Go to the top menu, Products > Frames > Manage Frames.
- The currently selected frame name and molding width are shown in the left column of the Info Bar.
- The overall size, indicating the outside dimension, including the frame is listed in the center column.
- If a frame has been applied to a product, the frame tag
 will appear on the thumbnail.
- If you notice red frame tags
 next to your frames, a detailed explanation can be found by clicking Frame Validation - Frame and Mat Selection Tags.
 - Displaying the frame molding width in square brackets next to the name is a preference. You can turn this feature off by going to the top menu, ProSelectEdit > Display > Display Options.
- Fixed Corner Frames are not available using the Select Frame tool. They are a product template and must be accessed using the template resource area.
You can remove all applied mats, frames, & virtual styles simultaneously by holding the OptionAlt key and then pressing the DeleteBackspace key on your keyboard.
This will rotate the selected Image/Product/Crop/Item 90 degrees clockwise.
- When rotating a product, the images in the template are NOT rotated. By Right-clicking on the Rotate tool, you have the option of rotating the images as well as the product template.
- Hold OptionAlt when rotating to rotate counterclockwise.
Use the shortcut Cmd + RControl + R to rotate an image or product.
You can mirror a product template using the Flip Product Horizontal tool.
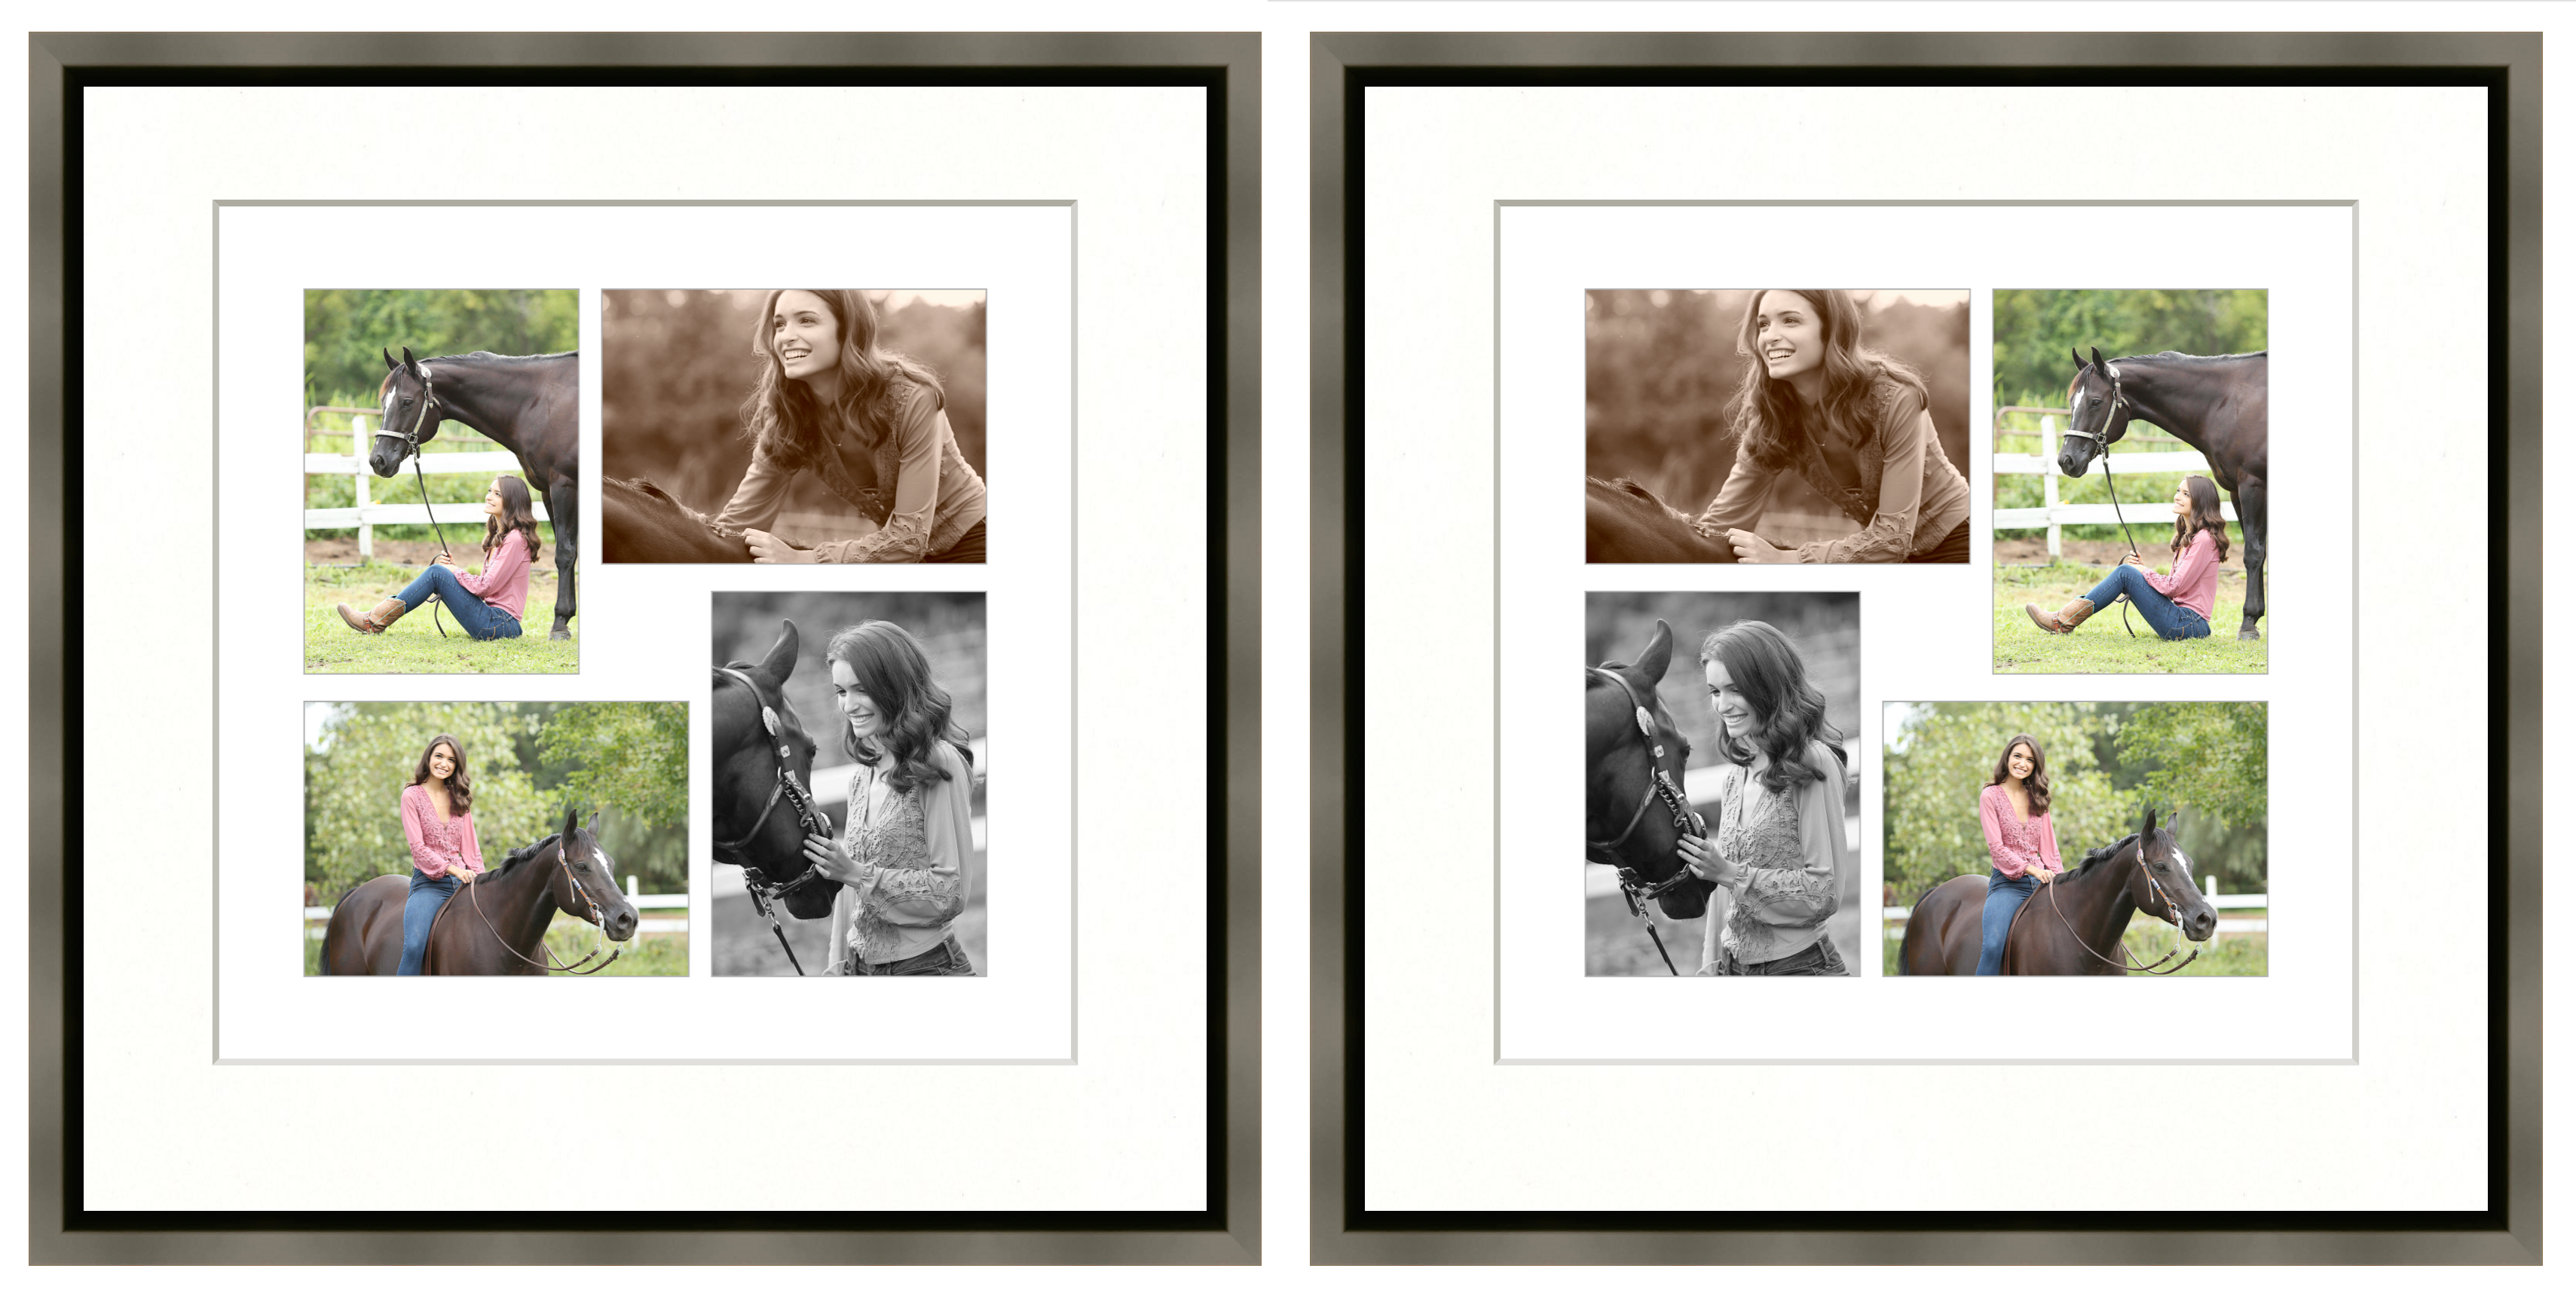
You can duplicate an image, product, or room using the Duplicate tool.
- When duplicating images, each copy retains the original filename but has its own thumbnail.
- This feature is particularly useful when you want to view or order the same image/product with different effects.
- Simply duplicate the item and apply distinct effects to each copy. You can then select and display both copies, allowing for easy comparison of the different effects applied.
You have the option to add notes to images, products, books, or rooms. Notes are used as a reminder of any special changes that need to be applied to the images in a product, general product notes, or order requests. Click on Notes to learn more about where notes appear throughout ProSelect.
- Select an image, product, or room and click on the Notes tool.
- The Notes dialog will open.
- You can manually add your own notes or add a note from your Notes Library.
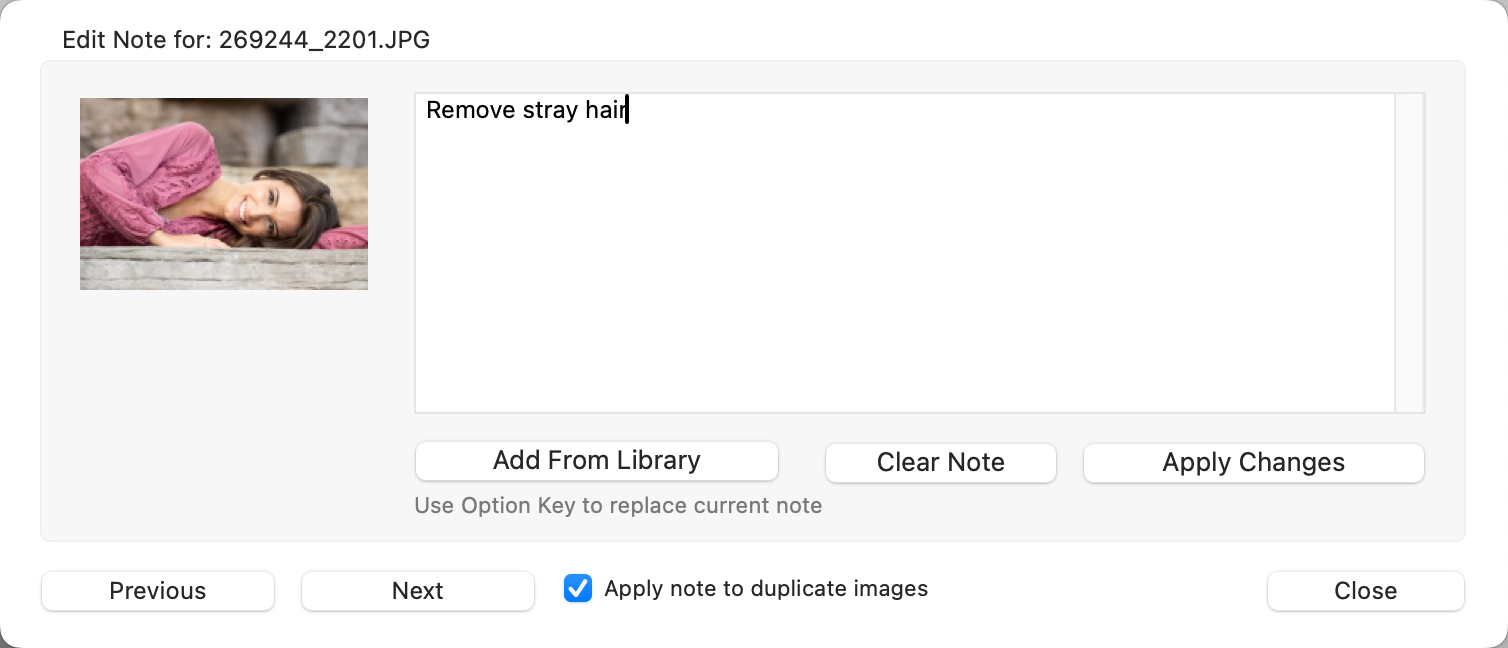
- Use the Previous and Next buttons to scroll through and add notes to other images/items within the set.
- If duplicate images appear, check this box to apply the note to duplicates as well.
- Use the Clear Note button to remove any notes.
- Click the Apply Changes button when you have finished adding or editing the note.
- You can add the same note to more than one image at a time by selecting all the relevant images before clicking on the Note tool.
- Notes added in Working with Images are applied to the individual image.
- Notes added in Working with Products or Working with Rooms are applied to the whole product or whole room. Not the individual image.
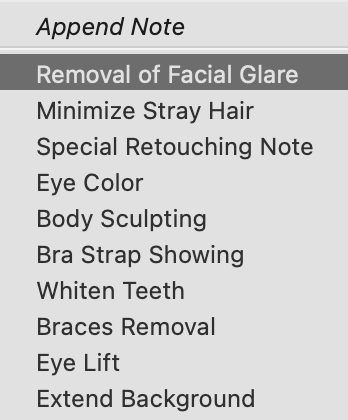
Right-Click
The Notes tool also has a right-click option. When you right-click, a drop-down menu of the Library Notes appears. You can select a commonly used note and add it. In this case, the note will be added without opening the Notes dialog.
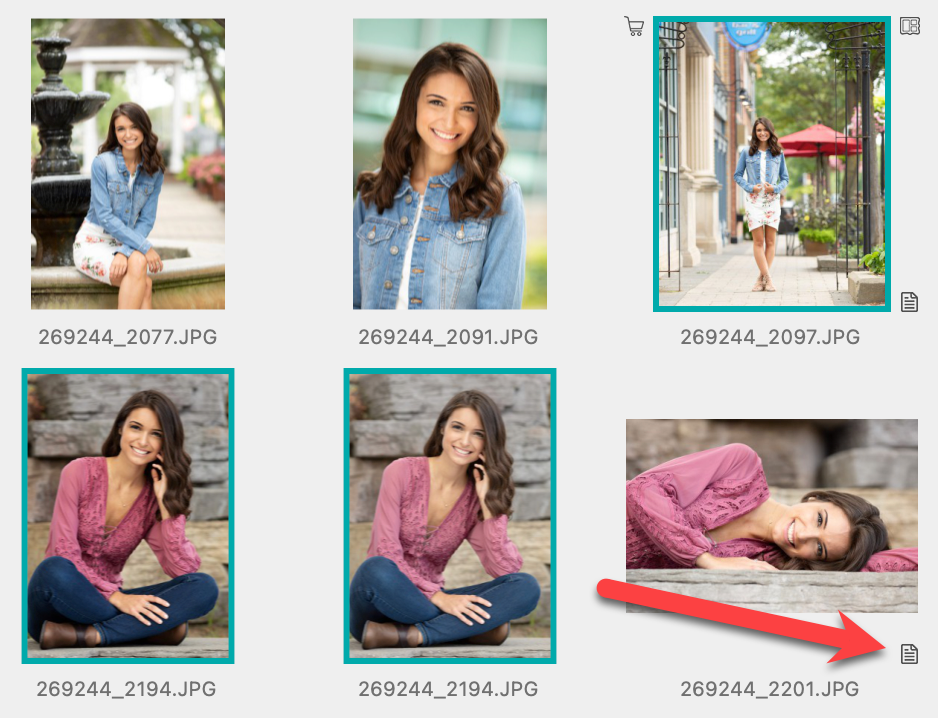
Notes Tag
All items with notes attached will have a small Notes tag ![]() at the bottom-right corner of the thumbnail image.
at the bottom-right corner of the thumbnail image.
The Order Product tool (shopping cart) allows you to add the selected product(s) to an order. Ordering can be done from any View mode. You can order products one at a time, or multiple products at a time. Once you click on the Order Product tool, a menu will appear that includes the product(s) you wish to order and other options associated with that product.
Click on the product you wish to order from the list. The product will be added to the Client's order.
Click on Ordering for more information.
Use the Next and Previous tools to navigate through your images, products, rooms, or slideshow slides.
- Use the Left and Right Arrow keys on your keyboard to navigate through your images, products, and slides.
- Use Shift + Left and Right Arrow keys to navigate through your rooms.
Jump in Groups
If you hold the OptionAlt key while clicking on the Next or Previous tool, the next group of items will be displayed. This group can be between 2 and 30 items. You can select the group size by right-clicking on the Next or Previous tools. This feature is only available in Show view and Cropping view.