Order Reports
You can print various order reports for your client and/or production staff. All orders are stored within the album file for later access. You can optionally append the Order Report with a custom message, such as your studio's sales policy, from the Notes Library. Click on Order Agreements to learn more.
- To print any report, go to the top menu, File > Print, and then choose from the list of available reports.
- To print just the Order Report, use the Print button on the bottom-left of the Review Order window.
- If you want your company logo to appear on the reports, set it up by going to the top menu, Resources > Setup Report Logos.
When printing the Order/Invoice Report, a dialog box will appear, allowing you to customize the report with various options. There are two options tabs at the top of the dialog. It is important to review and select your preferred options from both Options tab 1 and Options tab 2.
Go to the top menu, File > Print > Order/Invoice Report (or click on the Print button in the Review Order window).
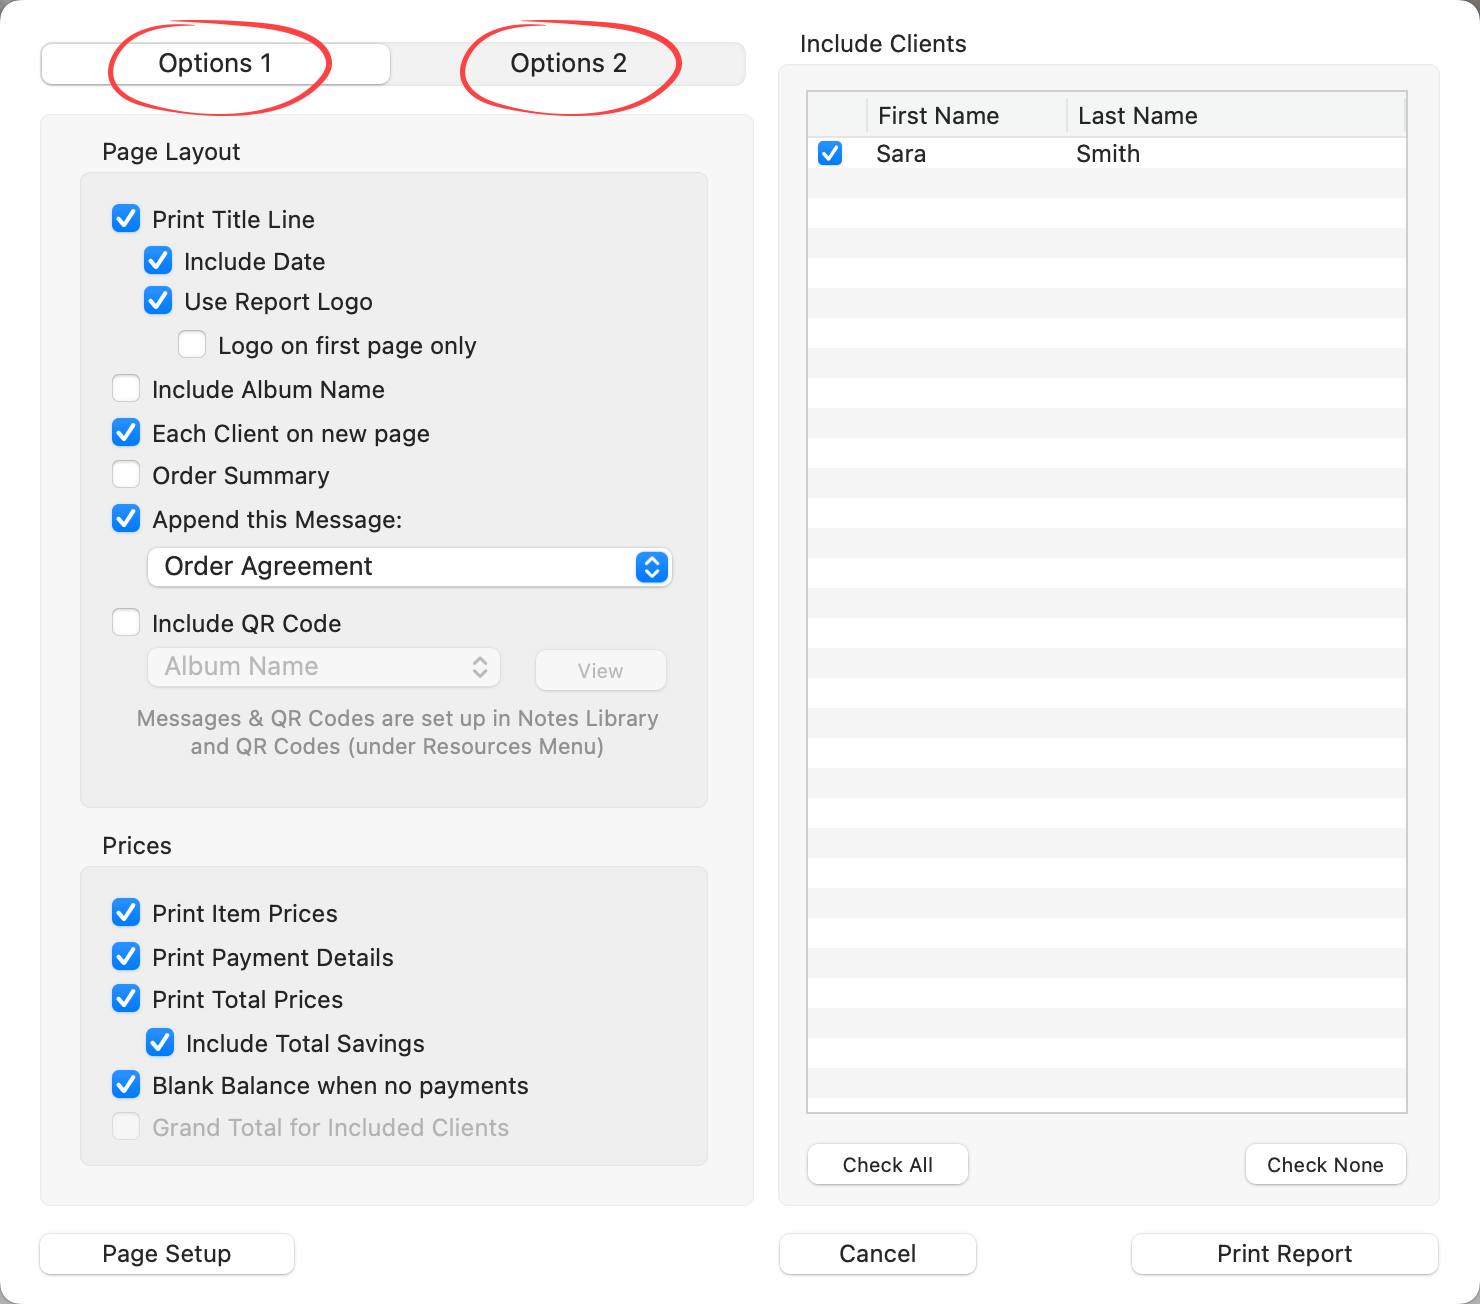
Because there are so many options when creating a customized Order/Invoice Report, we recommend a bit of trial and error. Customize it how you see fit, then print and save a pdf. Review the .pdf and make additional adjustments. Your selections will be saved and applied to future reports, streamlining the process for next time.
Page Layout Options
- Include a Title Line: Optionally add a title line to the report. If selected, you can also choose to display the current date in the title line.
- Use Report Logo: If a report logo is set up, this option enables its inclusion in the report. The report title will then be positioned at the bottom of the page. You can choose to display the logo only on the first page.
- Album Filename: Include the current album's filename in the report.
- Multiple Clients: Separate orders from different clients with a new page for each client.
- Order Summary: Summarize the total number of items in each presentation type at the report's end.
- Append this Message: Add an Order Agreement or custom message, such as your studio's sales policy, from the Notes Library. This appears at the report's end.
- QR Code: If enabled, include a selected QR Code in the client section of the report.
Prices
- Item Prices, Payment Details, Order Totals, and Total Savings: Choose to include any of these financial details in the report.
- Blank Balance: If desired, leave a space for writing the balance due by checking "Blank Balance when no payments."
- Grand Total for Included Clients: Calculate and display an order total across all selected clients.
Details
- Client Details: Choose how much detail to include about the client, along with any notes.
- Product & Order Notes: Include any product notes & order notes.
- Show Applied Pretouch Settings: Include a summary of the abbreviated presets used for any pretouched images in the order.
- Custom Effects Display Options: Decide if you want to show:
- (a) No names of applied Custom Effects,
- (b) Names of all applied Custom Effects (space permitting), or
- (c) Only Custom Effects designated for use in Production.
- Local effects, such as Black & White or Special Tint, are always included.
Quality
- Resolution: The default is set to 600dpi, but you can choose 150 or 300 based on your printer's capabilities or if you need to reduce file size for a PDF.
Images
- Thumbnails: Decide whether to include thumbnails for ordered items. You can choose to show the frames or mats if you like. You can also opt to display thumbnails for any ordered digital files. For extensive digital file orders, consider the Ordered Digital Files Report instead.
- File Names: Choose to display all individual filenames for digital file orders.
- Stamps, Watermarks, and Logos: Apply a copyright stamp from your Setup Stamps, Watermarks & Logos settings to the images in the report.
Products
- Print Product Opening Sizes: This will show the sizes of individual openings in any ordered products. Wall Grouping Template sizes are always displayed.
- Include Products Image Names: Opt to display the names of each image within a product.
- Include Virtual Styles on Composites: An additional row will be included for any applied virtual style, with the style's name displayed on the report.
Once you have customized the Order Report, click on the Print Report button. From here you can either print out the report or save it as a .pdf.
Sample Order Report:
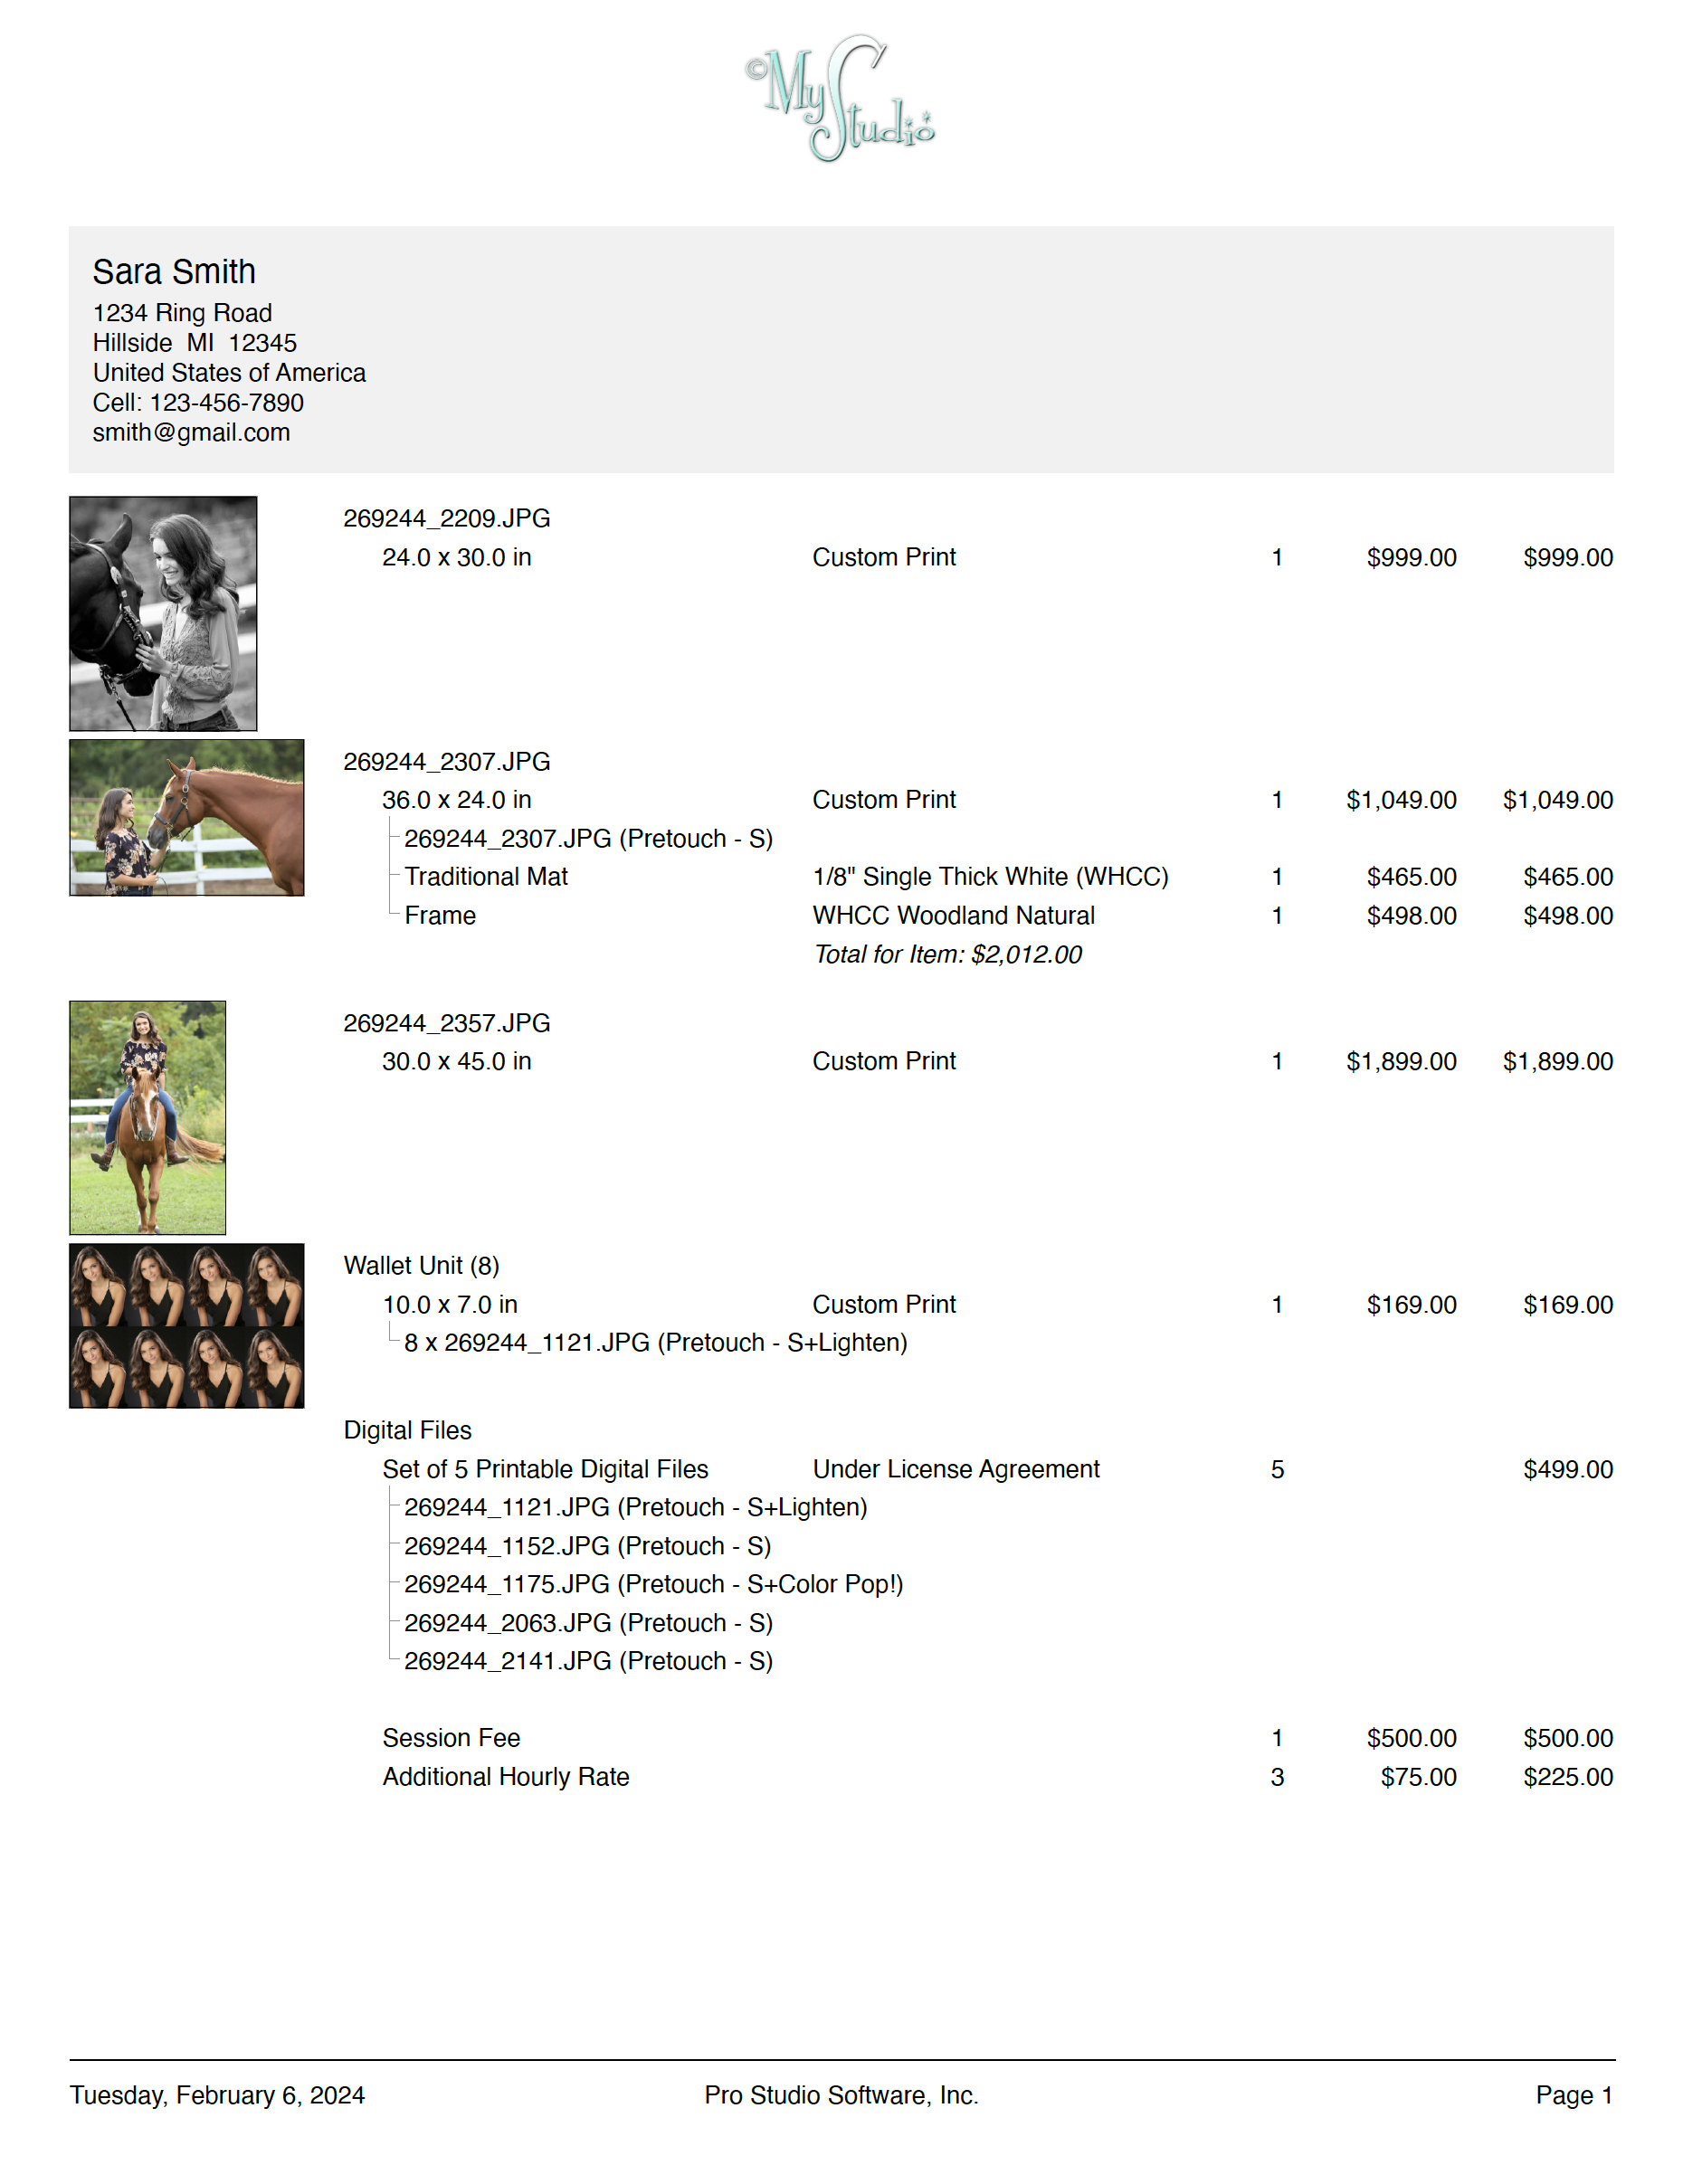
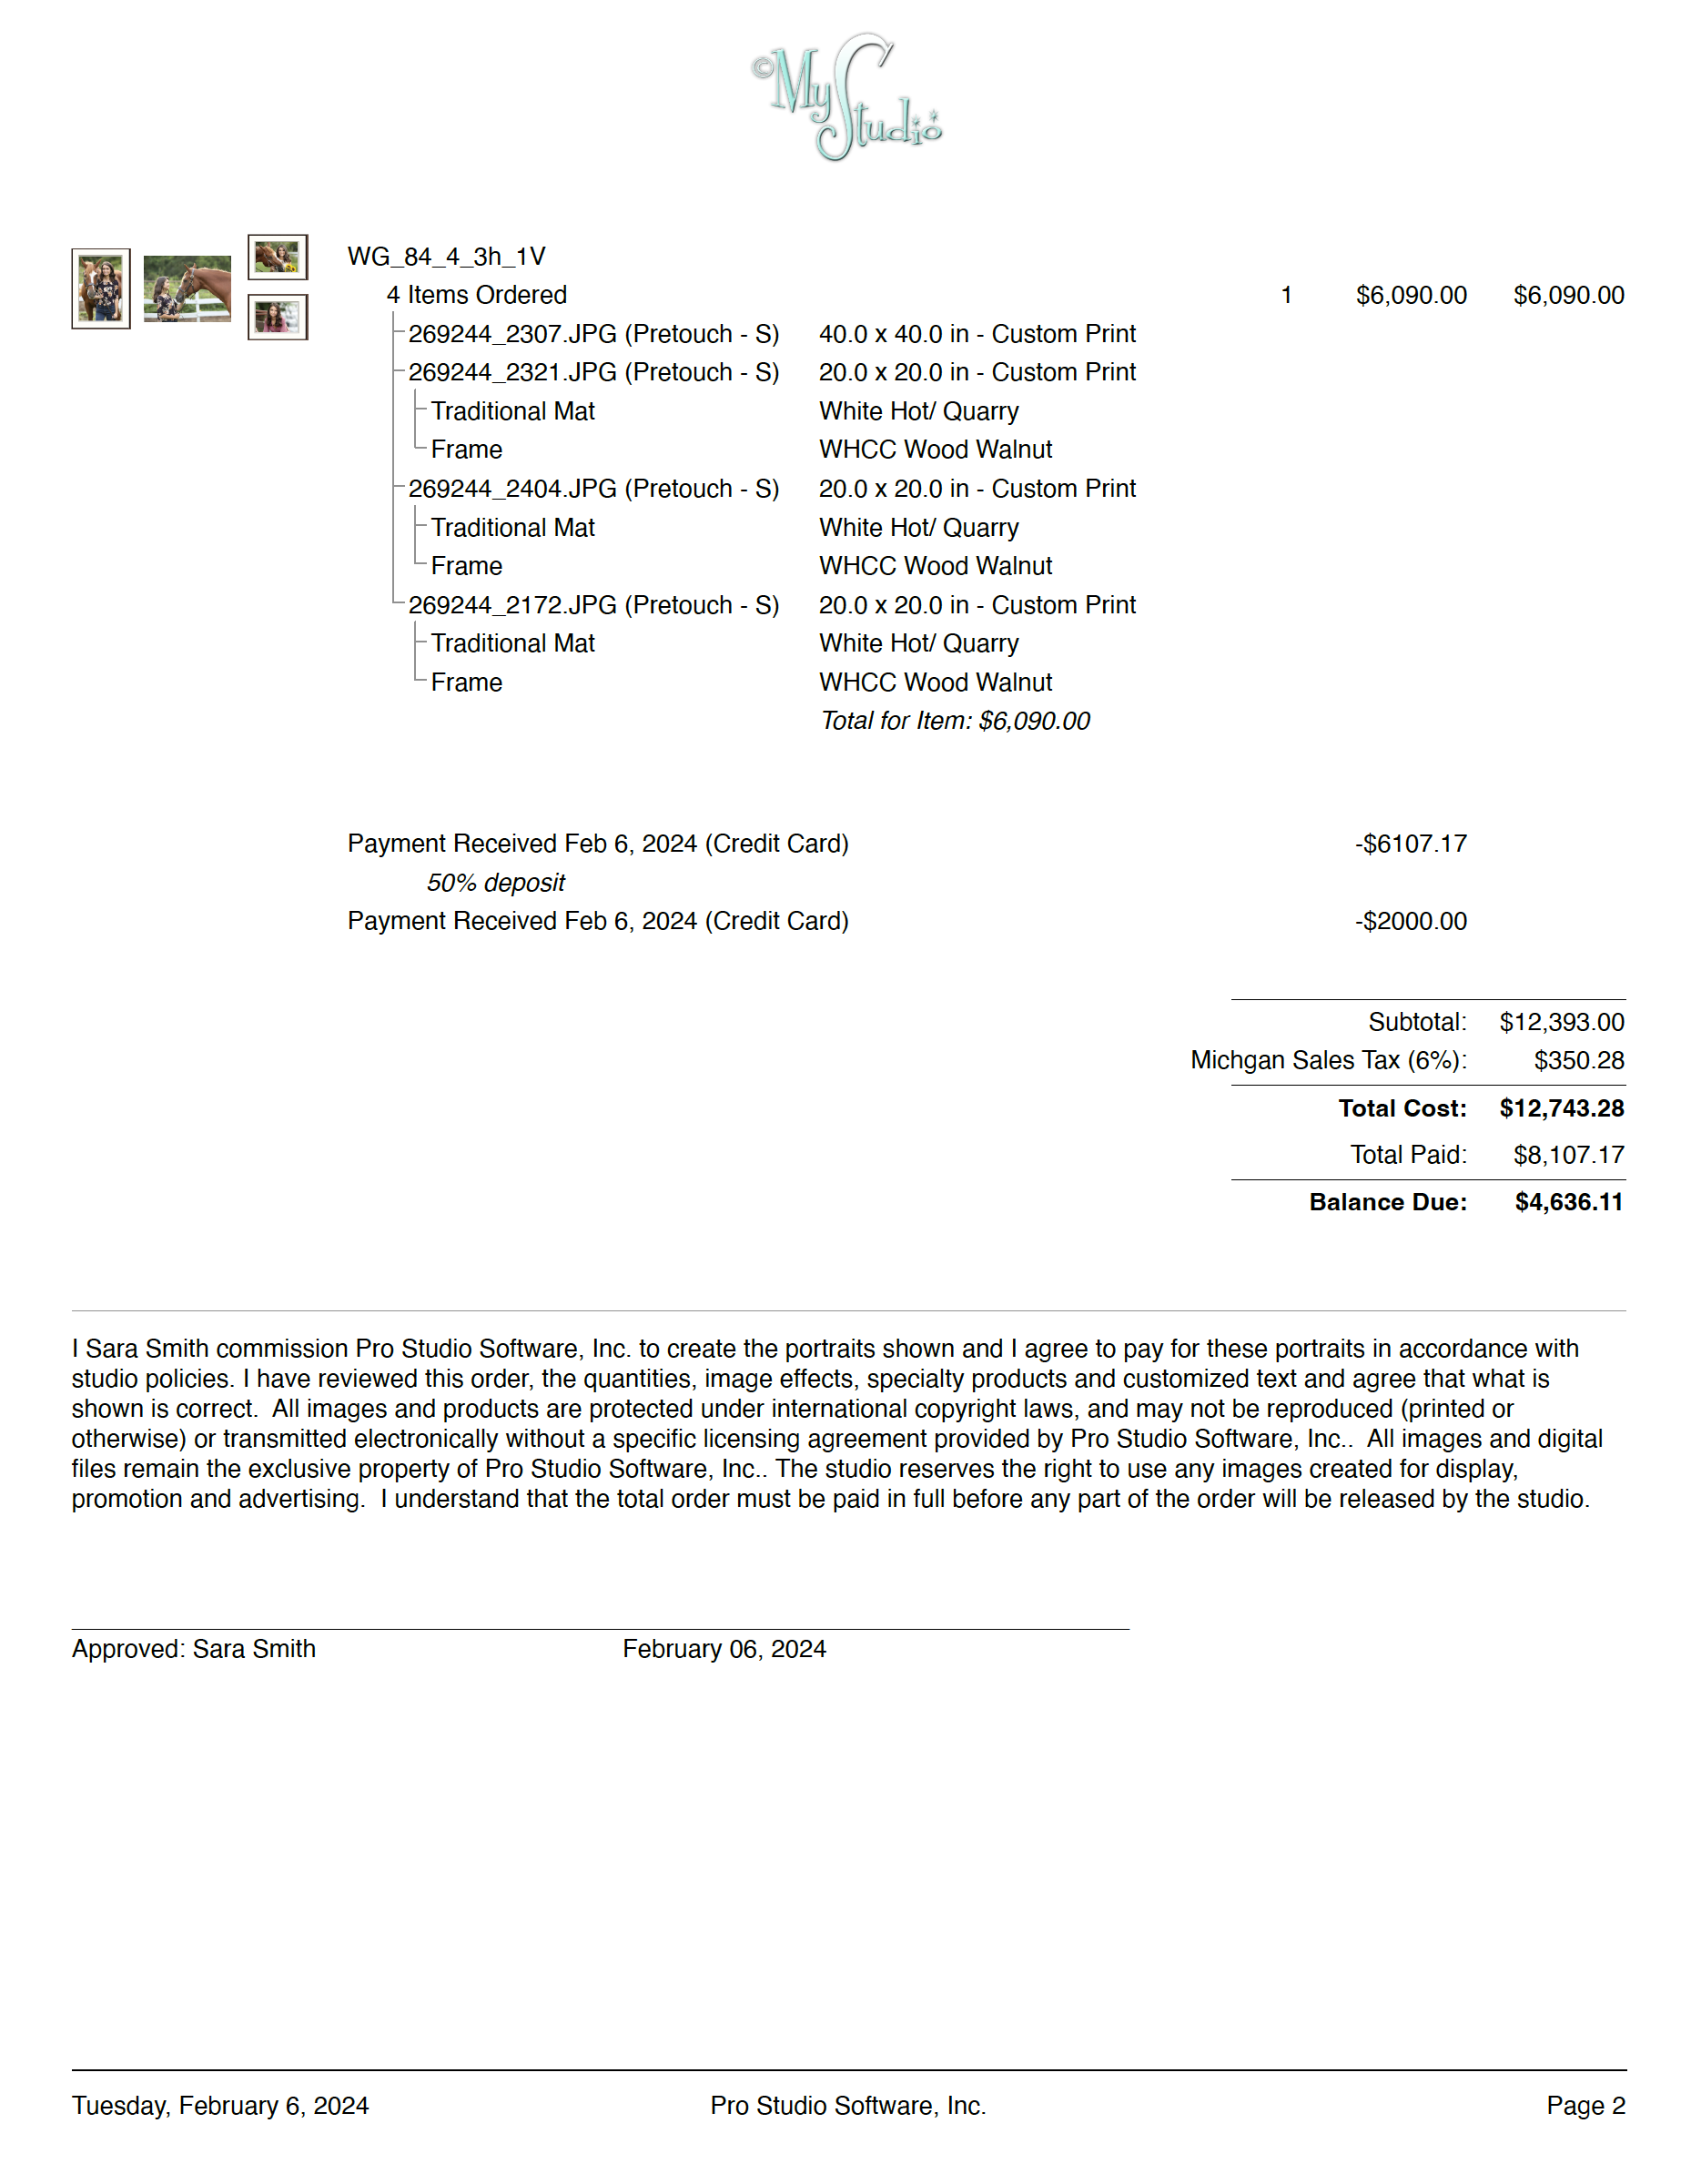
You can include a custom message, such as an Order Agreement or your studio's sales policy in your report. These are created and found in the Notes Library. This added message will appear at the end of the report, allowing you to provide additional information or policies relevant to the content of the report.
There are a number of default order agreements included with ProSelect, or use the Add button to create your own. Access the Notes Library by going to the top menu, Resources > Notes Library.
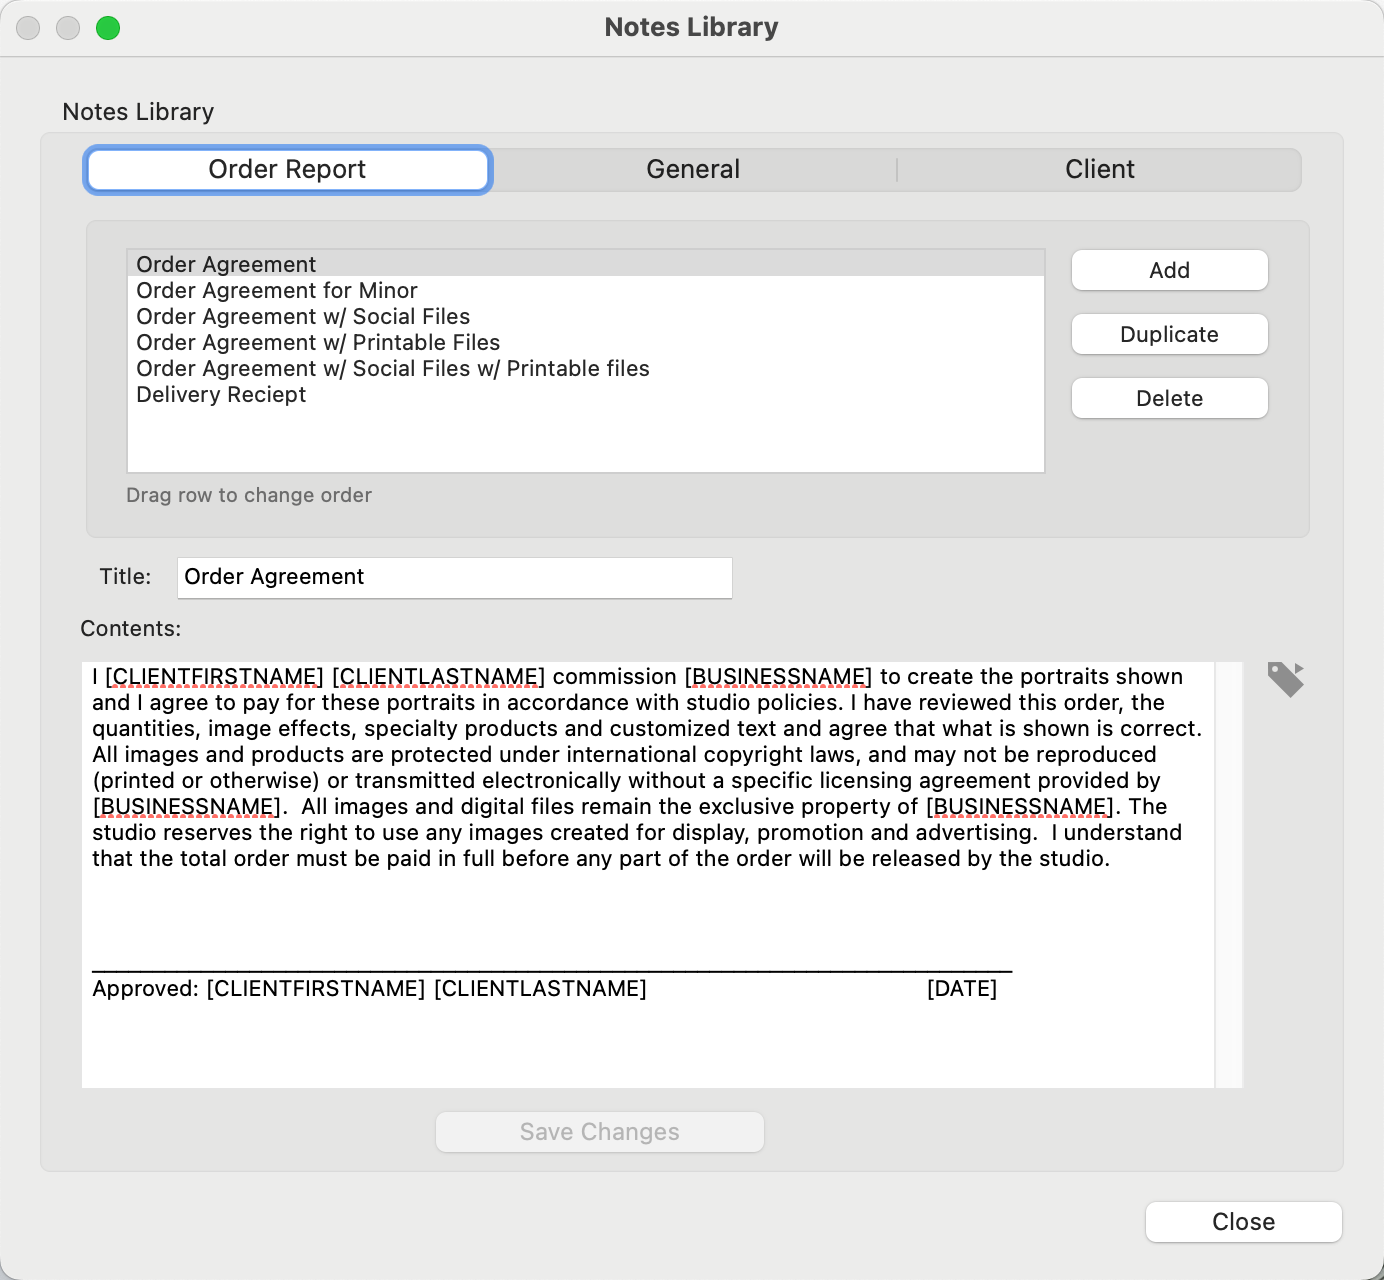
- Select a note from the list to view.
- Edit the notes in the "Contents" box. Save changes when finished.
- You can add a new note using the Add button.
- Alternatively, duplicate a note first, then make adjustments.
Text Tags
Text substitution in ProSelect allows you to automate the inclusion of dynamic content in your notes through the use of special text tags. These tags can be easily inserted into the text by clicking on the ![]() icon next to the Contents box. Choose a text tag from the list provided. When the text is displayed, printed, or exported, these tags are automatically replaced with their corresponding real-time values.
icon next to the Contents box. Choose a text tag from the list provided. When the text is displayed, printed, or exported, these tags are automatically replaced with their corresponding real-time values.
How Text Tags Work: Text tags act as placeholders within your text stamps that pull in specific data such as dates, business names, or client names. You can customize what information appears in your notes by choosing appropriate tags based on your needs.
Tags appear in square brackets. For example, [BUSINESSNAME].
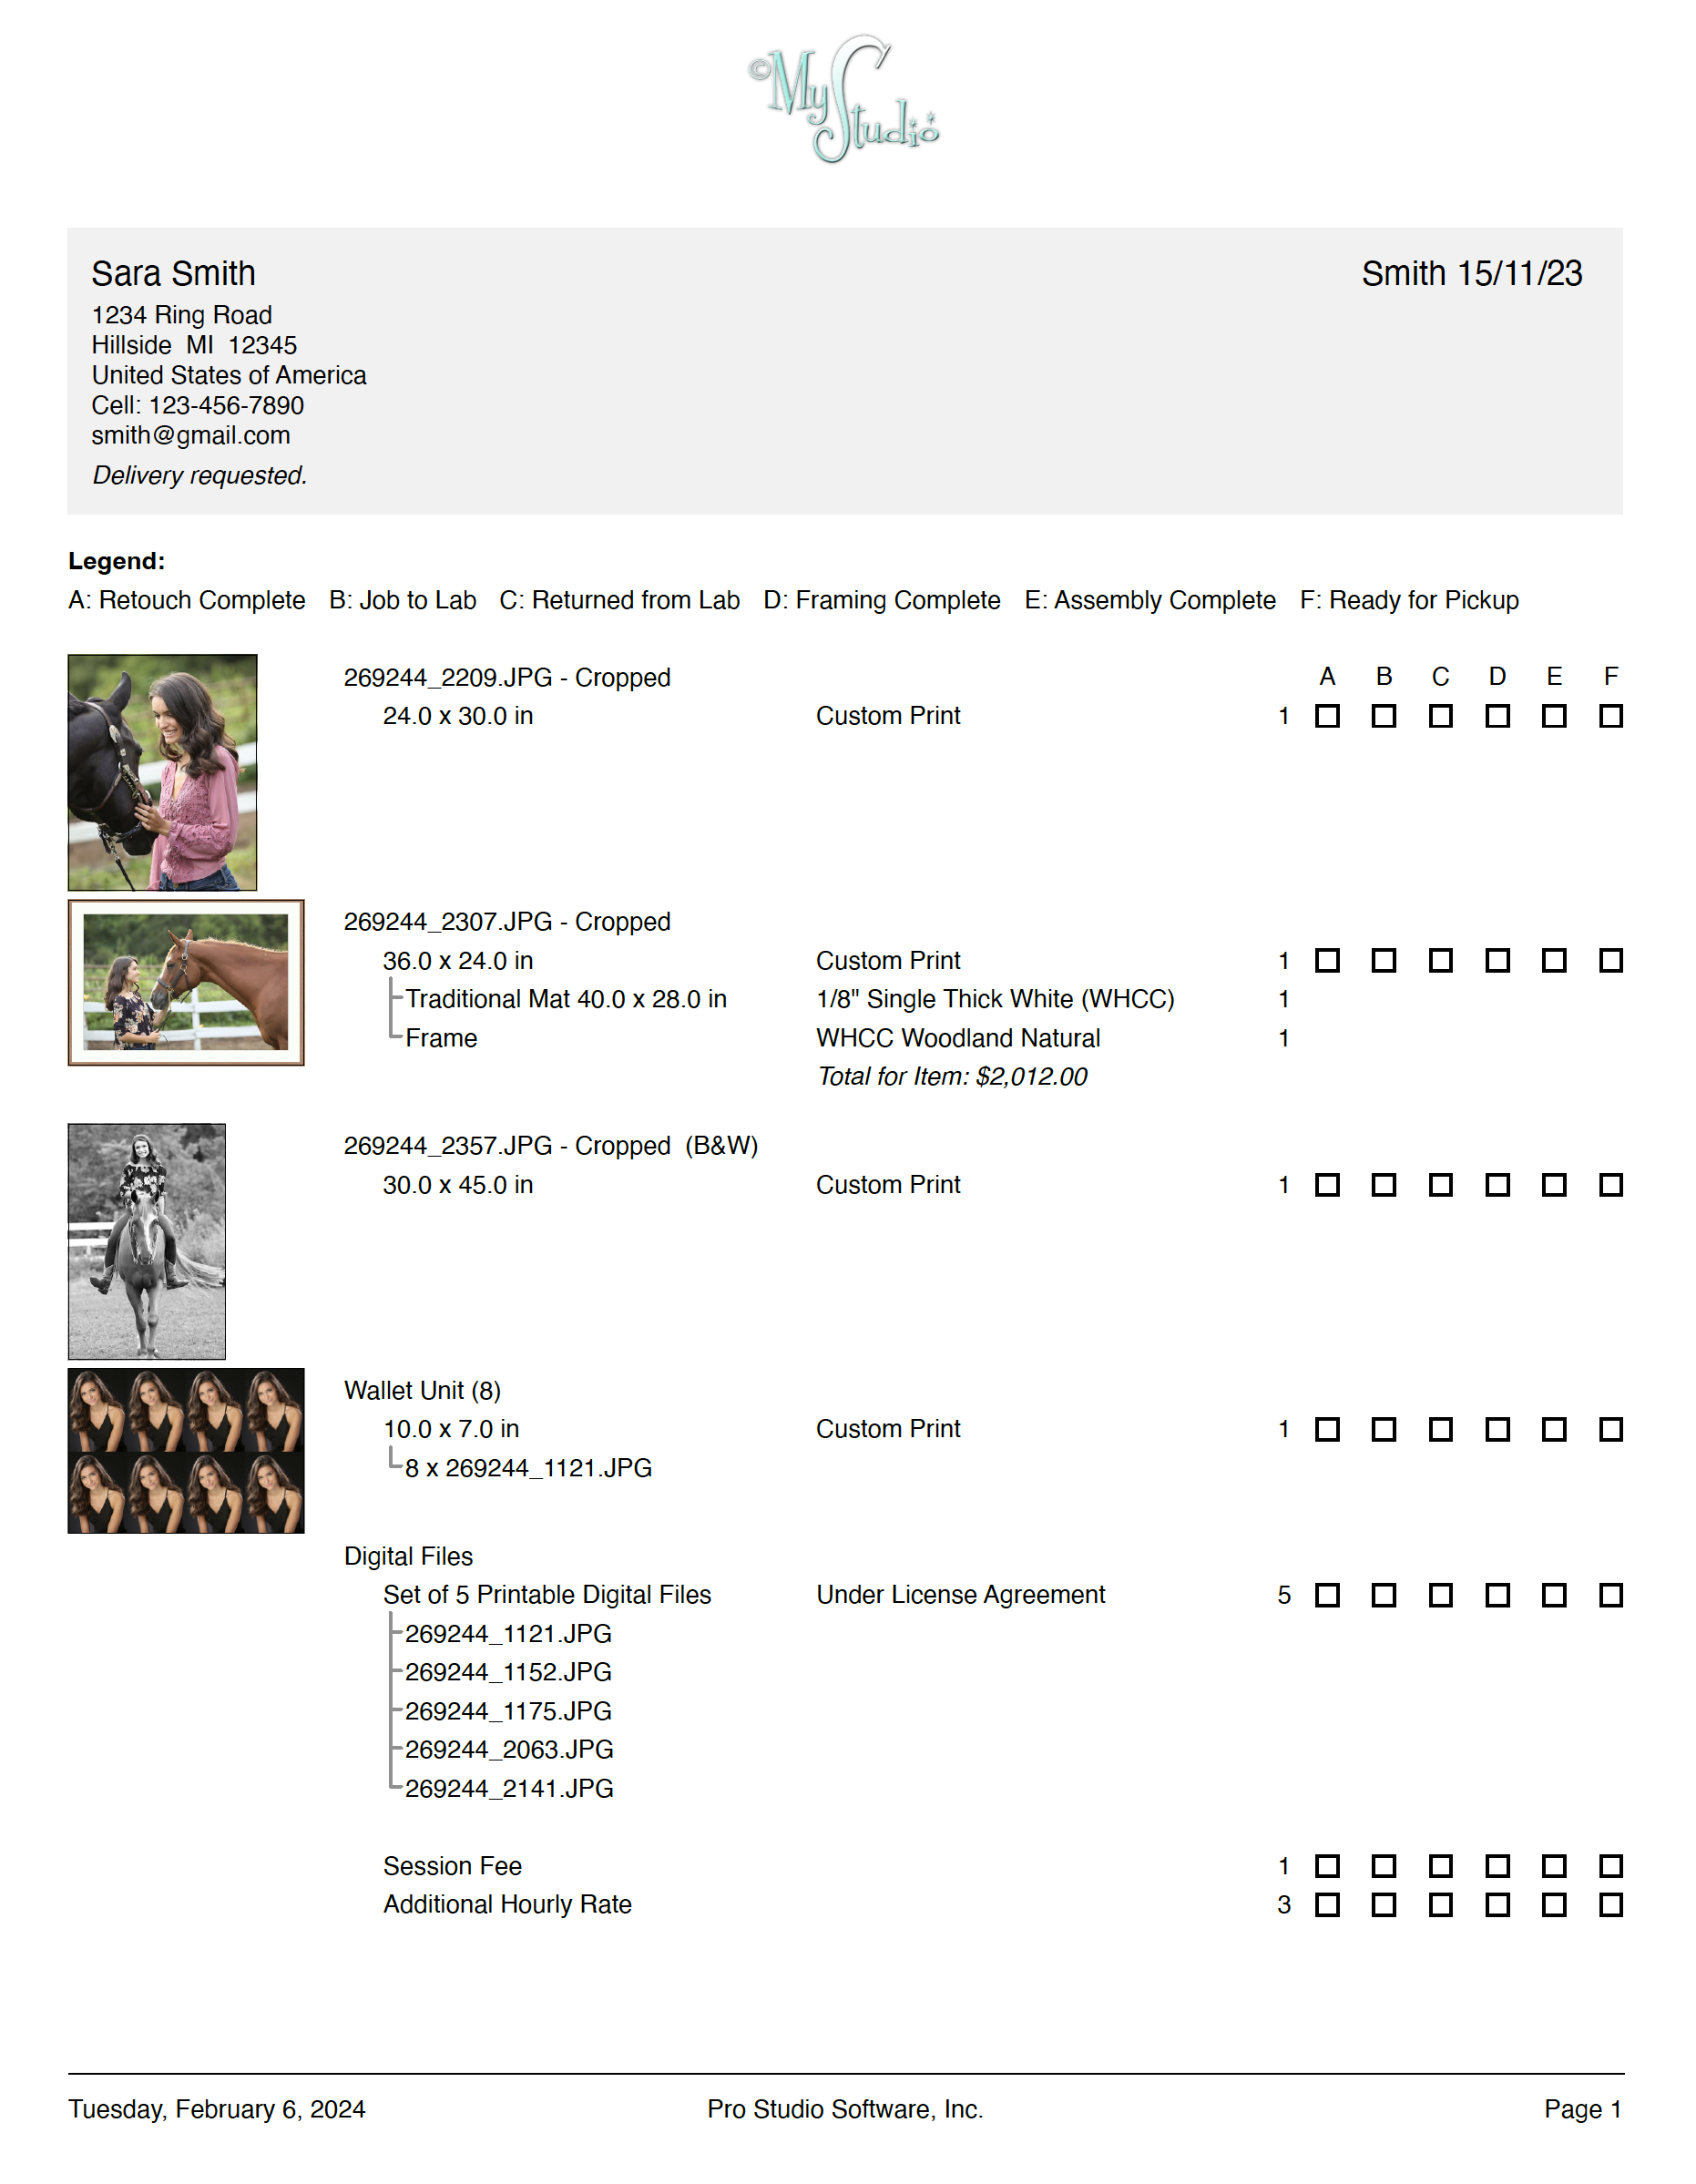
This report functions similarly to the Order Report, but instead of a pricing section, it features columns of checkboxes, designed to serve as a printed checklist to track progress through your fulfillment process. You have the option to define up to six checkbox columns, each with a legend description that can be customized to fit the specific needs of your studio.
Go to the top menu, File > Print > Order Assembly Report.
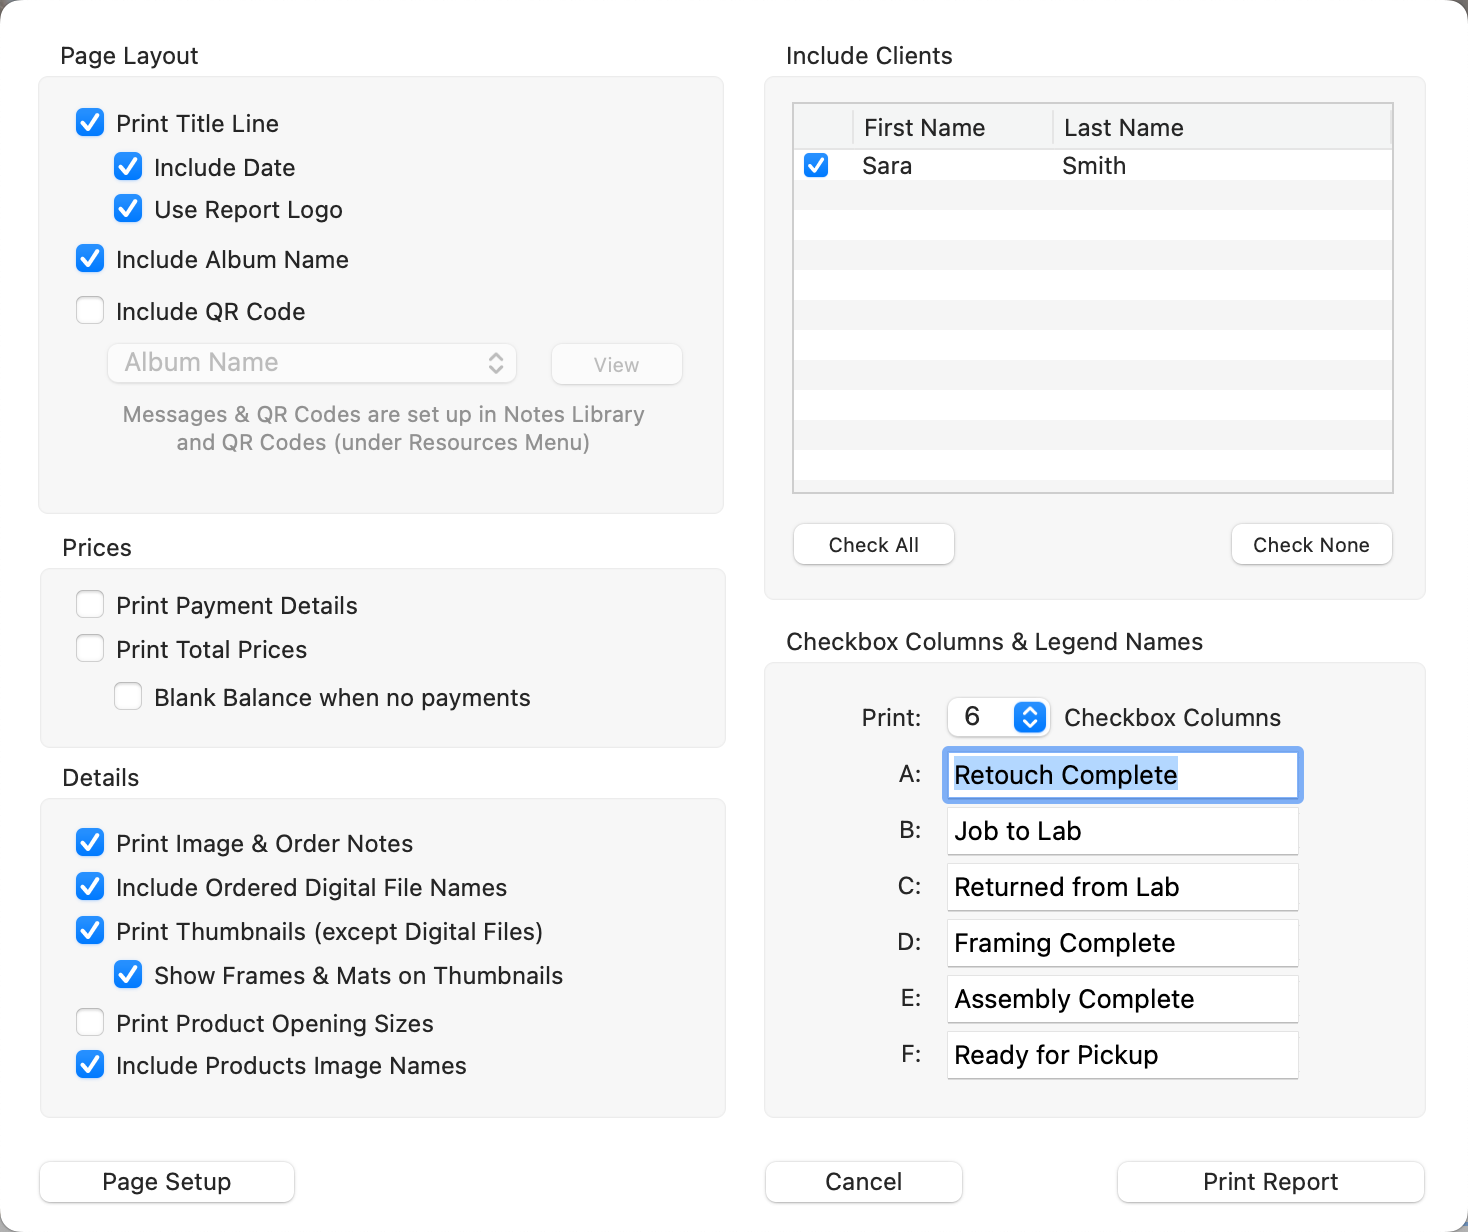
Page Layout Options
- Include a Title Line: Optionally add a title line to the report. If selected, you can also choose to display the current date in the title line.
- Use Report Logo: If a report logo is set up, this option enables its inclusion in the report. The report title will then be positioned at the bottom of the page.
- Album Filename: Include the current album's filename in the report.
- QR Code: If enabled, include a selected QR Code in the client section of the report.
Prices
- Payment Details, Order Totals: Choose to include any of these financial details in the report.
- Blank Balance: If desired, leave a space for writing the balance due by checking "Blank Balance when no payments."
Details
- Print Notes: Print any notes related to the images ordered or the order as a whole.
- Thumbnails: Decide whether to include thumbnails for ordered items (except digital files). You can choose to show the frames or mats if you like.
- File Names: Choose to display all individual filenames for digital file orders.
- Print Product Opening Sizes: This will show the sizes of individual openings in any ordered products. Wall Grouping Template sizes are always displayed.
- Include Products Image Names: Opt to display the names of each image within a product.
A summary of the total number of items in each presentation type will appear at the report's end.
Once you have customized the Order Assembly Report, click on the Print Report button. From here you can either print out the report or save it as a .pdf.
Sample Order Assembly Report:
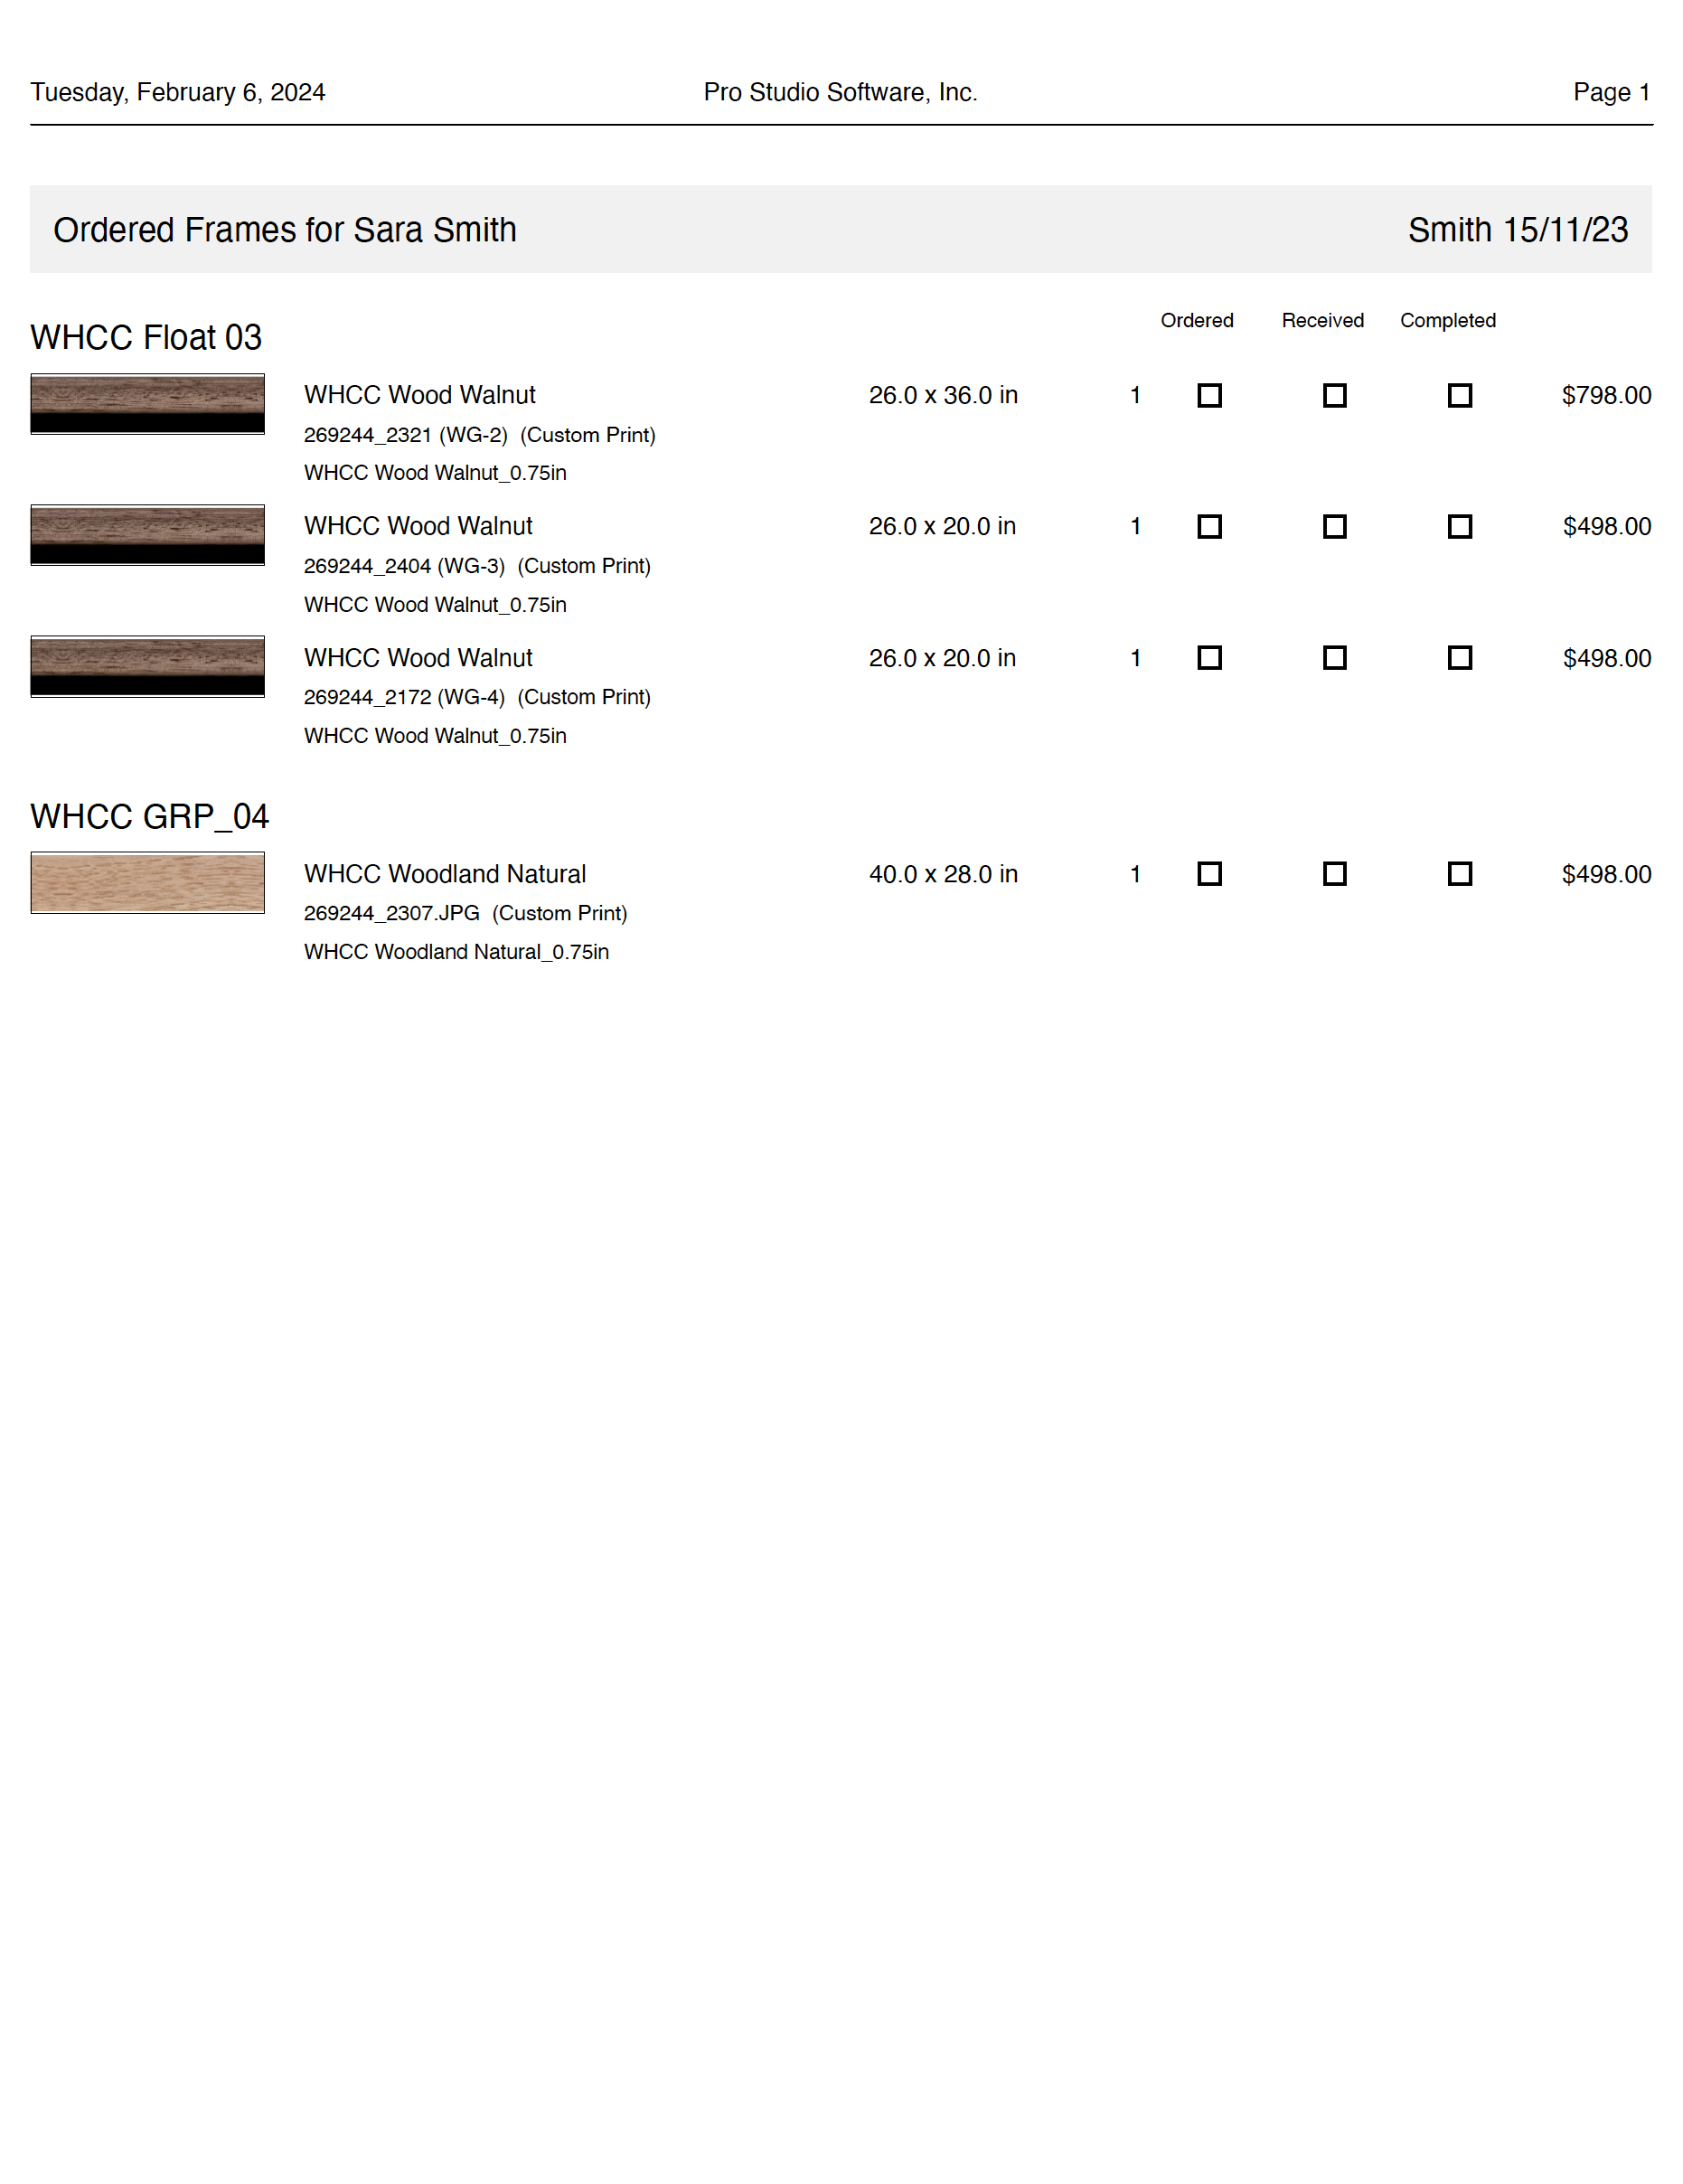
This report provides a detailed list of all frames ordered for each client or across all clients within the album.
Go to the top menu, File > Print > Ordered Frames Report.
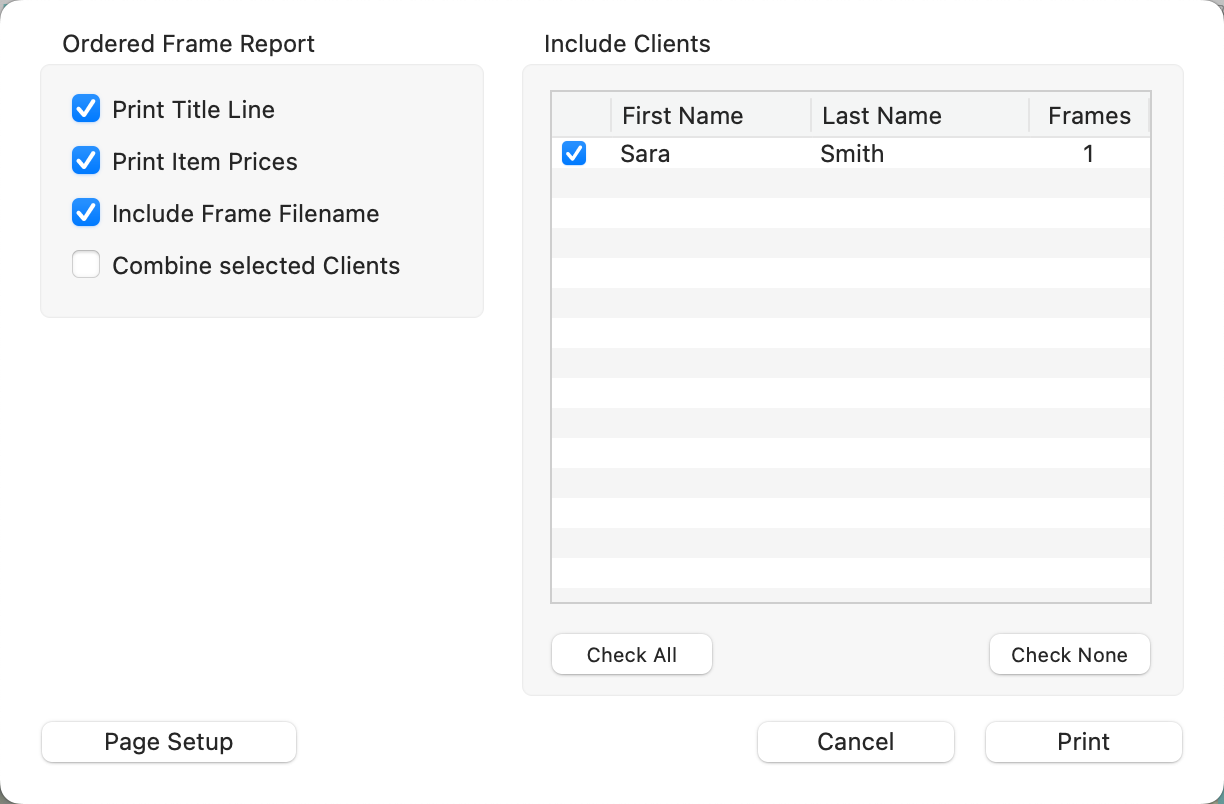
Report Options
- Include a Title Line: Optionally add a title line to the report. This includes the current date and your business name.
- Item Prices: Choose to include the prices of the frames.
- Include Frame Filenames: Include the filename of the frames.
- Combine selected Clients: If you have an order for more than one client, you can combine them.
Once you have customized the Ordered Frames Report, click on the Print button. From here you can either print out the report or save it as a .pdf.
Sample Ordered Frames Report:
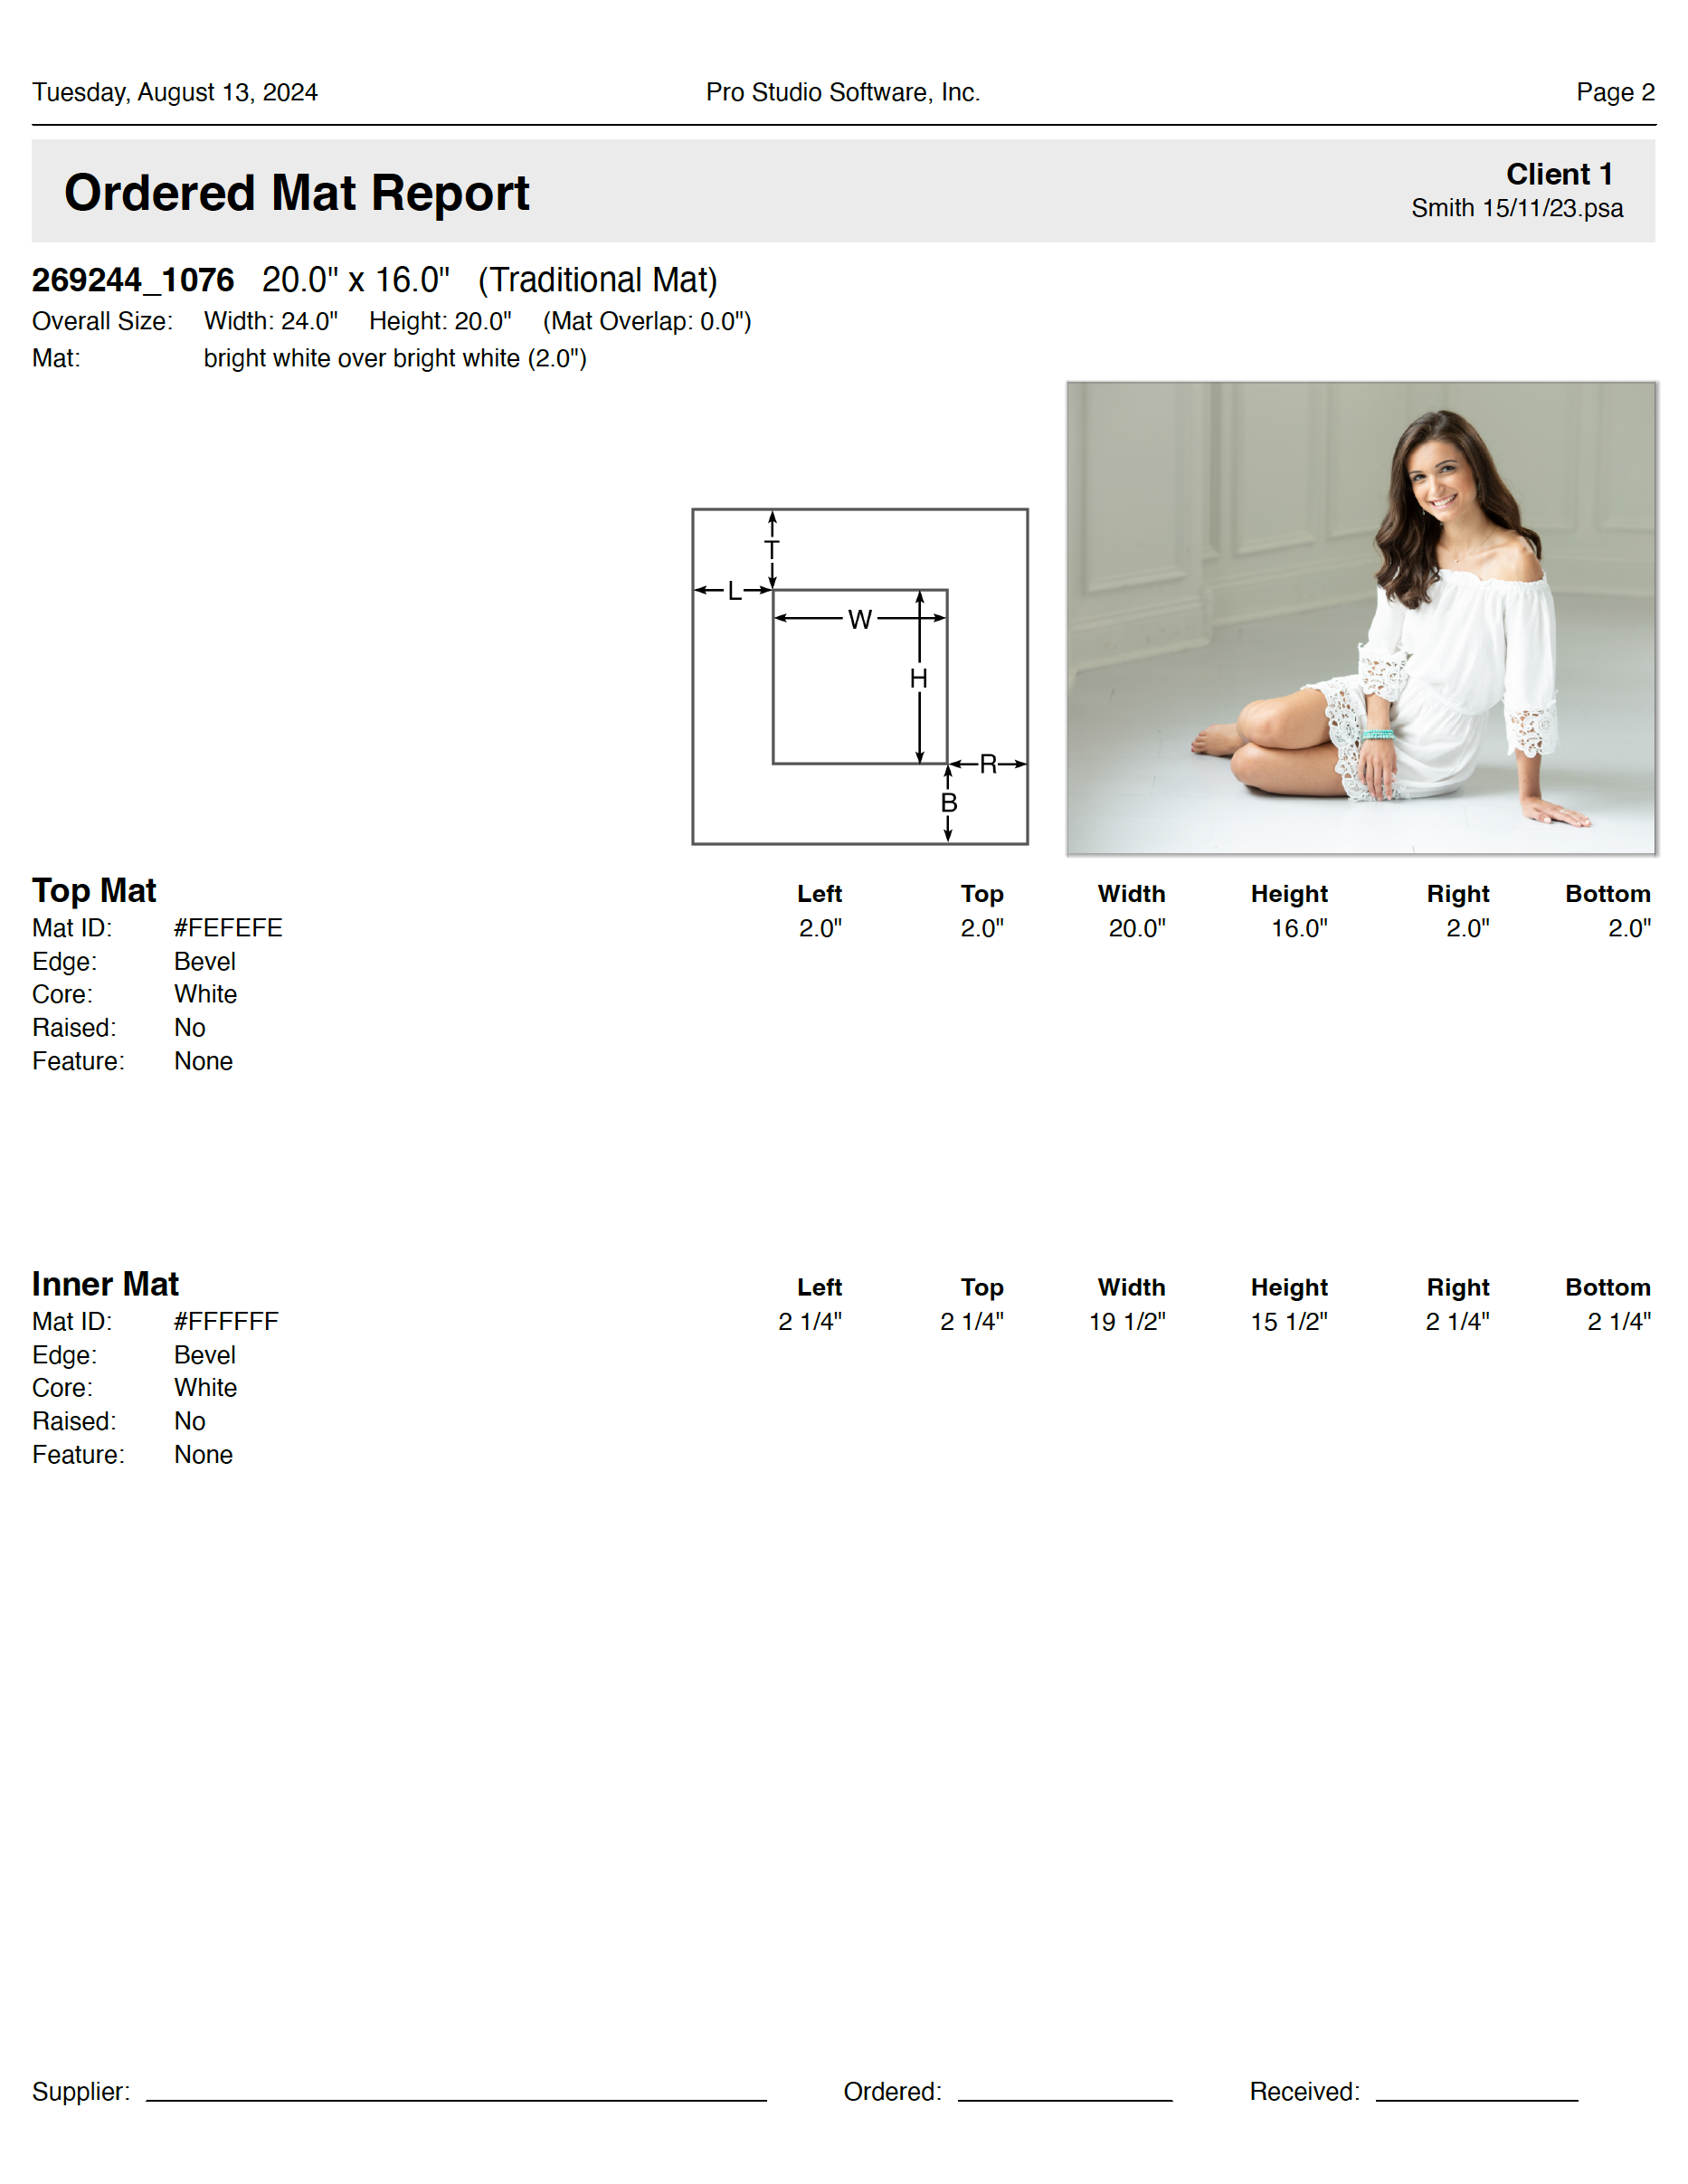
This report provides comprehensive specifications for all ordered traditional mats, including those used in traditional matted book pages sent to Pro Production. The report details full product dimensions for up to three layers of mats, enabling your mat supplier to construct mats that precisely match your design requirements.
Go to the top menu, File > Print > Ordered Mats Report.
Report Options
- Include a Title Line: Optionally add a title line to the report.
- Resolution: Select a resolution from the drop-down menu.
- Units: Choose either inches - fractions, inches - decimals, or centimeters.
Once you have customized the Ordered Mat Report, click on the Print button. From here you can either print out the report or save it as a .pdf.
Sample Ordered Mat Report
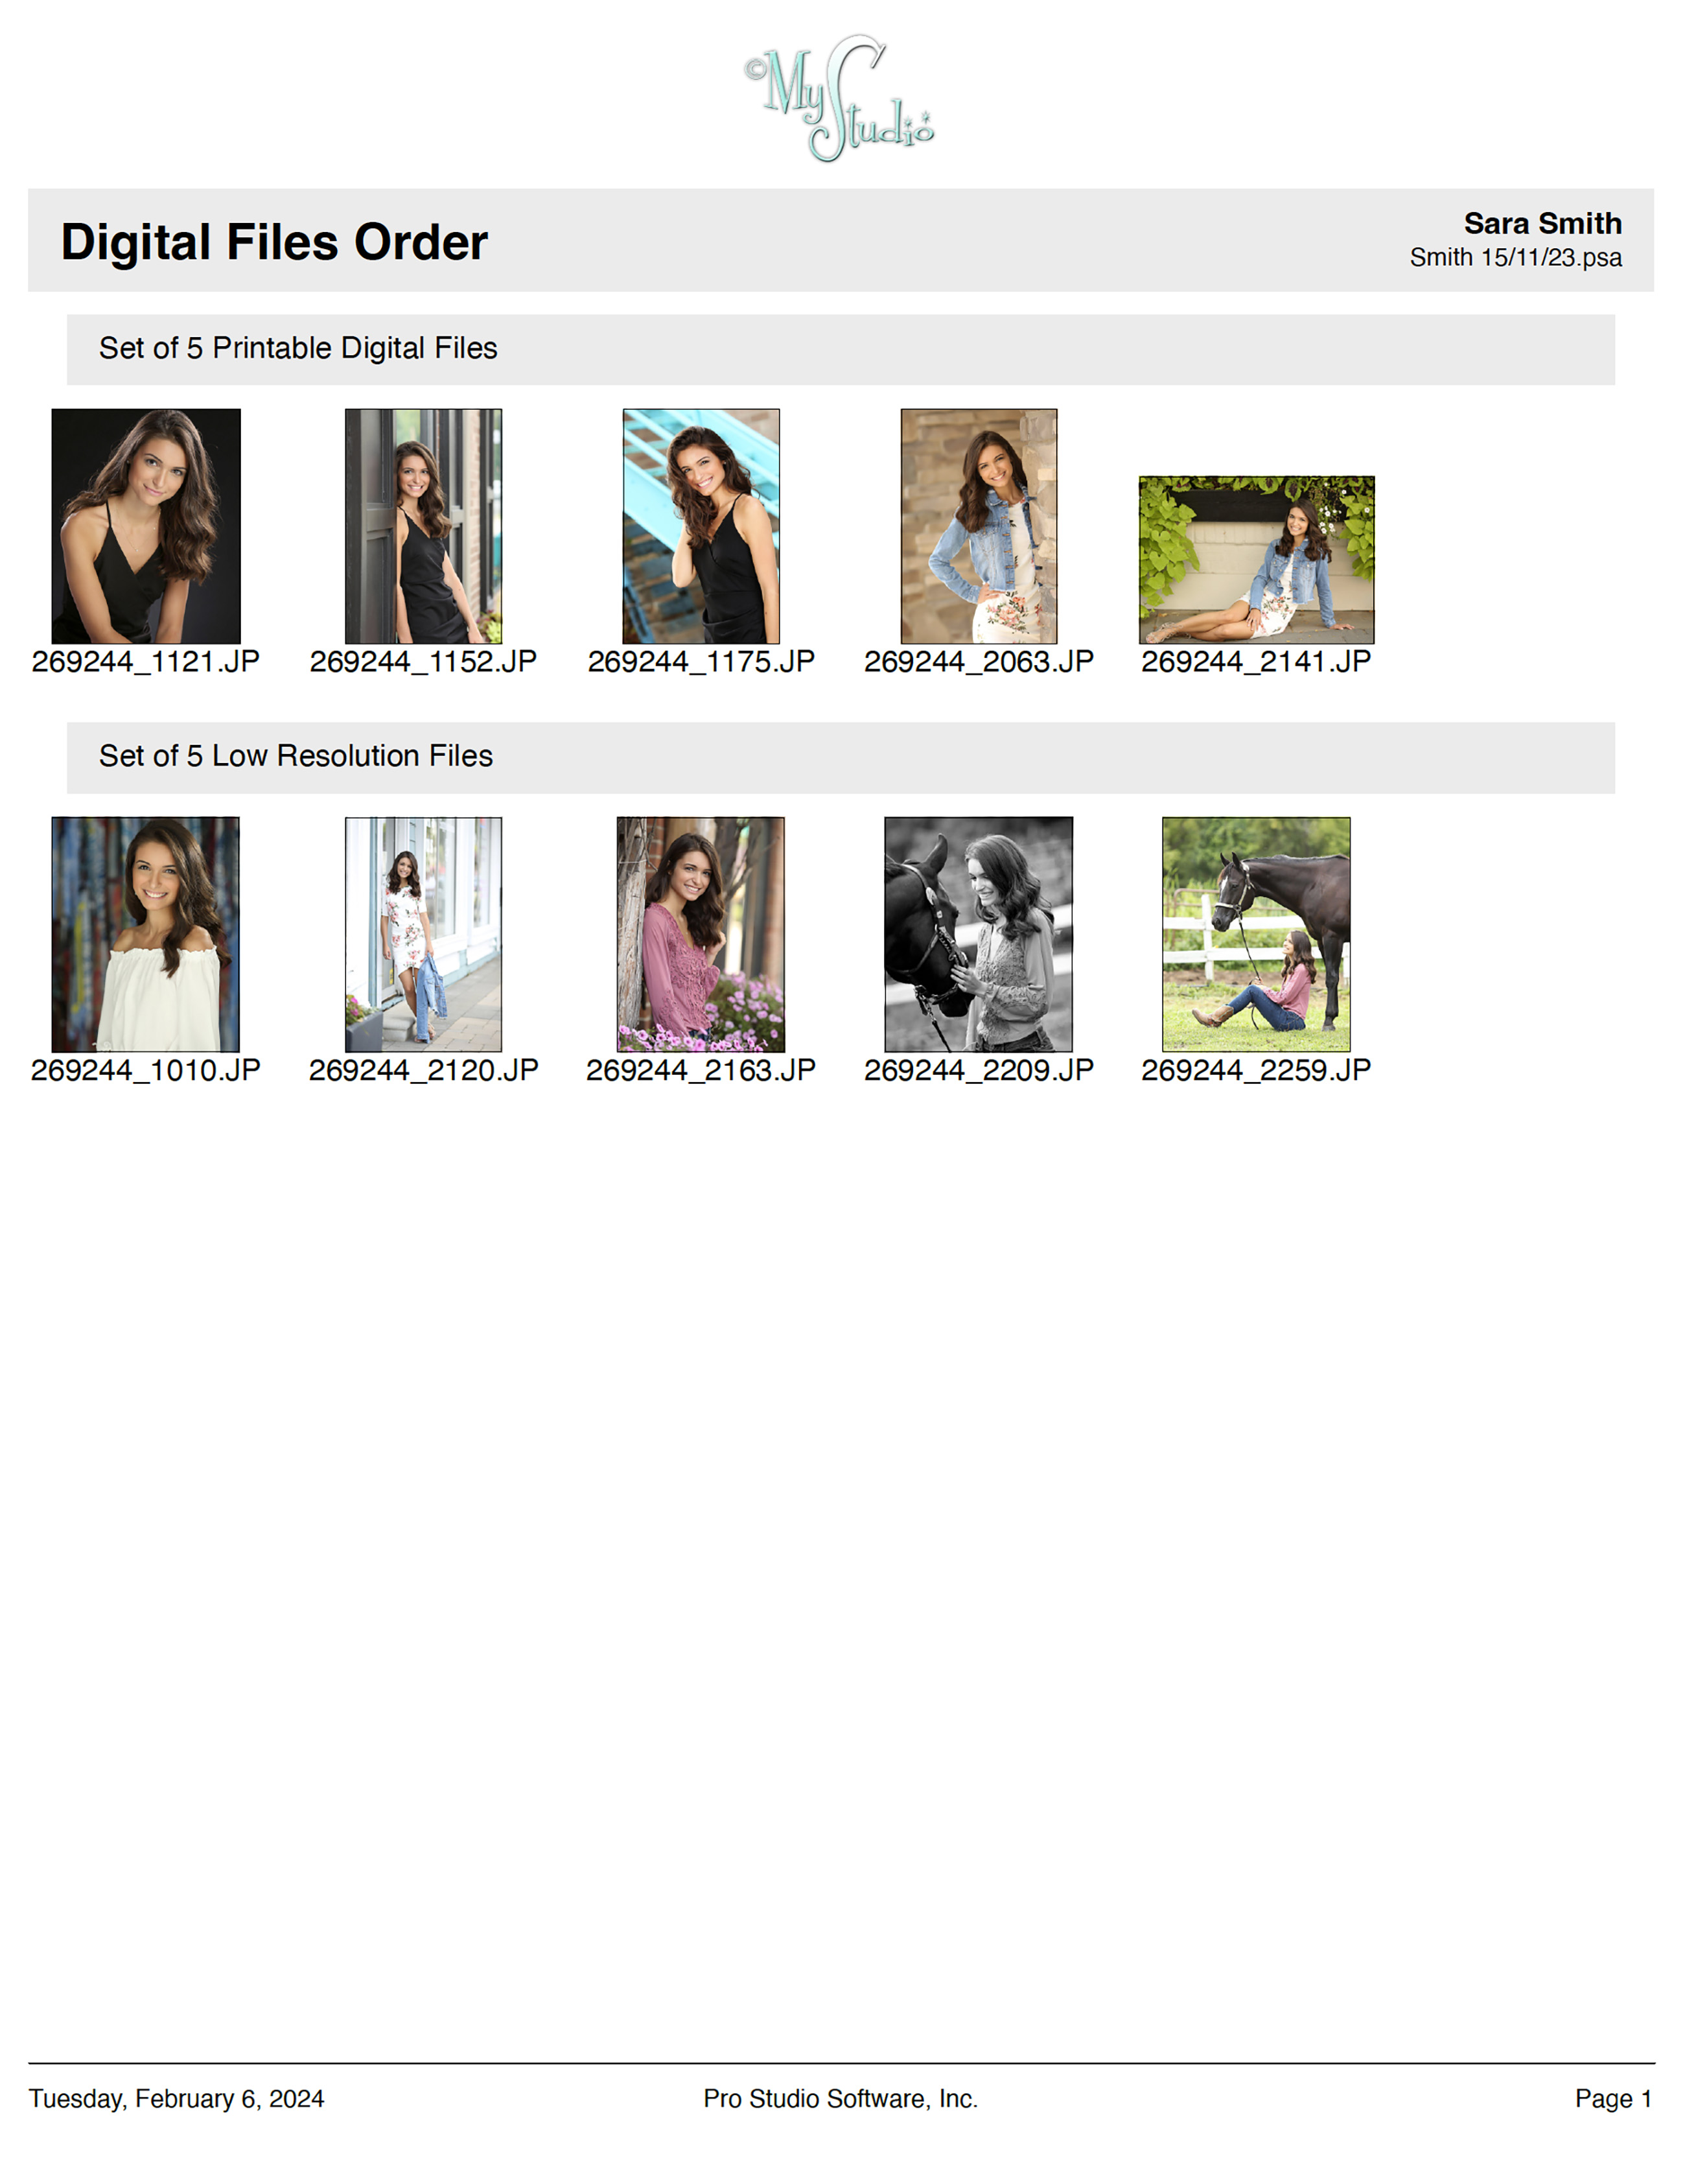
If you're dealing with a significant number of ordered digital files, this report is designed to print the thumbnail images in a proof sheet format for easy viewing. For a smaller collection of images, you have the option to include them in your Order Report by adjusting settings under the Options 2 tab.
Go to the top menu, File > Print > Ordered Digital Files Report.
Report Options
- Include a Title Line: Optionally add a title line to the report.
- Use Report Logo: If a report logo is set up, this option enables its inclusion in the report. The report title will then be positioned at the bottom of the page.
- Album Filename: Include the current album's filename in the report.
- Thumbnail Image Sizes: Tailor the presentation by selecting the size of the thumbnail images. Options include:
- Small (the same size as those in the Order Report),
- Medium (50% larger), or
- Large (100% larger).
- Filenames: Decide whether to include the filenames of the digital files on the report for identification purposes.
- Copyright Stamp: You have the option to apply a copyright stamp to each image on the report, adding an extra layer of protection and professionalism.
- Resolution: The default is set to 600dpi, but you can choose 150 or 300 based on your printer's capabilities or if you need to reduce file size for a .pdf.
Once you have customized the Ordered Digital Files Report, click on the Print button. From here you can either print out the report or save it as a .pdf.
Sample Ordered Digital Files Report: