 Pretouching Images
ProSelect includes an automatic pretouching feature powered by Perfectly Clear technology, designed to enhance the quality of portrait images swiftly. This tool offers 15 built-in presets tailored to address common image issues, allowing you to significantly improve your photos quickly. Pretouching is notably efficient; for instance, you can apply basic pretouching to 50 images in less than a minute. This efficiency enables you to enhance all your album images prior to sales sessions without significant time investment.
It's important to distinguish between pretouching and retouching in ProSelect. Pretouching refers to the enhancements applied to lower-resolution album images, whereas retouching involves modifications made to the original high-resolution images during the Pro Production process. The same pretouching presets can be used for both workflows.
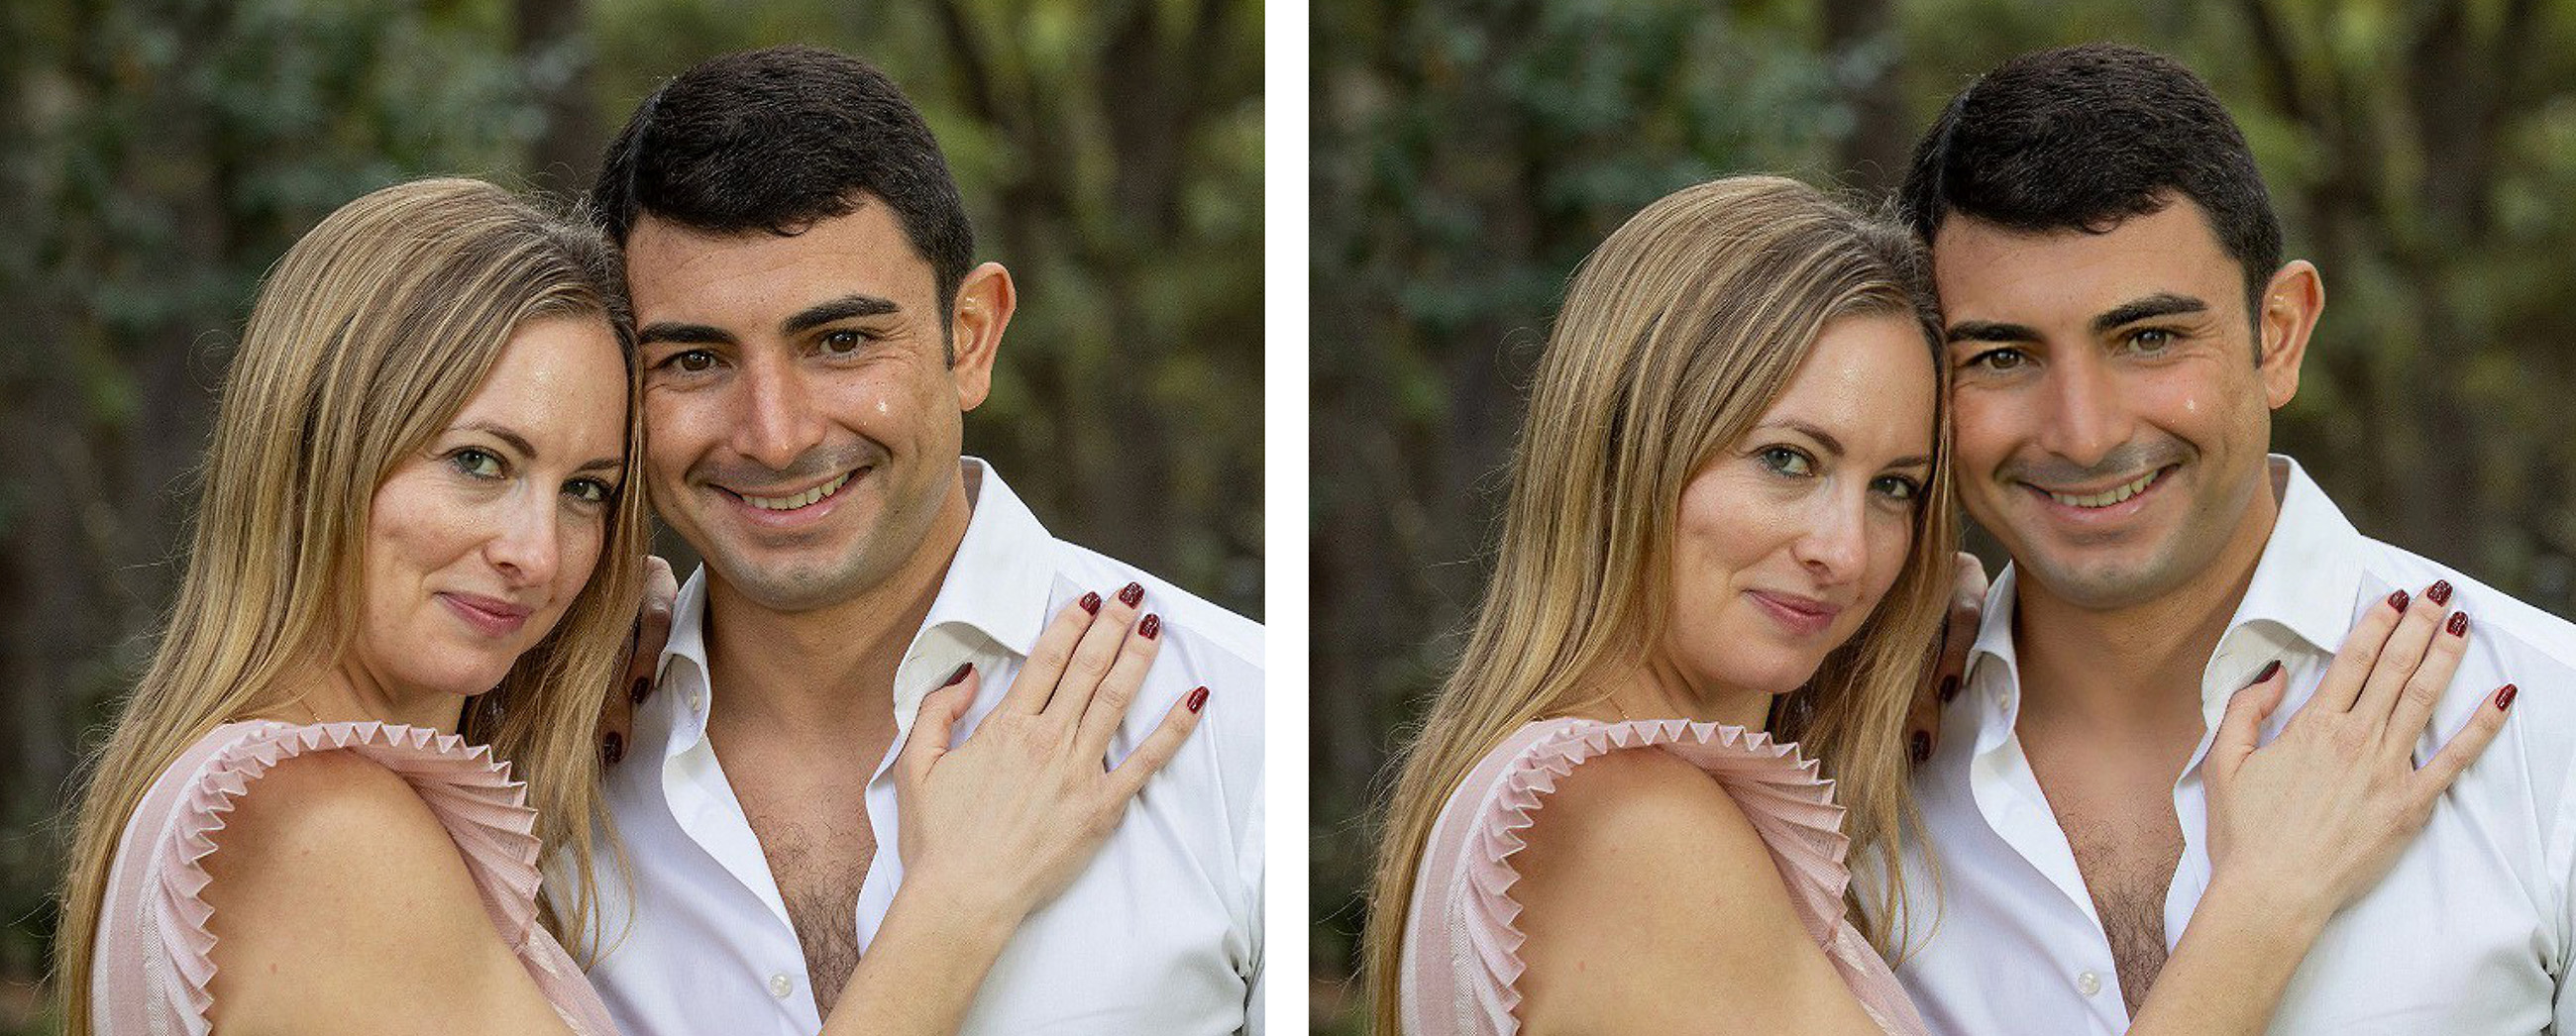
Before and After: Using FE-S @100%

Perfectly Clear, and the Perfectly Clear logo, are the Trademarks of Athentech Technologies, Inc. They are used under license by Pro Studio Software.
Perfectly Clear technology is designed to run on 64-bit operating systems. It will only work on 64-bit versions of Windows 7 or newer. All modern Mac computers (with OSX 10.9+) are all 64-bit.
You can quickly apply pretouching effects to your images in ProSelect using the Pretouch Images tool ![]() .
.
- Left-clicking the tool opens the Pretouch Images window, where you can individually select, preview, and adjust the pretouching presets. Once you find the optimal setting for an image, you can synchronize it to other selected images using the Sync button.
- Right-clicking the tool (or using the shortcut Shift + P) opens the Pretouching popup menu. You can apply a pretouch preset to the selected images or remove any pretouching. The most recently used presets, along with their intensity settings, are listed at the top of the list for easy access.
-
Remove pretouching by selecting "Remove Pretouch" from the drop-down list.
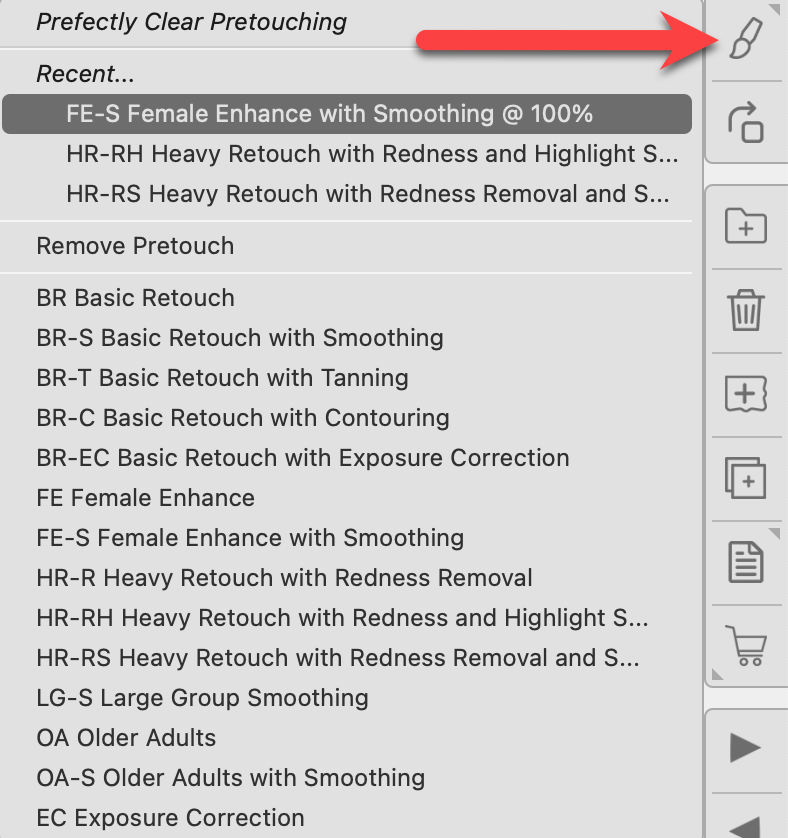
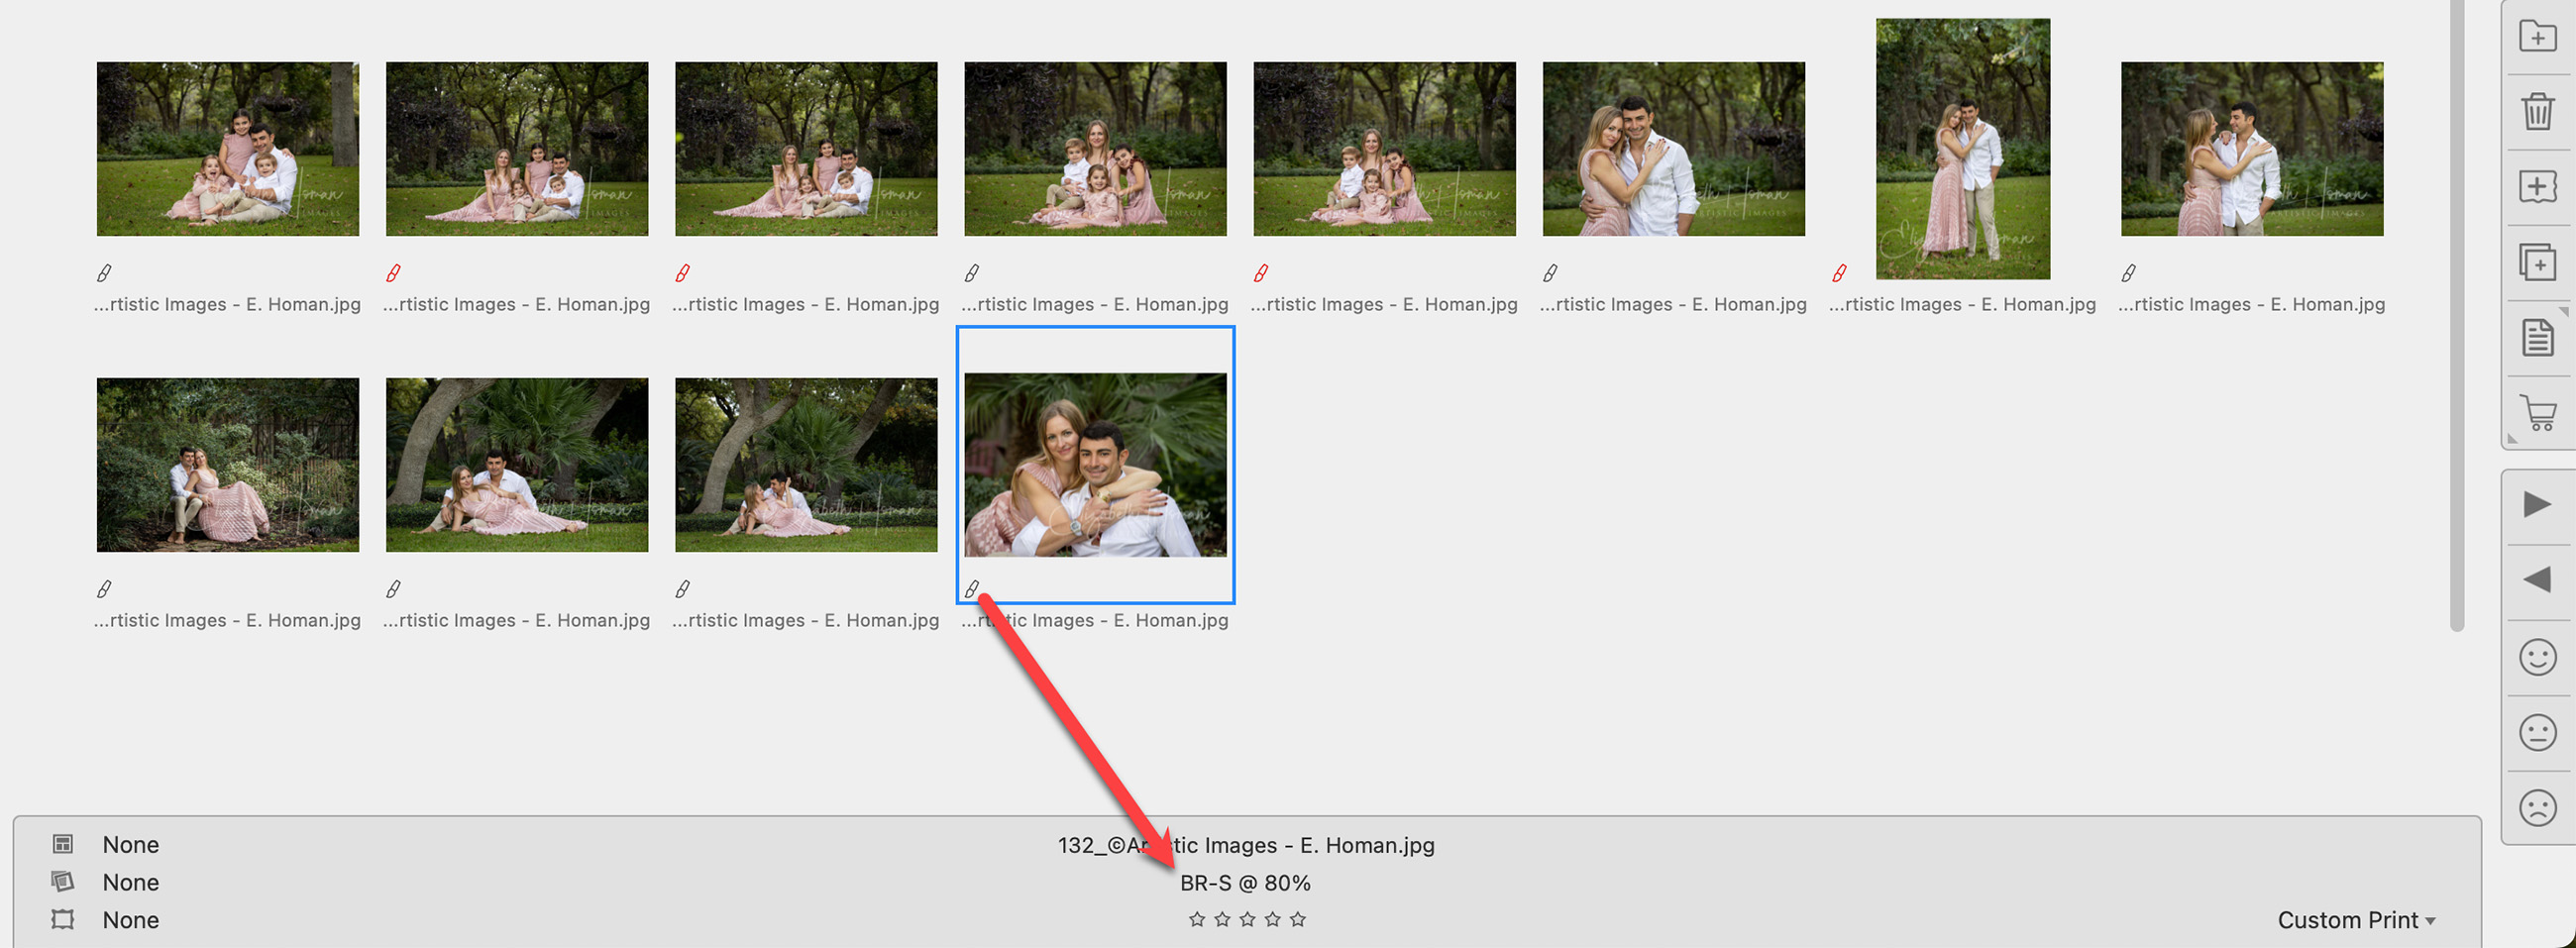
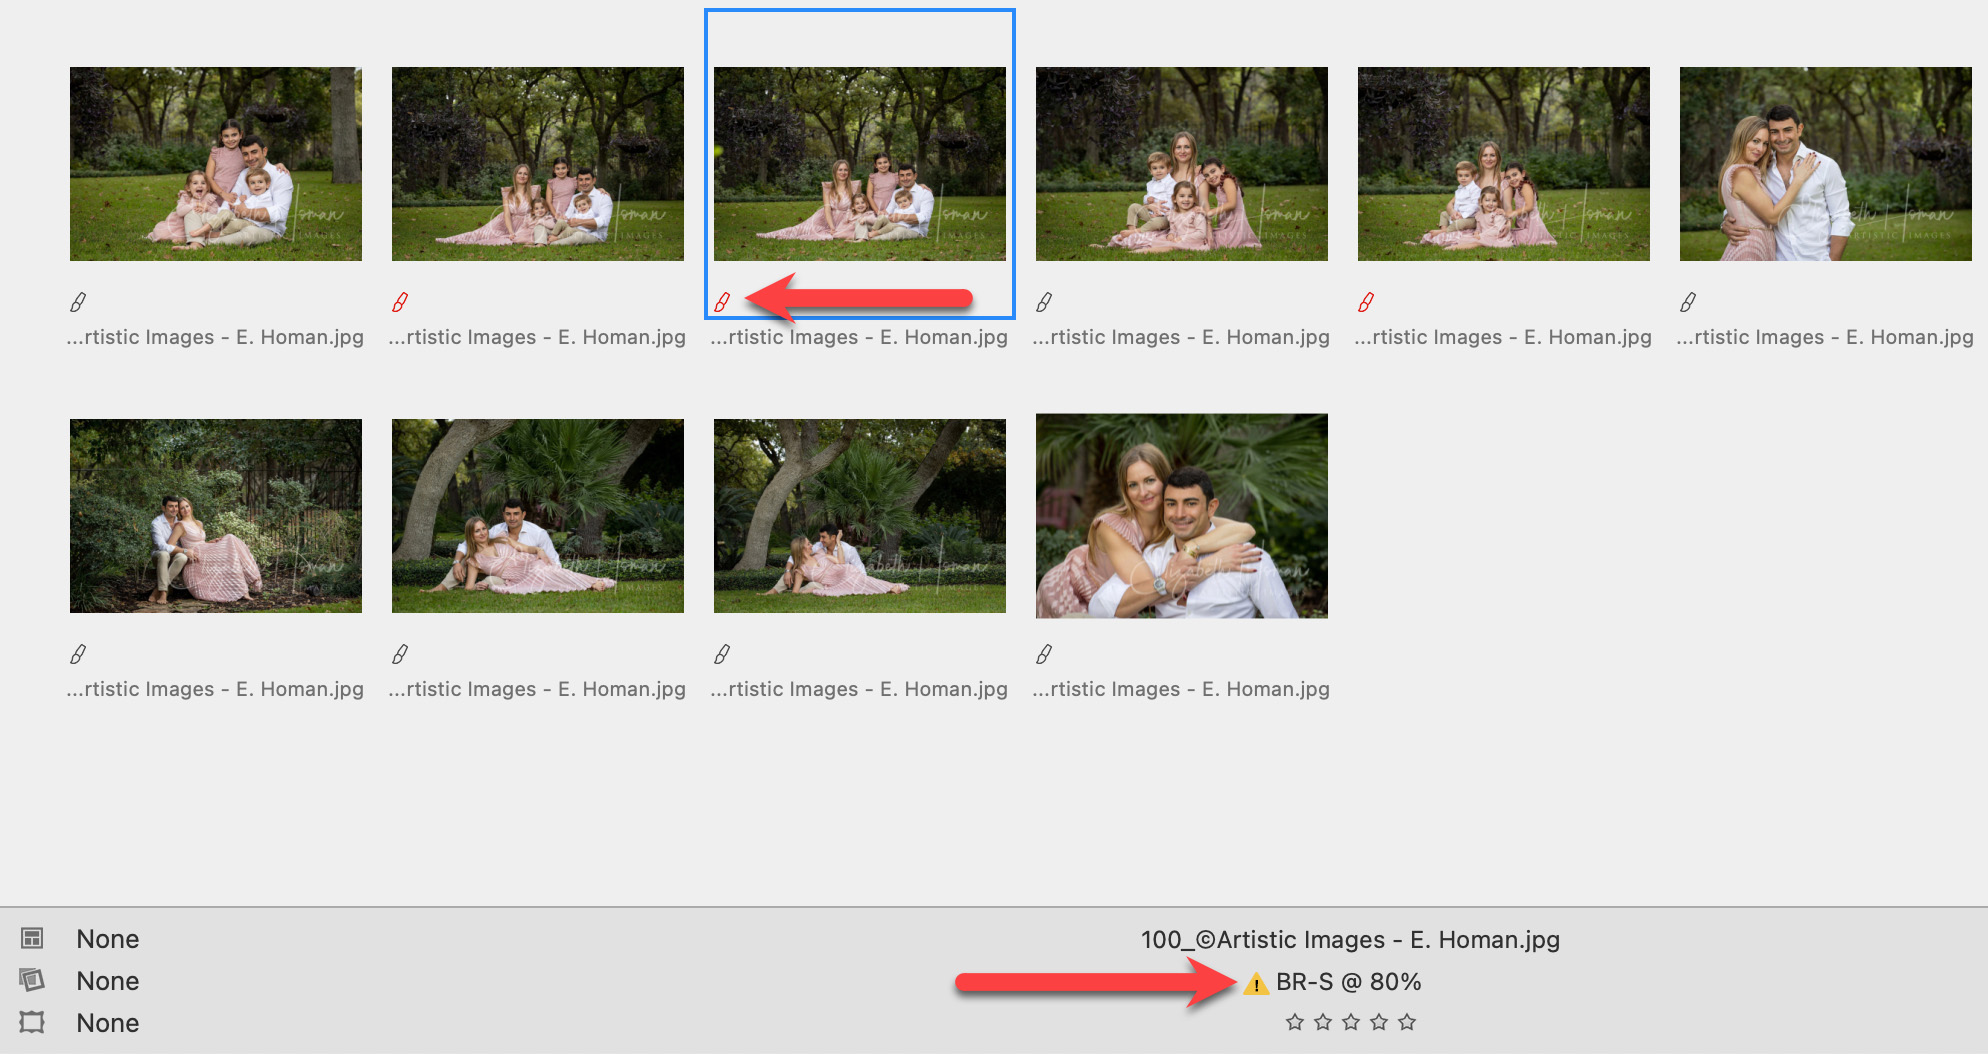
Once you have pretouched an image, the pretouching tag will appear on the thumbnail. When the image is selected, the pretouching code and intensity appear on the info bar.
Each preset in ProSelect is identified by a short code, a title, and a description for clarity. However, only the code and selected intensity appear in the Info Bar, ensuring that specific pretouching details remain discreet during client sessions.
When you left-click the Pretouch Images toolbar button in ProSelect, the Pretouch Images window will appear. This window displays all selected images along with any previously applied pretouch settings and custom effects on the left side. The first image in the list is automatically selected for previewing. If no preset has been previously applied to it, the topmost preset is selected by default and its effect is shown in the preview area.
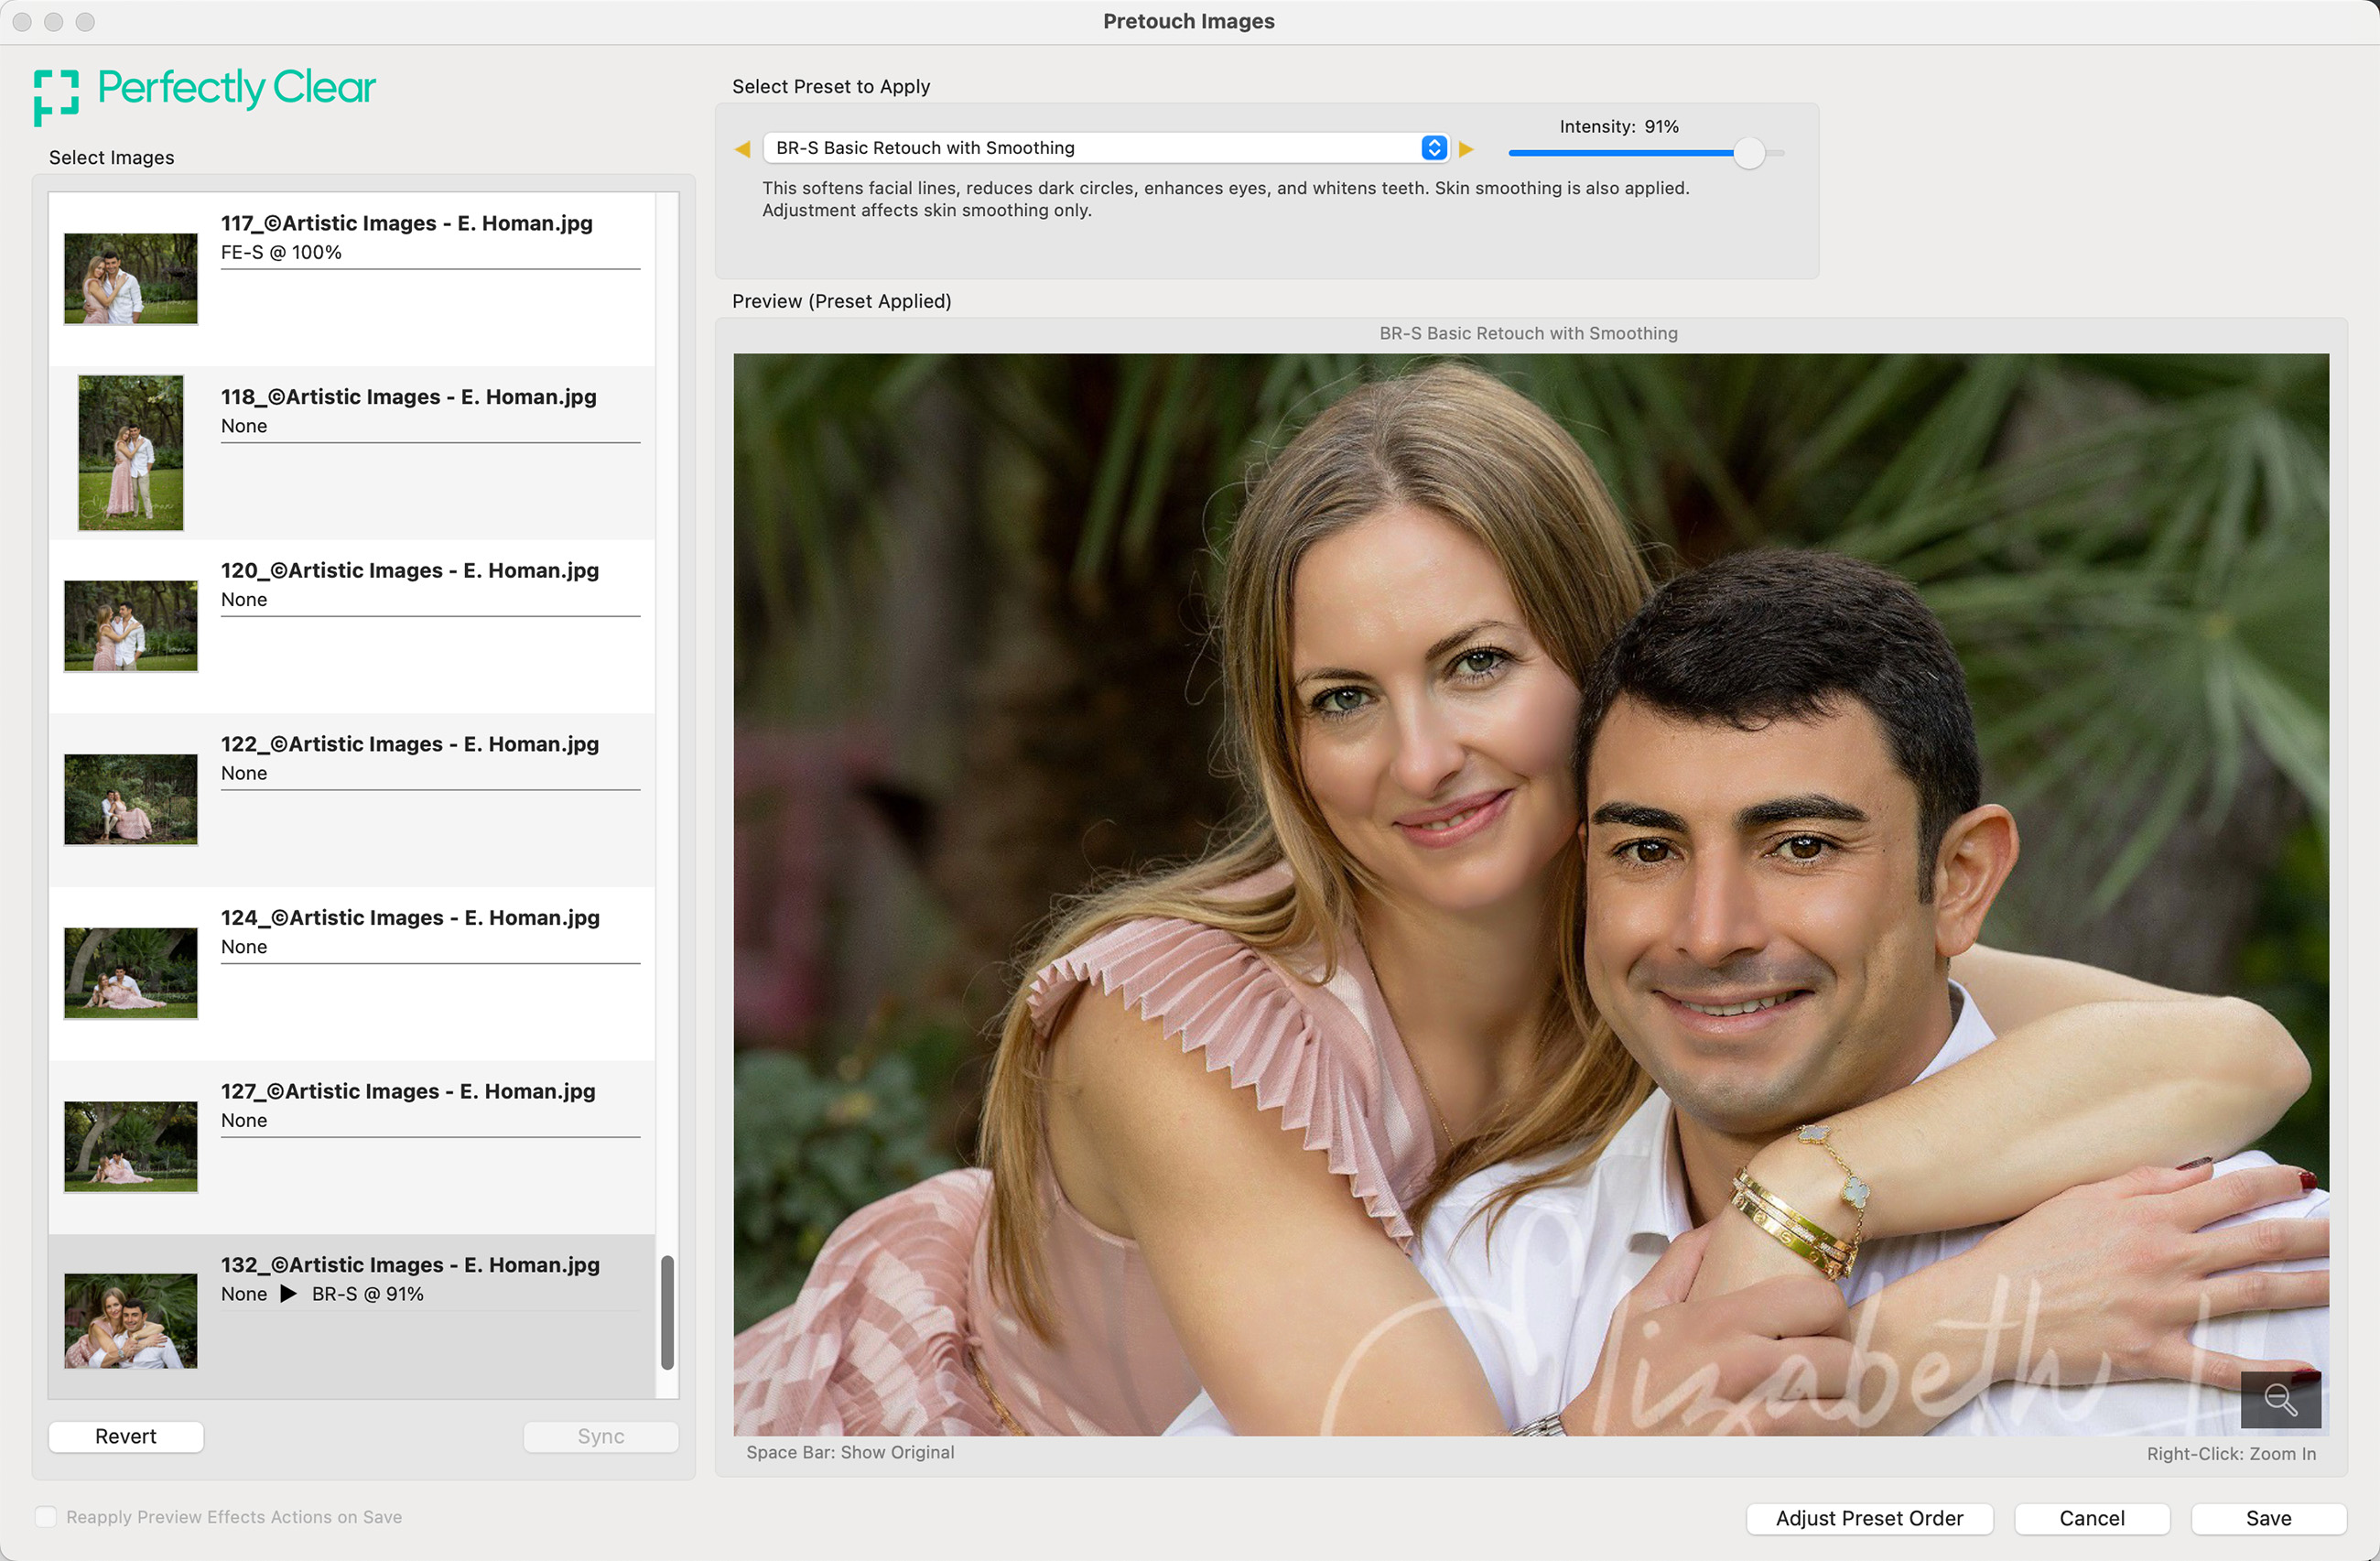
- Comparing Before and After: To compare the original and pretouched image, press the space bar. This will toggle between the original unpretouched image and the pretouched result.
- Seeing More Detail: You can enlarge the window for a bigger preview or right-click on the image to zoom in, similar to the main window's functionality, which follows your configured mouse options. While zoomed in, you can drag to reposition the image or click the Zoom Out button to reset the zoom.
- Exploring Pretouching Presets: To test different presets on the selected image:

- Choose a preset from the dropdown menu.
- Navigate through presets using the Previous/Next buttons on either side of the drop-down menu or the Left/Right Arrow keys.
- The effects of the selected preset and a brief description are displayed below the dropdown menu.
- Adjust the intensity of the effect using the Intensity slider to suit your preferences.
- When you finish making pretouching adjustments in ProSelect, click the Save button to update your album file with the pretouched versions of the images, replacing the originals. If you decide not to keep the changes, simply click Cancel to discard any modifications you've made.
- Applying presets is not permanent. You can always revert back to the original image by selecting "None" from the drop-down menu.
When you've determined the best settings for an image using the Pretouch Images window, you can easily apply these settings to other images.
- In Working with Images, select an image and press CmdCtrl + A to select all of the images.
- Click on the Pretouch Images tool.
- Select a preset to apply to the top image. Adjust the intensity as required.
- Scroll to the bottom of the image list, click on the last image while holding the Shift key.
- With all the images selected, click on the Sync button.
- All of the images will now have the selected preset applied at the same intensity.
- Alternatively, hold down the CmdCtrl + OptionAlt keys while clicking images one at a time to select just a handful of images. Click on the Sync button to apply the preset to the selected images.

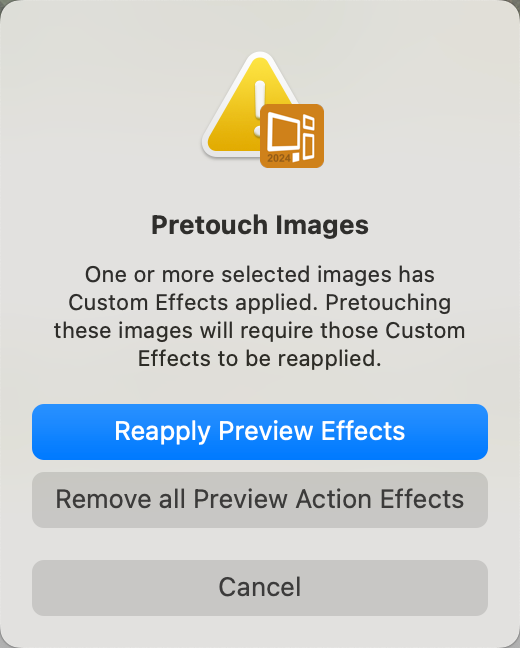
When using ProSelect, pretouching should generally be applied first to your images, before any Custom Effects. This ensures the base image enhancements are set before adding further stylization.
However, ProSelect accommodates scenarios where images already have effects applied. In such cases, ProSelect will first apply the pretouching to the original images and then reapply the existing effects. When doing this, ProSelect will prompt you to confirm if you want to reapply the custom effects after the pretouching adjustments. You can confirm this by selecting the "Reapply Preview Effects" option, which will automatically check the corresponding checkbox in the dialog window.
To rearrange the order of your presets, click the Adjust Preset Order button to open the corresponding window. Here, you can drag the preset names up or down to reorder them as desired. Once you're satisfied with the new arrangement, click the Save Changes button to apply the modifications.

Pro Production is a Pro feature. Upgrade your subscription to Pro on the Pro Studio Software website.
With a ProSelect Pro license, you can apply selected pretouch presets to your final images. You have the option to manually retouch images or use the Perfectly Clear Complete plugin in Photoshop or Lightroom. This enables you to apply the same pretouch presets used in ProSelect to your images and then fine-tune them with more advanced controls available in these programs. This integration significantly cuts down post-production time, especially for digital file orders. However, it's important to note that images processed with Perfectly Clear during production will be converted from 16-bit to 8-bit. Click on Handling Pretouching Presets to learn more.
When using ProSelect's Pretouching feature, which is powered by Perfectly Clear™ and employs advanced AI algorithms, the software effectively identifies and enhances people and faces in most images by learning from a vast number of samples. However, sometimes certain images may not be processed correctly, leading to pretouching errors.
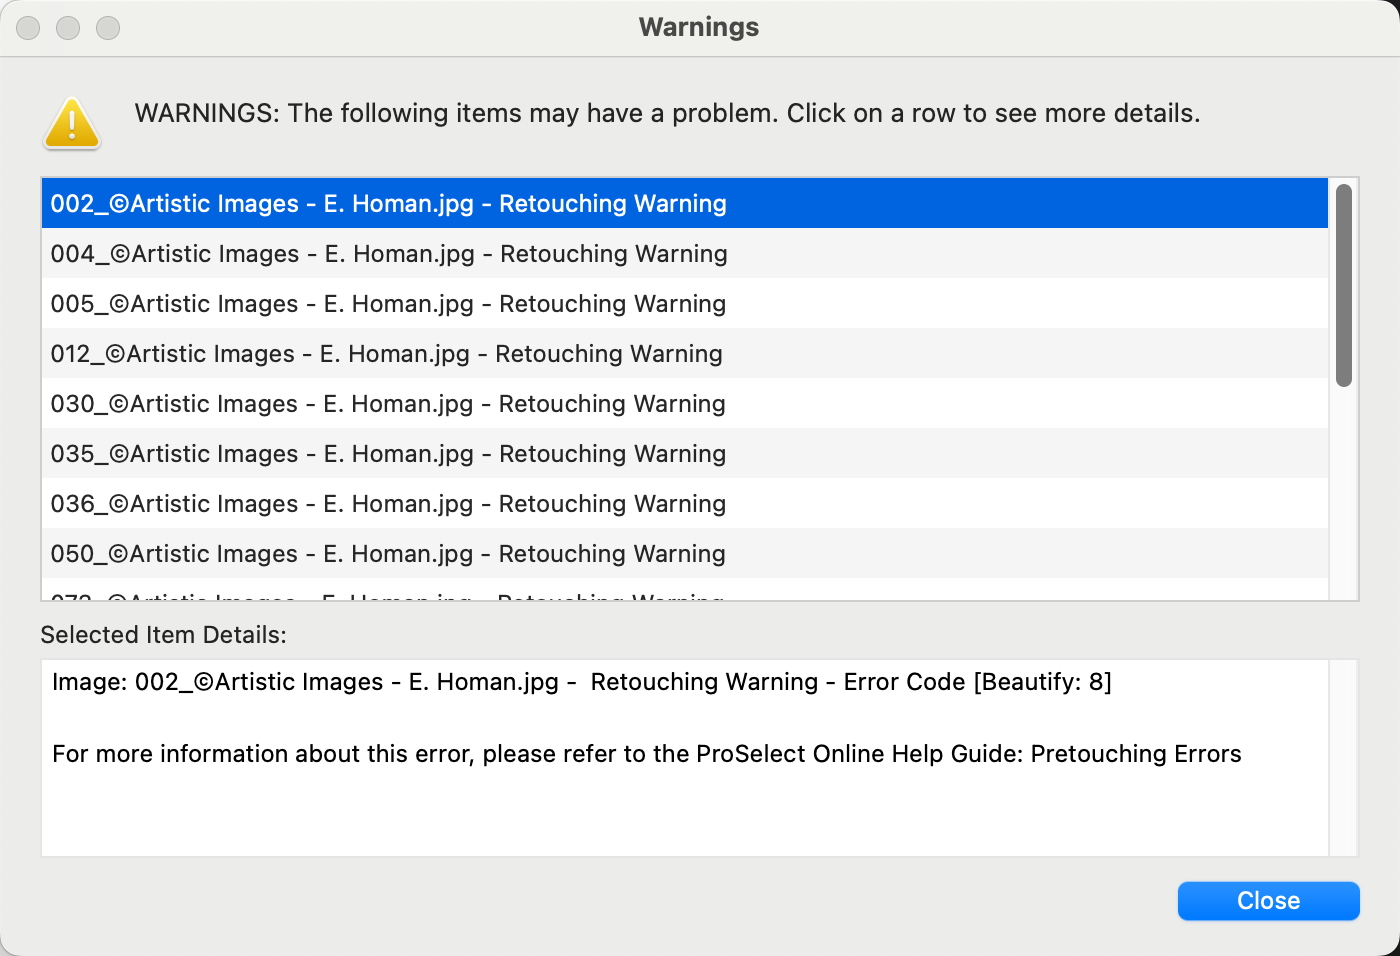
- If an error has occurred, a warning icon
 will appear near the affected image, and if an error is specific to a selected image, error codes will be displayed at the bottom of the window enclosed in square brackets.
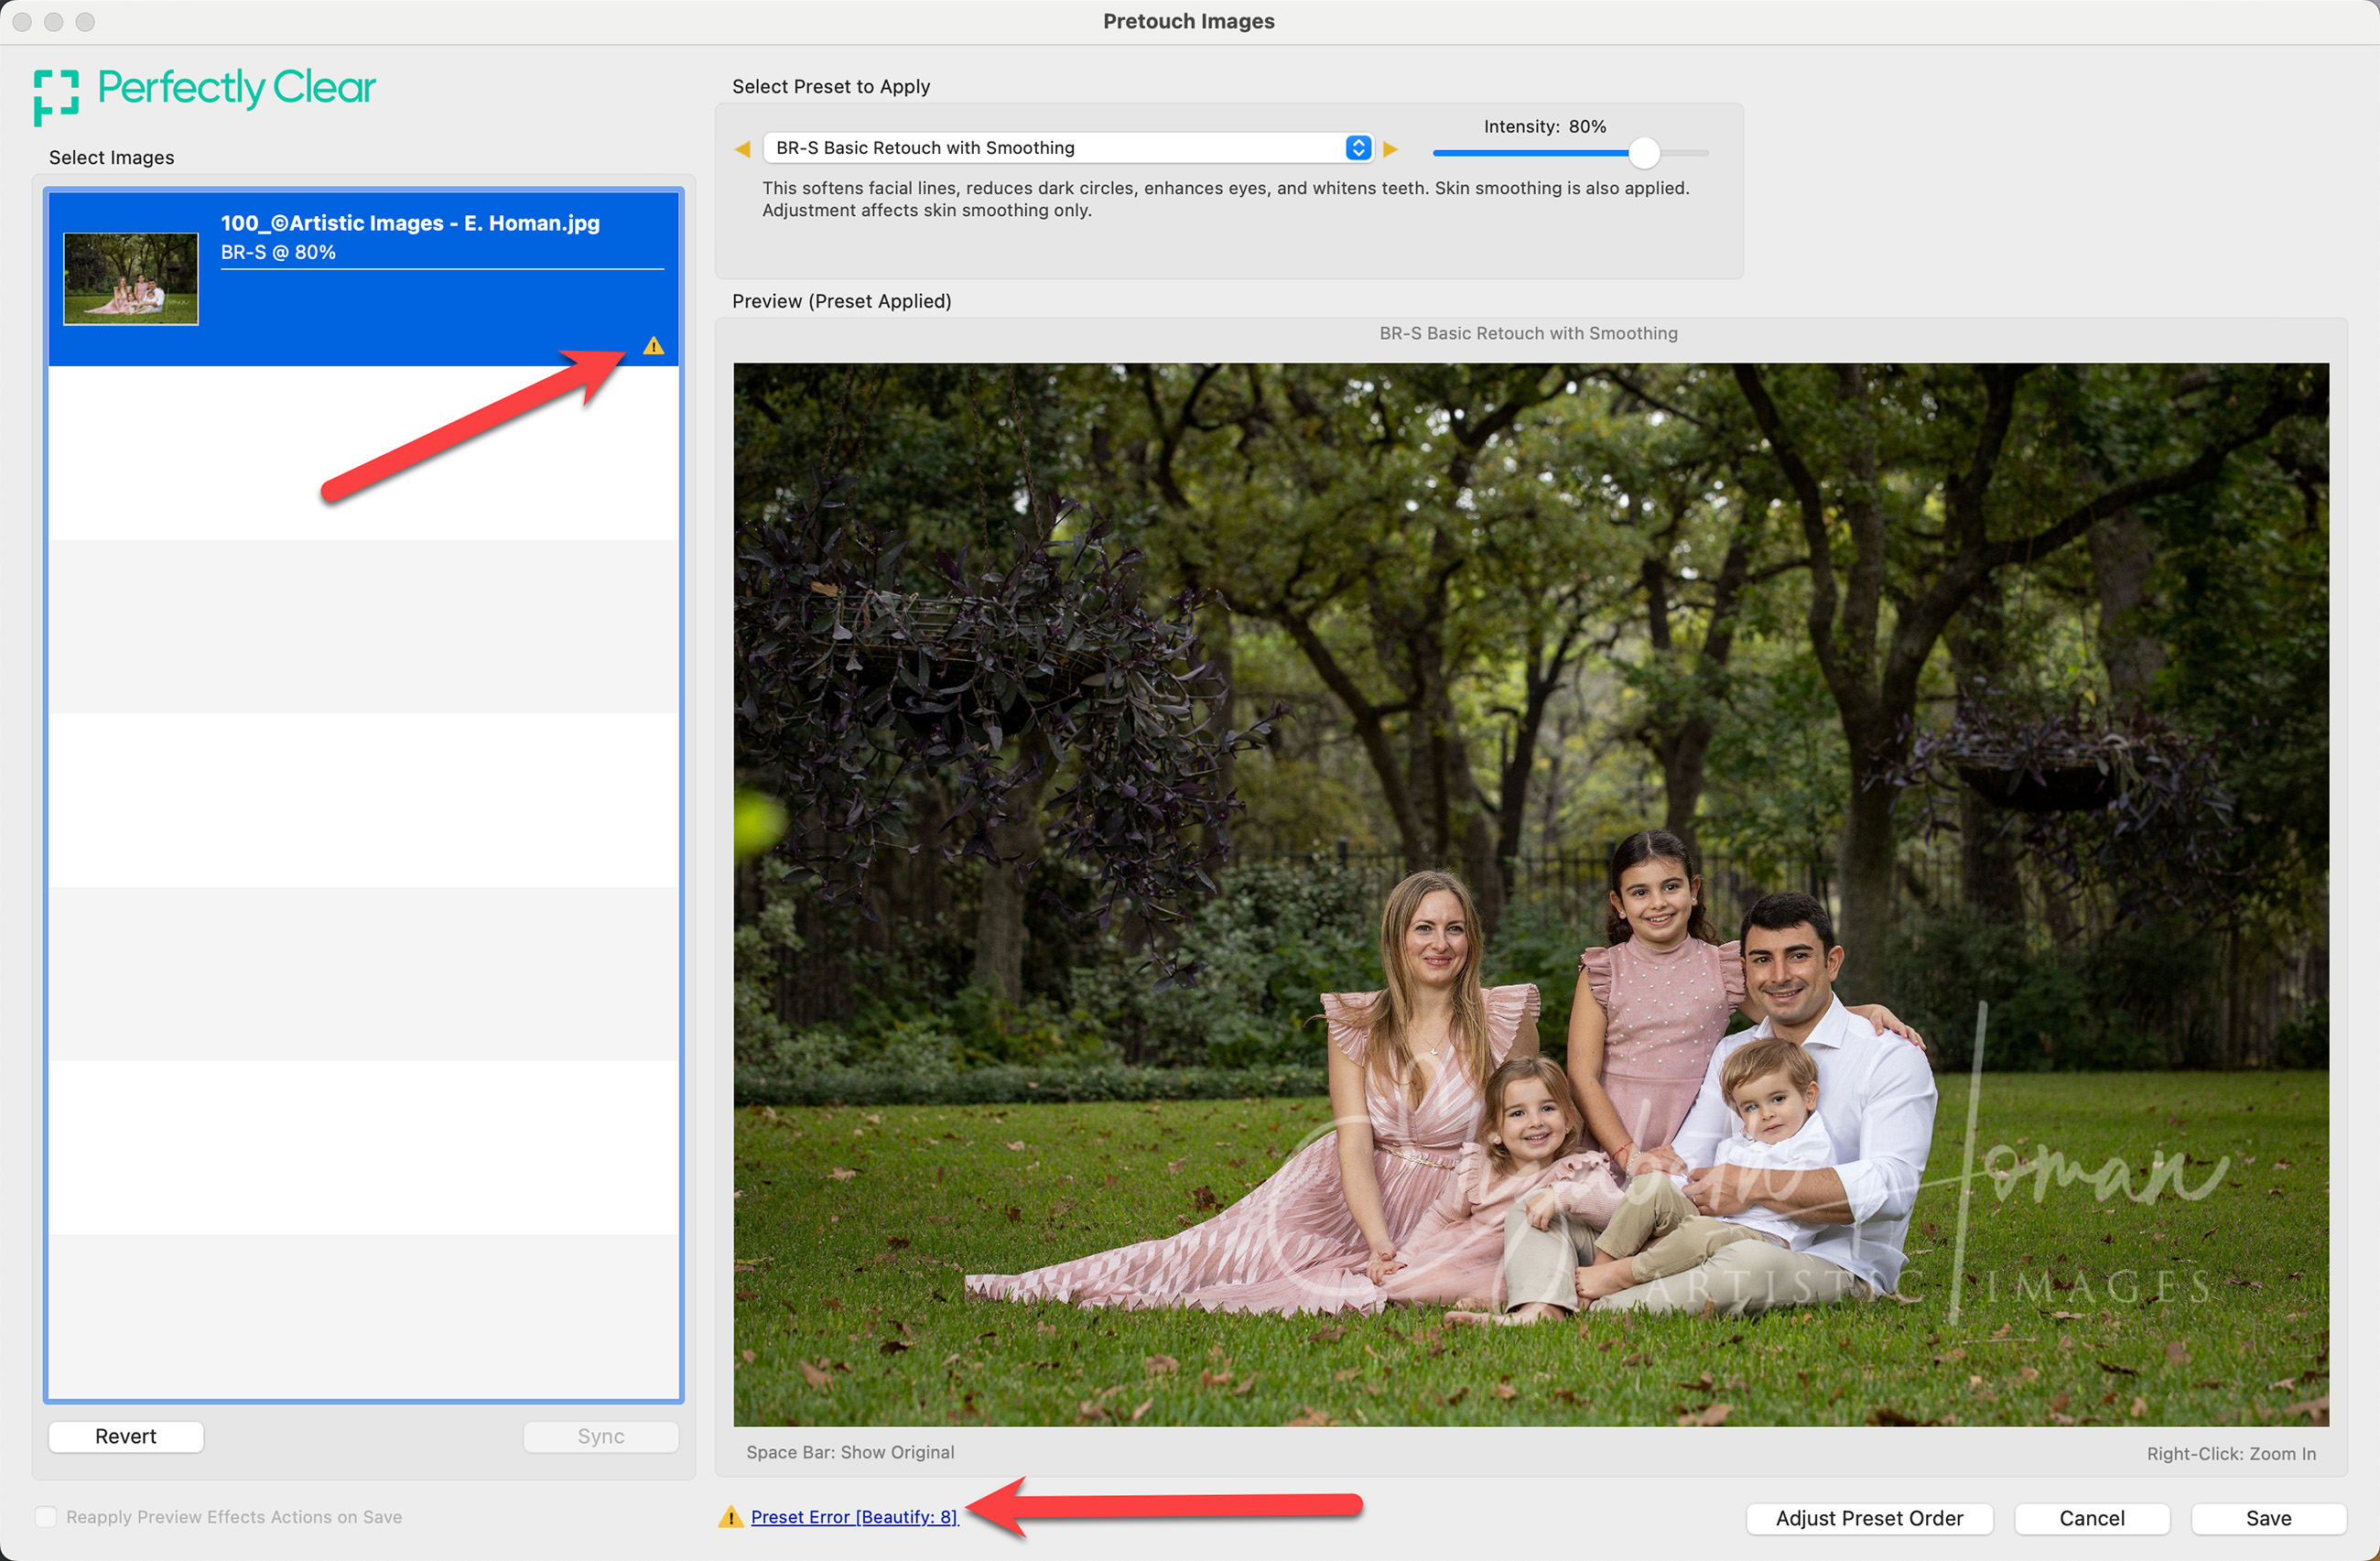
- Additionally, images that encounter pretouching issues will be marked with a red thumbnail tag and display a warning symbol in the Info Bar.
Handling Errors
- If an error occurs, the image might remain unchanged or only partially pretouched. You should evaluate the outcome to decide if you should retain the applied preset, select a different one, or remove the preset altogether. For detailed explanations of any error codes, click on Error Codes.
Errors During Pro Production
- If pretouching presets are carried over to Pro Production, errors might also manifest when these presets are applied to the full-resolution images. Such errors will appear as warnings during the production process.
- It’s important to note that Perfectly Clear™ might behave differently when processing low-resolution album images versus high-resolution originals. An error may occur with one resolution but not the other.
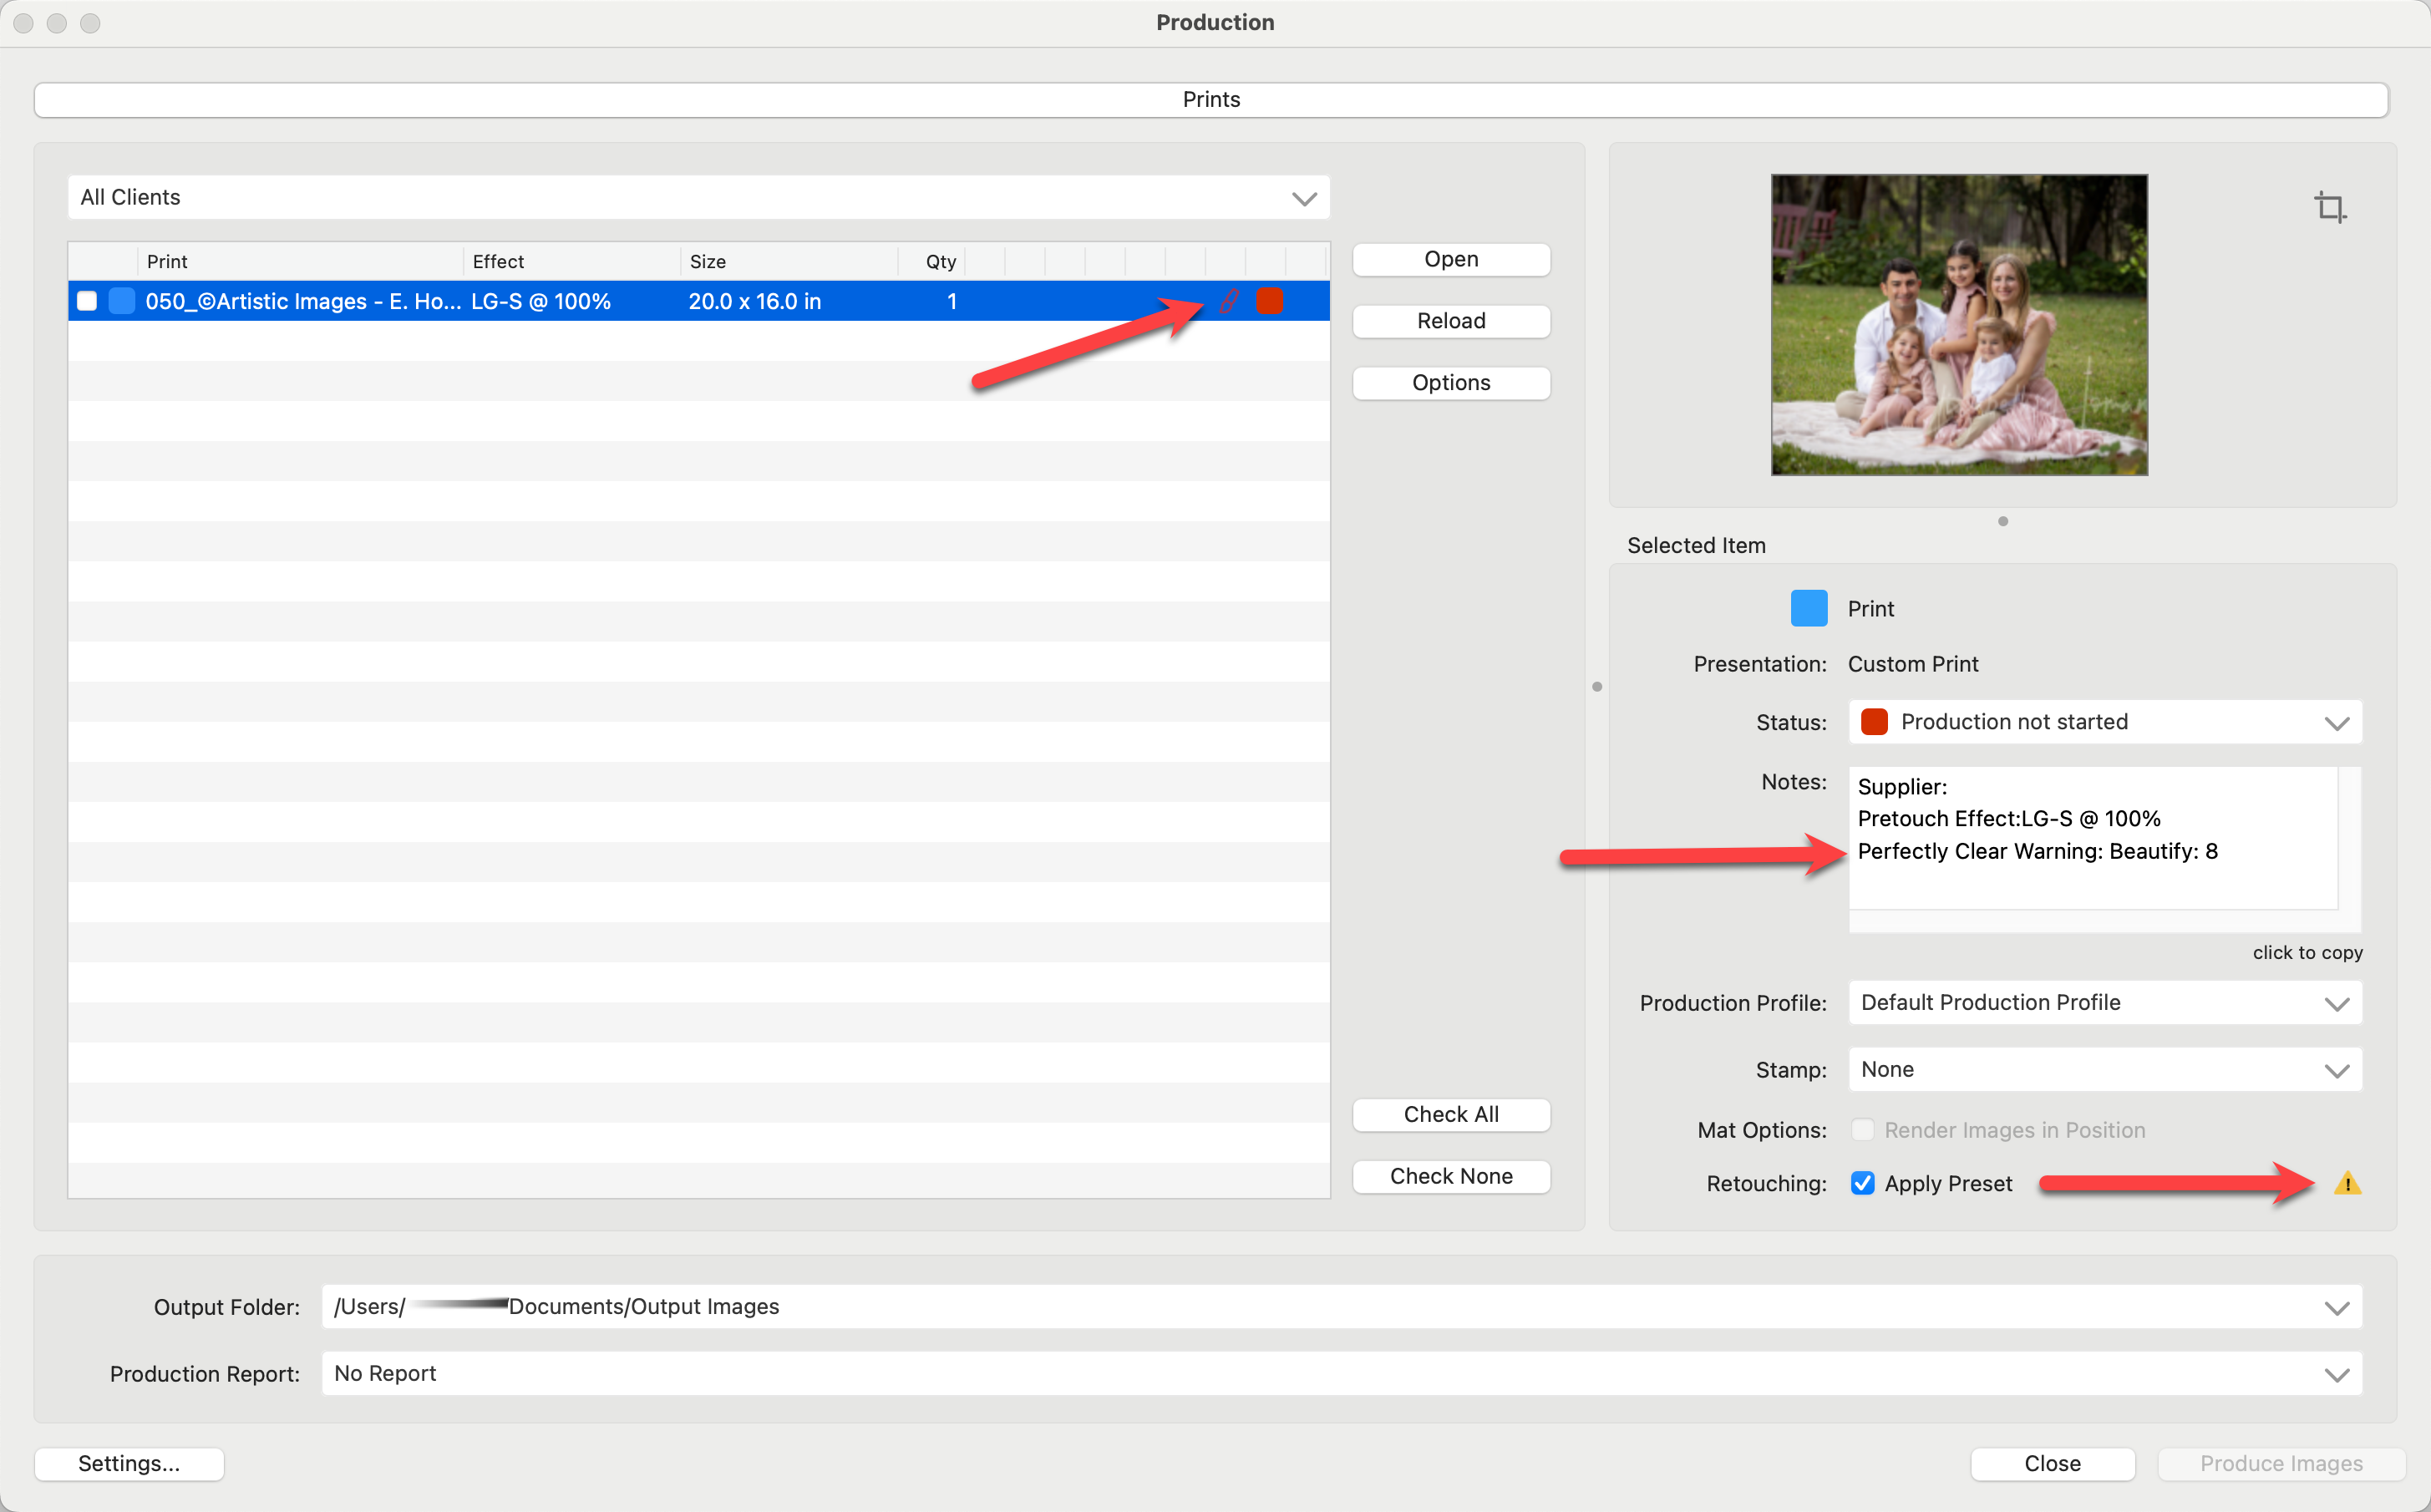
When you encounter an error during the pretouching process in ProSelect, refer to the specific error codes provided. Understanding these error codes will help you determine the best course of action—whether to adjust the current preset, switch to a different one, or remove the preset entirely from the affected images. Perfectly Clear™ version 8.3 Error codes:
Noise Removal
0 = Success.
1 = Feature not enabled.
2 = Full res image (pImage) is missing.
3 = Process canceled.
4 = Error reading image data.
5 = Error in settings.
6 = Misc. errors.
7 = Noise not found.
Core (overall) features
0 = Success.
1 = Feature not enabled.
2 = Process canceled.
3 = Full res source image (pImage) is missing.
4 = Process aborted because of insufficient memory.
5 = Monolith "clipart" source image.
6 = Image side dimension smaller than 32 pixels.
Face Beautification
0 = Success.
1 = Feature not enabled.
2 = Warning. e.g. face not detected.
3 = Full res image (pImage) is missing.
4 = Process canceled.
5 = Unable to locate function in the SFBEngine library.
6 = Unable to create SFB Engine object for processing.
7 = The face analysis was not completed successfully.
8 = No correction occurred during the process.
9 = Not executed.
10 = Face beautification feature not available.
Red Eye Correction
0 = Success.
1 = Feature not enabled.
2 = Full res image (pImage) is missing.
3 = Red eye not found.
4 = General error.
5 = Invalid parameter.
6 = Insufficient memory.
7 = Process canceled.
8 = Not supported.
A failure in one area with success in other areas may still give you satisfactory image enhancement results. If you do get an error, also visually check your pretouched images to see the results before modifying.