Import & Update Pricing From Spreadsheets
Importing pricing from spreadsheets in ProSelect allows for an efficient import/update of product pricing by importing details from CSV (Comma-Separated Values) file. CSV files are a type of plain text file that can be created or edited with spreadsheet software like Excel or Numbers. This feature simplifies bulk pricing adjustments, seasonal updates, or promotional changes without manual entry. By editing prices in a spreadsheet and uploading the CSV file to ProSelect, you can ensure your product offerings are accurately priced, streamlining the sales process and minimizing discrepancies.
To update your print or gallery wrap pricing using a CSV file, begin by exporting the current prices from ProSelect. Once exported, you can update these prices using Numbers, Excel, or Google Sheets. After making the necessary changes, import the updated prices back into ProSelect. This is a convenient way to review and adjust your prices outside of ProSelect, especially if you need to make extensive changes or updates.
- Select the print or gallery wrap folders you wish to update (in the Categories & Folders panel).
- Click on the Options button.
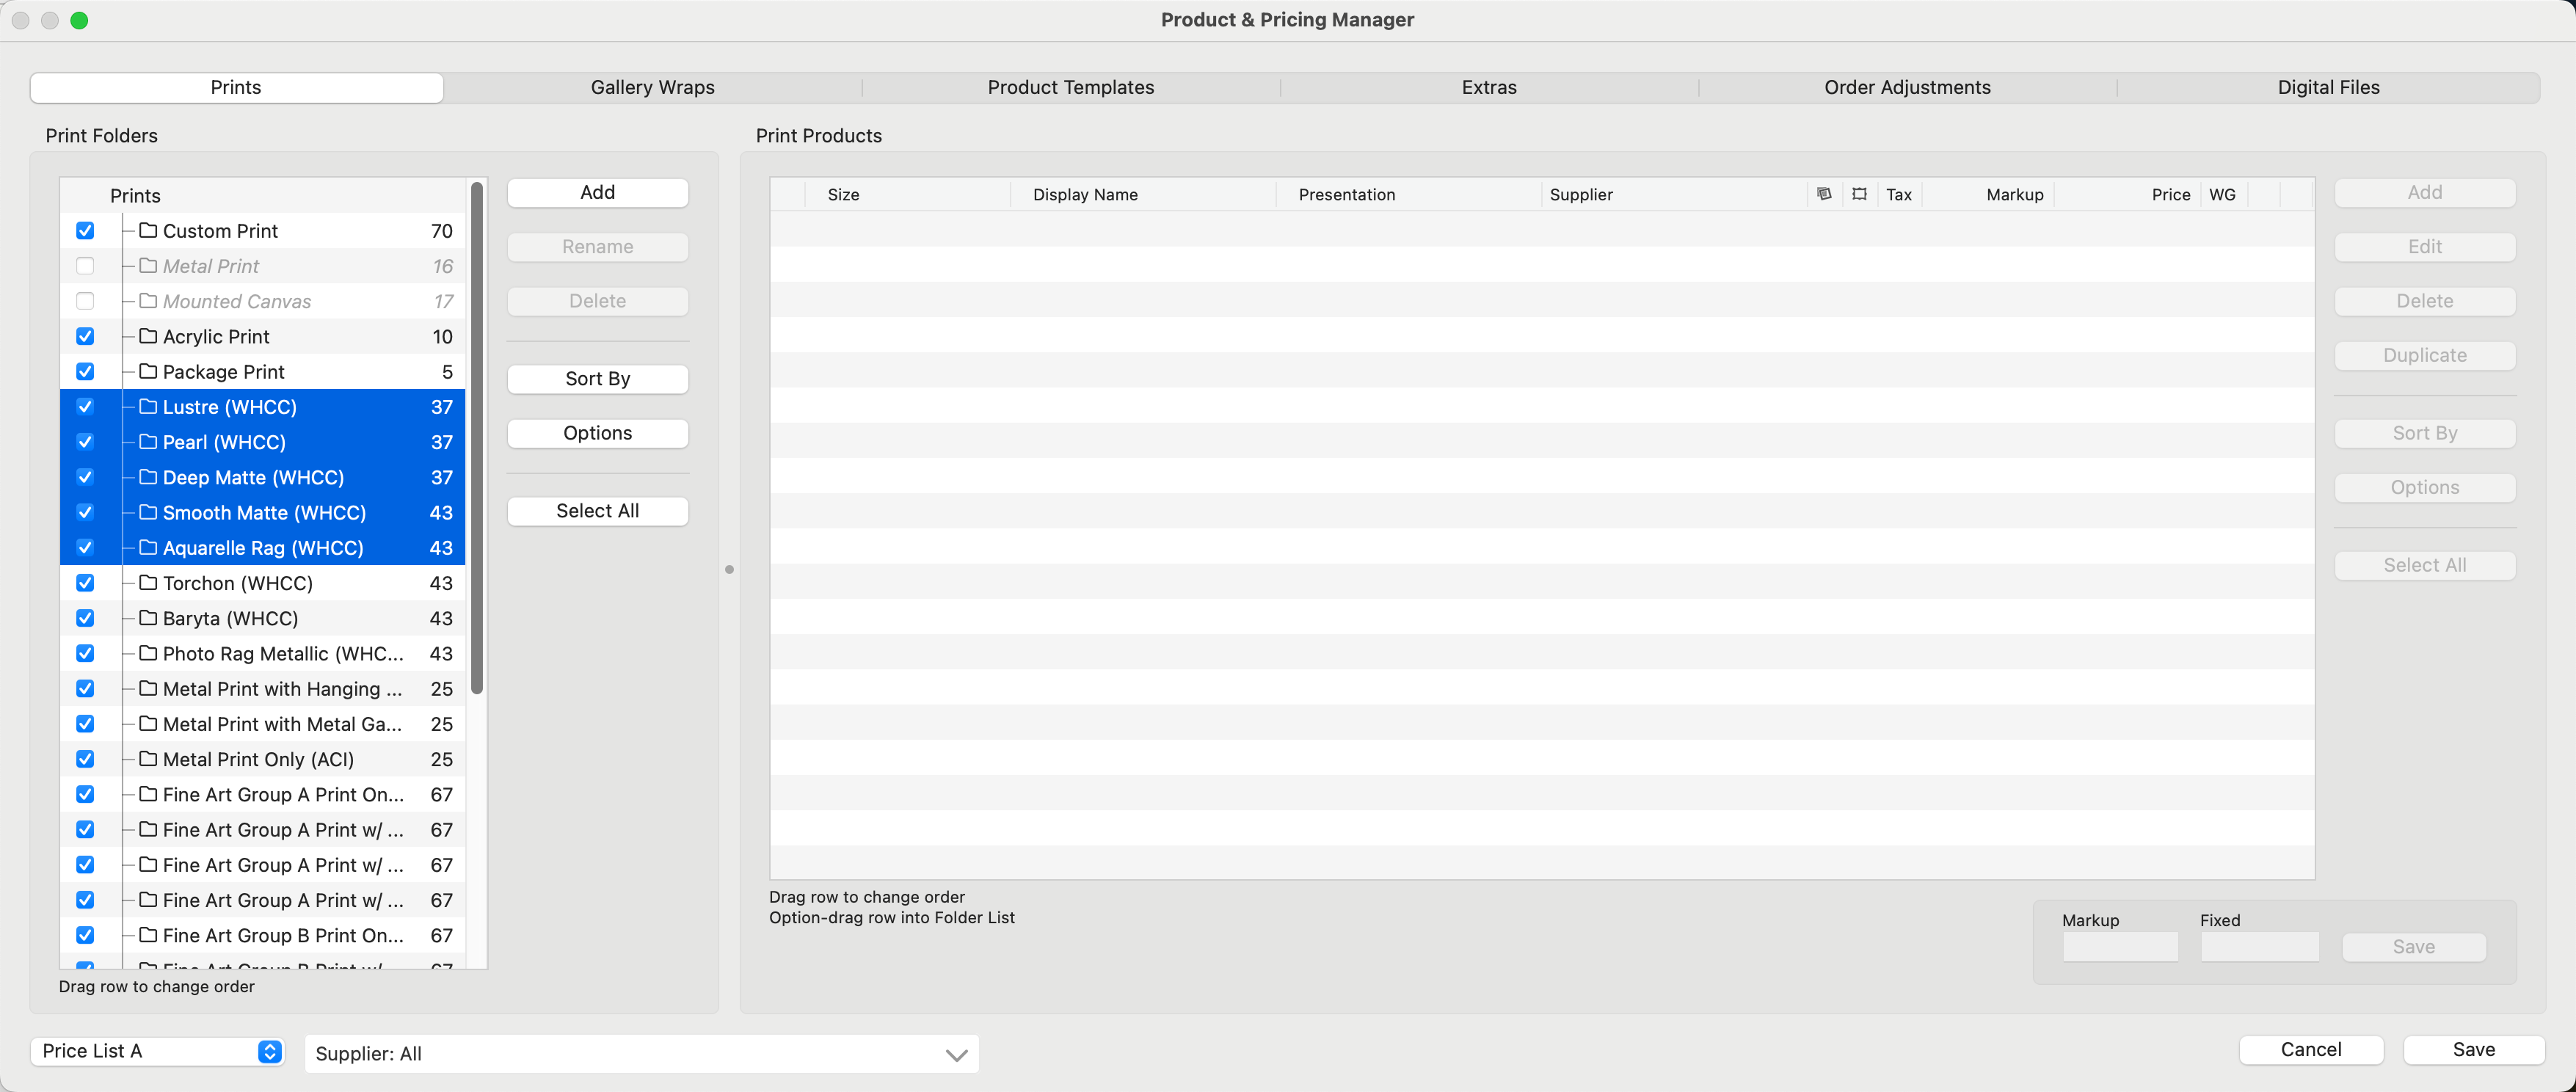
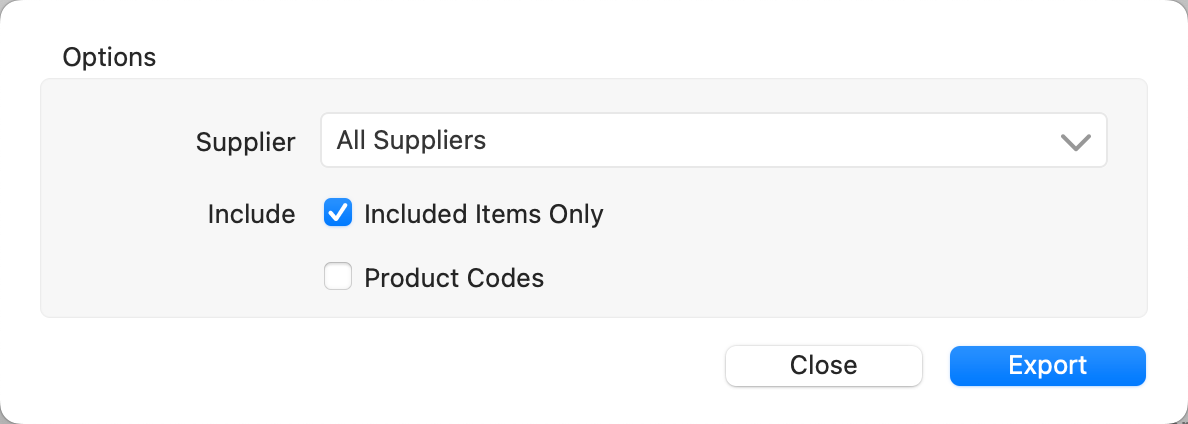
- Select "Export Prices" from the popup menu.
- By default, ProSelect will only export the prices for products that are "turned on" or "included." To export the prices for "unchecked" products (grayed out) deselect the checkbox.
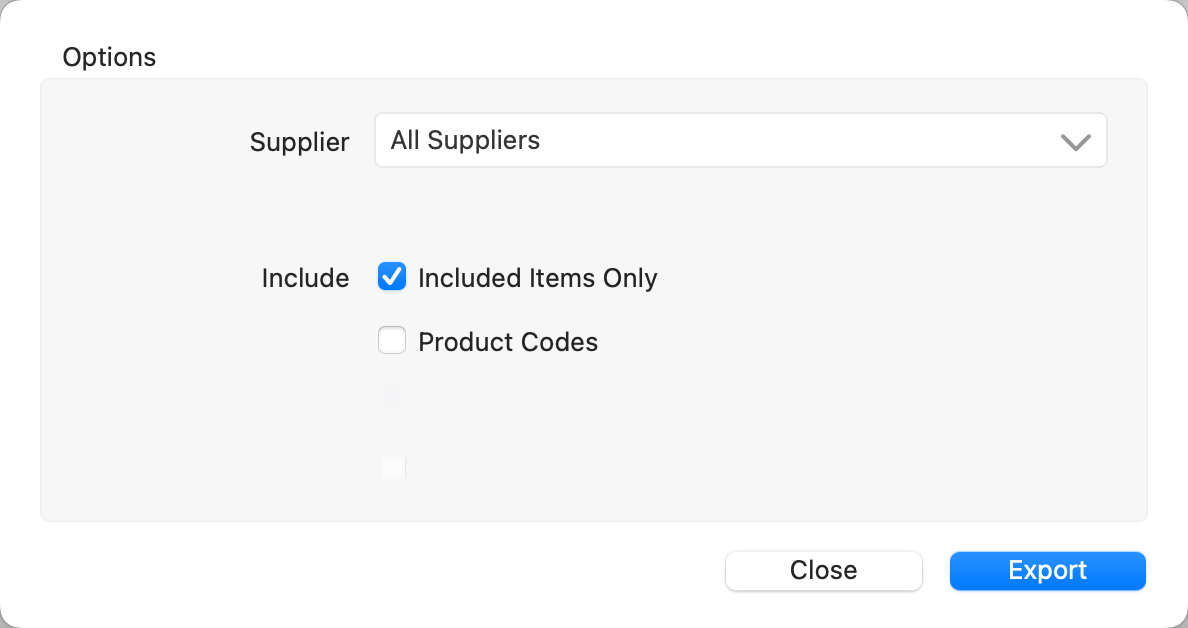
- Click the Export button.
- Choose a location for the exported file.
- Open and make pricing adjustments only to the CSV file using a spreadsheet program such as Numbers, Excel, or Google Sheets.
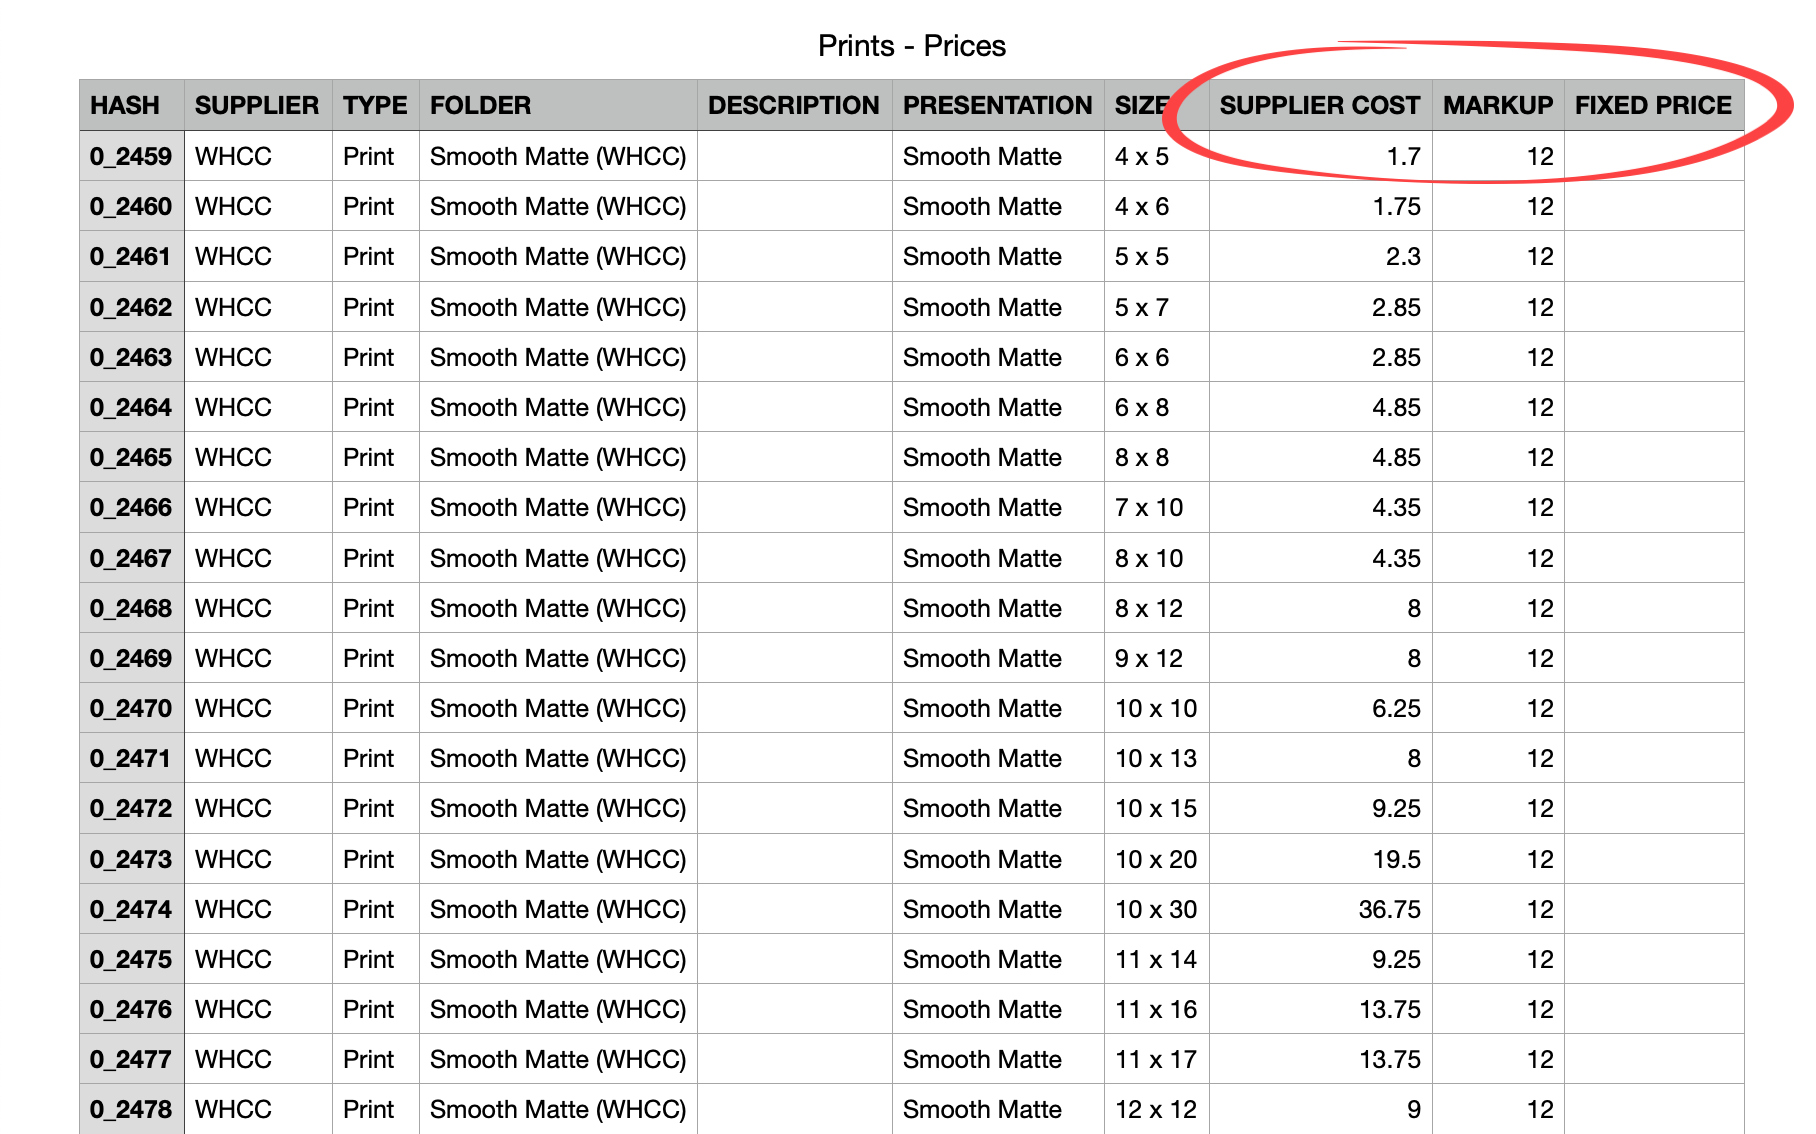
- Once the pricing adjustments have been made, export the file as a CSV file. The file extension must be .csv for ProSelect to import it back in.
- Back in ProSelect, return to the Product & Pricing Manager. Click on the Options button, and select "Update Prices."
- Locate the CSV file on your computer and select it.
- When prompted, click the OK button to update prices.
- The prices have now been updated for the selected products.
To update your product template prices using a CSV file, begin by exporting the current prices from ProSelect. Once exported, you can update these prices using Numbers, Excel, or Google Sheets. After making the necessary changes, import the updated prices back into ProSelect. This is a convenient way to review and adjust your prices outside of ProSelect, especially if you need to make extensive changes or updates.
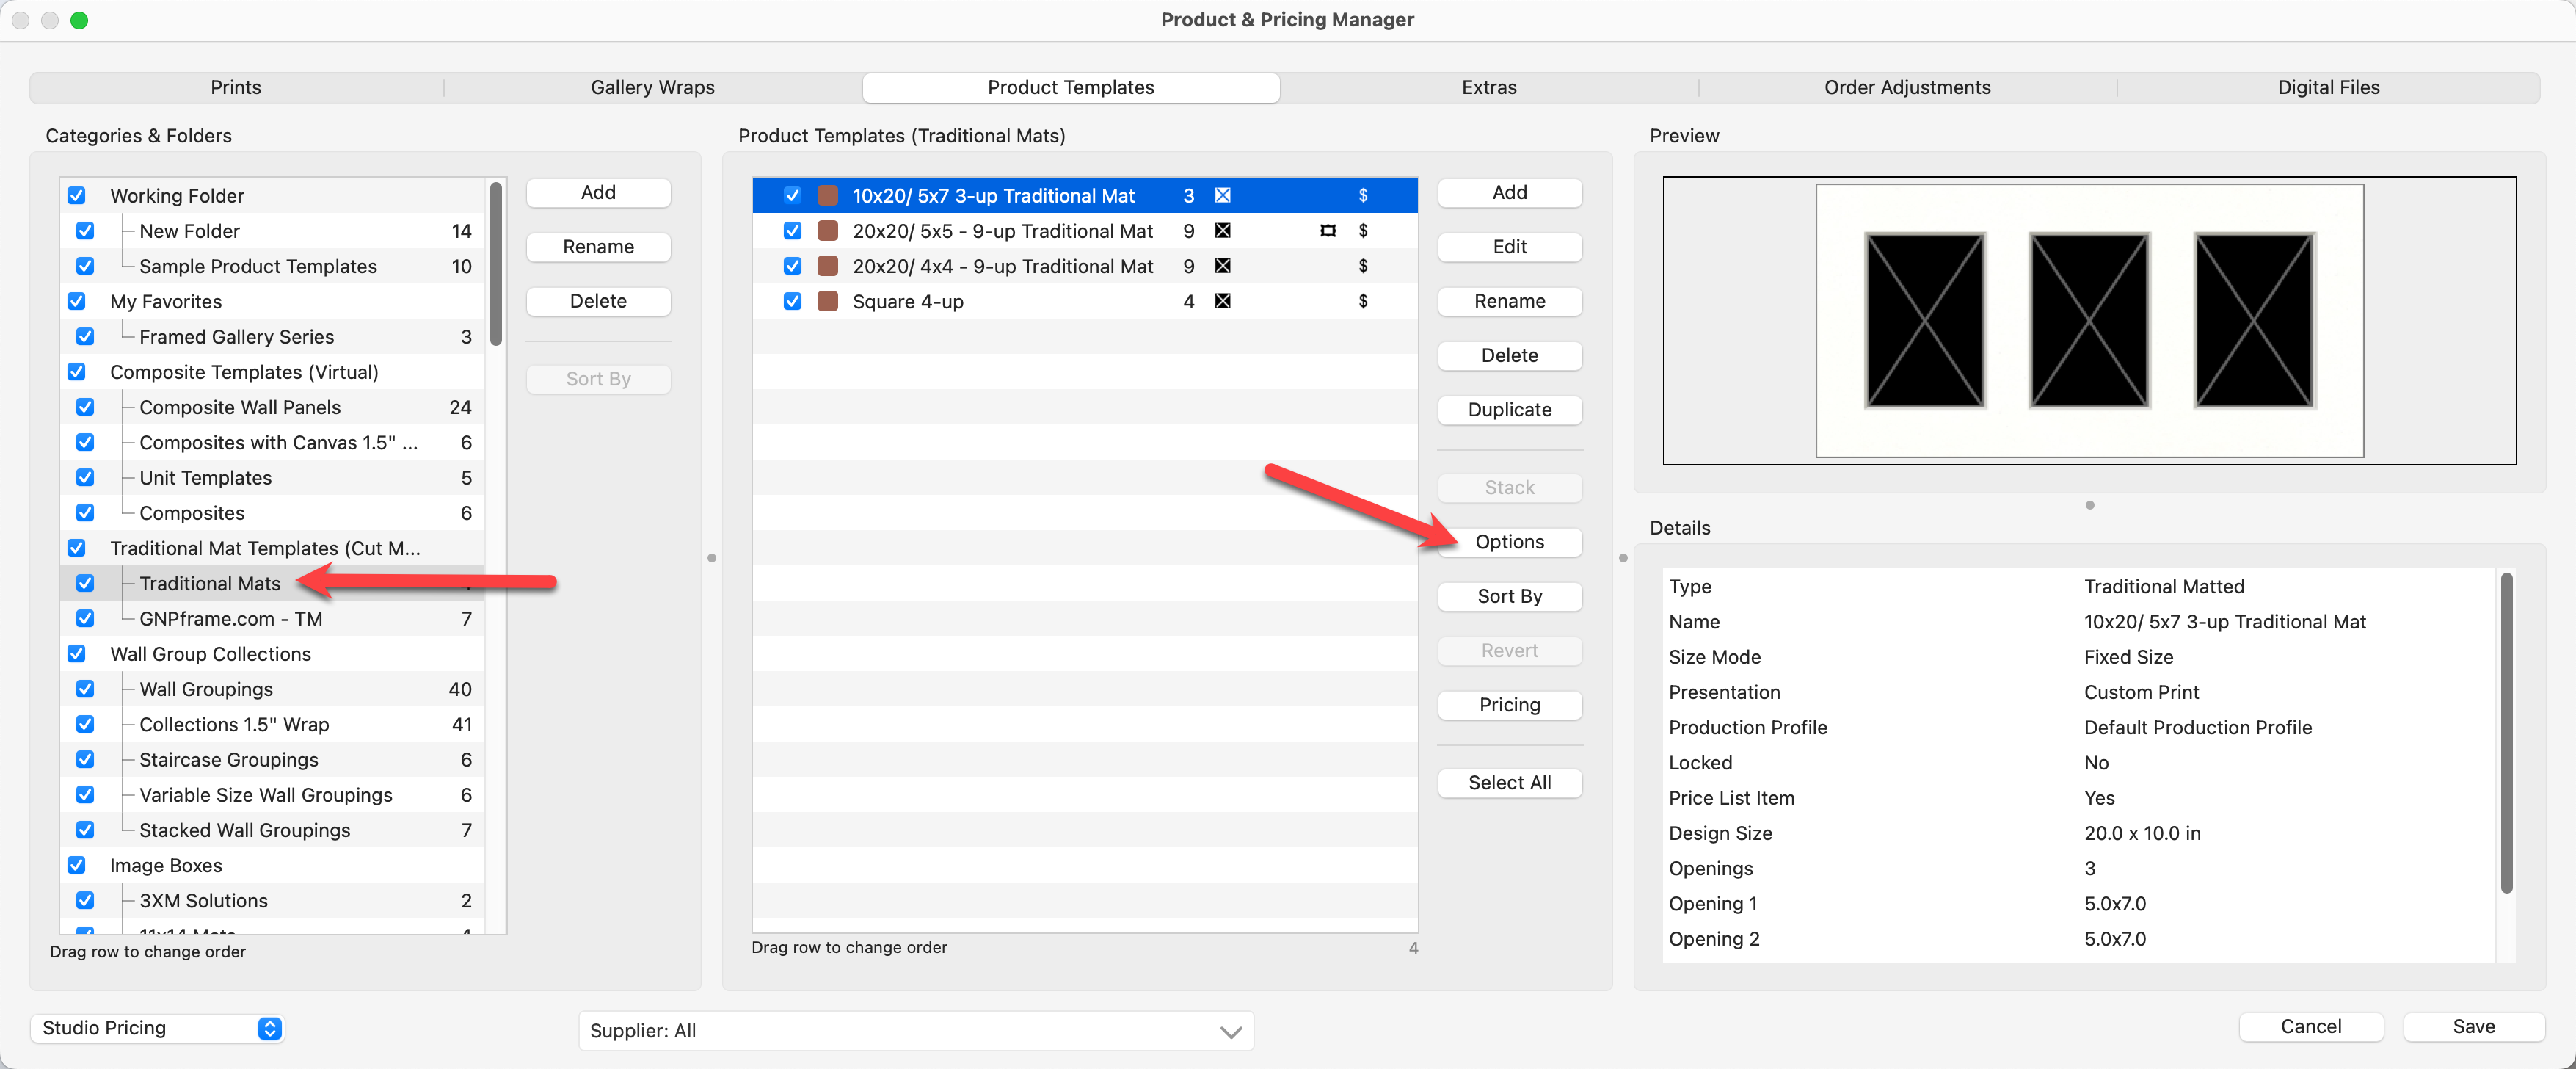
- Select the folder you wish to update (in the Categories & Folders panel).
- Click on the Options button.
- Select "Export Prices" from the popup menu.
- By default, ProSelect will only export the prices for products that are "turned on" or "checked." To export the prices for "unchecked" products (grayed out) deselect the checkbox.
- Click the Export button.
- Choose a location for the exported file.
- Open and make pricing adjustments only to the CSV file using a spreadsheet program such as Numbers, Excel, or Google Sheets.
- Once the pricing adjustments have been made, export the file as a CSV file. The file extension must be .csv for ProSelect to import it back in.
- Back in ProSelect, return to the Product & Pricing Manager. Click on the Options button, and select "Update Prices."
- Locate the CSV file on your computer and select it.
- When prompted, click the OK button to update prices.
- The prices have now been updated for the selected products.
ProSelect allows you to generate an import CSV file, which you can use to import details like sizes and prices for your prints. This feature is especially helpful for bulk adding or updating print information efficiently in ProSelect.
- Select the Prints tab at the top of the Product & Pricing Manager.
- Click on the Options button.
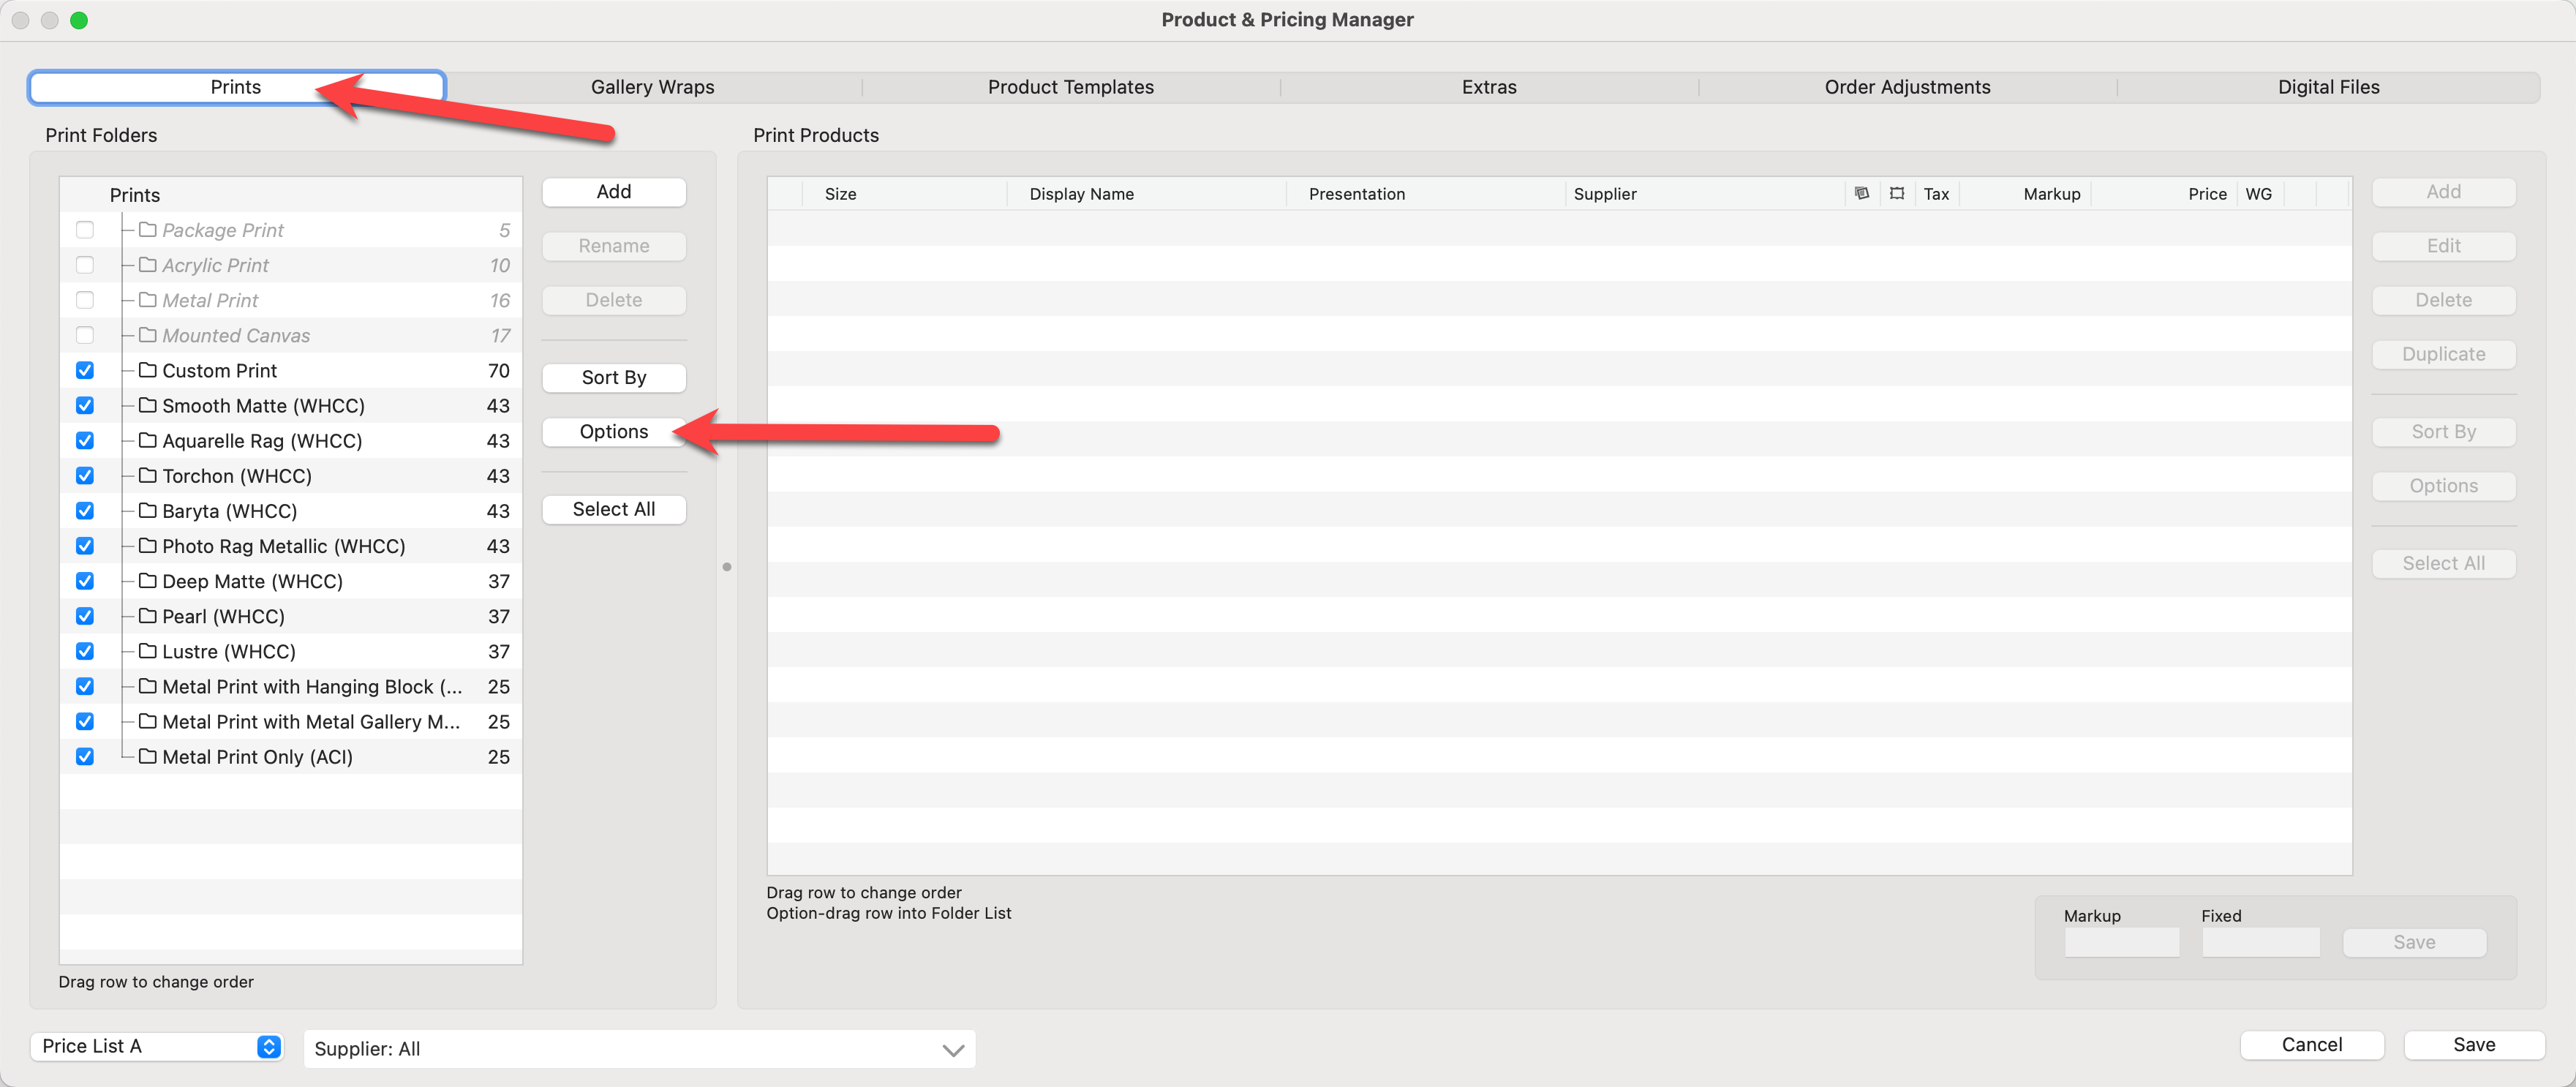
- Select "Generate Print Export Spreadsheet" from the popup menu.
- Fill in the appropriate information in the dialog before generating the spreadsheet:
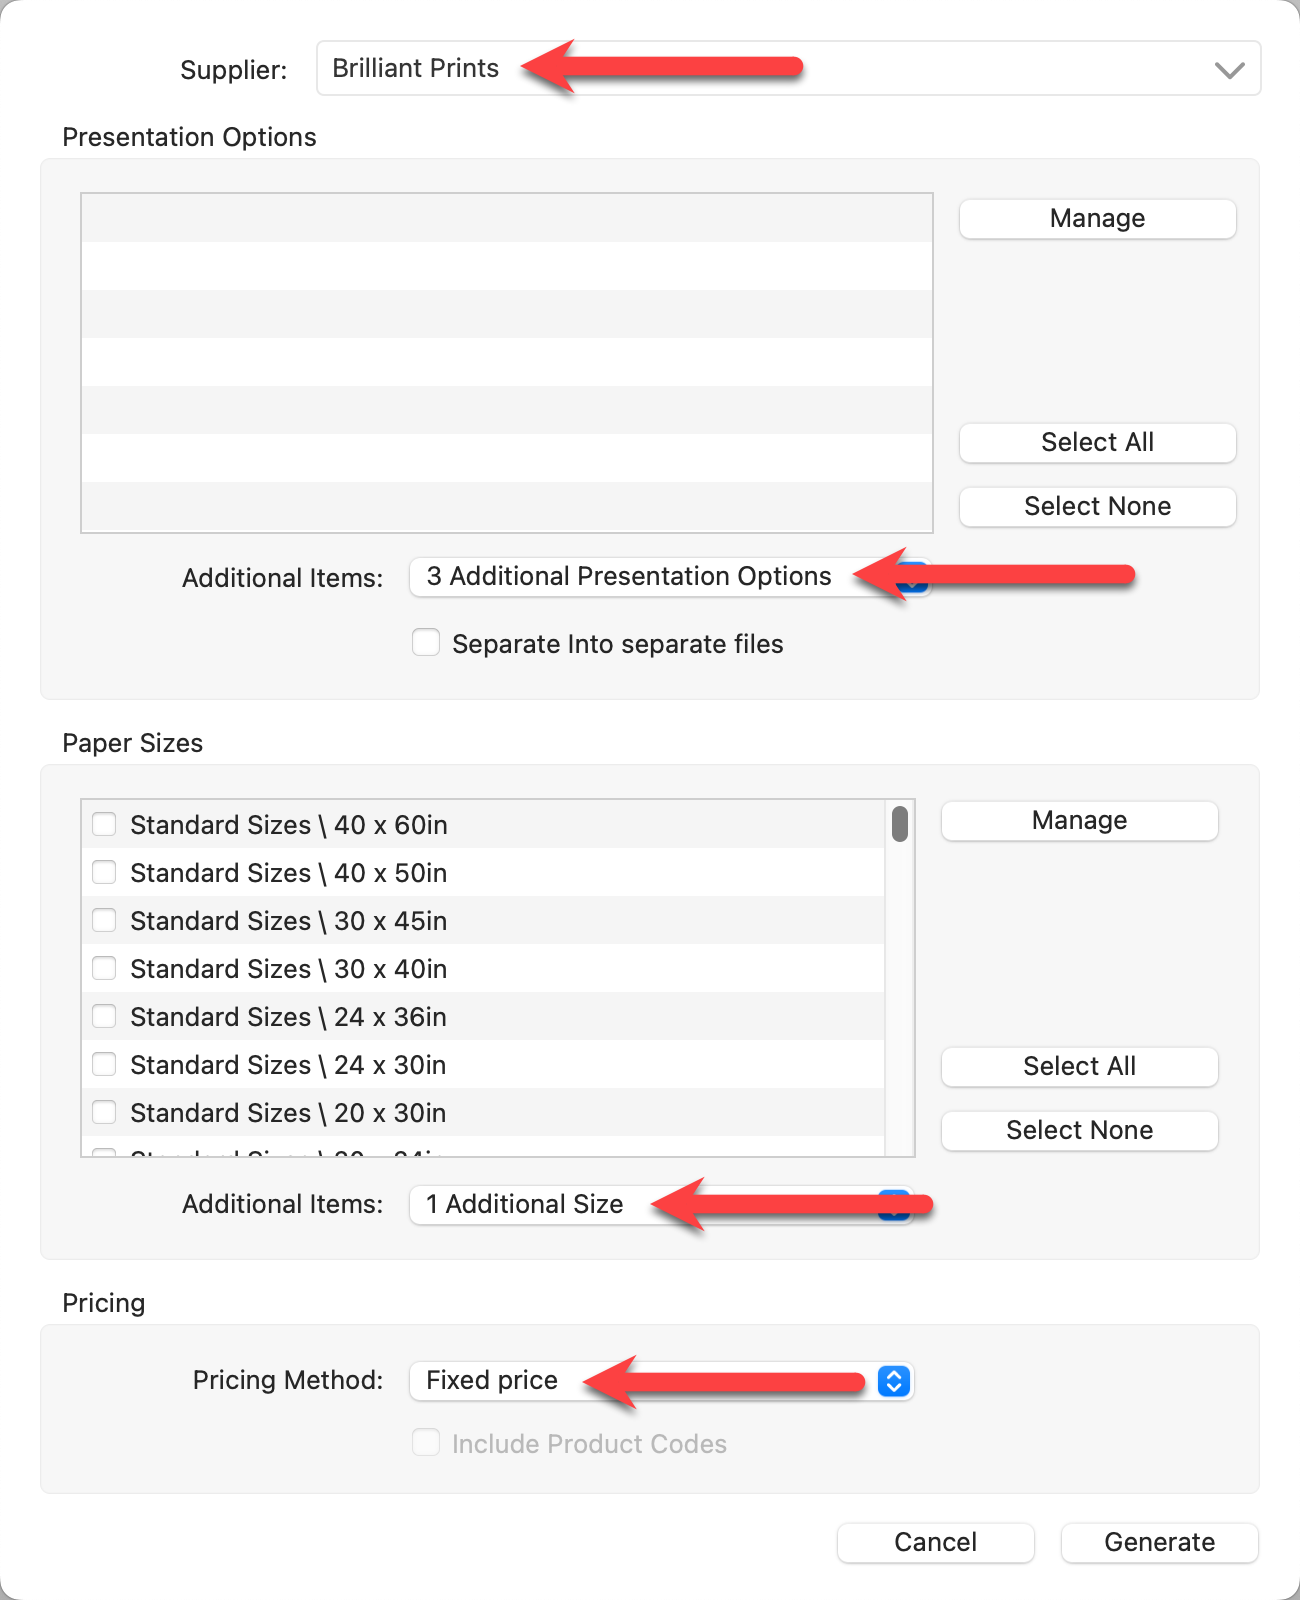
- Supplier: Select a supplier from the drop-down list (alternatively, choose "manage" to enable suppliers or "unspecified").
- Presentation Options: Use the checkboxes to include any previously created Presentation Options. Alternatively, use the "Additional Items" drop-down list to add as many as 10 additional (new) Presentation Options.
- Separate into Separate Files: Check this box if you want a separate spreadsheet for each Presentation Option. Otherwise, by default, all the Presentation Options will appear side by side in the same file.
- Paper Sizes: If you know which paper sizes you will be offering, use the checkboxes to select them or use the "Select All" button. If you are copying paper sizes from a supplier's website or your Studio's Price List, we recommend using the "Additional Items" drop-down list. Do not check any paper sizes. Instead, add "1 Additional Size." This will be used as a placeholder, and all the sizes available on the website can be added when you copy and paste.
- Pricing Method: Choose a pricing method from the drop-down list. If Product Codes have been enabled, use the checkbox to include them (optional).
- Click the Generate button.
- Save the spreadsheet to your computer.
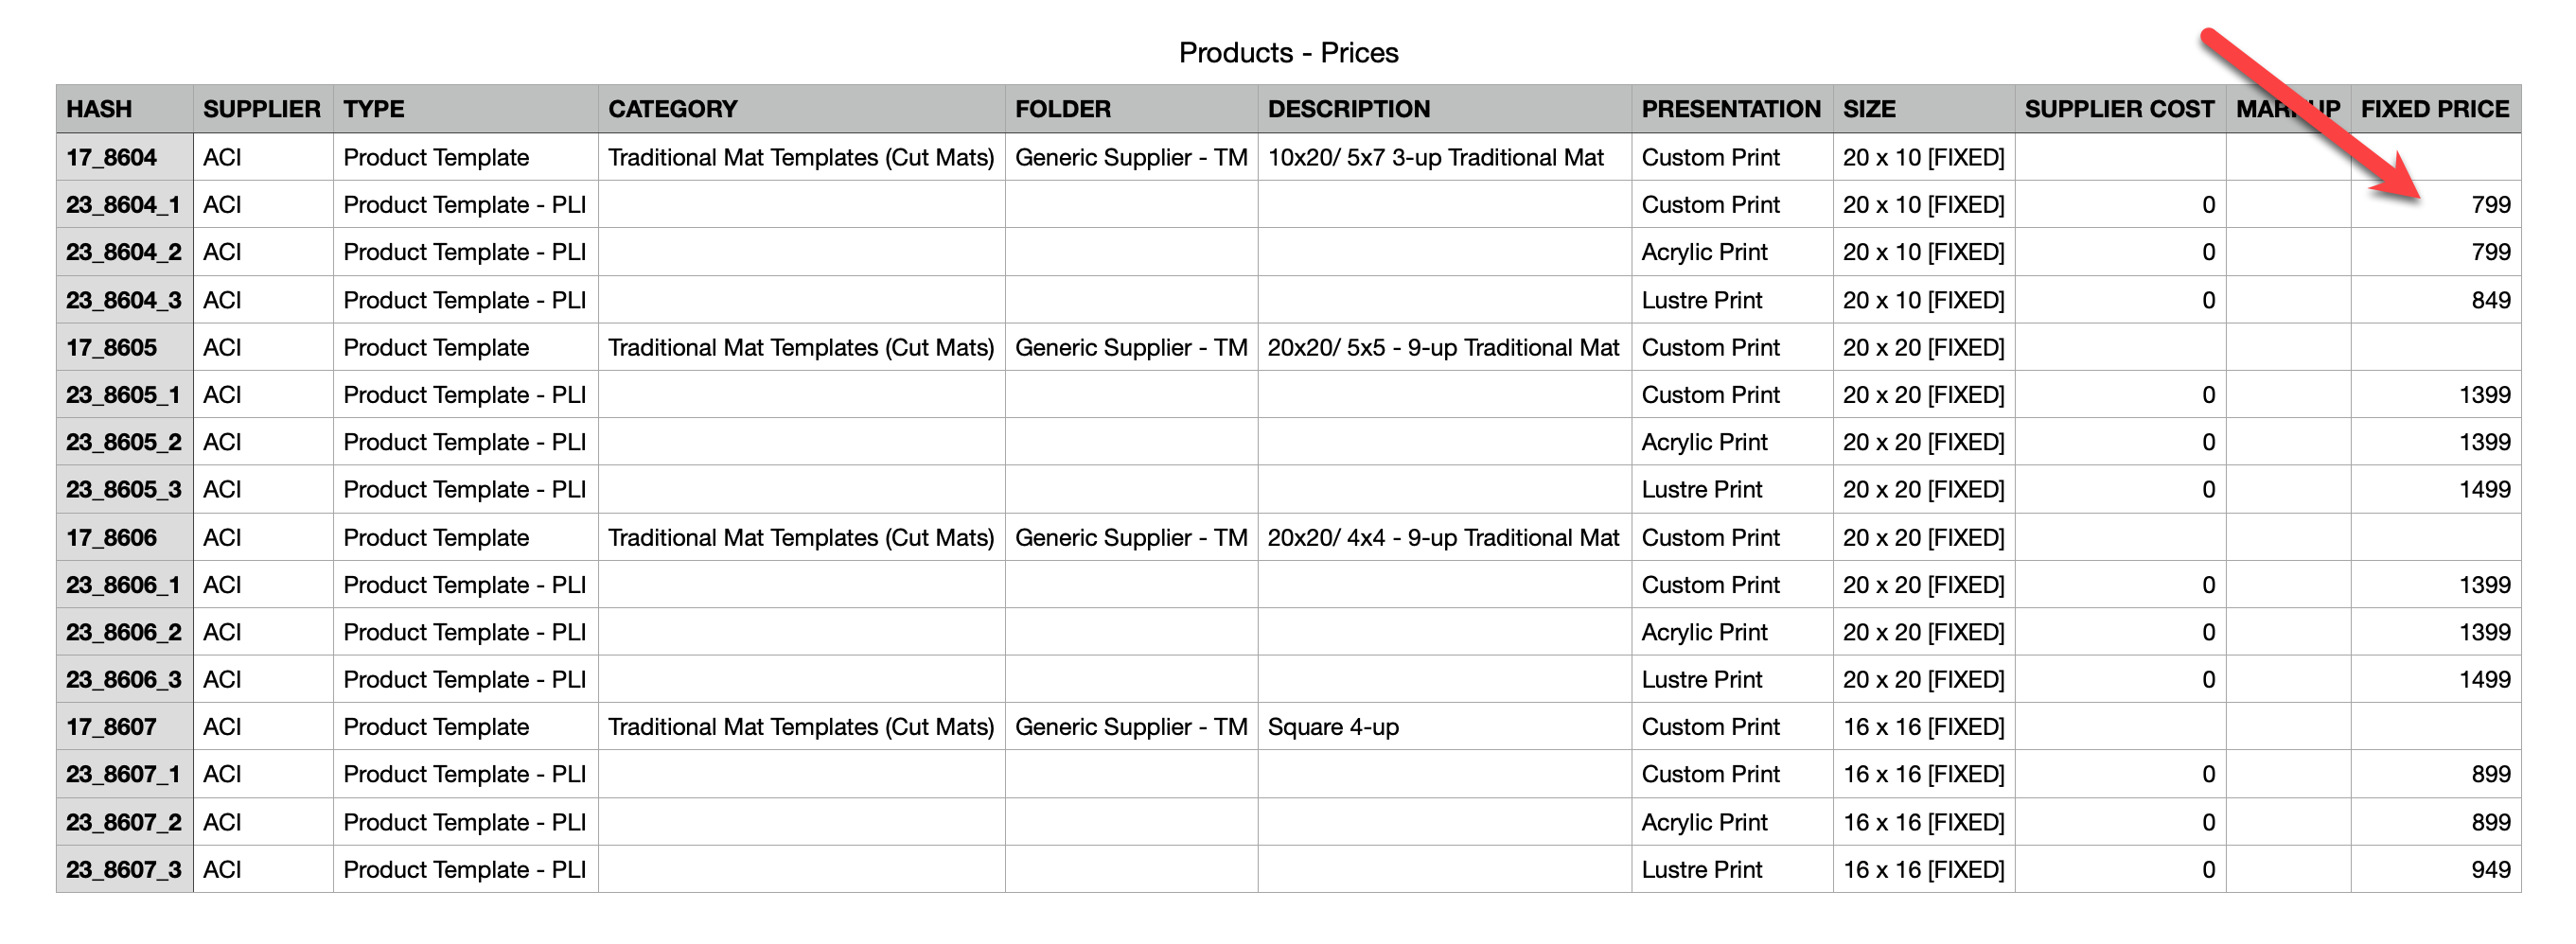
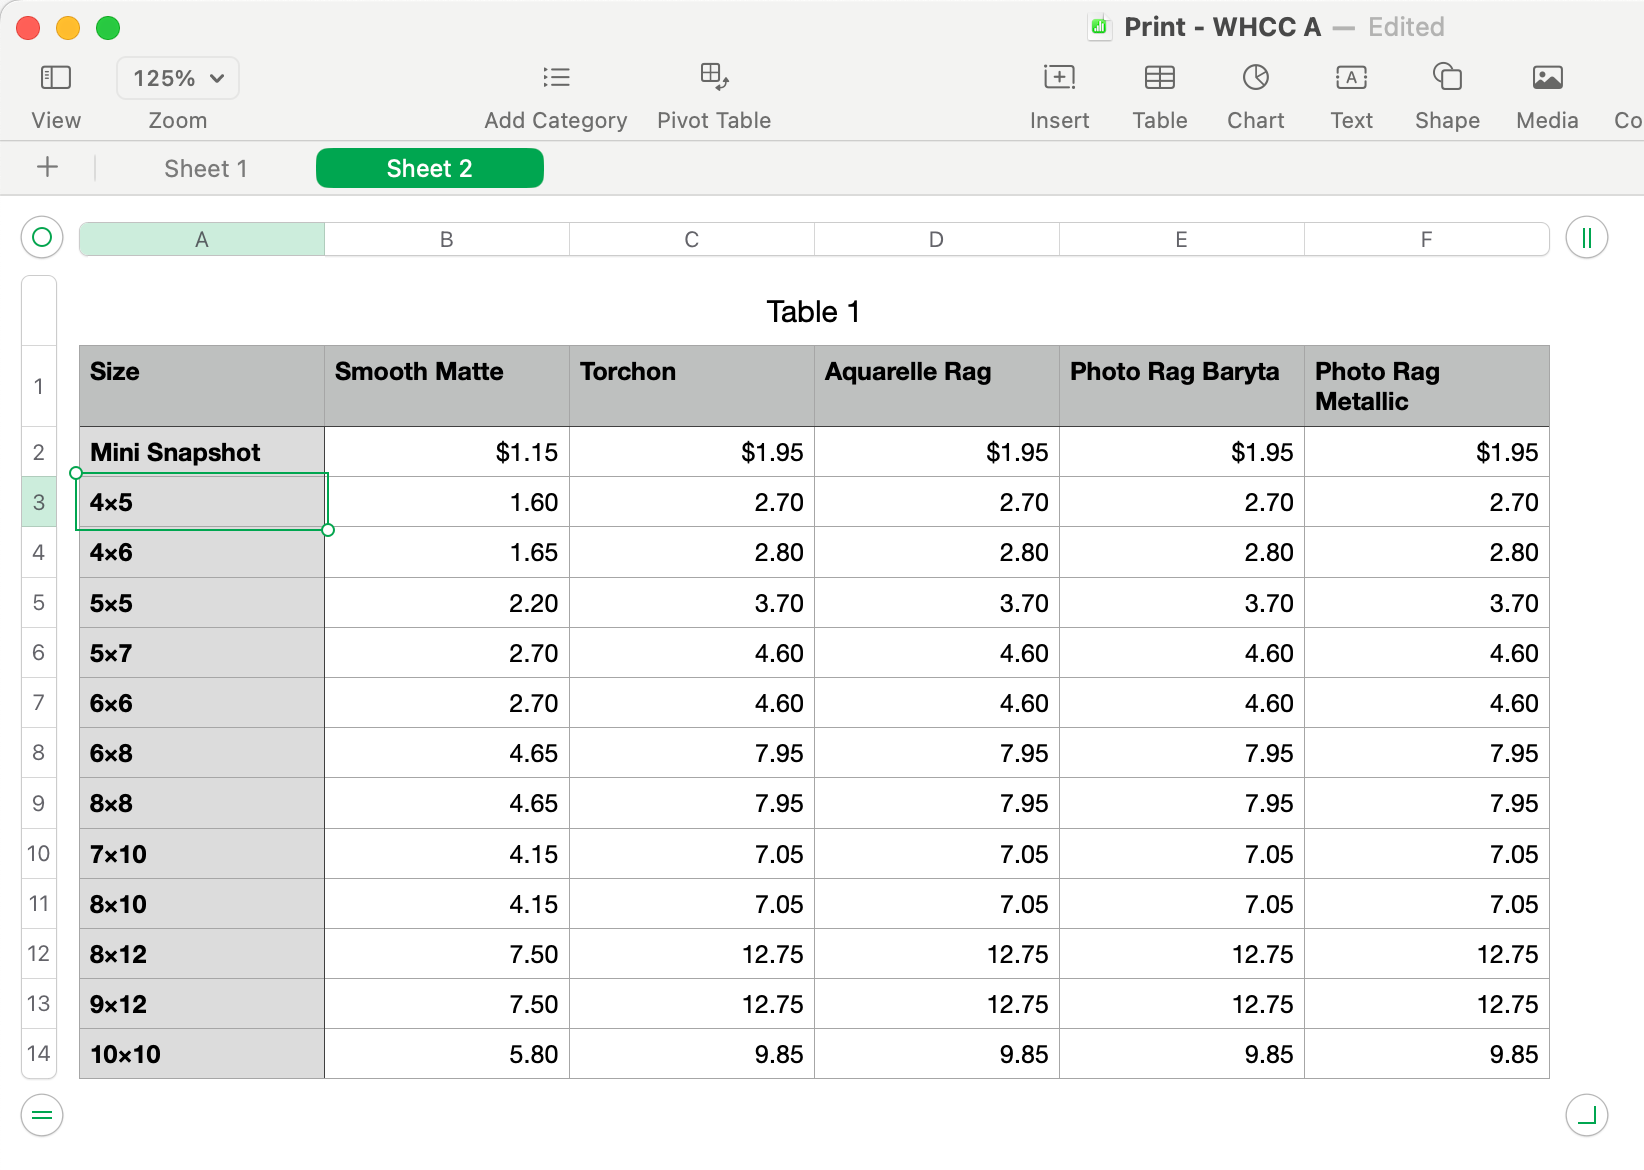
- Open the generated spreadsheet in your preferred program. In the example below, the pricing method "Fixed Price" has been selected.
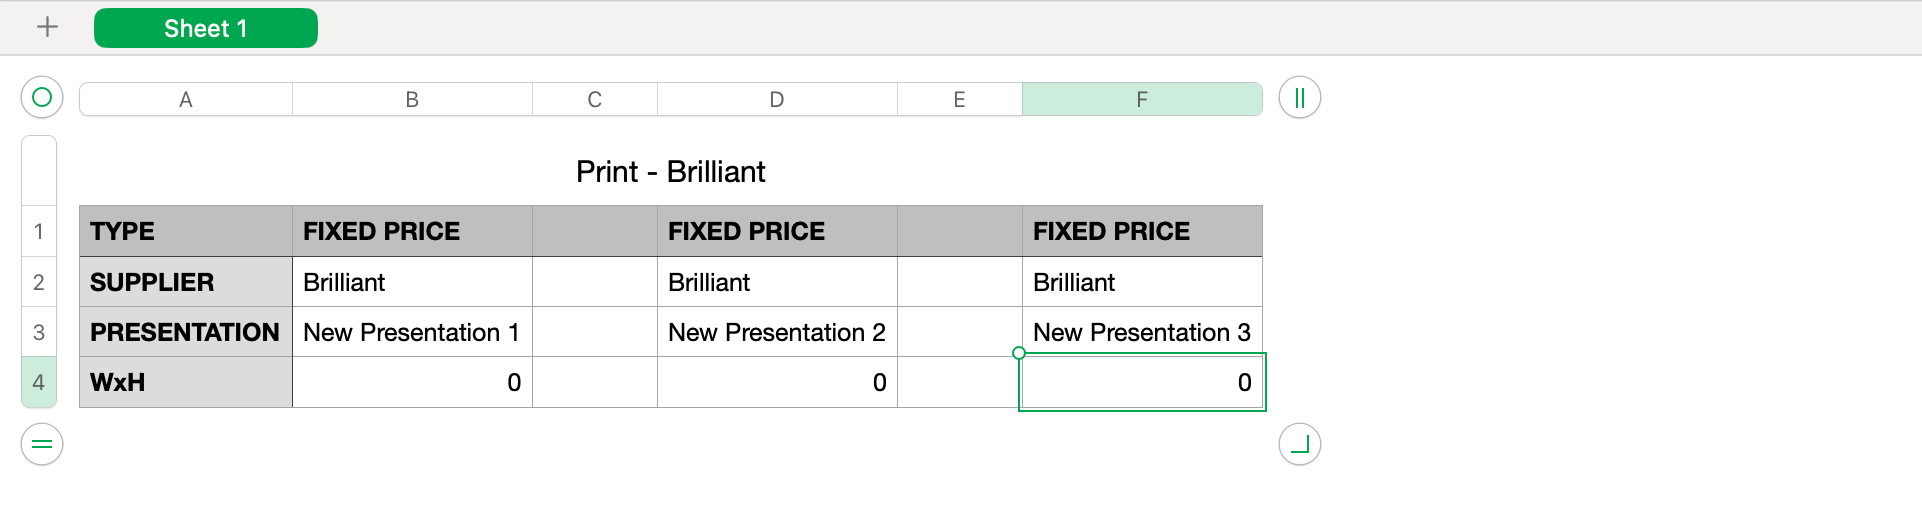
- Pricing columns have been created for our 3 new Presentation Options.
- The Supplier is listed underneath the pricing option, followed by the Presentation Option.
- The row "WxH" is where the sizes will go.
- Change the Presentation Option names on the items you are importing. If you opted for Supplier Cost x Markup pricing, two Presentation Option columns will appear for each one and both need to be renamed.
- Fill in the WxH rows with paper sizes. Add as many rows as you like. You can also copy and paste the paper sizes from your supplier's website. Click on Tips - Copying Pricing From Supplier Websites for helpful information.
- Enter the fixed prices of all the sizes you want to offer for each Presentation Option.
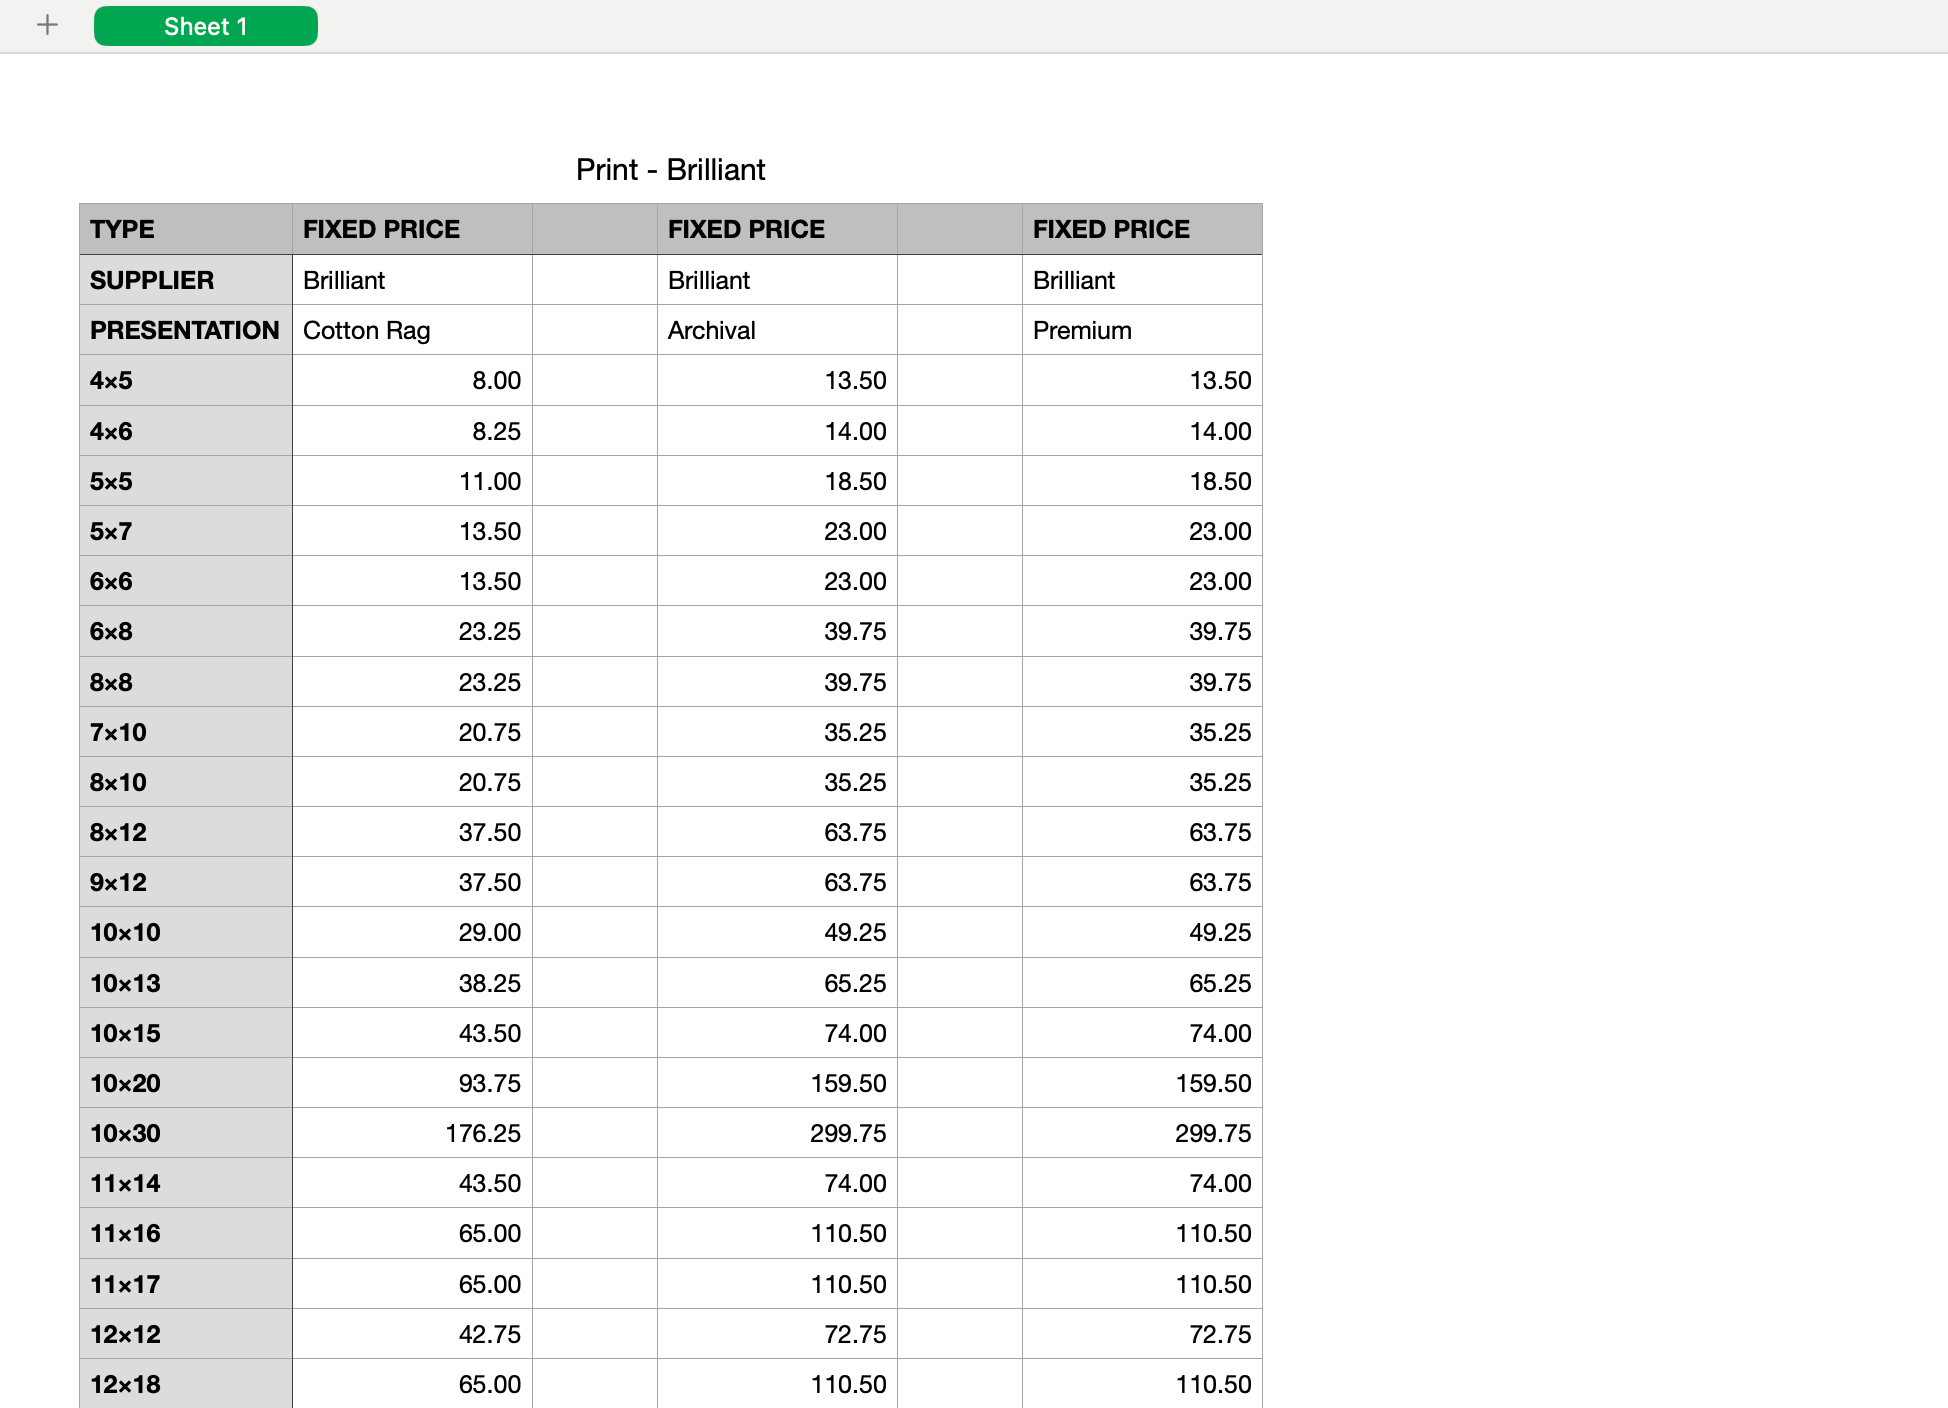
- Once the spreadsheet has been populated, save or export the file as a CSV file. This is required for importing back into ProSelect.
- Back in the Product & Pricing Manager, close the "Generate Spreadsheet" dialog.
- Click on the Options button once again.
- Select "Import Prints" from the popup menu.
- Find and Open the CSV file you just created.
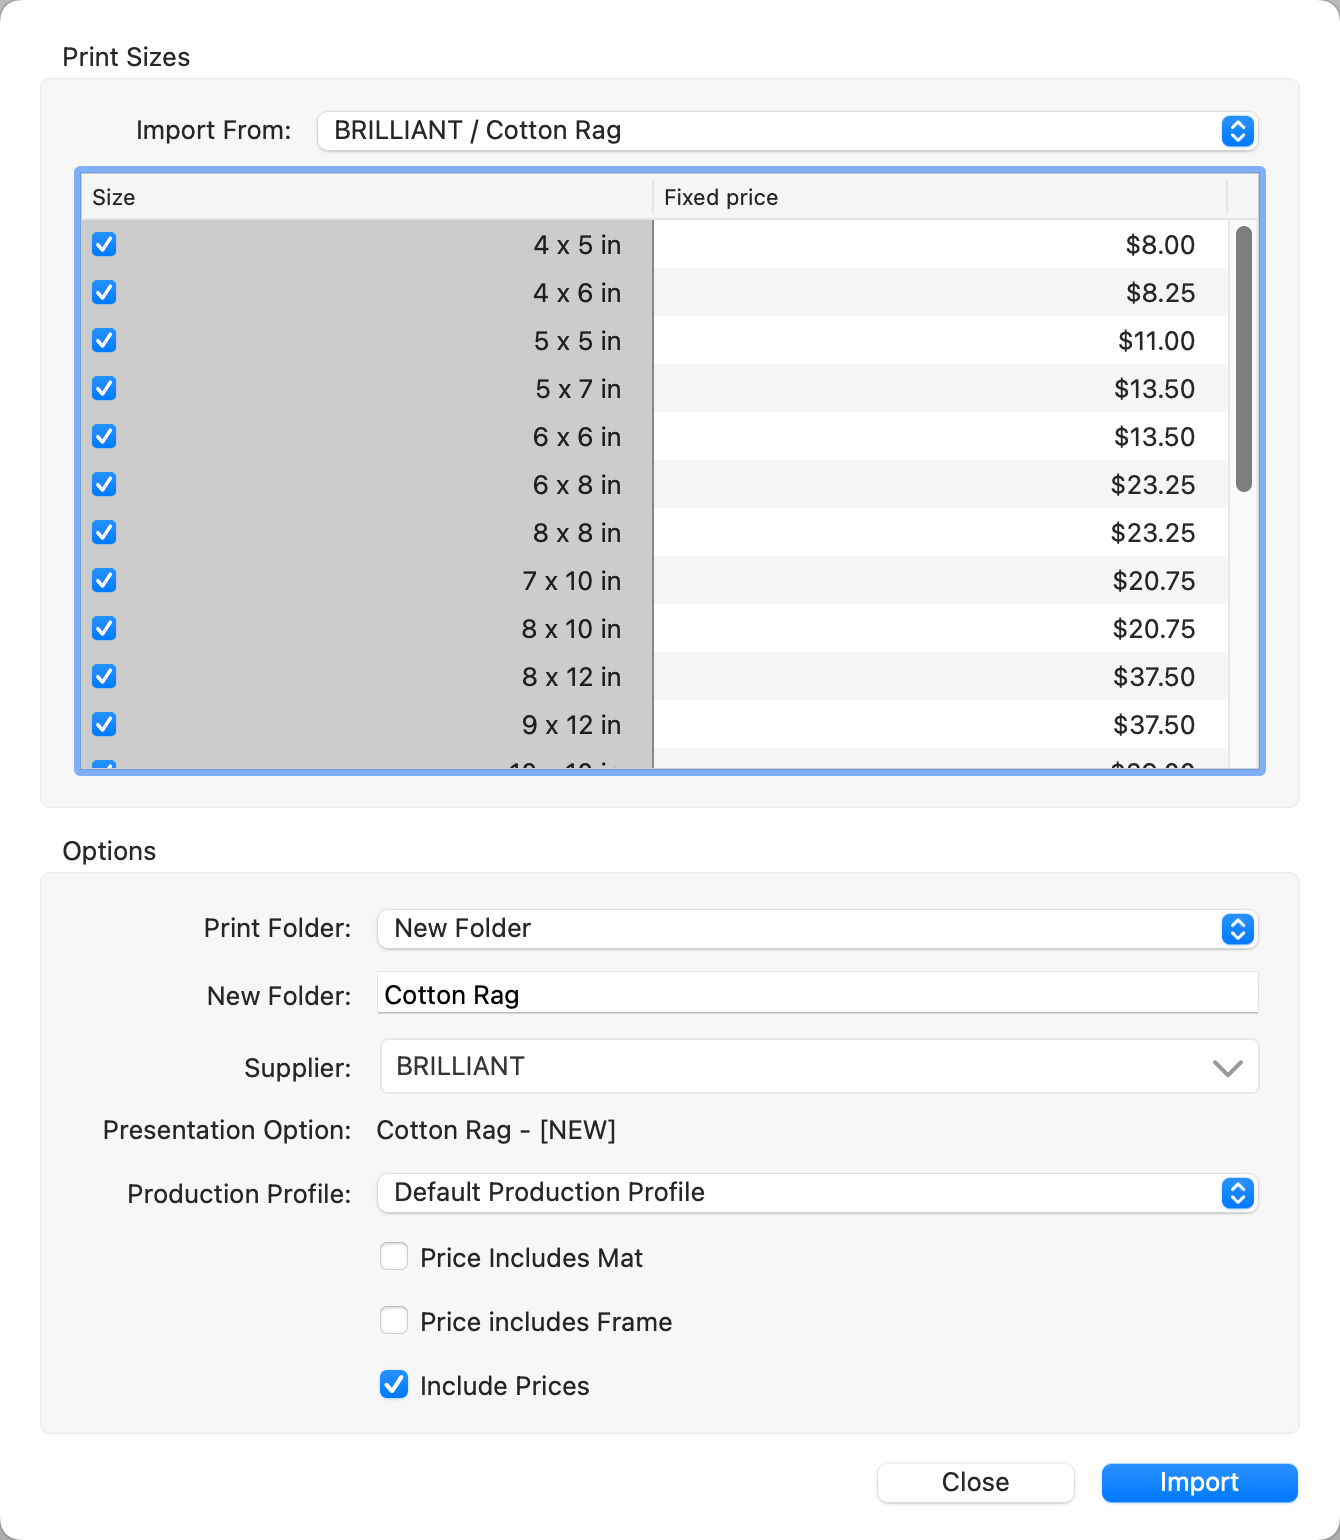
- ProSelect will import each new Presentation Option one at a time. This allows you to create a "New Folder" for each type.
- Click the Import button to import the first new Presentation Option.
- Once the import is complete, select the next new Presentation Option from the drop-down list at the top of the dialog.

- Use the "Import From" drop-down menu at the top. Go through each new Presentation Option and click the Import button until they are all imported. Once completed, click the Close button.
- All of the new products have been imported into ProSelect.
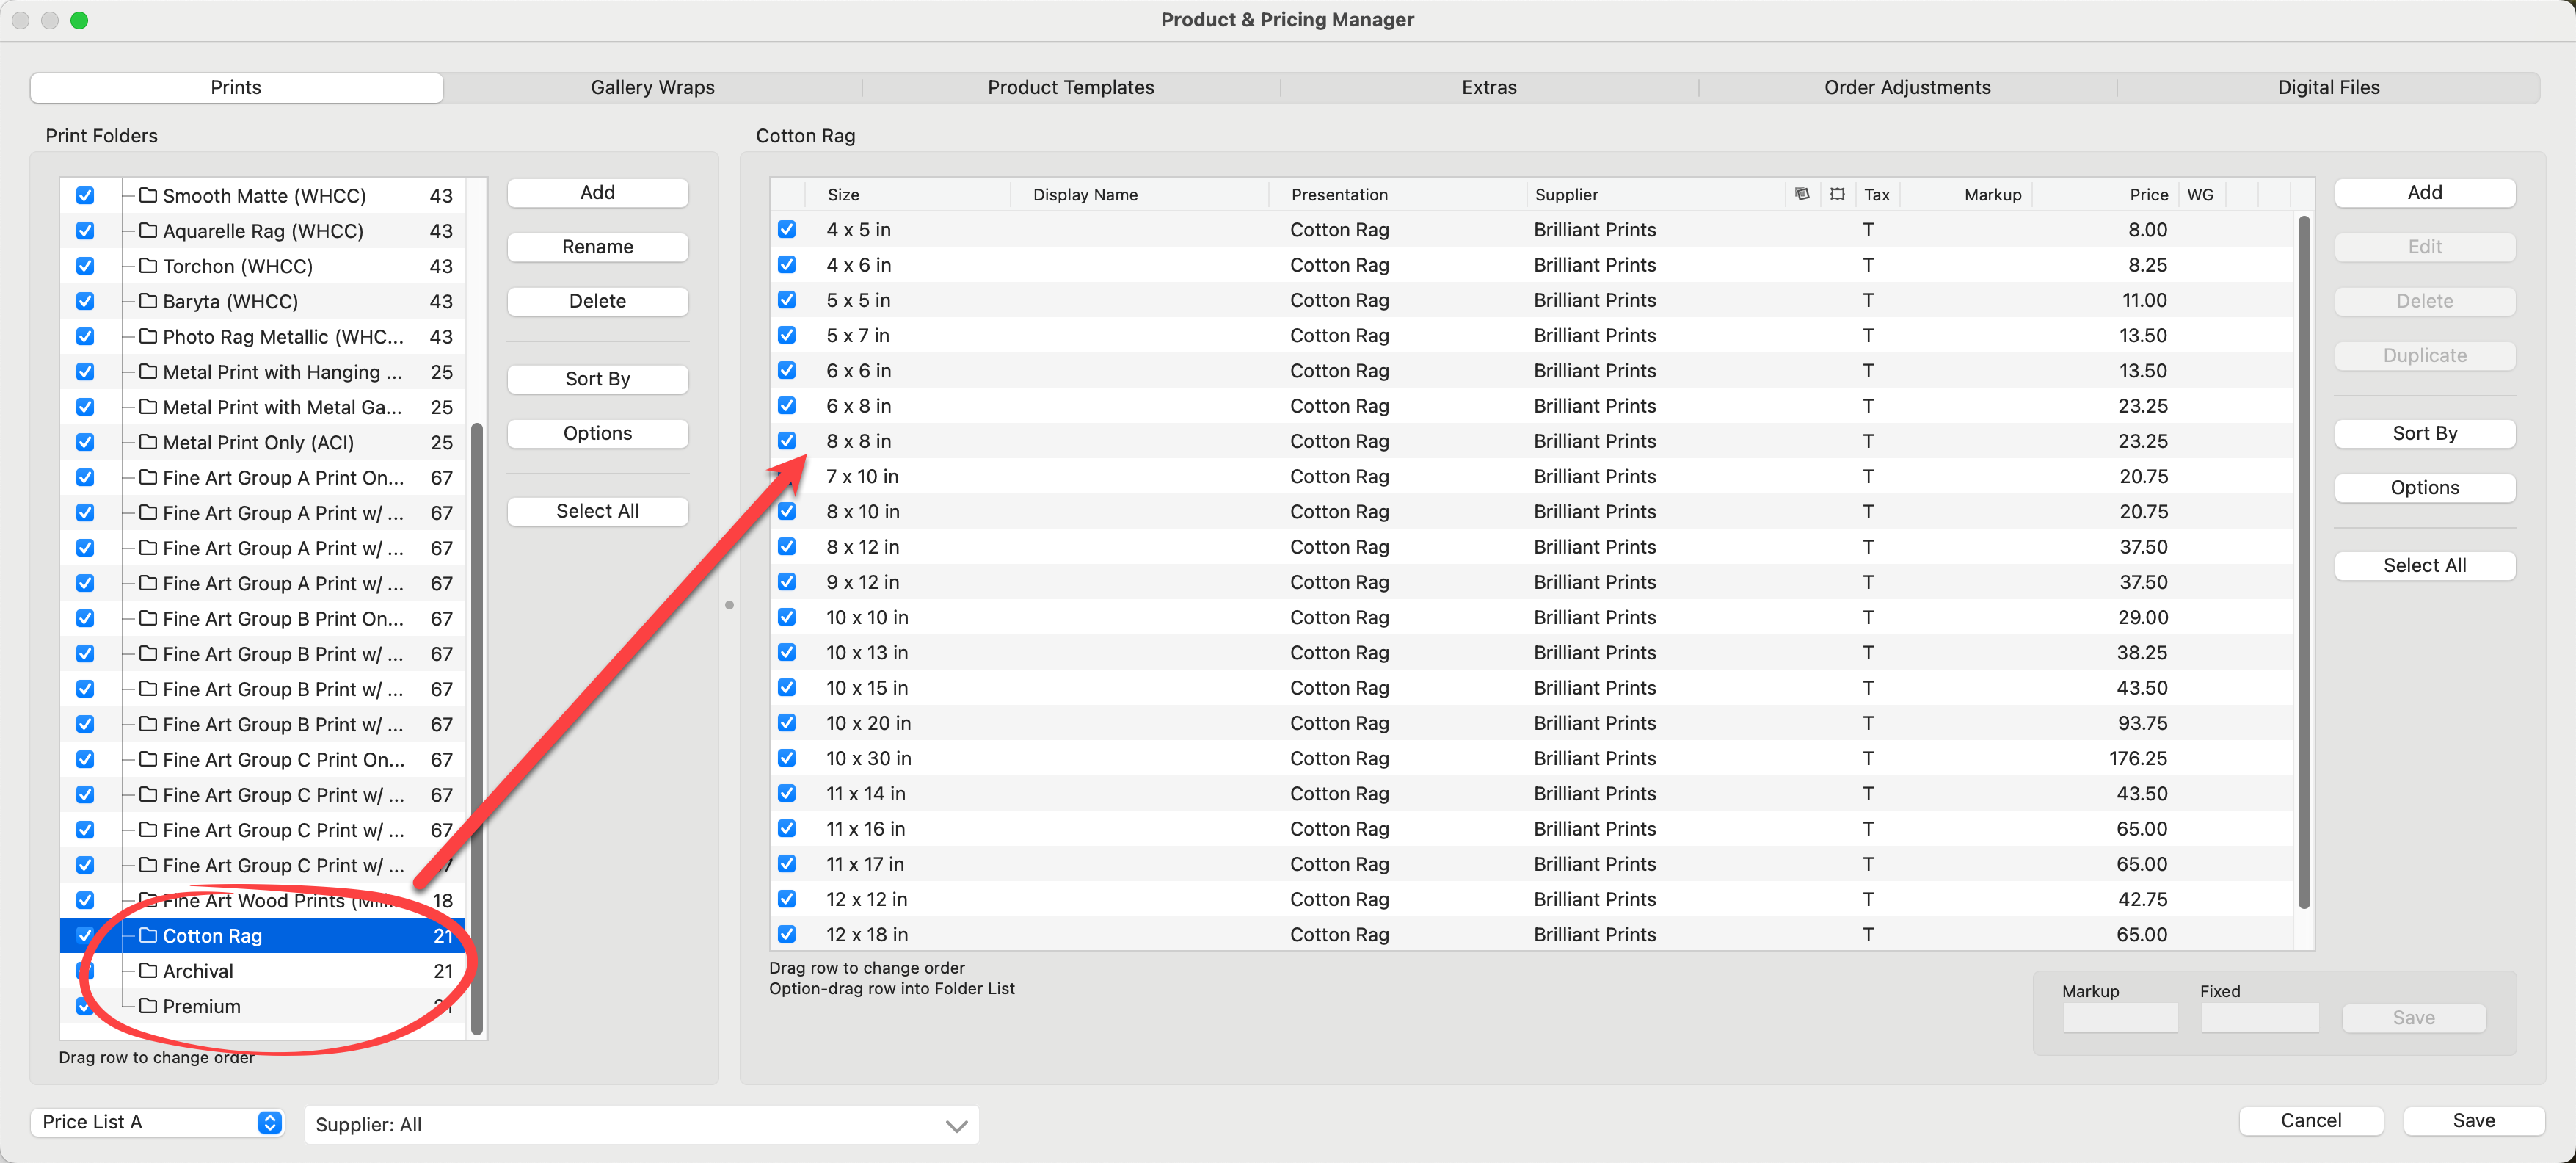
- The newly created Presentation Options have been added to your Presentation Options List. Any new paper sizes imported will be added to your Paper Sizes list.
As with Prints, ProSelect allows you to generate an import CSV file, which you can use to import details like sizes and prices for your gallery wraps. This feature is especially helpful for bulk adding or updating information efficiently in ProSelect.
- Select the Gallery Wraps tab at the top of the Product & Pricing Manager.
- Click on the Options button.
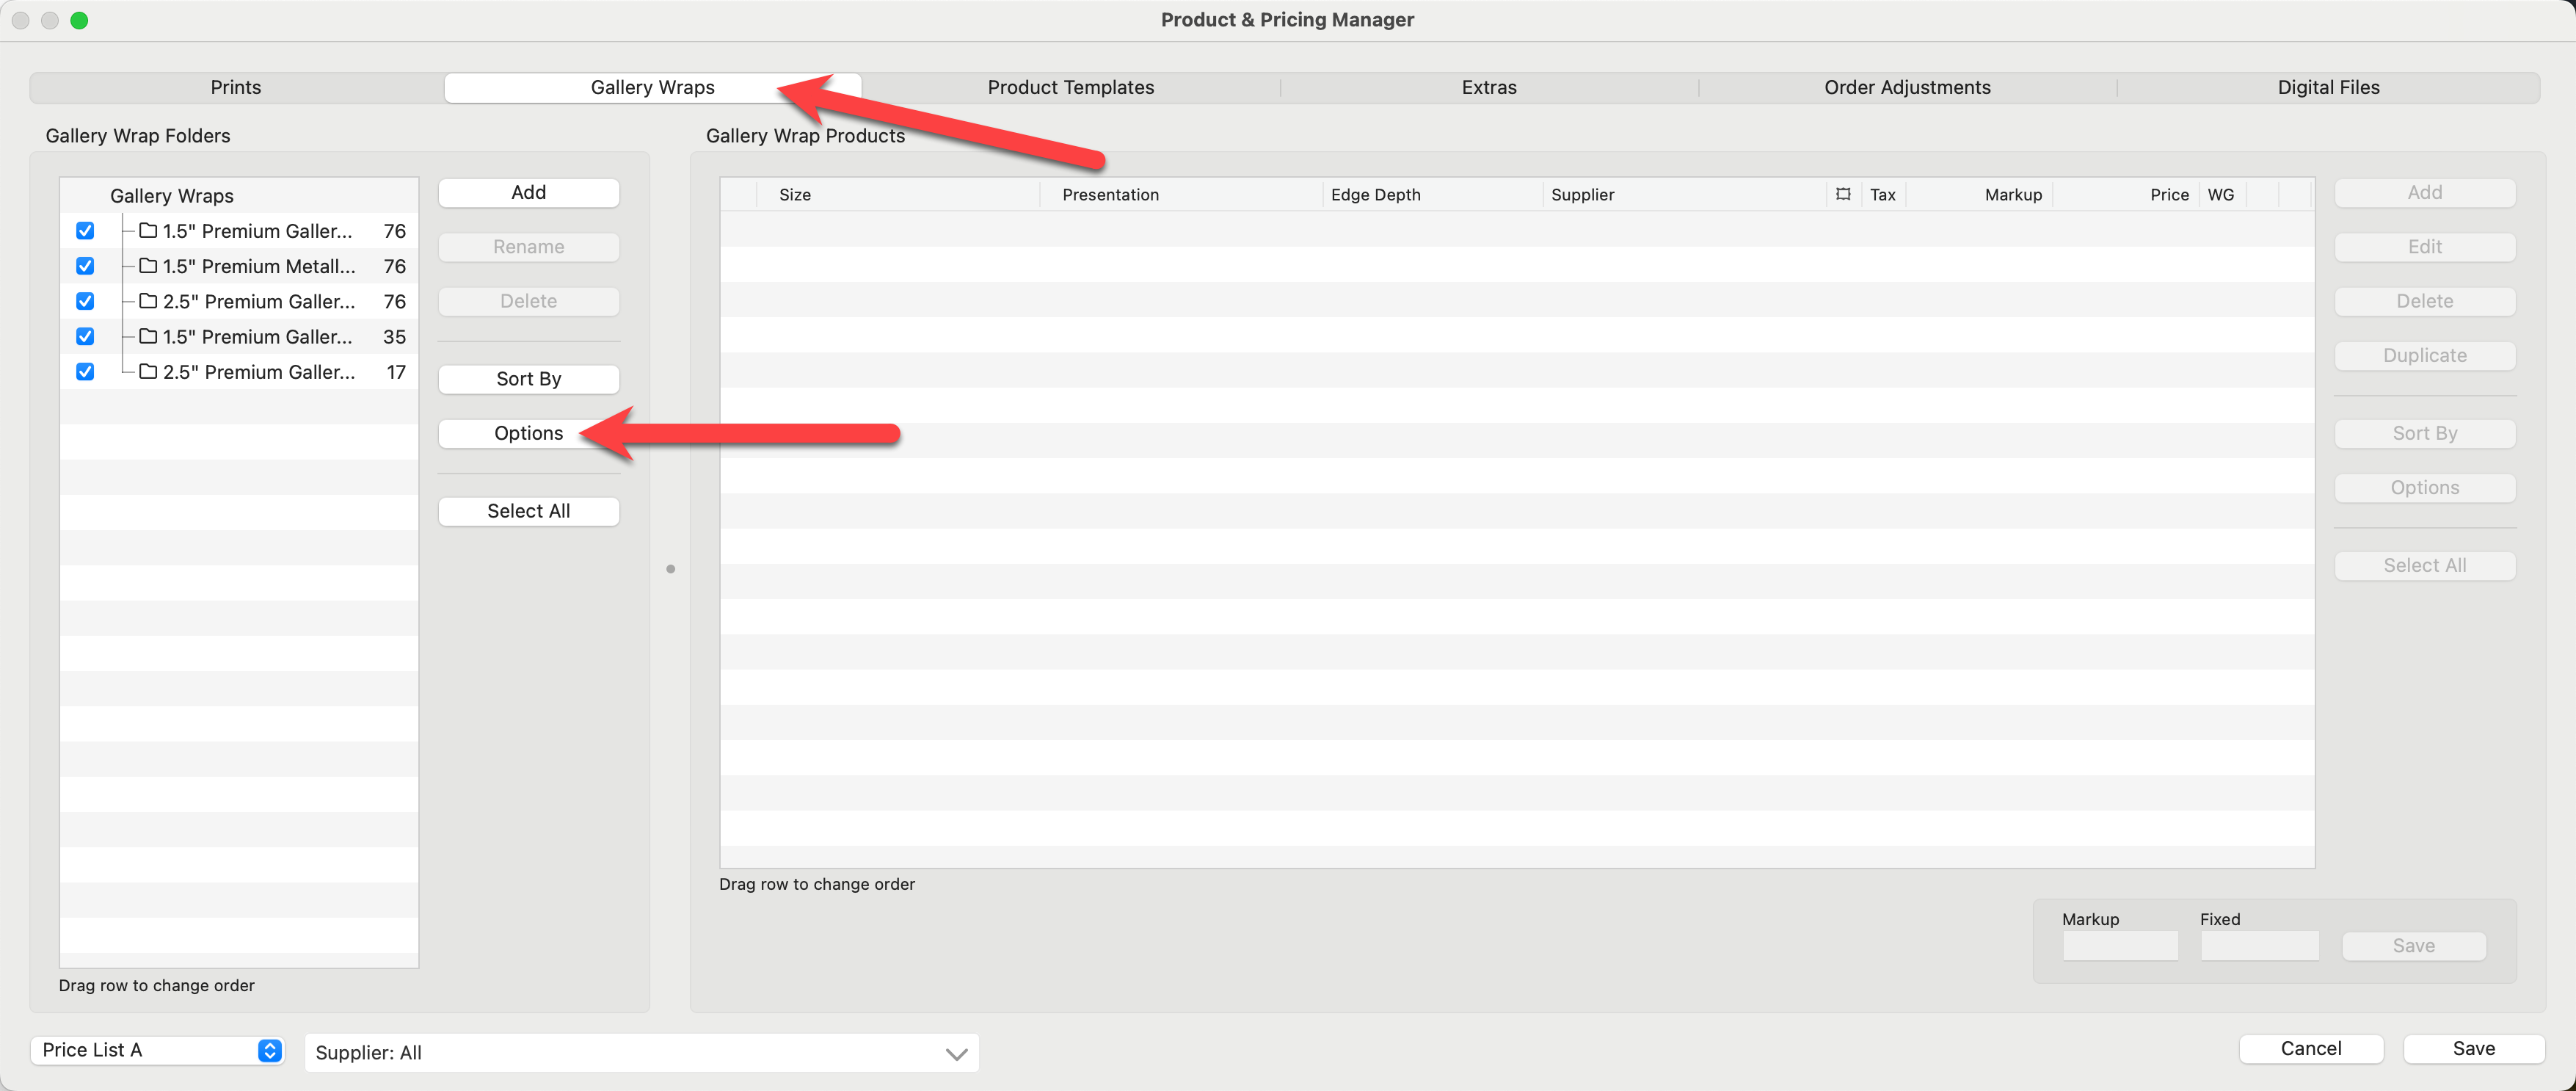
- Select "Generate Gallery Wrap Export Spreadsheet" from the popup menu.
- Fill in the appropriate information in the dialog before generating the spreadsheet:
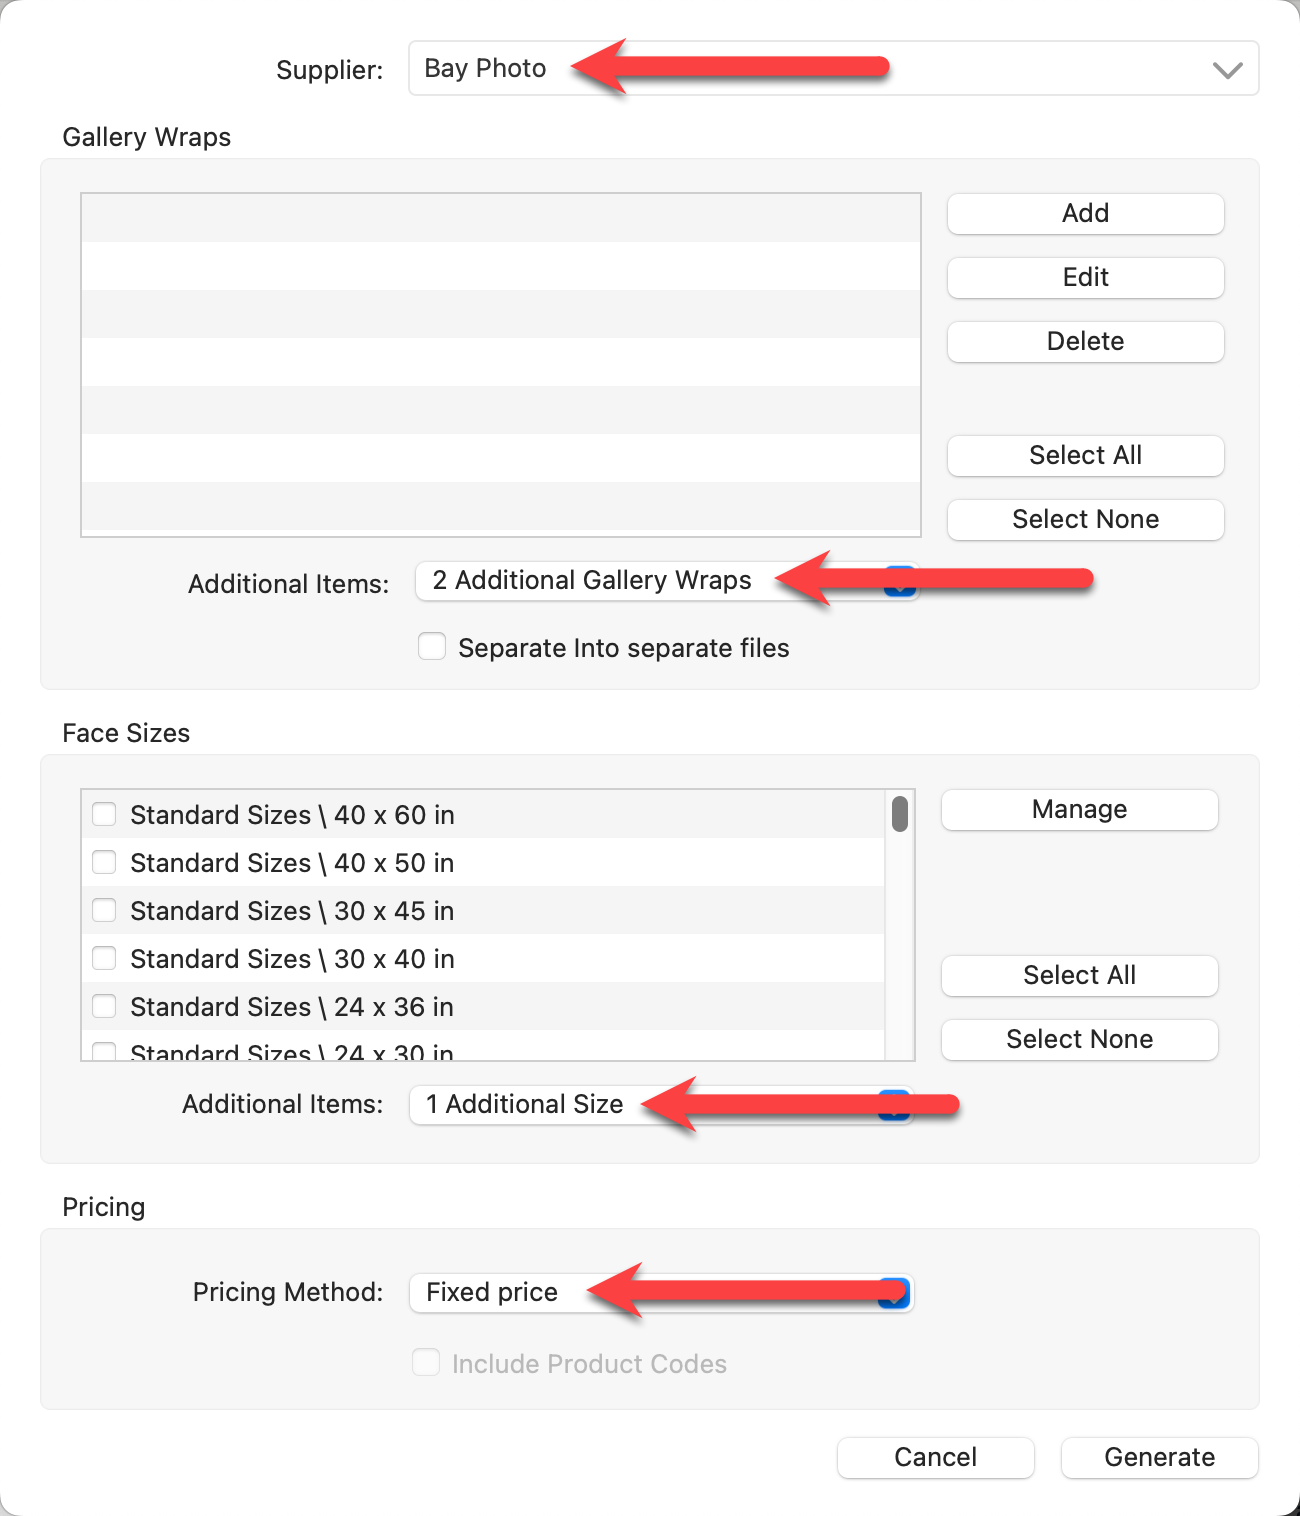
- Supplier: Select a supplier from the drop-down list (alternatively, choose "manage" to enable suppliers or "unspecified").
- Gallery Wraps: If you have already created the required edge depth and Presentation Options for your new Gallery Wraps, use the "Add" button to include them in the Spreadsheet.
- Alternatively, use the "Additional Items" drop-down list to add as many as 10 additional Gallery Wraps. For demonstration purposes, we will use this option.
- Separate into Separate Files: Check this box if you want a separate spreadsheet for each Gallery Wrap. Otherwise, by default, all the Gallery Wraps will appear side by side in the same file.
- Face Sizes: If you know which paper sizes you will be offering, use the checkboxes to select them or use the "Select All" button. If you are copying paper sizes from a supplier's website or your Studio's Price List, we recommend using the "Additional Items" drop-down list. Do not check any paper sizes. Instead, add "1 Additional Size." This will be used as a placeholder, and all the sizes available on the website can be added when you copy and paste.
- Pricing Method: Choose a pricing method from the drop-down list. If Product Codes have been enabled, use the checkbox to include them (optional).
- Click the Generate button.
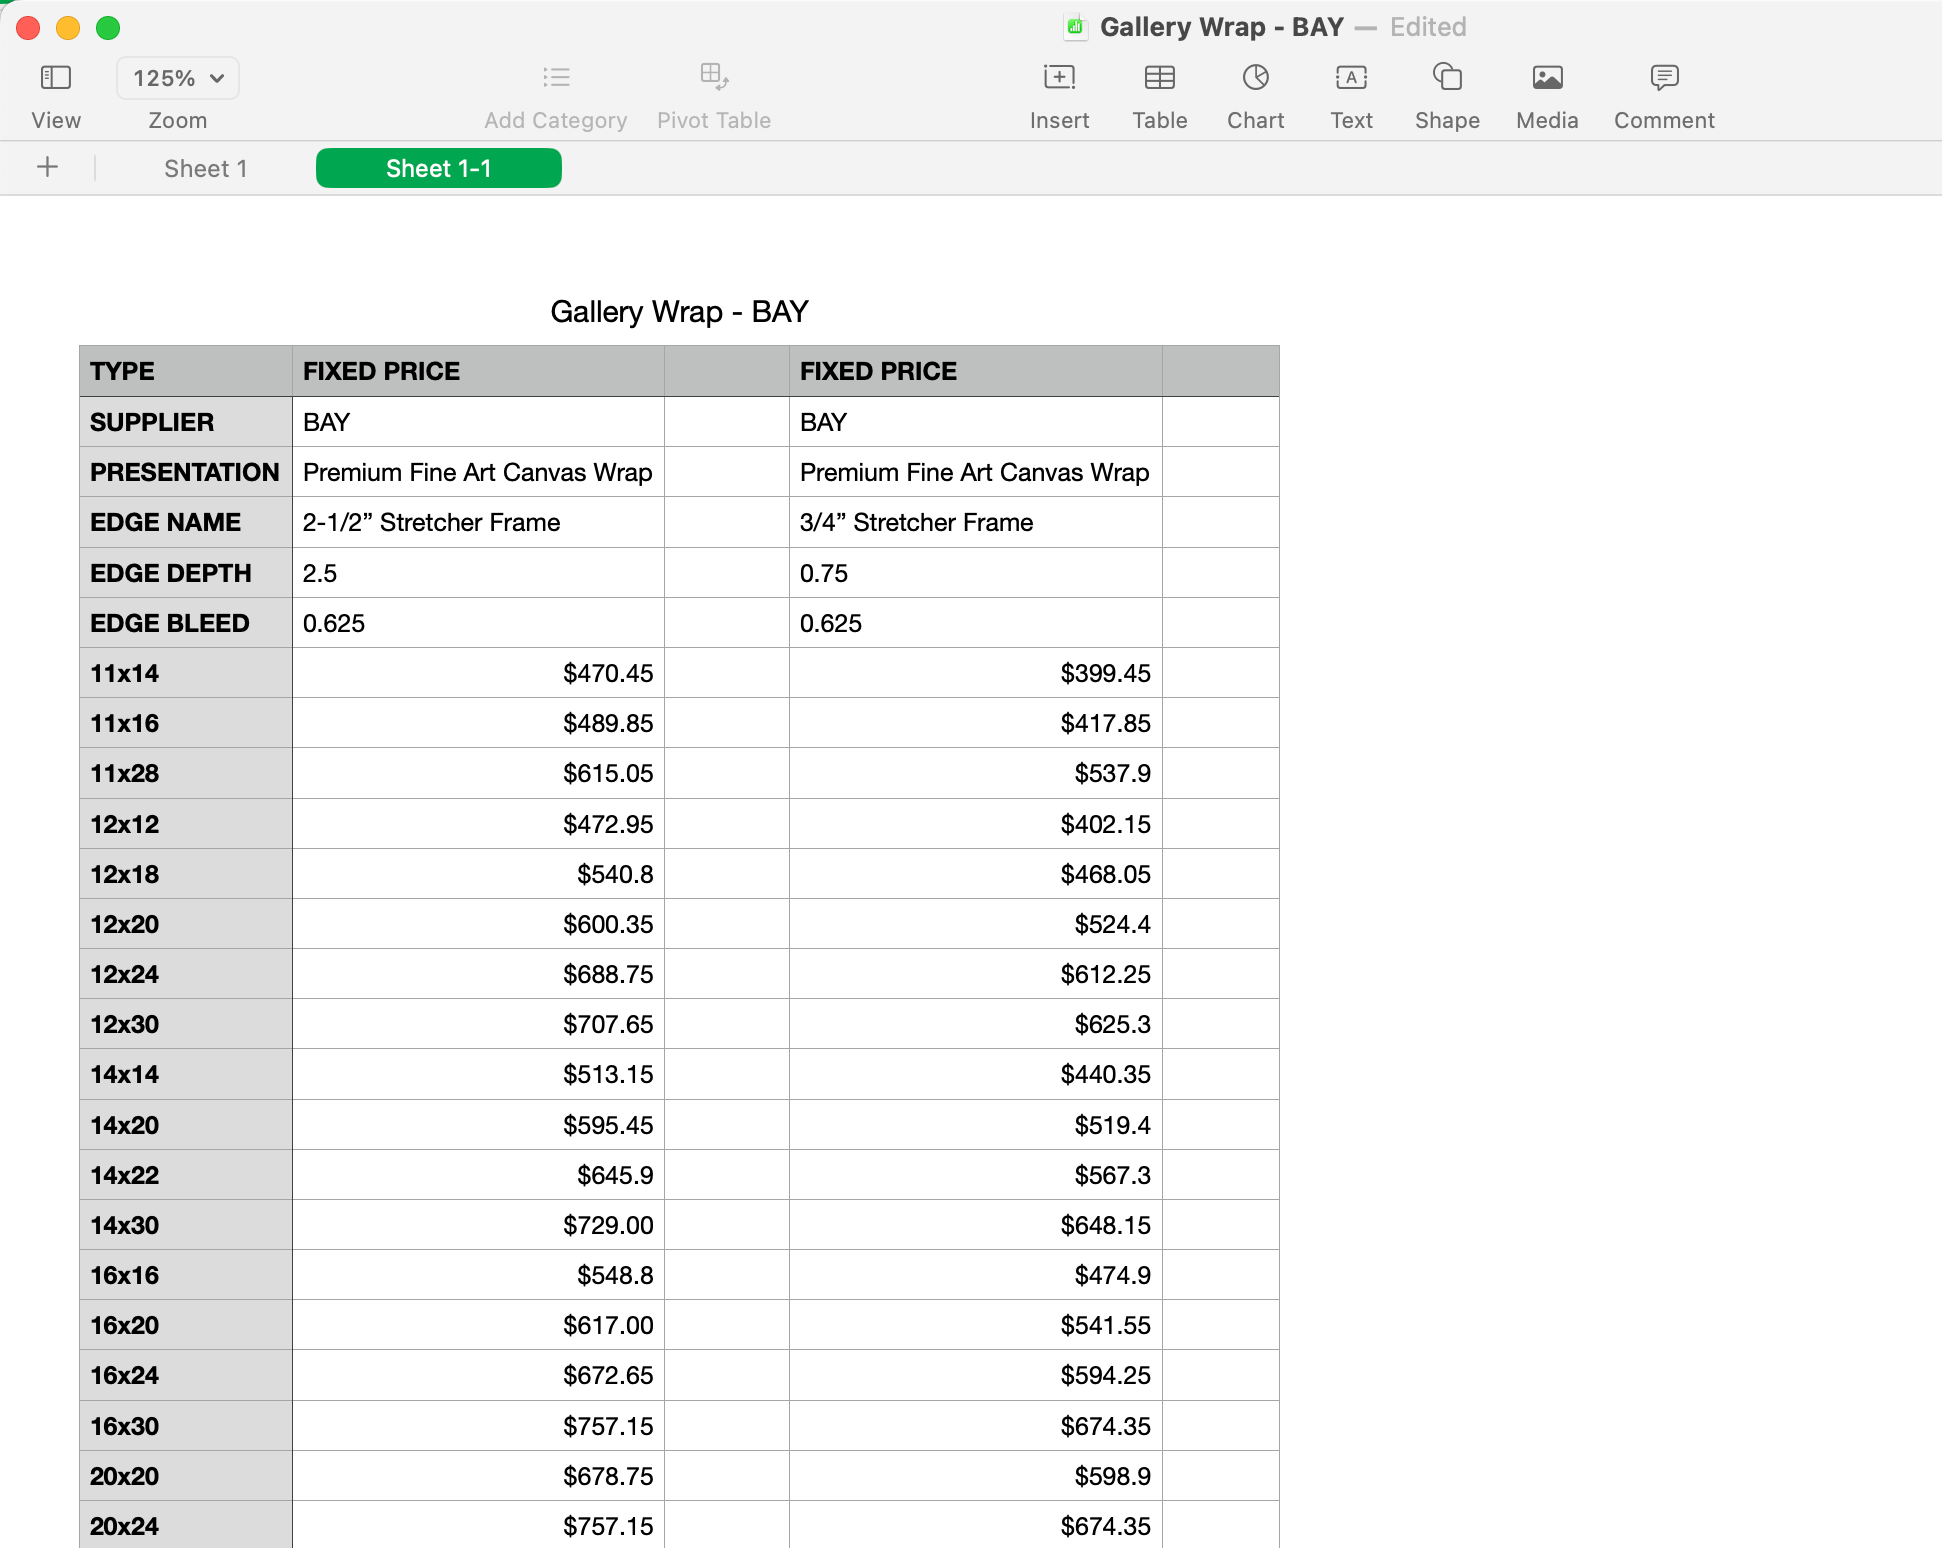
- Open the generated spreadsheet in your preferred program. In the example below, the pricing method "Fixed Price" has been selected.
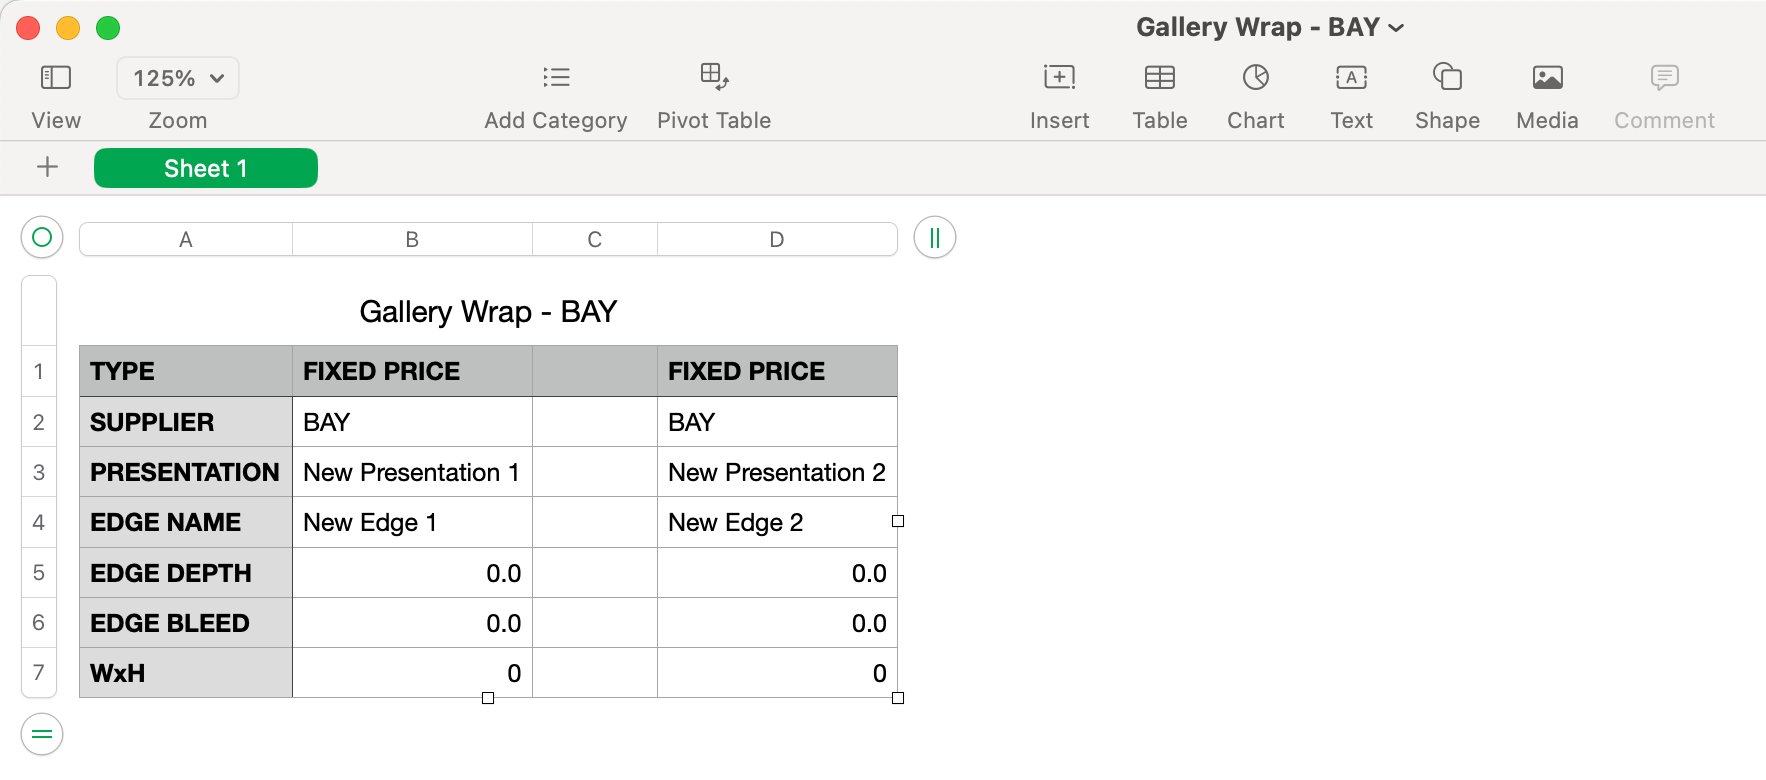
- Note that there are 2 columns. This is because we are creating "2 Gallery Wraps."
- The Supplier is listed underneath the pricing option, followed by the Presentation Option, Edge Name, Edge Depth, and Edge Bleed. All of these elements are required when creating a Gallery Wrap.
- The row "WxH" is where the sizes will go.
- Change the Presentation Option names to the type of Gallery Wrap you are creating.
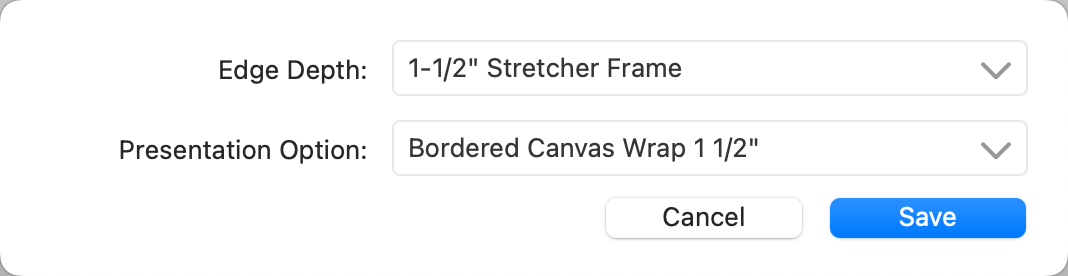
- Fill in the Edge Name, Depth, and Bleed for your gallery wraps. For convenience, ProSelect has already inputted this information for many different Suppliers. Click on Gallery Wrap Edge Depths for more information.
- Fill in the WxH rows with paper sizes. Add as many rows as you like. You can also copy and paste the paper sizes from your supplier's website. Click on Tips - Copying Pricing From Supplier Websites for helpful information.
- Lastly, calculate the fixed price you want to charge for the Gallery Wraps in each size they are offered.
- Once the spreadsheet has been populated, save or export the file as a CSV file. This is required for importing back into ProSelect.
- Back in the Product & Pricing Manager, close the "Generate Spreadsheet" dialog.
- Click on the Options button once again.
- Select "Import Gallery Wraps" from the popup menu.
- Find and Open the CSV file you just created.

- ProSelect will import each new Gallery Wrap one at a time. This allows you to create a "New Folder" for each type. Ensure "New Folder" is selected in the Options area.
- Click the Import button to import the first new Gallery Wrap.
- Once the import is complete, select the next new Gallery Wrap from the drop-down list at the top of the dialog.
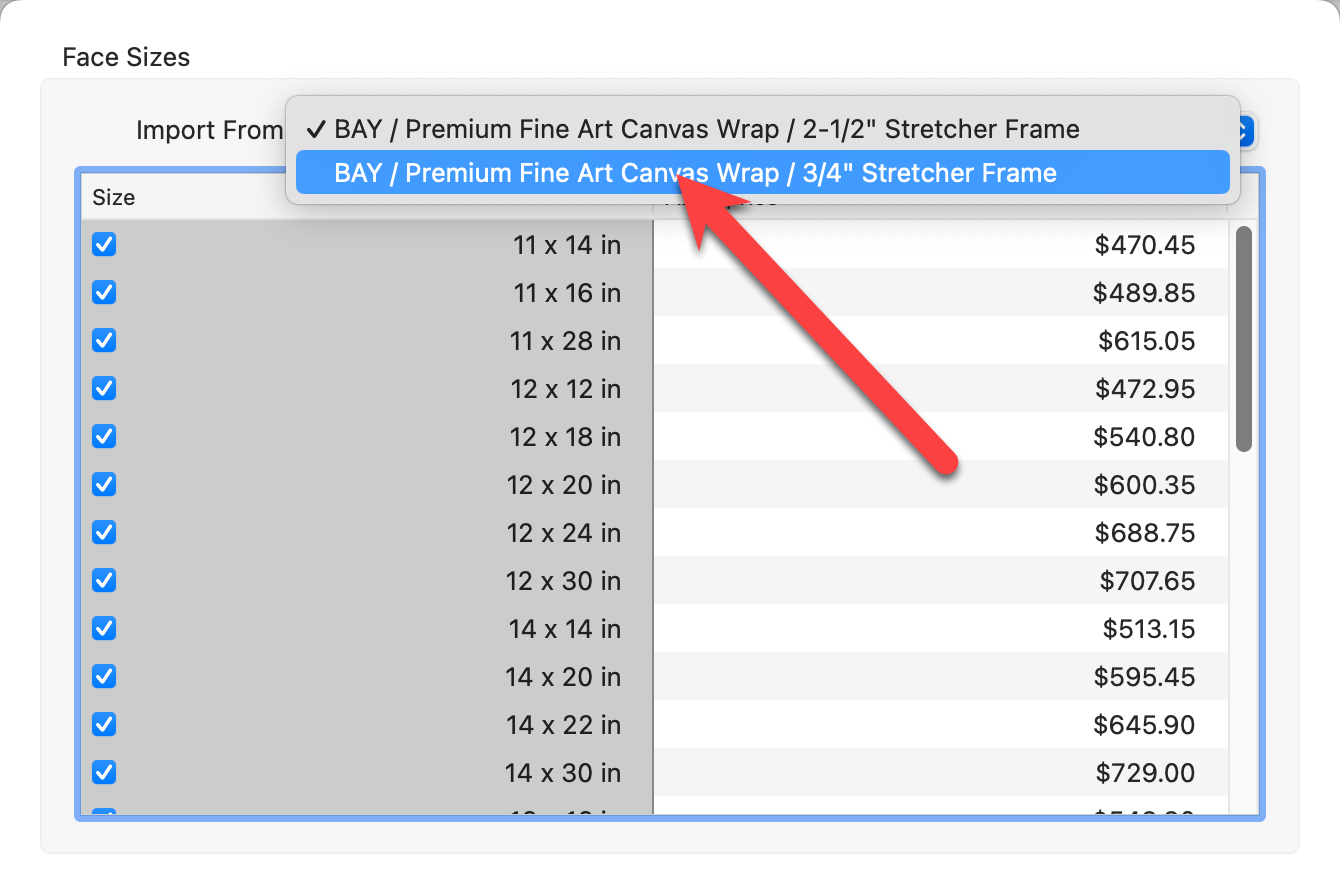
- Use the "Import From" drop-down menu at the top. Go through each new Gallery Wrap and click the Import button until they are all imported. Once completed, click the Close button.
- All of the new products have been imported into ProSelect.
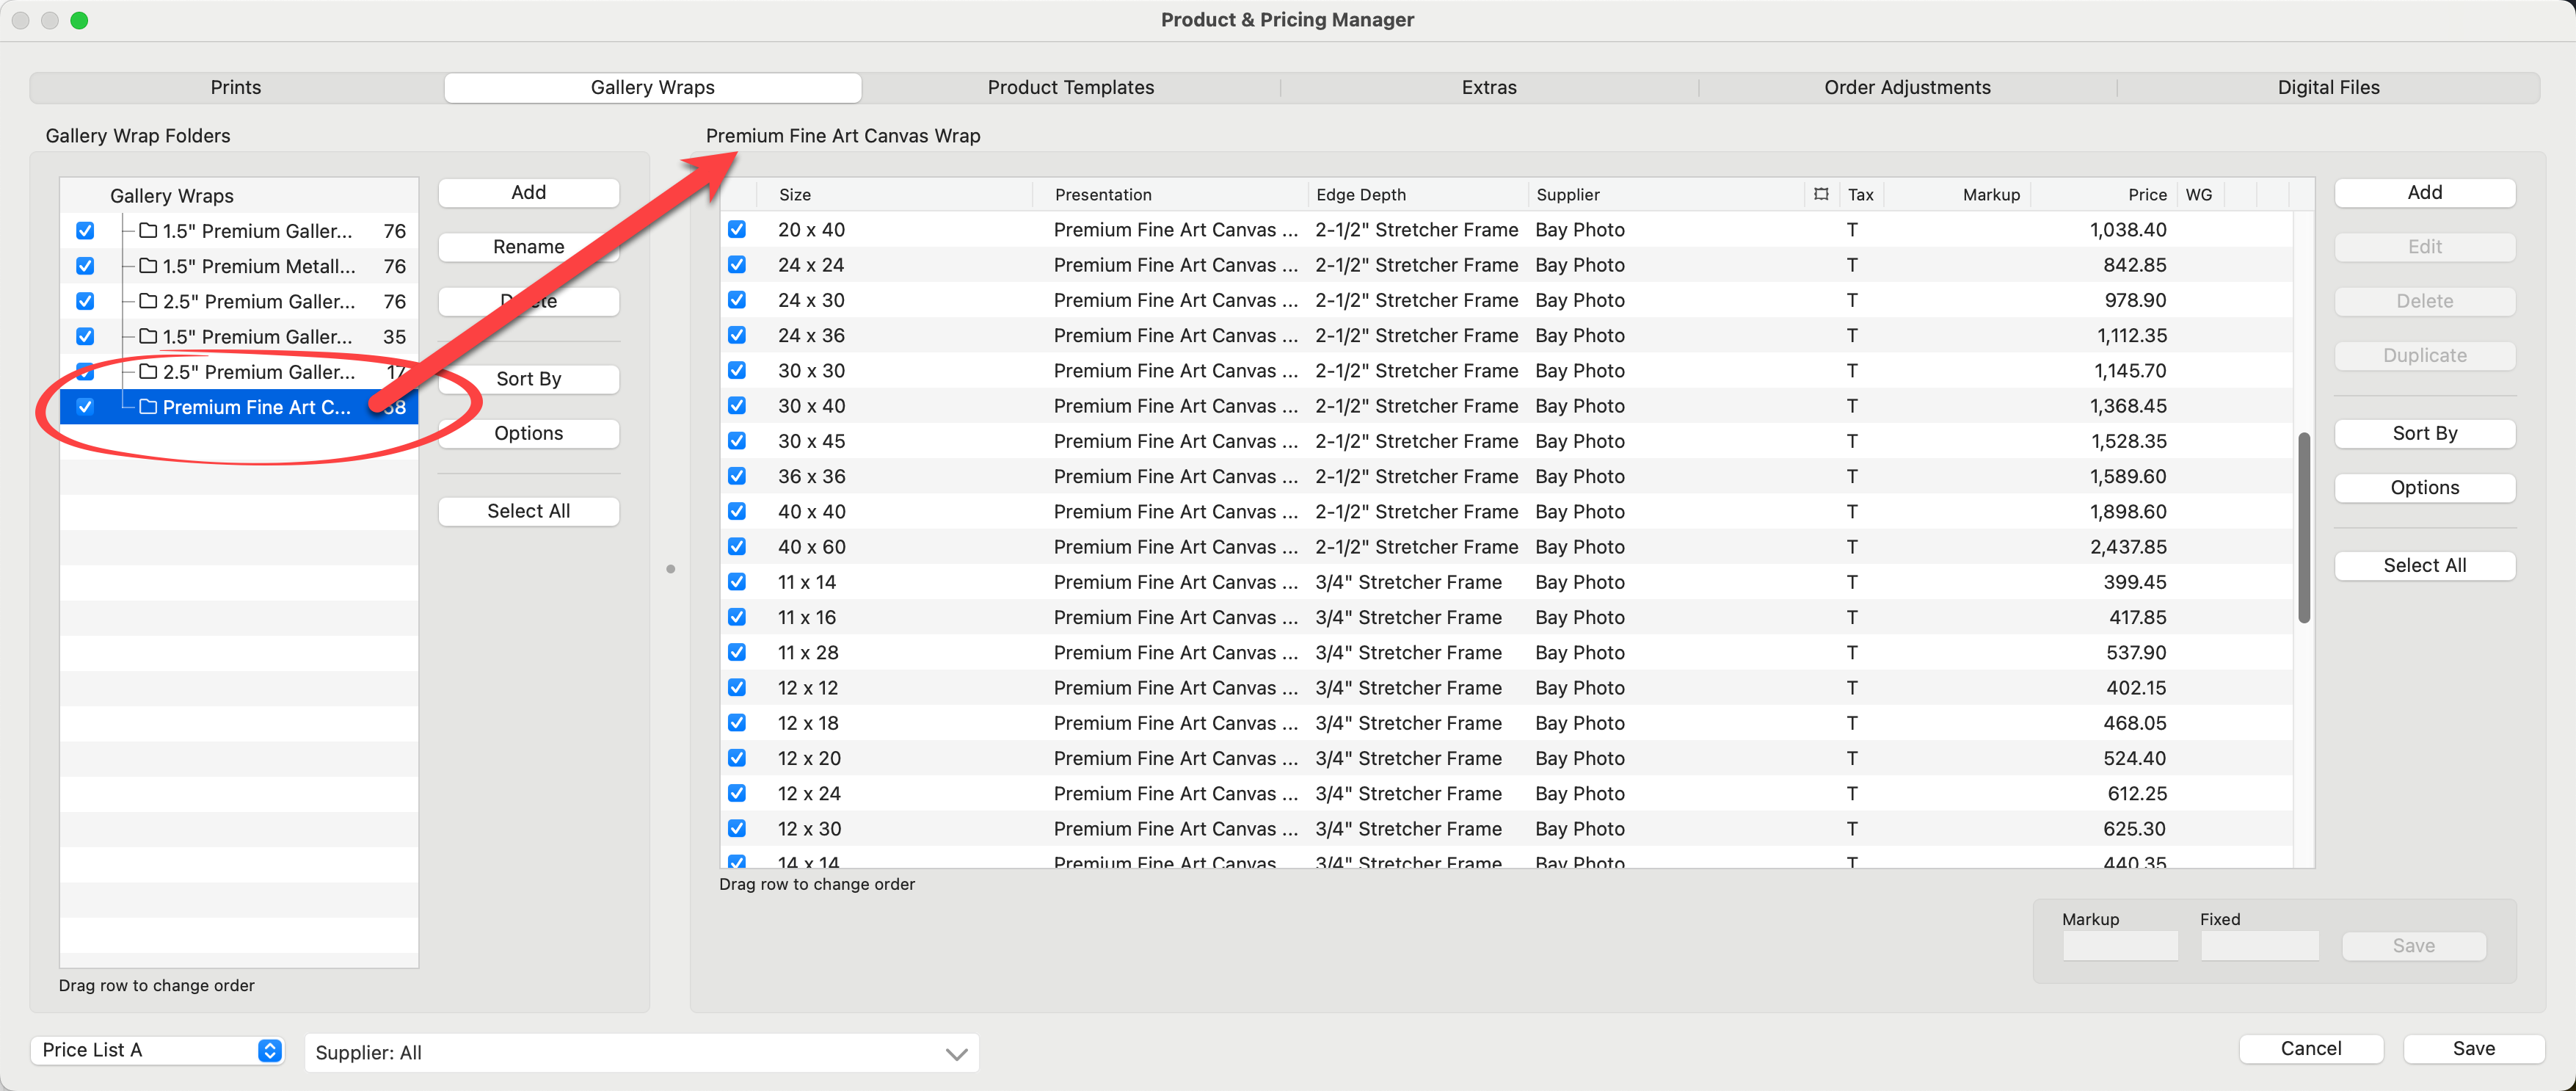
- Any newly created Presentation Options have been added to your Presentation Options List. Any new paper sizes imported will be added to your Paper Sizes list.
When transferring information from a supplier's website into a ProSelect-generated spreadsheet, you may encounter formatting inconsistencies as well as limitations when "copying" information. To address this issue, we recommend first copying and pasting the information into a new spreadsheet using the "paste with matching formatting" option. This step helps preserve the original formatting. Afterward, you can transfer the cleaned-up information into the ProSelect-generated spreadsheet more seamlessly.
For Example: White House Custom Color, Art Prints
- Copy the entire selection you wish to import into ProSelect. Many websites do not allow you to copy just a single column, which makes it difficult to populate the ProSelect-generated spreadsheet.
- Before transferring content to your ProSelect-generated spreadsheet, first paste the information into a new, separate spreadsheet. Then right-click on an empty cell in the new spreadsheet and select "Paste and Match Style." This step ensures that the formatting from the original source is adapted to match the styling of the spreadsheet. Note that the exact phrasing of this option may vary depending on the spreadsheet software you are using.
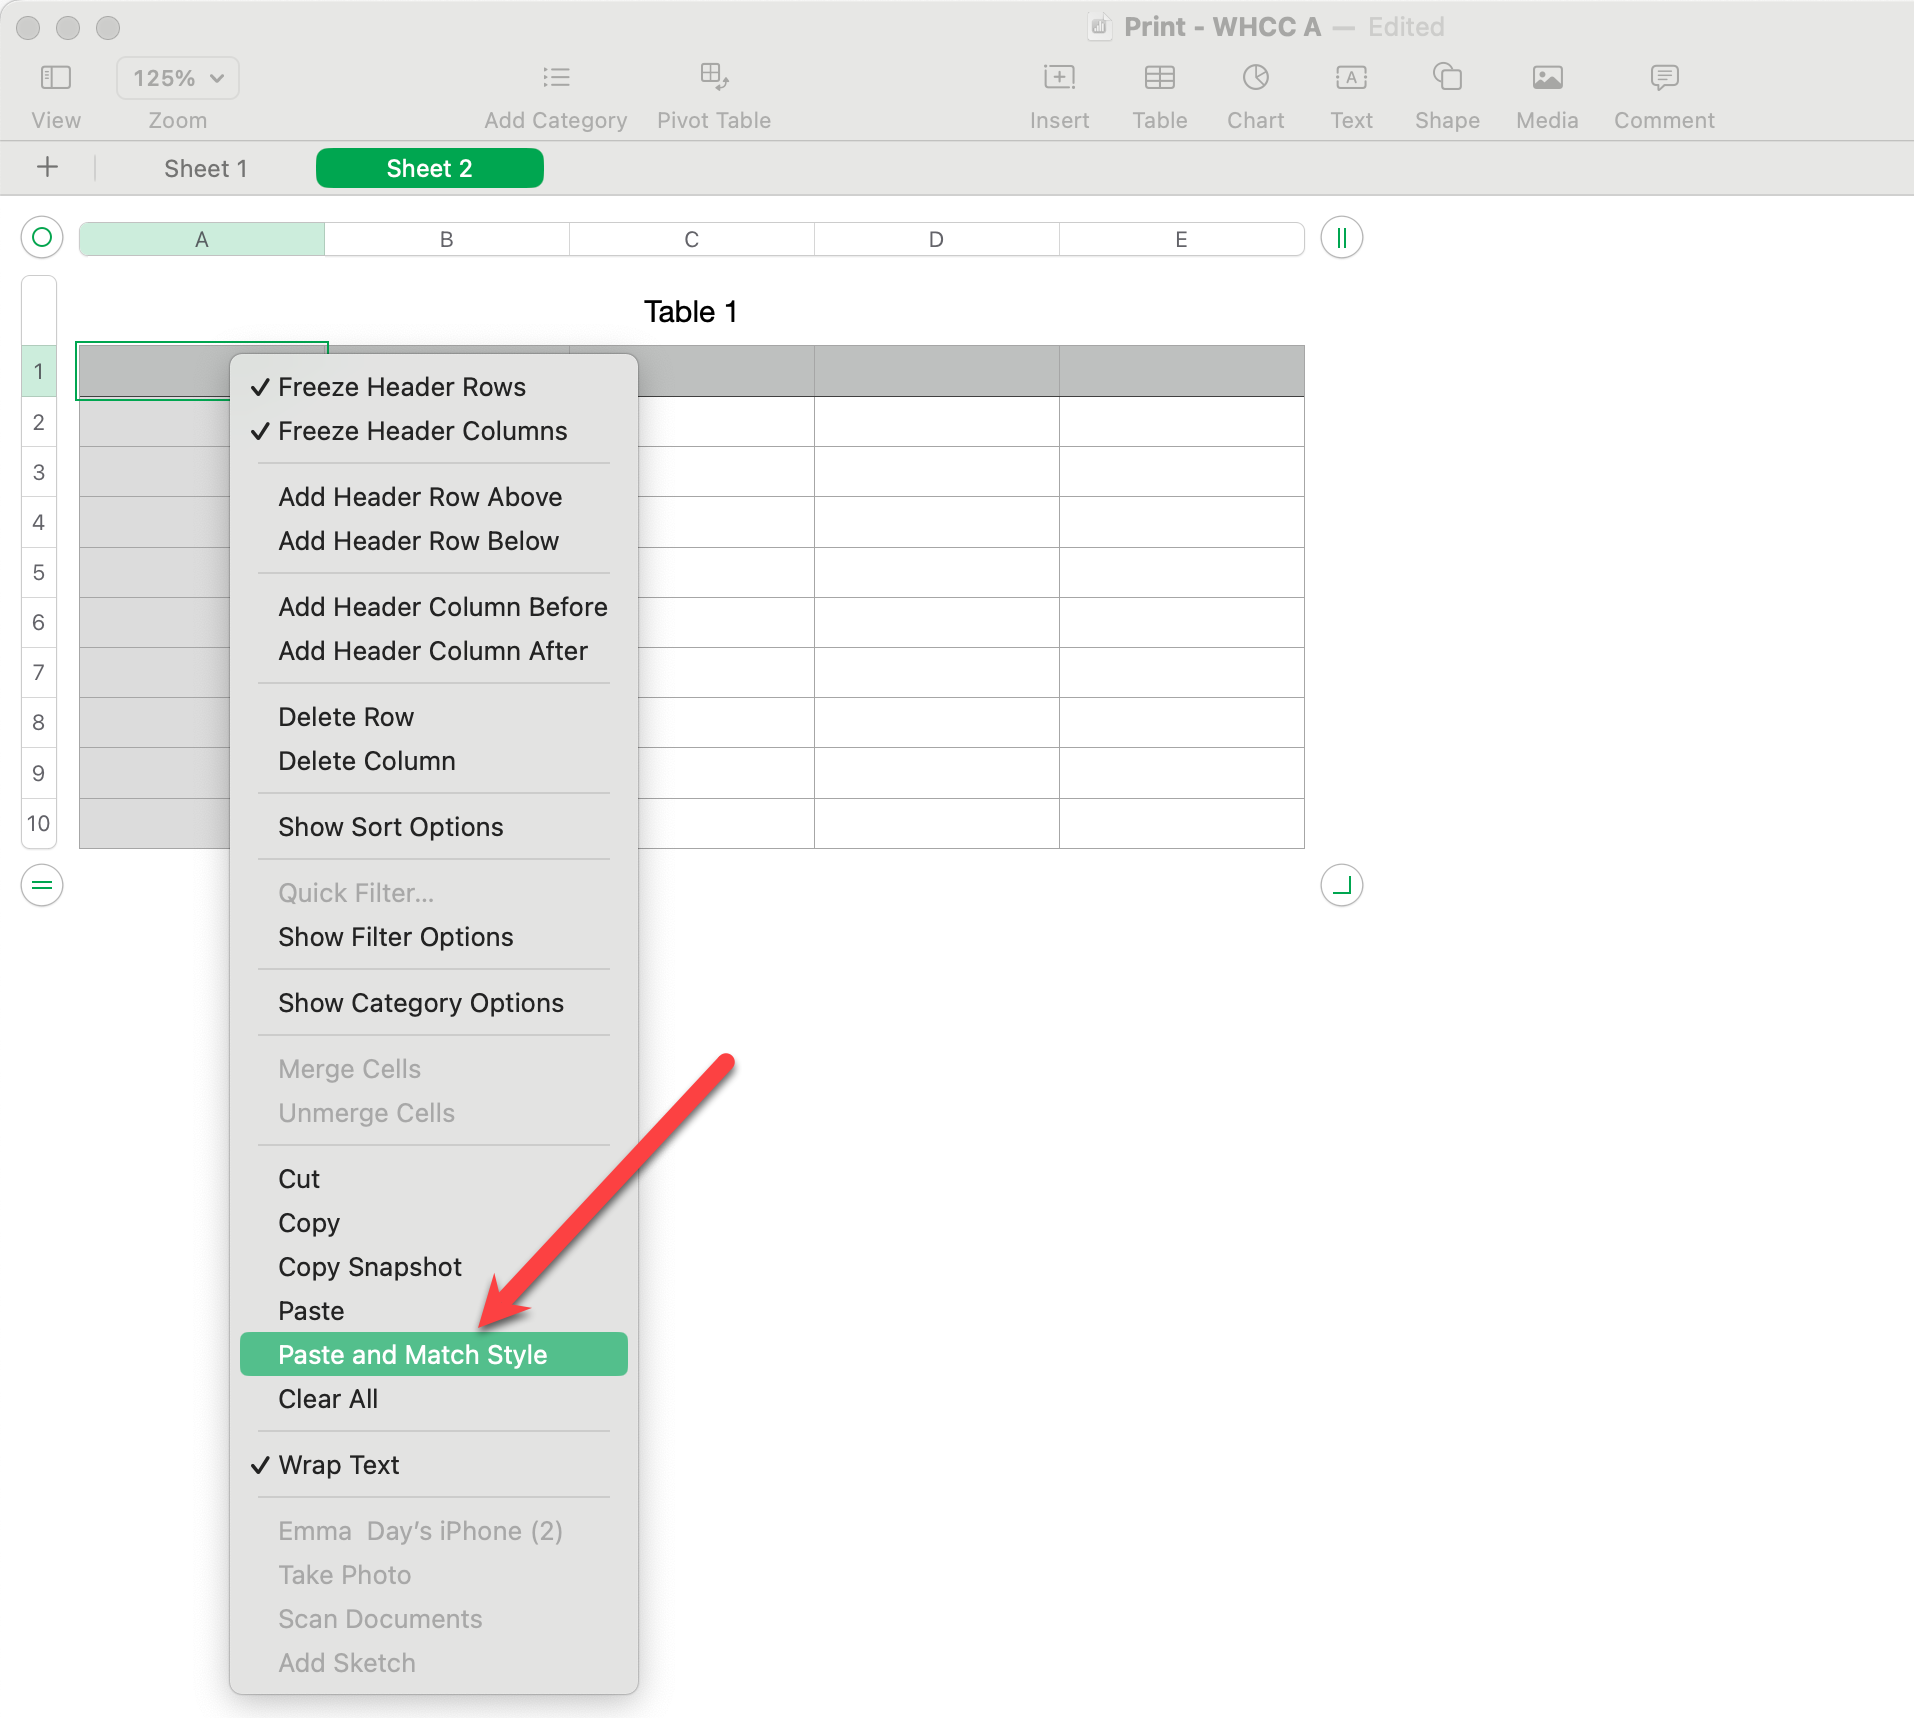
- Now that the information has been transferred to a new spreadsheet, you can copy and paste the appropriate information across to the ProSelect generated spreadsheet.
Sample Spreadsheet
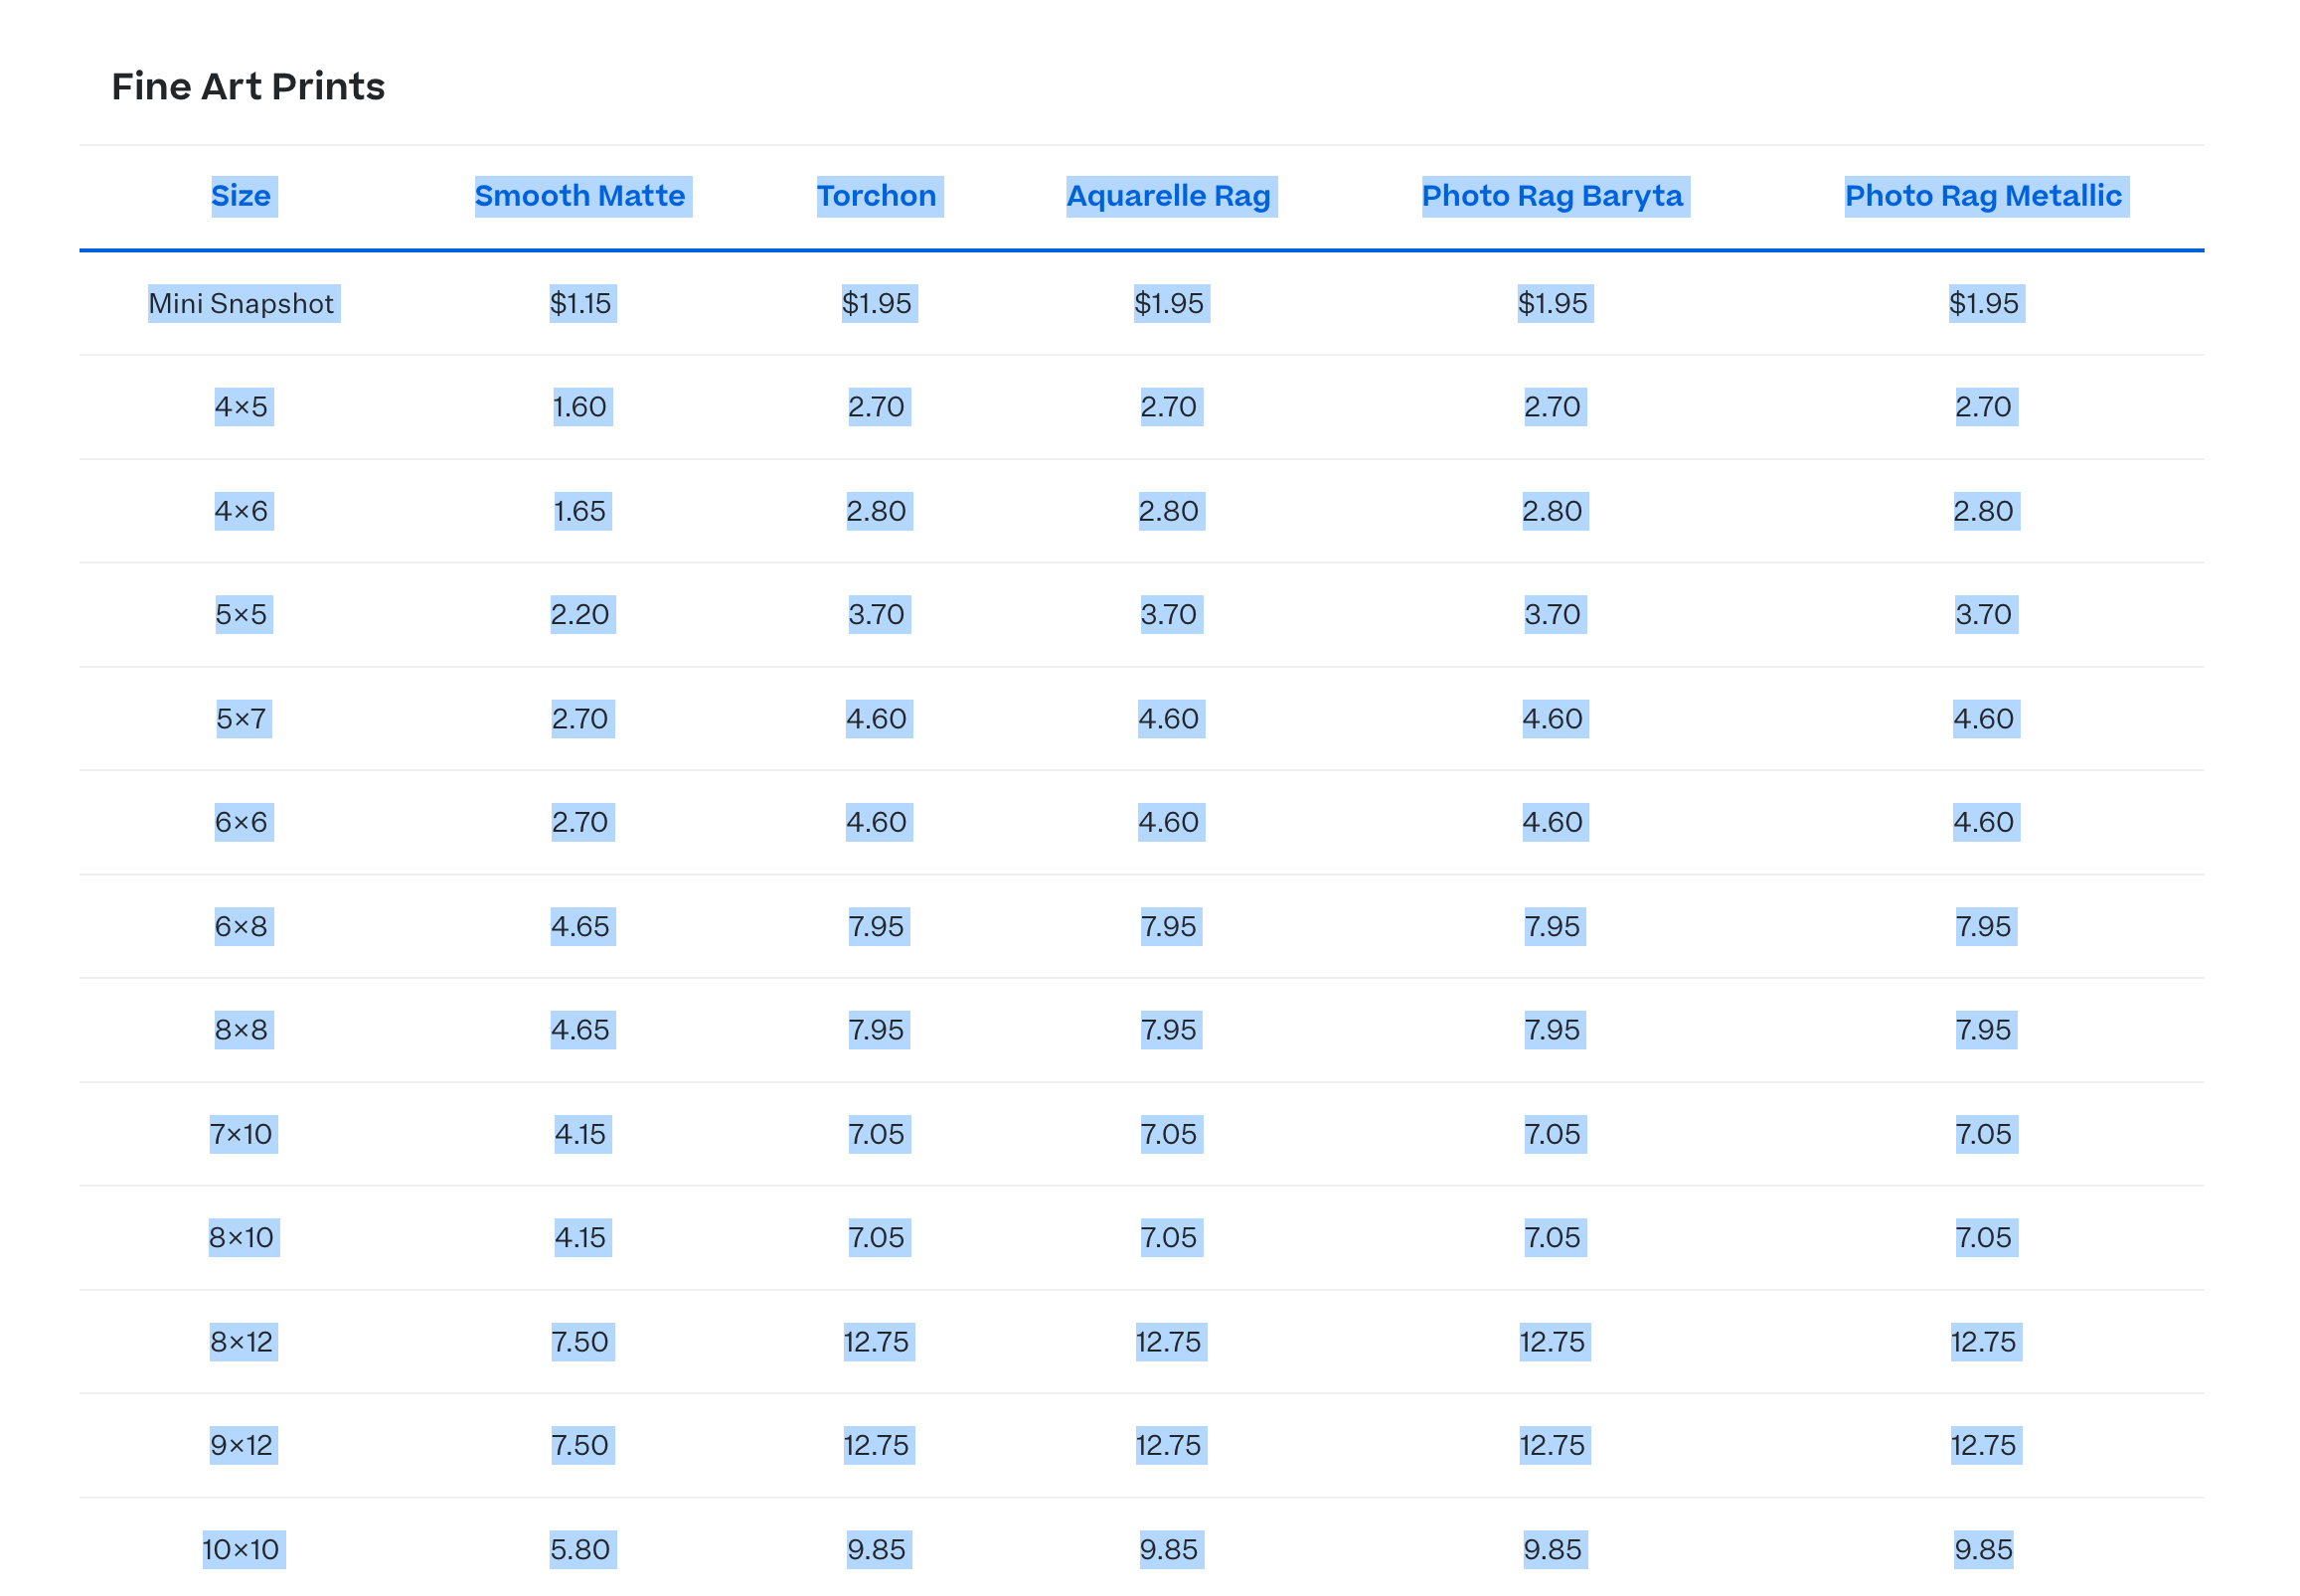
Click on Print Import Sheet - Fixed Price to download and use this sample spreadsheet. It can be used to import up to 10 new Presentation Options in 43 commonly used sizes. Simply replace "Presentation Option 1,2, etc." with your print finishes. Type in a fixed price for each size you want to offer and follow the steps to import the pricing spreadsheet into ProSelect. Please note you can start from Step 7, because the spreadsheet has already been generated for you.