Production Profiles
Production Profiles allows you to configure output settings for your final image files according to your needs. You have the flexibility to create multiple production profiles to cater to the varying requirements of the different labs you work with. You can also continue to work with the default profiles created, customizing them to your needs. The default production profiles will be used unless another is specified in Pro Production. Access the production profiles dialog by going to the top menu, Production > Production Profiles.
Production Profiles are attached at the Presentation Option (print finish) level, but can always be changed in the Production window if desired. See Presentation Options for more information on assigning a production profile.
Production Profile Options Include:
- Specify the desired resolution to match your lab or printer's requirements.
- Choose how to handle odd-sized images by filling them to the next standard size.
- Select from JPEG, Flattened TIFF, or Layered Photoshop formats PSD for your final images.
- Choose to produce all digital files as high-quality JPEGs regardless of the main output format.
- Use clipping masks for non-destructive cropping.
- Split double-spread book pages if required by your bookmaker.
- Utilize PSD files for overlays to maintain editable text layers in composites.
- When a Supplier Collection is downloaded, ProSelect automatically generates a locked Production Profile corresponding to that supplier. These particular production profiles can be renamed, but not edited.
To manage Production Profiles, navigate to the top menu, Production > Production Profiles. Here, you can manually add new profiles, adjust existing profiles that were automatically included with imported Supplier Collections, and handle profiles that were added when a Supplier was enabled.
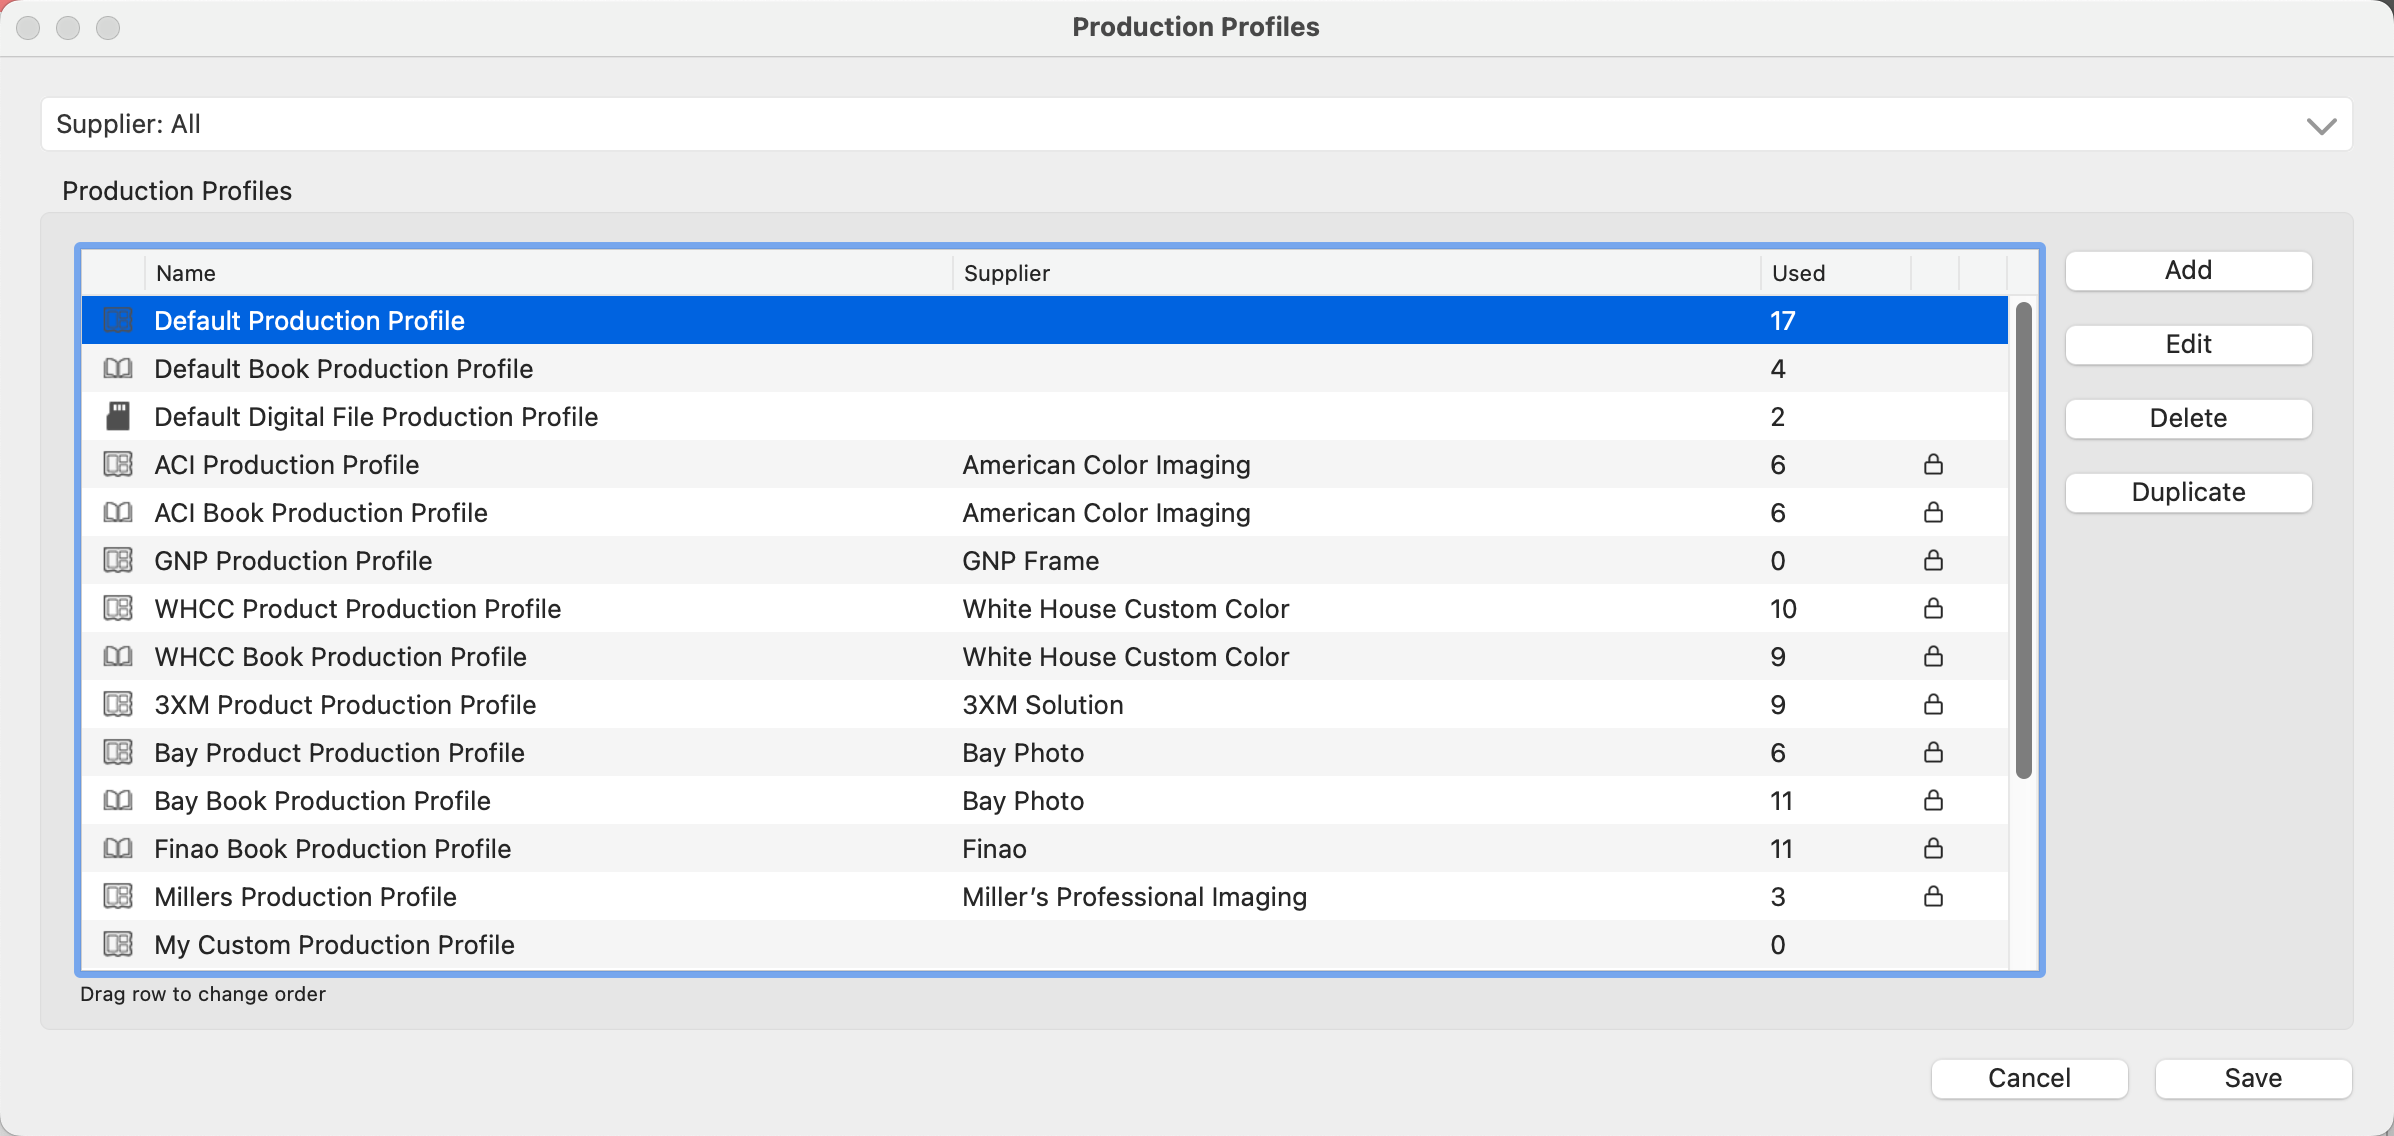
 The digital file tag indicates the production profile is specifically for producing digital files.
 The book tag indicates the production profile is specific to books/albums.
 The products tag indicates the production profile universally works for all prints and products.
- Used: this column indicates the number of presentation options currently using the production profile.
 Locked: Production Profiles associated with Supplier Collections are locked.
  Duplicate: It is possible to get duplicate production profiles. If this occurs, a warning tag will appear. You can either delete the duplicate or reassign the production profiles.
- Add, Edit, or Remove a production profile using the buttons on the right-hand side.
- Options include assigning a Supplier or Reassigning Production Profiles.
Please be aware that ALL newly created production profiles in ProSelect are created using the default settings. It is the user's responsibility to edit and customize these profiles to meet the specific requirements of their lab.
Use the Add button to create a new profile. Alternatively, Duplicate a current Production Profile and modify it.
The Default Production Profile is designed for managing the production of all Prints and Products, except for books or digital files, which require their own specific profiles.
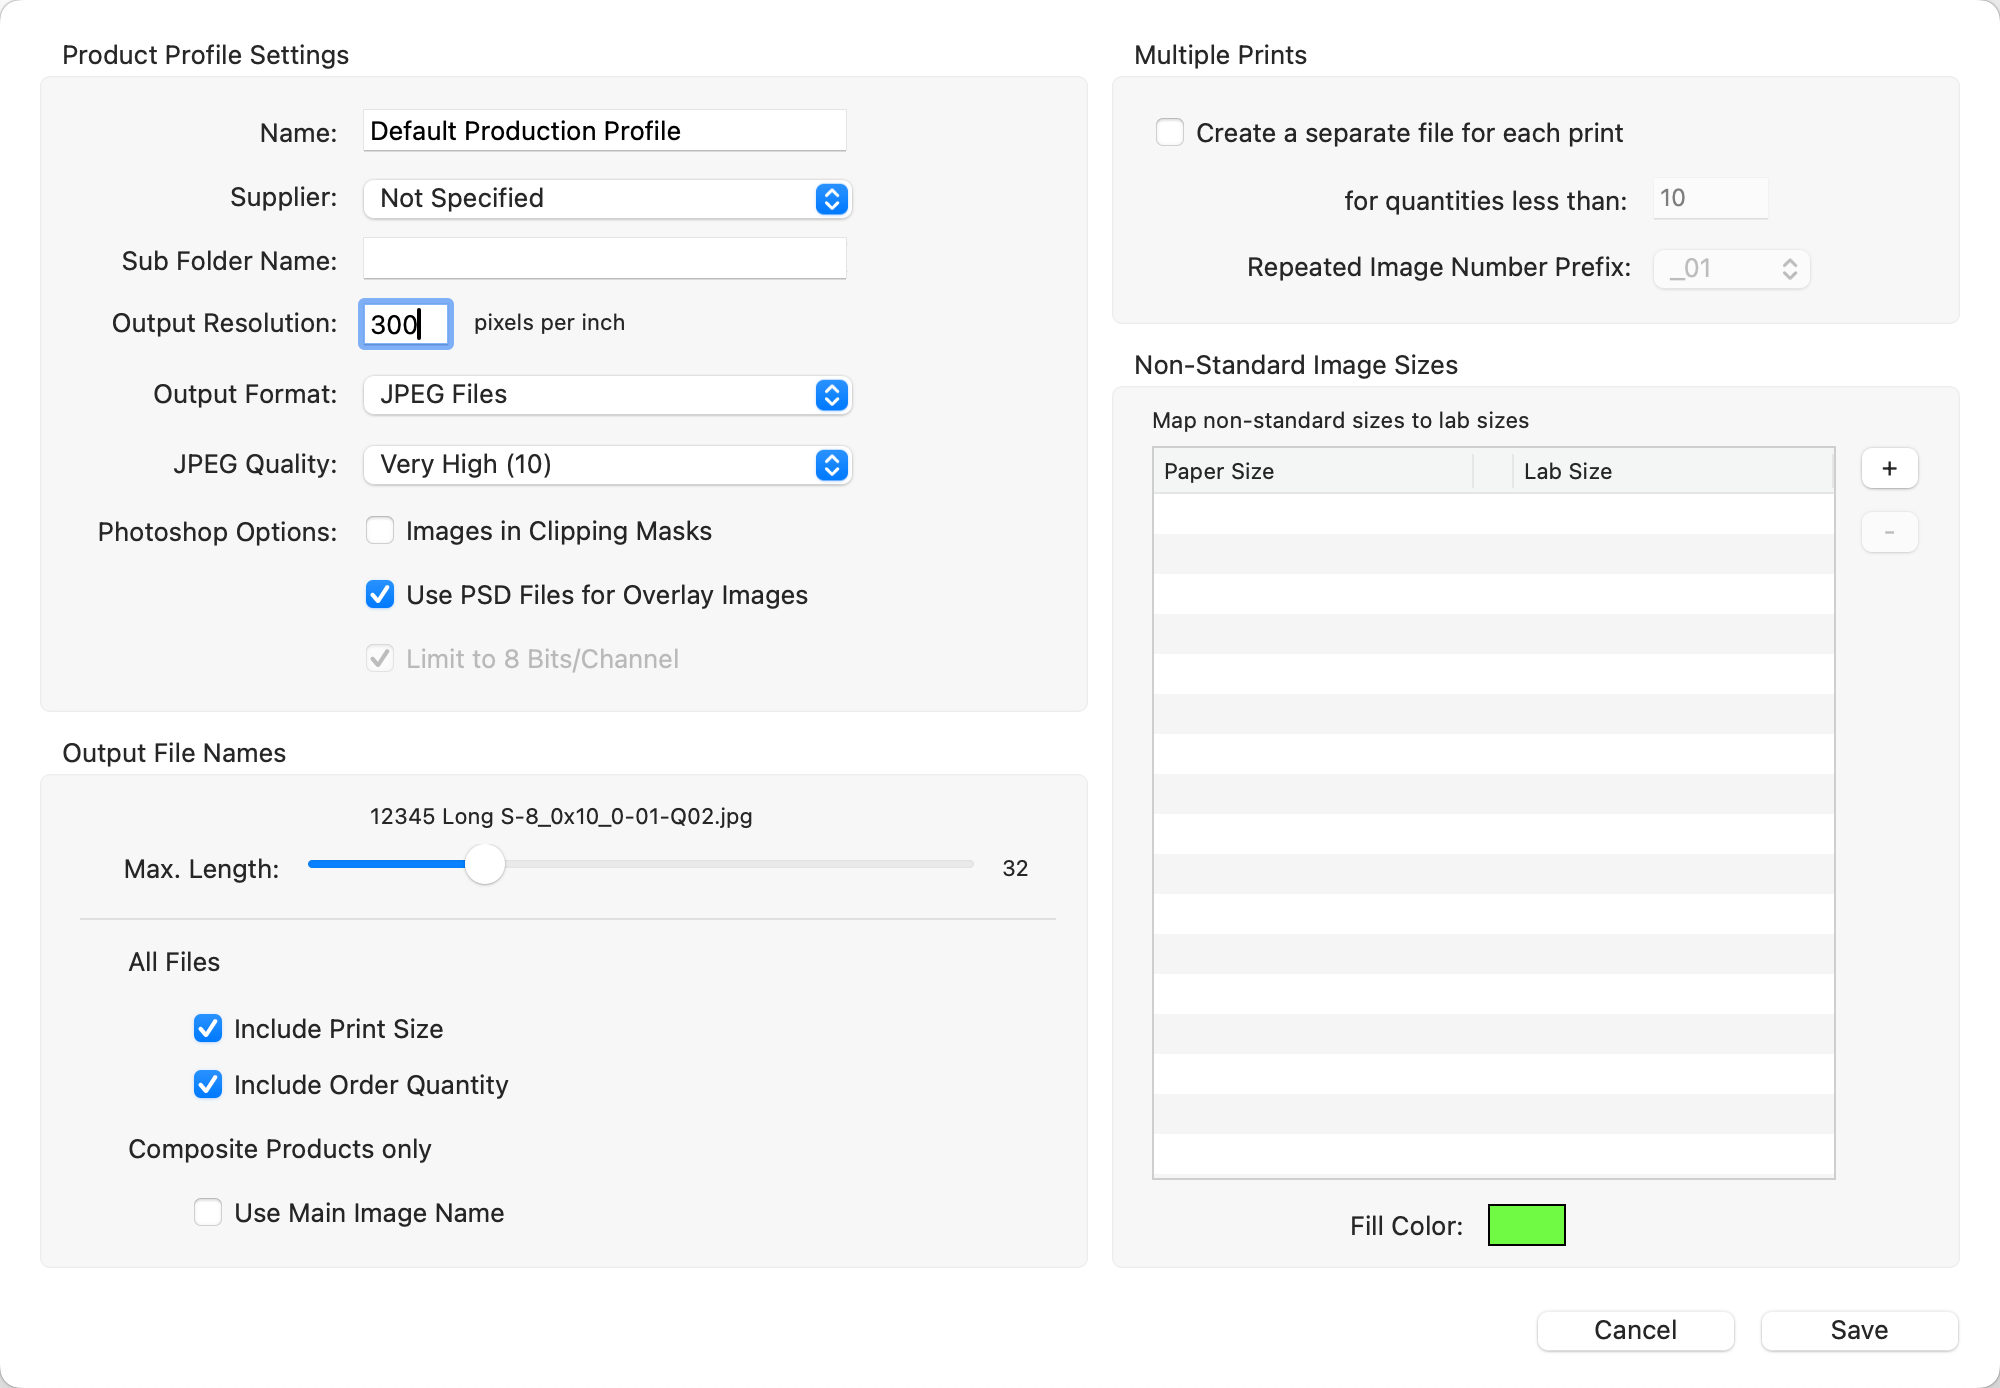
Product Profile Settings
- Name: Default Production Profile.
- Supplier: Optionally select your Supplier from the list. The supplier must first be enabled. Go to the top menu, Products > Suppliers.
- Sub Folder Name: Optionally add a Sub Folder Name here. A supplier code will populate this box if the production profile was autogenerated for a specific supplier. Use this code or create your own. This is in addition to the default Production Sub Folder created in Settings. Go to the top menu, ProSelectEdit > Settings > Pro Production > Output Settings > Product Sub-folder Options.
- Output Resolution: Specify the resolution needed by your lab or printer. The module adjusts the final image size accordingly.
- Output Format: Options include JPEG (with compression setting), Flattened TIFF, or Layered Photoshop file. For further post-production work, choose the Layered Photoshop file format.
- JPEG Quality: We recommend a minimum of High (8).
- Photoshop Options:
- Images in Clipping Masks: This option uses clipping masks instead of cropping, allowing image repositioning for Layered Photoshop files. It's typically unnecessary with ProSelect's current features and best left unchecked.
- Use PSD Files for Overlay Images: When using composites with overlay images and a corresponding .psd exists in the template overlays subfolder, the .psd layers will be included separately in the final image, useful for text layer adjustments.
- Limit to 8 Bits/Channel: Production output can match the bit depth of your input images. If enabled in the production profile and at least one image is 16-bit, the final output will be 16-bit. Otherwise, it stays at 8-bit.
Output File Names
Output file names are limited to a maximum of 80 characters to accommodate lab requirements, with an adjustable slider for length preference. If an output filename exceeds this limit, it will be shortened from either the left or right side, based on your Settings. Go to the top menu, ProSelectEdit > Settings > Display > Calibration & Options > Filenames. The standard format for output filenames includes the image filename, print paper size, unique order number, order quantity, and the file type extension.
Sample Filename: Image Filename 12345-8_0x10_0-01-Q02.jpg
- Max. Length: Use the slider to adjust the length of the filename.
- All Files: Include the print size (8_0x10_0) and order quantity (Q02) to aid in identifying print specifics.
- Composite Products Only: Use Main Image Name: This utilizes the main opening's image name, which is beneficial for single-image prints.
Multiple Prints
- Create a separate file for each print: By default, if a print is ordered multiple times, production will output the file just once. However, if you enable the option to include the quantity in the output file name, you can easily identify how many copies are needed. Alternatively, you have the option to create a new file for each copy ordered.
- for quantities less than: Select a quantity here.
- Repeated Image Number Prefix: Choose a prefix to be added after the image name.
Non-Standard Image Sizes
When dealing with images that are non-standard sizes, either because they've been cropped or are based on a specific template, you can utilize the mapping area feature. This allows you to pair a particular paper size you're working with to a corresponding lab size. Once selected, your images will be automatically centered on the chosen lab-size paper. Any additional space around the image will then be filled with a color of your choosing. This ensures your images fit perfectly on the lab's paper size, despite their original dimensions or any adjustments you've made.
- Click on the fill color to adjust it.
The Digital File Profile is designed for managing digital files only.
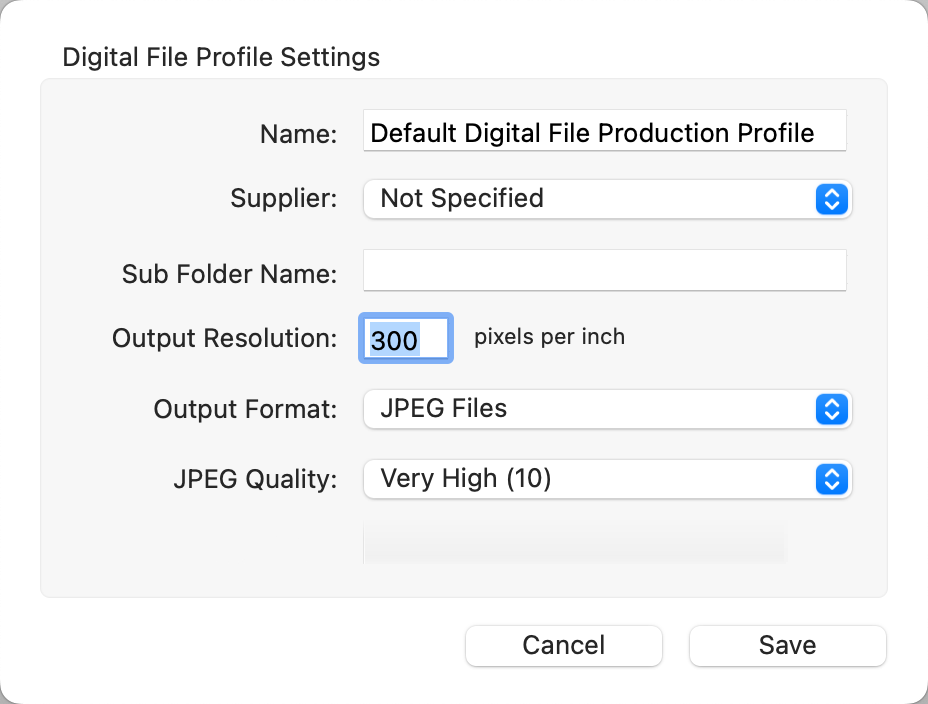
Digital File Profile Settings
- Name: Default Digital File Production Profile.
- Supplier: Optionally select your Supplier from the list. The supplier must first be enabled. Go to the top menu, Products > Suppliers.
- Sub Folder Name: Optionally add a Sub Folder Name here. A supplier code will populate this box if the production profile was autogenerated for a specific supplier. Use this code or create your own. This is in addition to the default Production Sub Folder created in Settings. Go to the top menu, ProSelectEdit > Settings > Pro Production > Output Settings > Product Sub-folder Options.
- Output Resolution: Specify the resolution needed by your lab or printer. The module adjusts the final image size accordingly.
- Output Format: Options include JPEG (with compression setting), Flattened TIFF, or Layered Photoshop file. For further post-production work, choose the Layered Photoshop file format.
- JPEG Quality: We recommend a minimum of Very High (10).
The Book Profile is designed for managing books only.

Book Profile Settings
- Name: Default Book Production Profile.
- Sub Folder Name: Optionally add a Sub Folder Name here. A supplier code will populate this box if the production profile was autogenerated for a specific supplier. Use this code or create your own. This is in addition to the default Production Sub Folder created in Settings. Go to the top menu, ProSelectEdit > Settings > Pro Production > Output Settings > Product Sub-folder Options.
- Output Resolution: Specify the resolution needed by your lab or printer. The module adjusts the final image size accordingly.
- Output Format: Options include JPEG (with compression setting), Flattened TIFF, or Layered Photoshop file. For further post-production work, choose the Layered Photoshop file format.
- JPEG Quality: We recommend a minimum of Very High (10).
- Photoshop Options:
- Images in Clipping Masks: For Layered Photoshop files, this option uses clipping masks instead of cropping, allowing image repositioning. It's typically unnecessary with ProSelect's current features and best left unchecked.
- Use PSD Files for Overlay Images: When using composites with overlay images and a corresponding .psd exists in the template overlays subfolder, the .psd layers will be included separately in the final image, useful for text layer adjustments.