Stamps, Watermarks & Logos
Stamps and watermarks in ProSelect serve multiple purposes, enhancing your exported images and protecting your creative work. You can create an unlimited number of custom stamps for various uses, such as branding, copyrighting, or image protection. This flexibility allows you to tailor each stamp to meet specific needs across different scenarios:
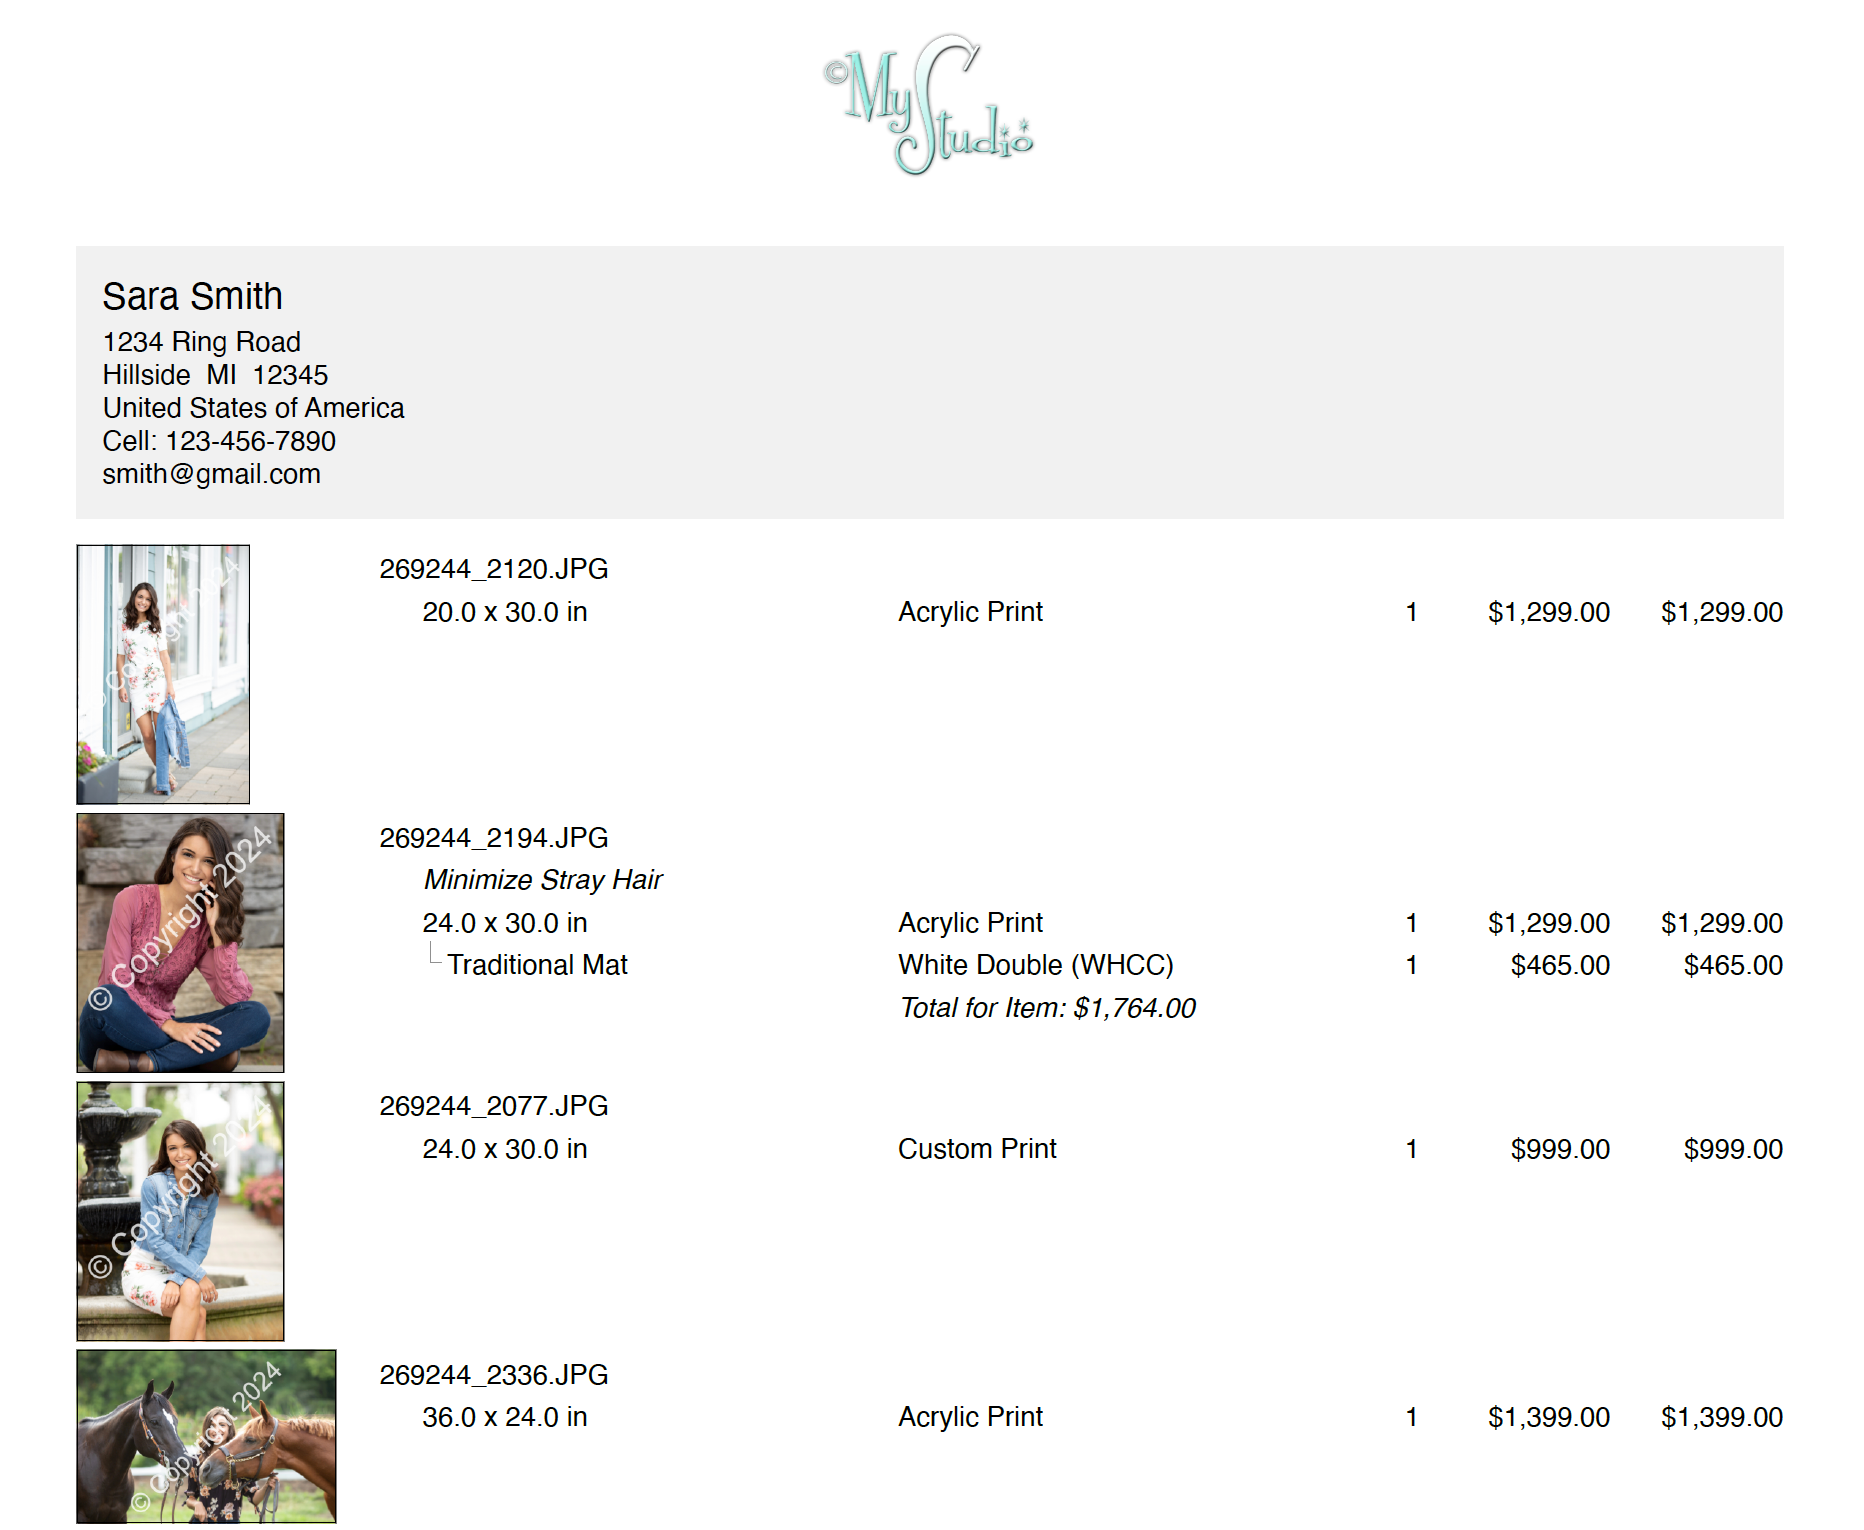
- Copyright Protection: Add a copyright stamp to sample images, book layouts, room view images, exported slideshow movies, Proof Sheet images, and Order Report images.
- Branding: Include your studio logo on final images exported through Pro Production.
- Highlighting Favorites: Mark your favorite images and products during slideshows and viewing presentations.
- Image Protection: Secure your displayed images during remote sales sessions conducted over the internet.
Types of Stamps Available
There are three main types of stamps available:

- Text: Enter text into the text box to create a stamp. Customize the font and bold settings. Supports "text tag" substitution, allowing you to include dynamic information like the image filename or date.
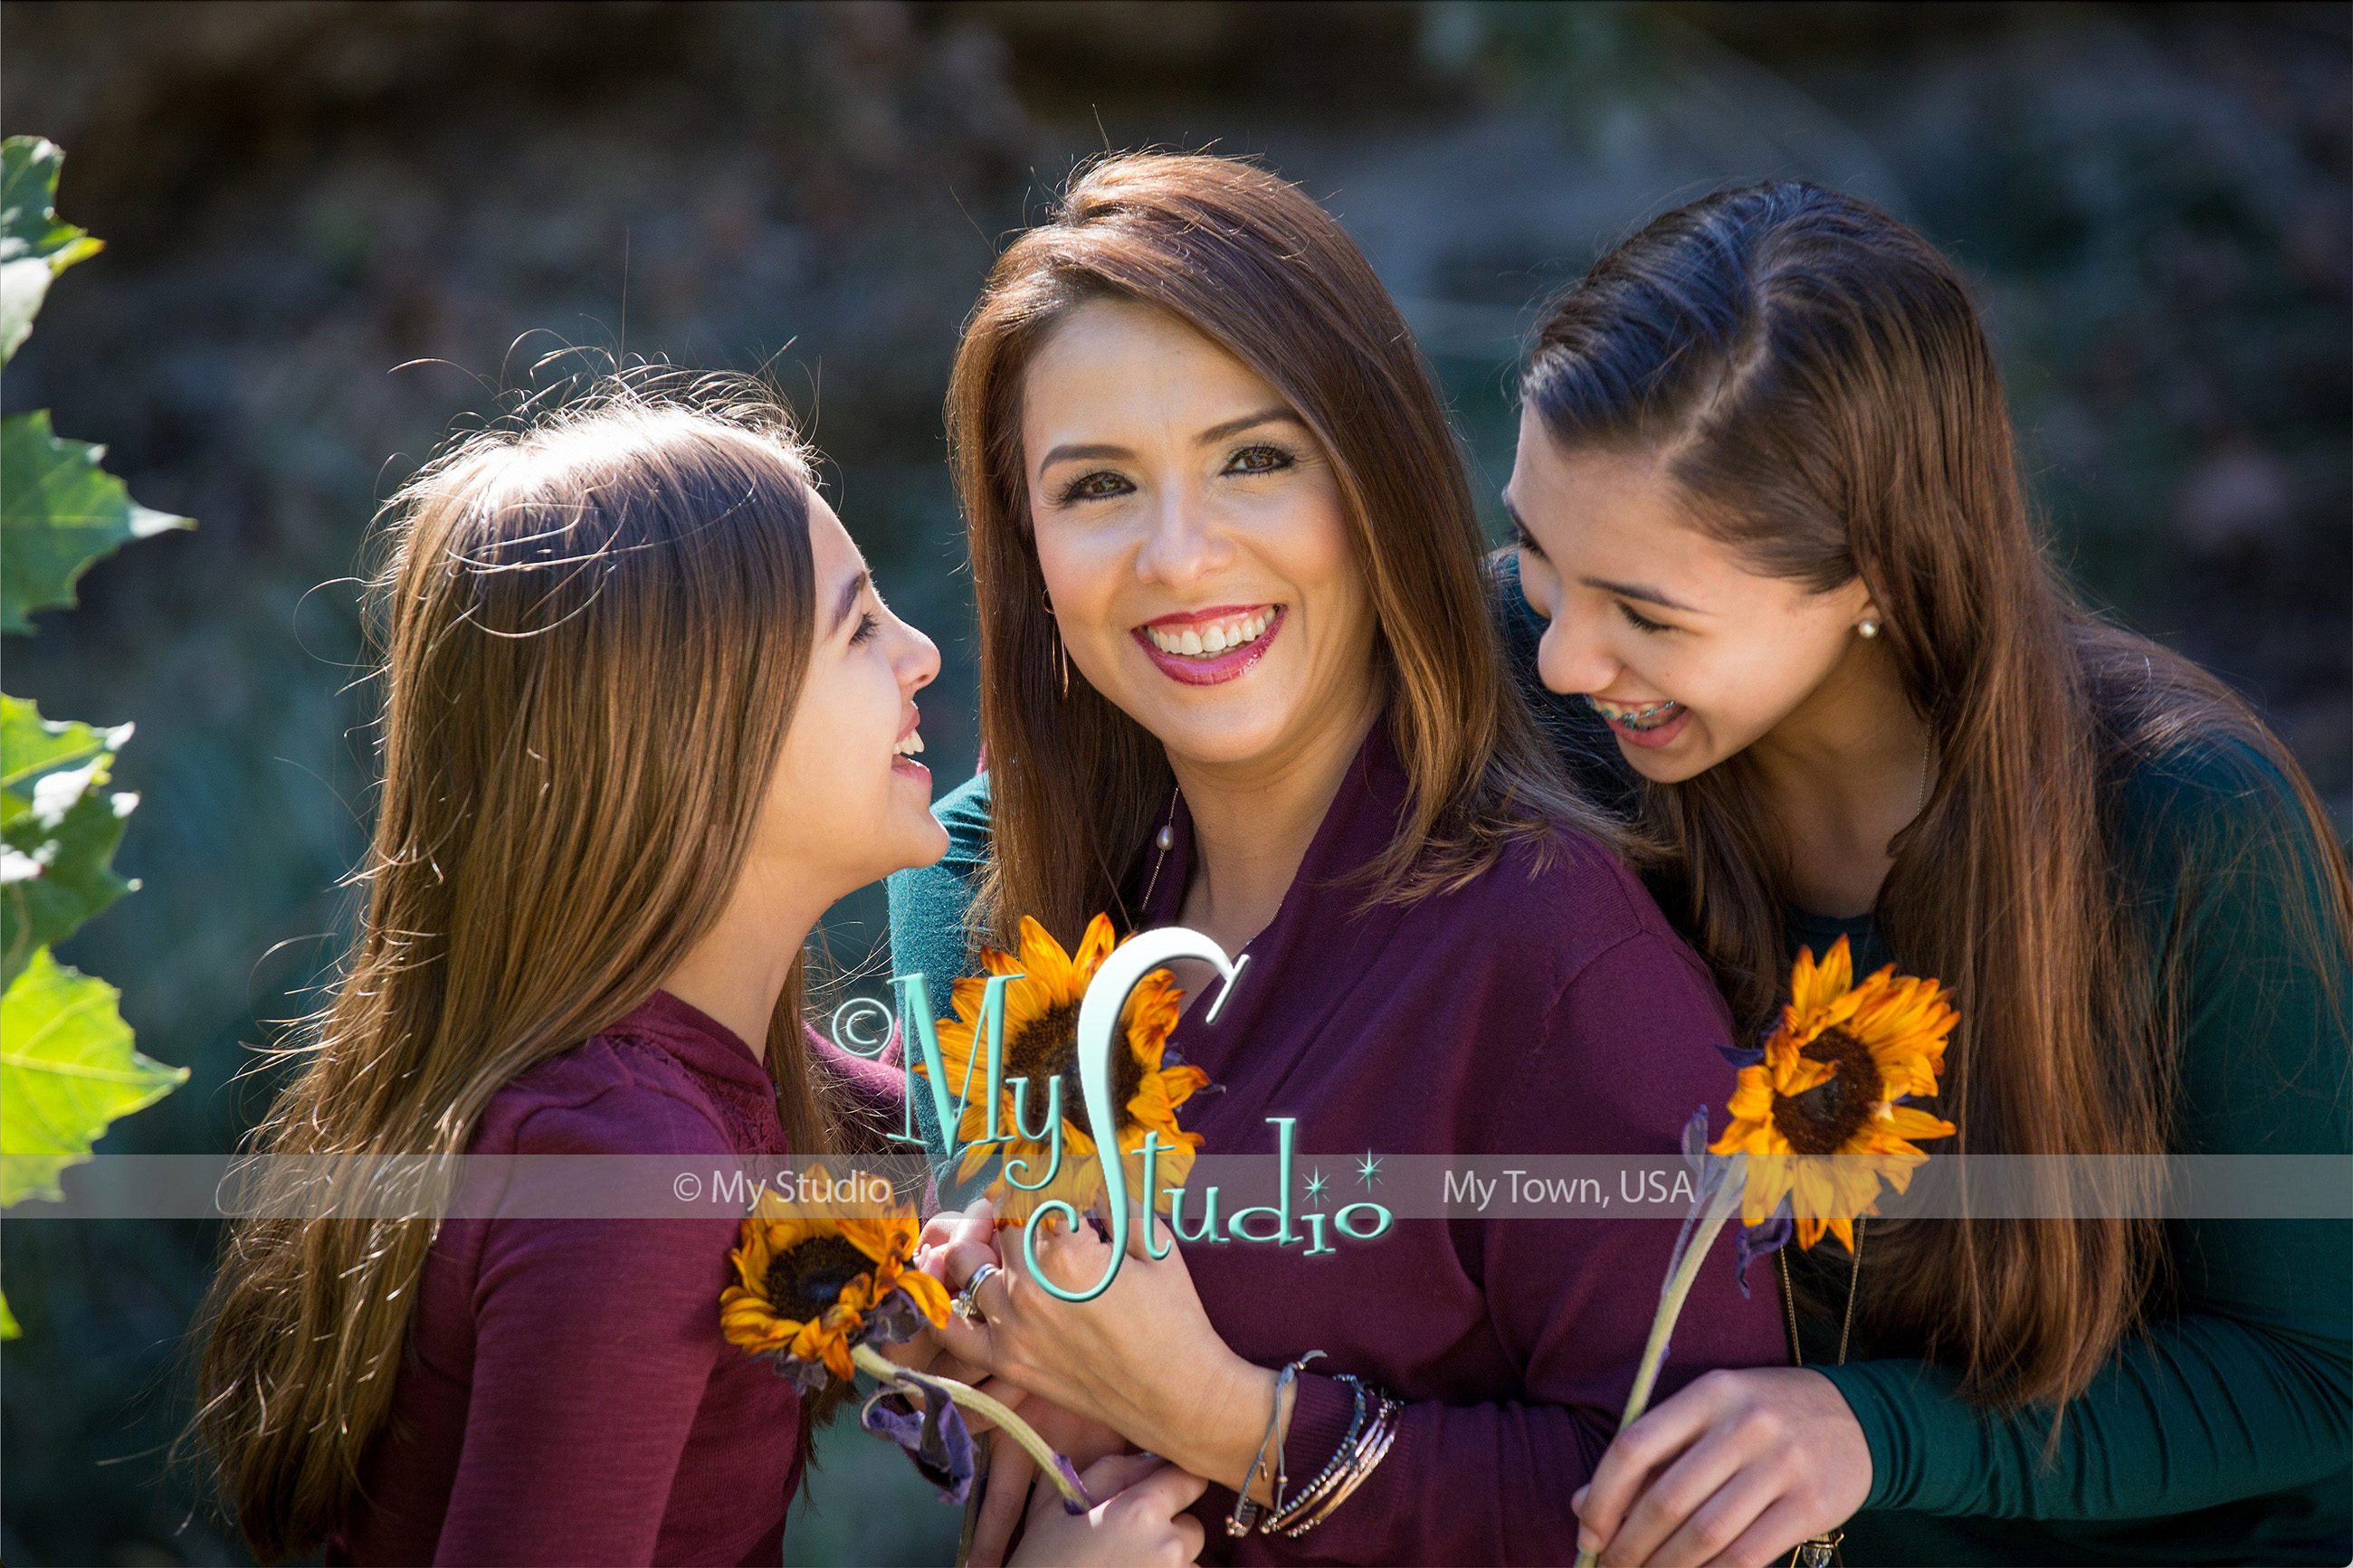
- Mask: Use a B&W .jpg or .png image to control the stamp’s opacity. Ideal for adding a semi-transparent logo, typically set with a white color and about 50% opacity for a watermark effect.
- Logo File: Use a .jpg for solid color stamps, or a .png for those requiring a transparent background.
Stamp Impact Options
- Size and Positioning: Adjust the size relative to the image, whether to fill the width irrespective of the image’s aspect ratio or maintain a size proportional to the image. Proportional sizes are calculated as a percentage of the image’s diagonal, ensuring consistency across different orientations.
- Position Options: Choose from various anchor positions (e.g., bottom left, centered) and orientations (horizontal, vertical, diagonal, or angled). The position can be finely adjusted using the inset slider.
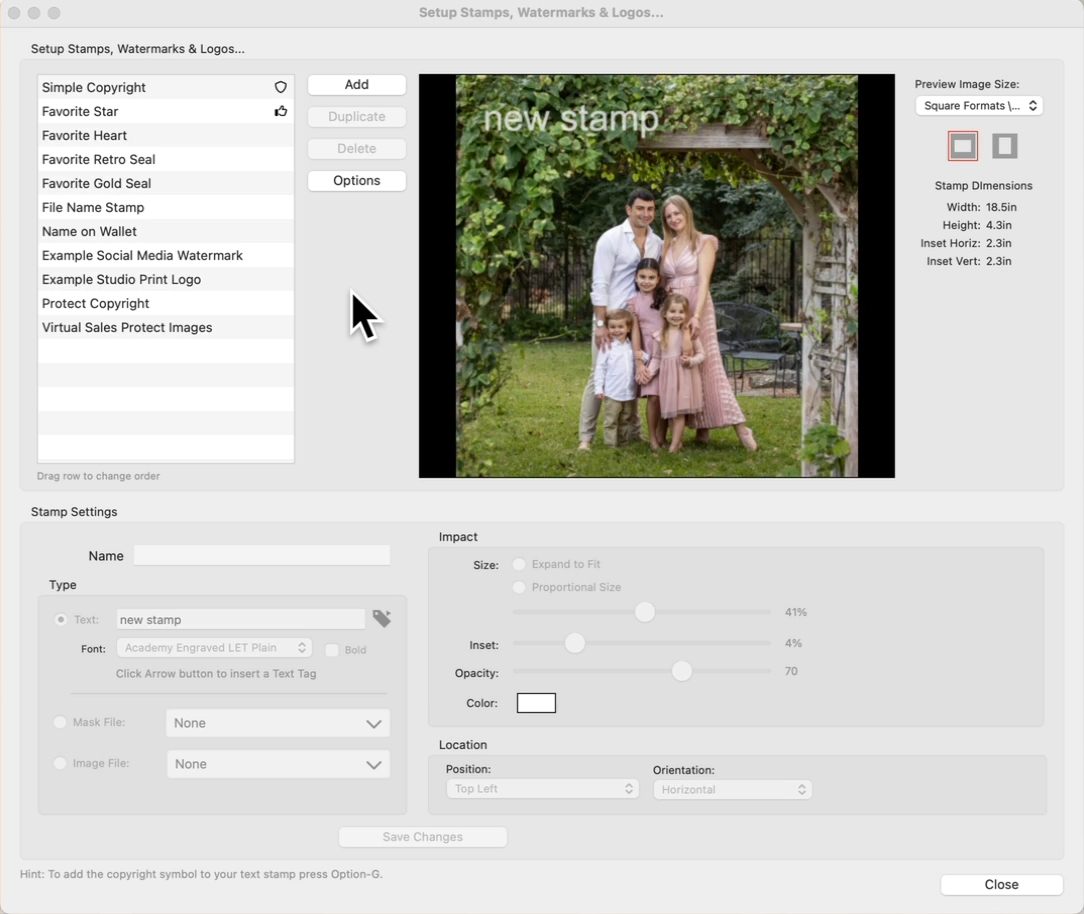
Go to the top menu, Resources > Setup Stamps, Watermarks & Logos. This will open the Setup dialog.
![]()
- Available stamps are listed on the left-hand side.
- Create an unlimited number of custom stamps for various uses, such as branding, copyrighting, or image protection.
- The Preview box on the right-hand side allows you to choose a preview size. The selected stamp dimensions are listed beneath the image size selected.
- The Stamp Settings allow you to name the stamp, and select between the different stamp types (Text, Mask File, or Image File).
- The Impact and Location of the stamp can be adjusted using the controls on the right.
- Go to the top menu, Resources > Setup Stamps, Watermarks & Logos.
- Click on the Add button. *Alternatively, you can duplicate an existing stamp, modify it, and save it as a different name.
- Type in a name for your new stamp.
- Choose the stamp type: Text, Mask File, or Image File.
- For Text Files: Type in the text you want to display on the image. You have the option of using Text Tags
 , and changing the font.
 - For Mask and Image files: Choose a file from your Corporate Logos (image Resource Folder). Click on Resources to learn more.
- Once you have selected your stamp type, adjust the impact and location settings:
- Size: Choose either "expand to fit" or "proportional size." Use the slider to adjust how big the stamp appears.
- Inset: Use the slider to adjust how far from the edge of the image the stamp appears.
- Opacity: Use the slider to adjust the opacity of the text or image file.
- Color: Click on the box to change the color of the text.
- Location: Use the drop-down menus to change both the position and orientation of the stamp.
- Save Changes when finished.
To add the copyright symbol to your text stamp press Option + G.Alt + 0169.
In ProSelect, you can mark selected images and products as favorites either through the Edit menu or by using the "F" keyboard shortcut. Once images have been selected as a favorite, you can optionally include the favorites stamp when exporting sample images, products, and slideshows. You can customize the appearance of favorite stamps, and designate which stamp to use for your favorites in the Setup Stamps, Watermarks & Logos dialog.
You can choose between one of the ProSelect default stamps, or create your own.
ProSelect default favorite stamps

Setup Your Favorites Stamp
- Go to the top menu, Resources > Setup Stamps, Watermarks & Logos.
- Select the stamp you wish to use as your "favorites" stamp from the list.
- Customize the impact (size and opacity) as well as the location.
- Click on the Options button.
- Select "Set as Favorites Stamp" from the options list.
- A thumbs up tag
 will appear next to the stamp you have selected as your favorites stamp.
ProSelect Main Display
For full-sized images, the favorites stamp will display exactly as configured in your setup. When viewing thumbnails, a thumbs up tag ![]() serves as the tag to indicate favorites. This tag appears on the bottom left corner of all thumbnails that are marked as favorites.
serves as the tag to indicate favorites. This tag appears on the bottom left corner of all thumbnails that are marked as favorites.
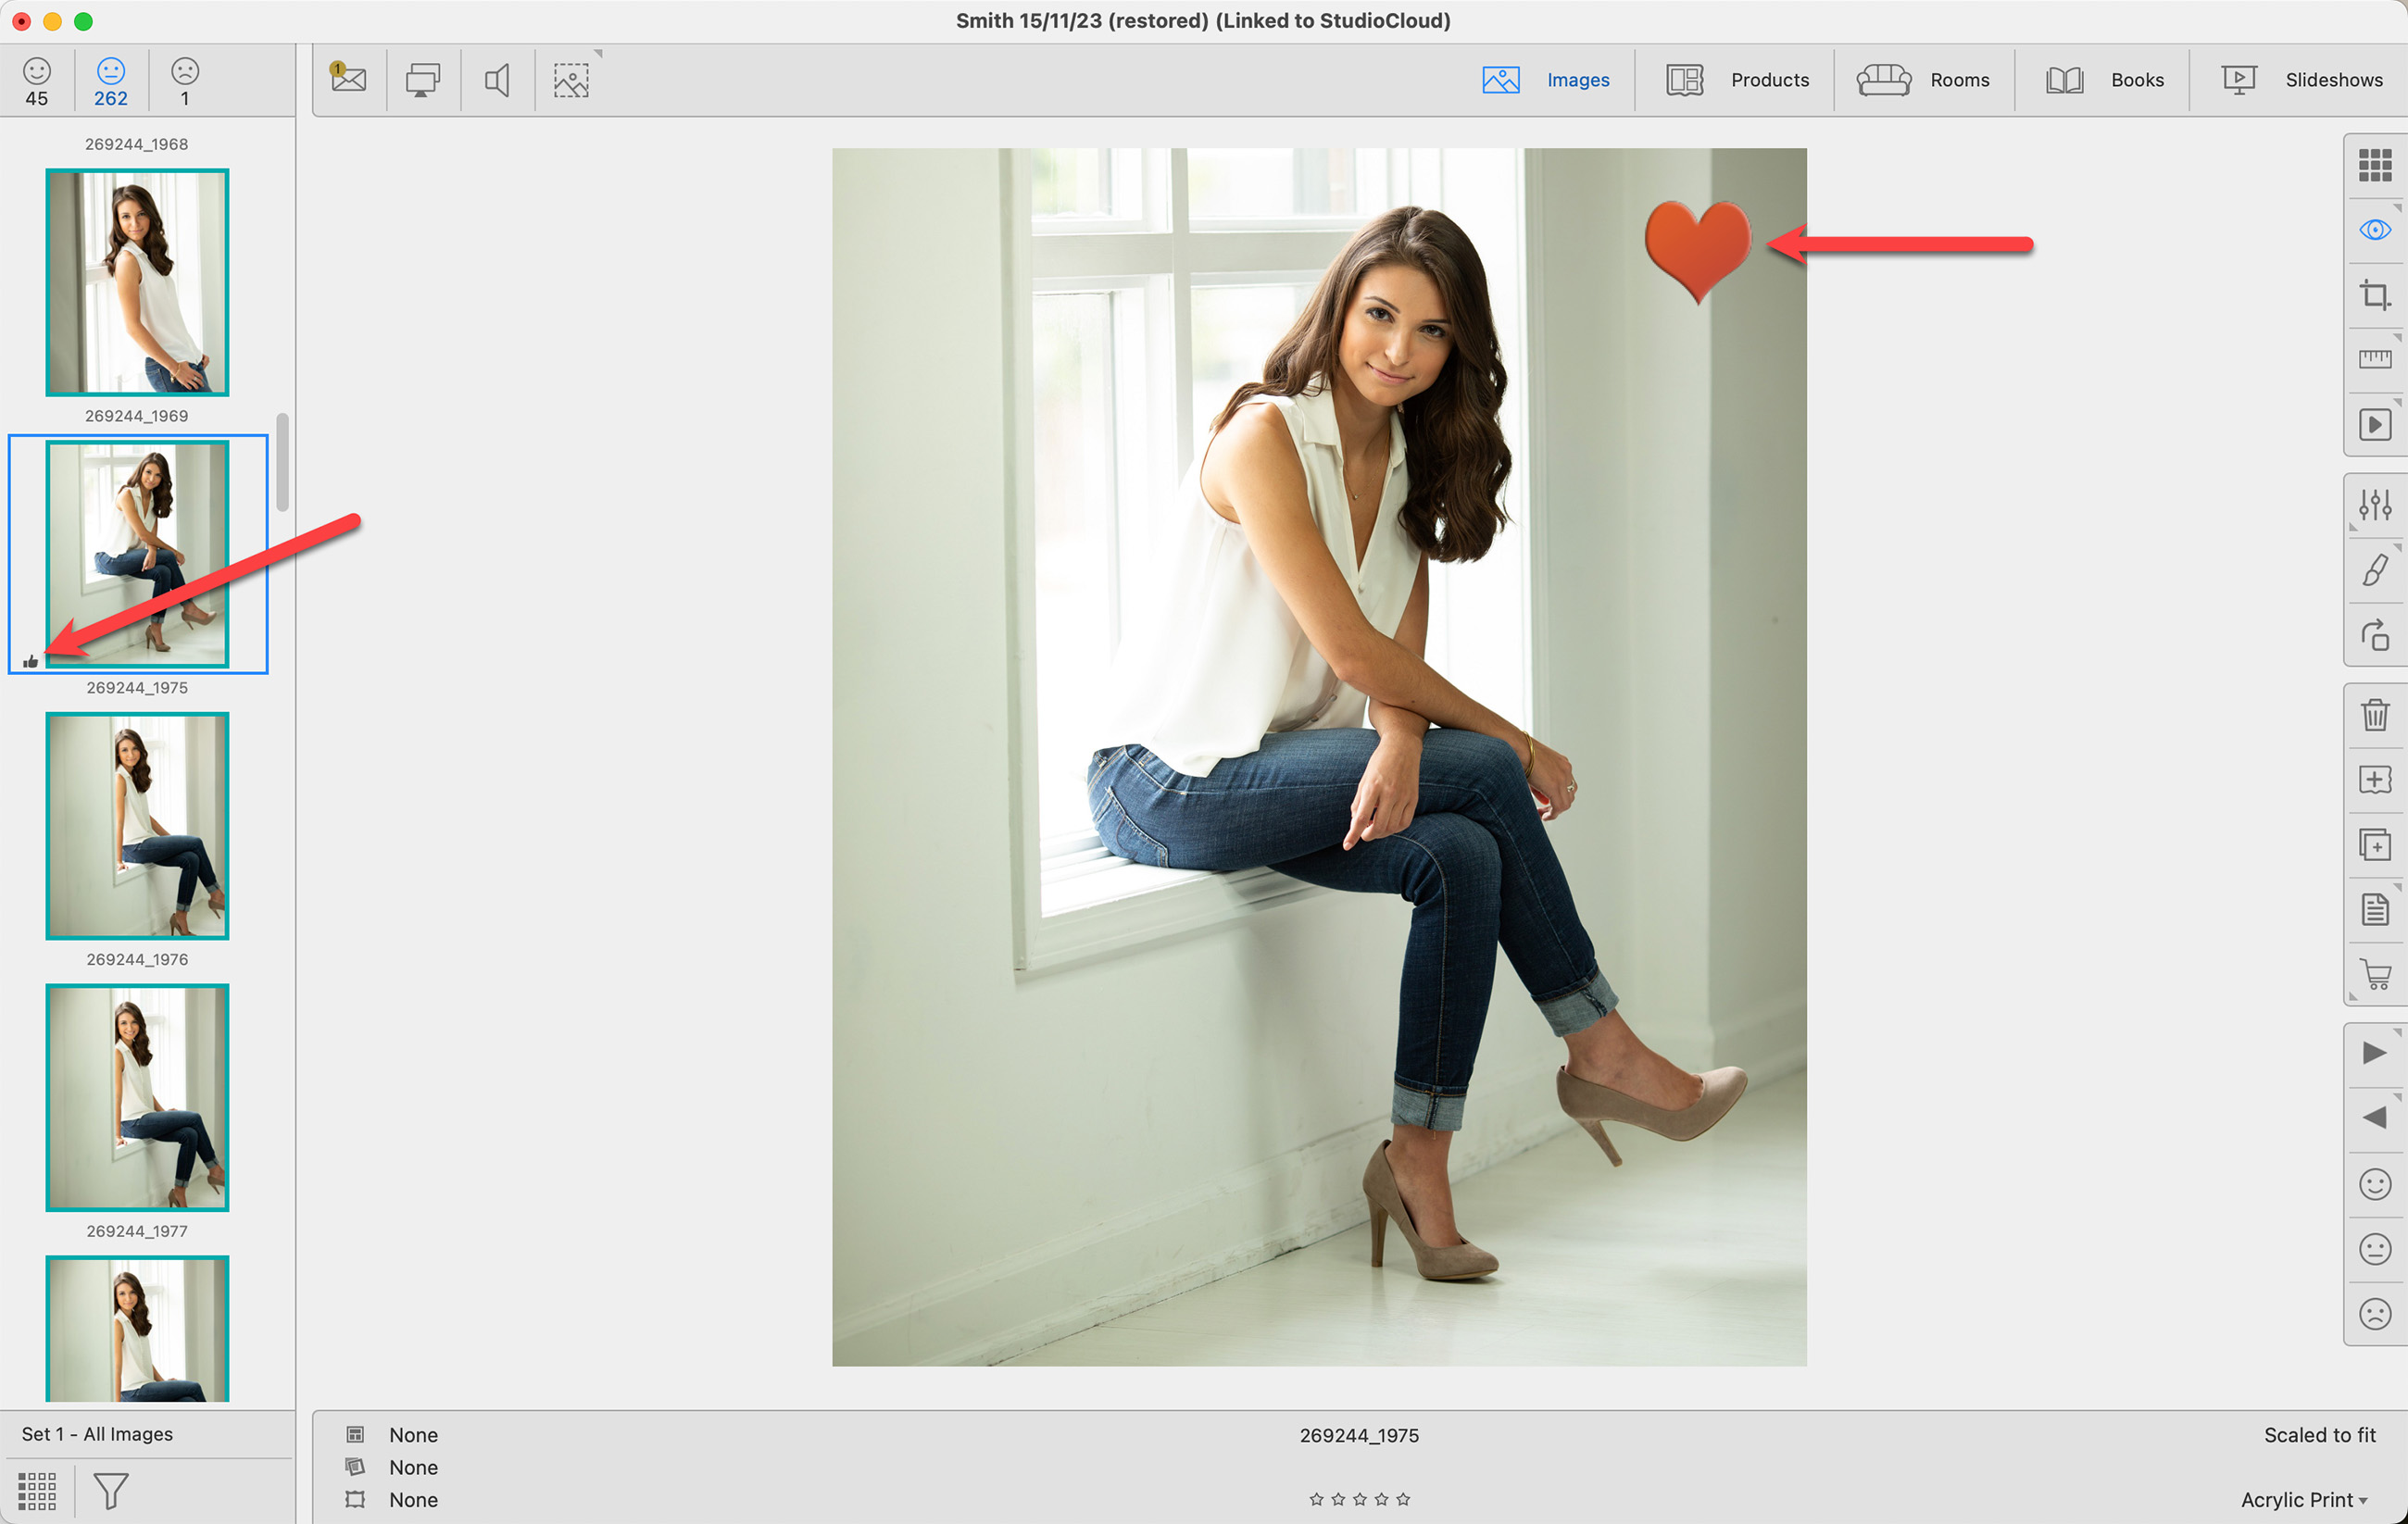
- When viewing thumbnails of your favorites, ensure the "Show Thumbnail Tags" option is enabled (found under the View menu).
- For full-sized images, activate the "Show Favorites Stamp" option (found under the View menu).
In ProSelect, you can display a selected stamp over all images during presentations and slideshows by enabling the "Protect Images" option found in the View Menu or by using the keyboard shortcut Cmd + GCtrl + G. This feature is particularly useful during remote viewing sessions, such as over Skype or Zoom, as it helps discourage screen capturing by overlaying a protective stamp. You can customize the appearance of the protect images stamp in the Setup Stamps, Watermarks & Logos dialog.
Customize Your Protect Images Stamp
- Go to the top menu, Resources > Setup Stamps, Watermarks & Logos.
- Select the stamp you wish to use as your "Protect Images" stamp from the list.
- Customize the impact (size and opacity) as well as the location.
- Click on the Options button.
- Select "Set as Protect Images Stamp" from the options list.
- A shield icon
 will appear next to the stamp you have selected as your protect images stamp.
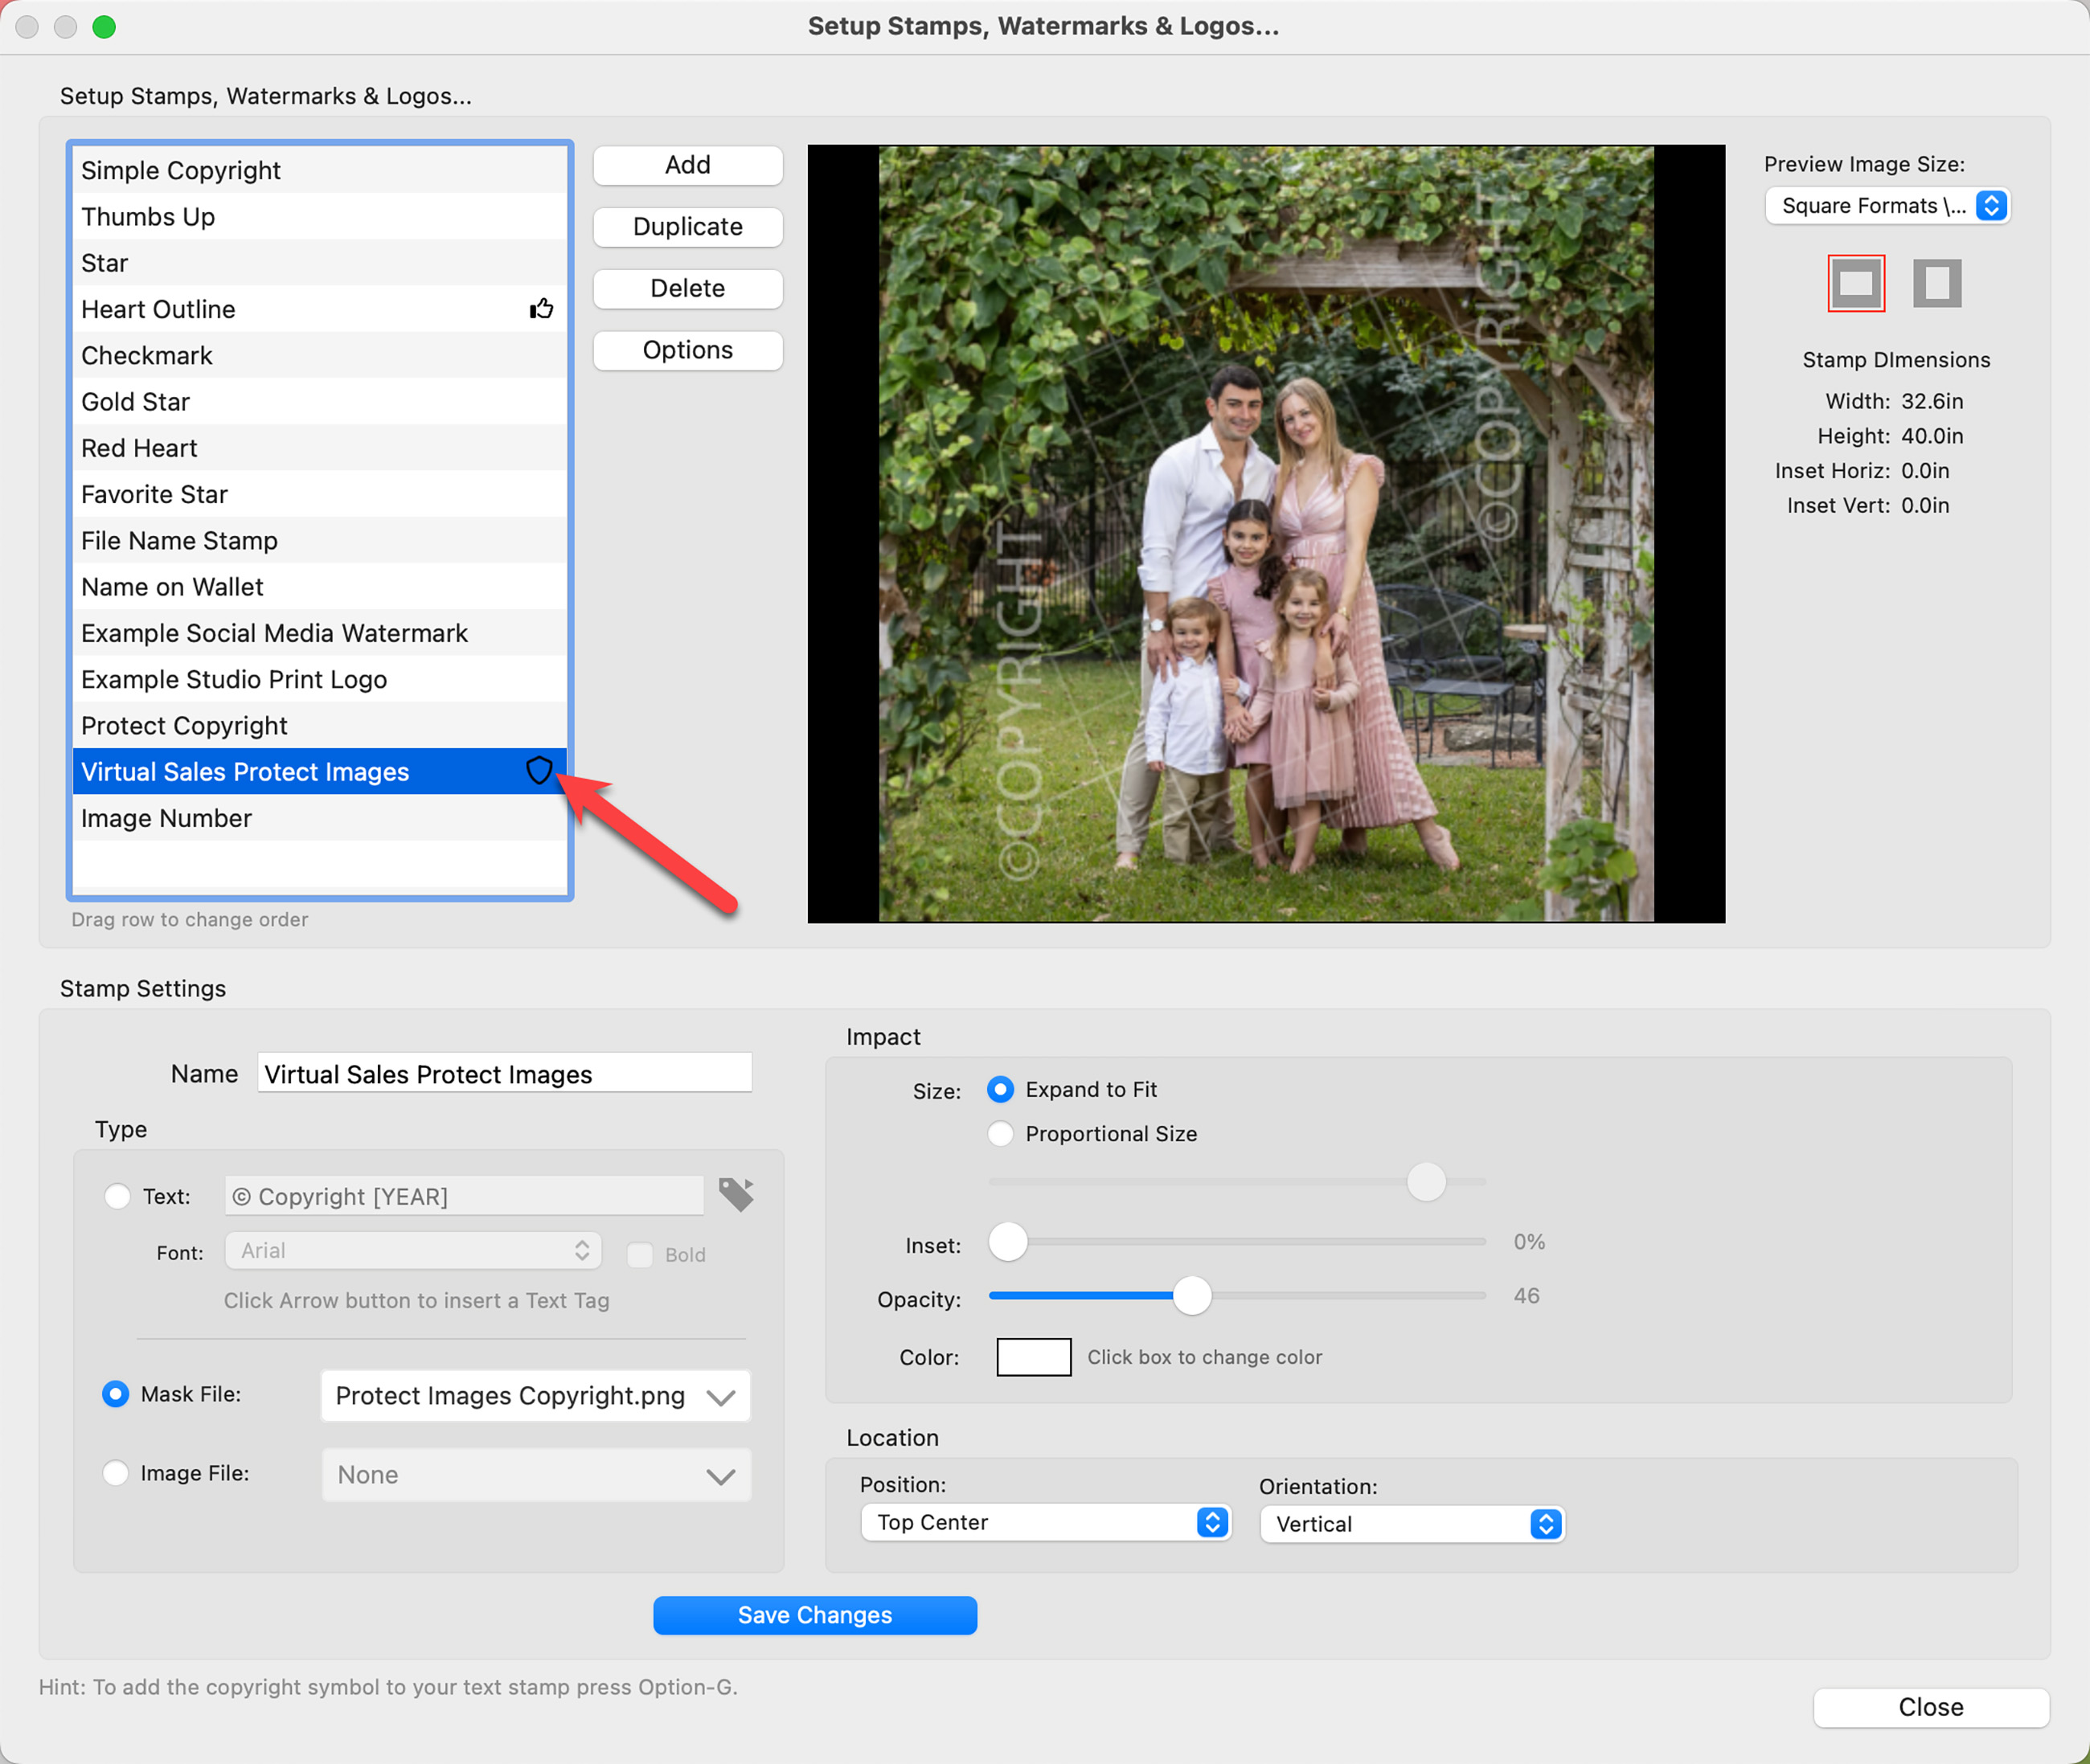
Practical Application
If the "Protect Images" stamp is enabled, both the ProSelect Main Display as well as the Presentation Screen will show the stamp.

Text substitution in ProSelect allows you to automate the inclusion of dynamic content in text stamps through the use of special text tags. These tags can be easily inserted into text-type stamps by clicking on the ![]() tag next to the text entry box. When the stamp is displayed, printed, or exported, these tags are automatically replaced with their corresponding real-time values.
tag next to the text entry box. When the stamp is displayed, printed, or exported, these tags are automatically replaced with their corresponding real-time values.
How Text Tags Work: Text tags act as placeholders within your text stamps that pull in specific data such as dates, business names, or image details. You can customize what information appears in your stamps by choosing appropriate tags based on your needs.
Examples of Text Tags and Their Usage
-
Date Tag:
- Tag: [DATE]
- Example Usage: "Date: [DATE]"
- Output Example: "Date: 04/15/2024"
- This tag would automatically insert the current date into the stamp, useful for copyright or documentation purposes.
-
Business Name Tag:
- Tag: [BUSINESS_NAME]
- Example Usage: "Copyright © [BUSINESS_NAME]"
- Output Example: "Copyright © PixelPerfect Photography"
- Use this tag to include your studio or business name in watermarks or copyright notices on images.
-
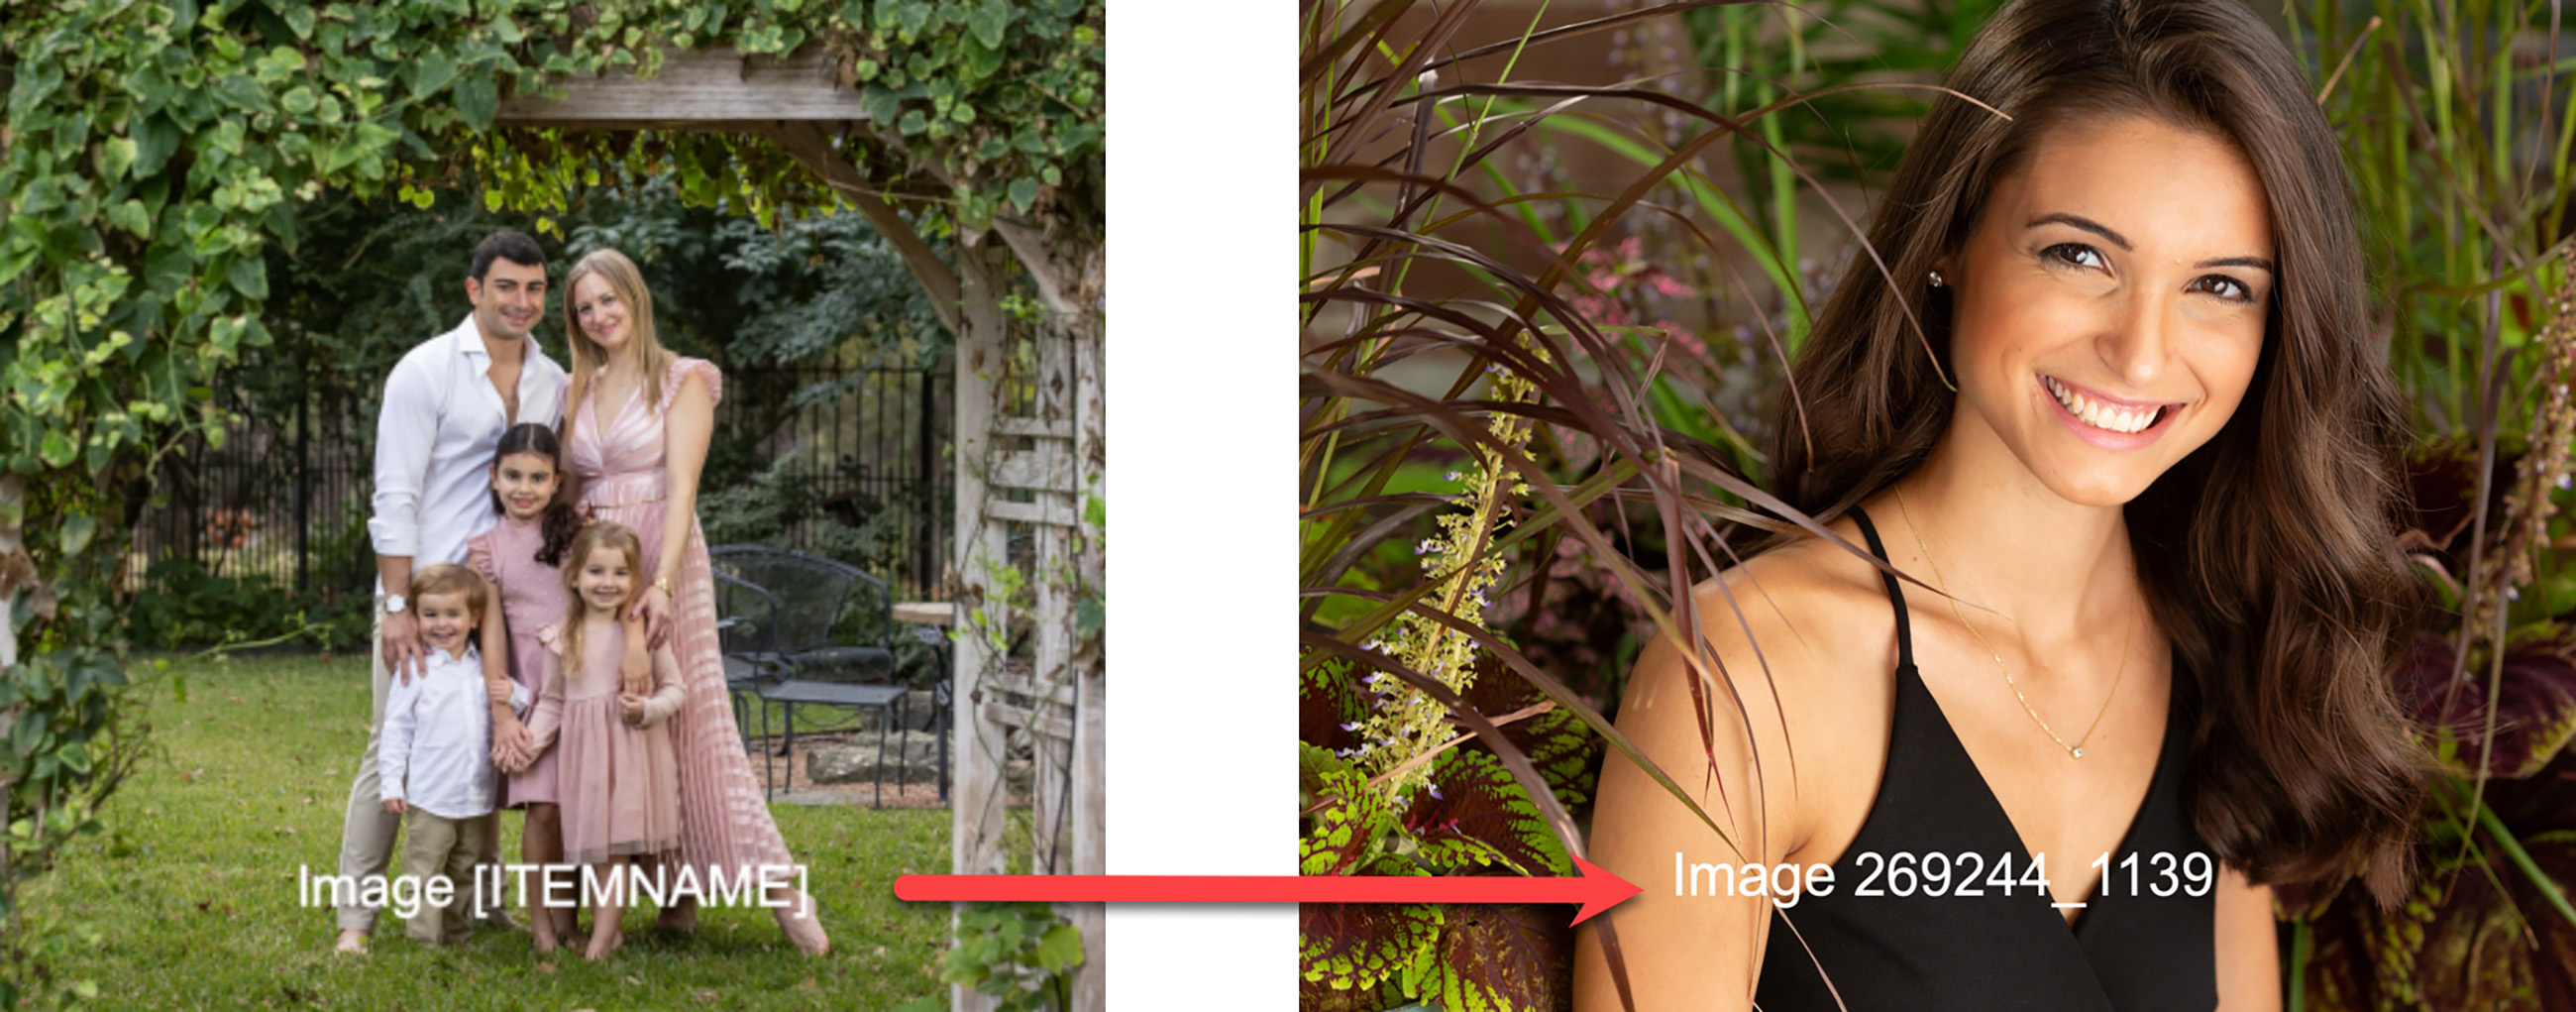
Image Filename Tag:
- Tag: [ITEMNAME]
- Example Usage: "Image: [ITEMNAME]"
- Output Example: "Image: 269244_1139"
- This tag inserts the filename of the image where the stamp is applied. The filename extension (e.g., .jpg) will appear only if enabled in your Settings > Display > Calibration & Options > Filenames.
You can enhance your Order/Invoice Reports and Proofsheet Reports by adding your studio logo. A Report Logo Image Template is available on the Pro Studio Software website for users who want to create a custom logo for their Order Reports. This template is provided as a layered Photoshop file that can be edited to match your studio branding. After customizing the file in Photoshop, it can be imported into ProSelect using the Setup Report Logos option under the Resources menu. The template is available on the Photoshop Resources page.
- Go to the top menu, Resources > Setup Report Logos.
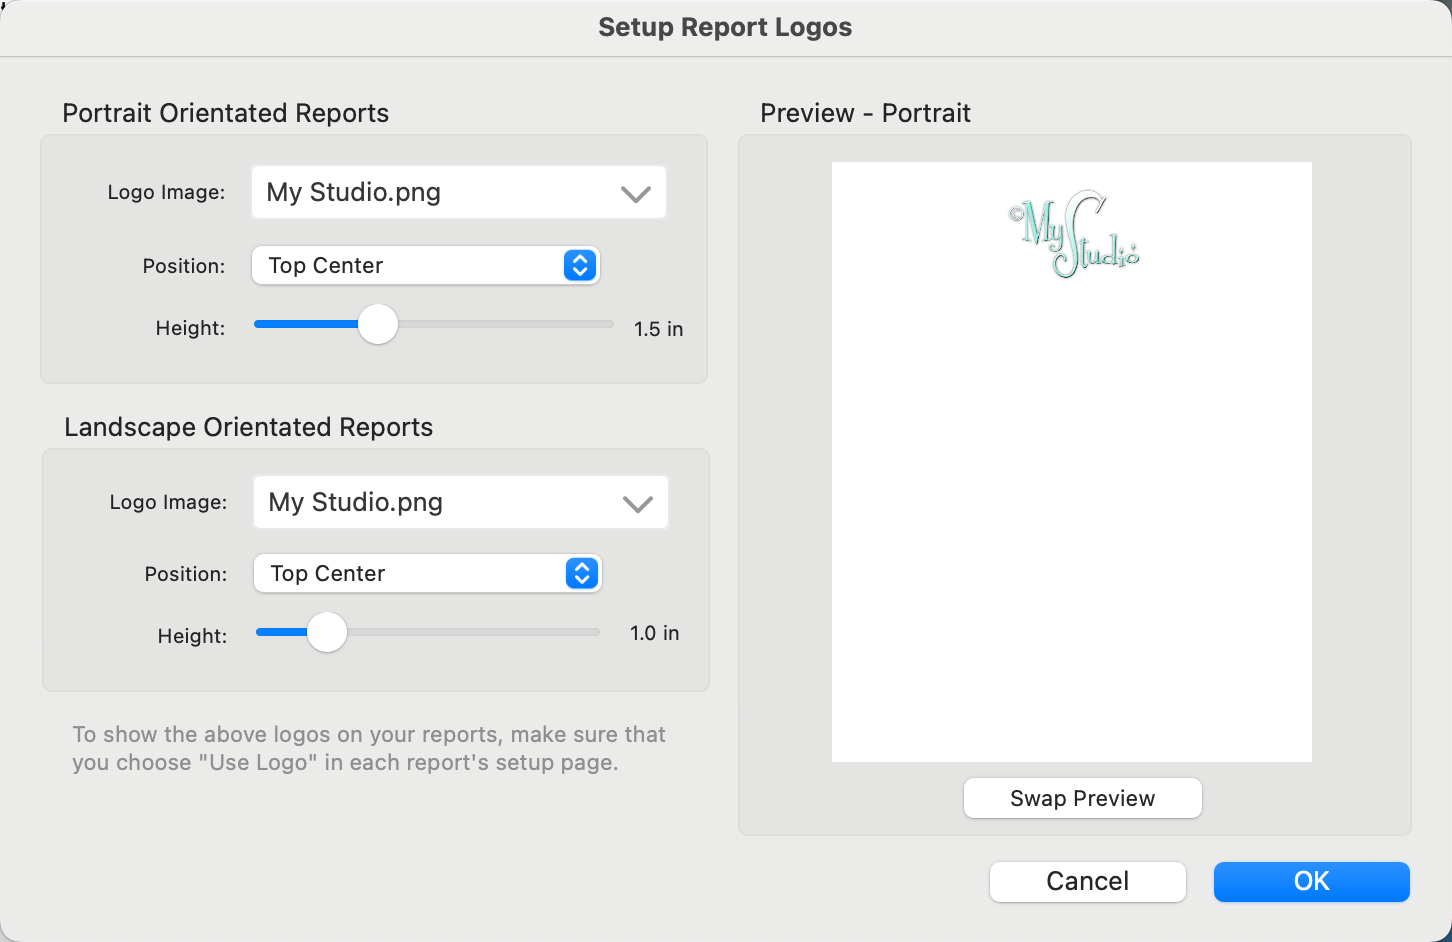
- You have the flexibility to set different logos and placements for reports oriented in portrait and landscape.
- Logo Image: From the drop-down list, choose "Select Corporate Logo."
- Select the image you want to use from the Corporate Logos Folder. The logo file can be in .jpg or .png format. For best results, especially if your printer paper is not white, use a .png file with a transparent background to avoid background color mismatches. If your logo has not yet been added to the Corporate Logos Resource Folder (which will be the case if you used the template available on the website), use the Add button. For more information, click on Managing Resource Images.
- Set the placement and size of your logo in the reports.
- You can position the logo in any corner of the page or at the top or bottom center. The height control setting will adjust how tall the logo appears on the page.
- Alternatively, select "Fit across top" or "Fit across bottom" to stretch the logo across the width of the paper, subtracting any side margins. This is ideal for wide logos but be cautious as it could consume considerable vertical space if the logo isn't proportioned correctly.
- Follow the same steps to set up both portrait and landscape reports.
Including Your Logo in Reports
To include a logo in a specific report, be sure to check the "Use Logo" option in the report’s setup window.
![]()
Sizing Logo Files
When preparing logo files for use in ProSelect, it's important to consider the resolution and dimensions to ensure they appear clear and professional in your printed materials. ProSelect will automatically resize your logos to fit the settings specified in the Settings during printing, but here's how to optimally prepare your logo files:
- Resolution: Ensure your logo images are between 300dpi and 600dpi. This range provides a good balance between file size and print quality, allowing for crisp and clear logos without unnecessarily large file sizes.
- Dimension Calculation:
- Determine the actual print size you desire for your logo. For instance, if you want your logo to be printed at a width of 2 inches and a height of 1 inch.
- At 600dpi (dots per inch), calculate the pixel dimensions as follows:
- Width in pixels = 2 inches x 600 dpi = 1200 pixels
- Height in pixels = 1 inch x 600 dpi = 600 pixels
- File Format: Save your logo as a .jpg file format for use in ProSelect. This format is widely supported and balances quality with file size, making it suitable for printing.
Management and Sharing
Your logos are stored in the Corporate Logos subfolder within your designated ProSelect Resources folder. The settings for each logo setup are saved in your ProSelect Data file, facilitating easy sharing between computers when using ProSelect’s sharing features.
Stamps, such as your studio logo or copyright mark, can be automatically applied to your final images during Pro Production. For detailed information, click on Production - Applying a Stamp.
When exporting images, products, or room view images for use on social media, you can select a stamp to use from the drop-down menu in the export settings. Your choice of stamp will be saved, so it will automatically be applied the next time you export, streamlining the process for future sessions.
A Social Media Watermark Image Template is available on the Pro Studio Software website for users who want to create a custom watermark or logo stamp for their exported images. This template is provided as a layered Photoshop file that can be edited to include your studio logo or branding. After customizing the file in Photoshop, it can be imported into ProSelect using the Setup Stamps, Watermarks and Logos option under the Resources menu. The template is available on the Photoshop Resources page.
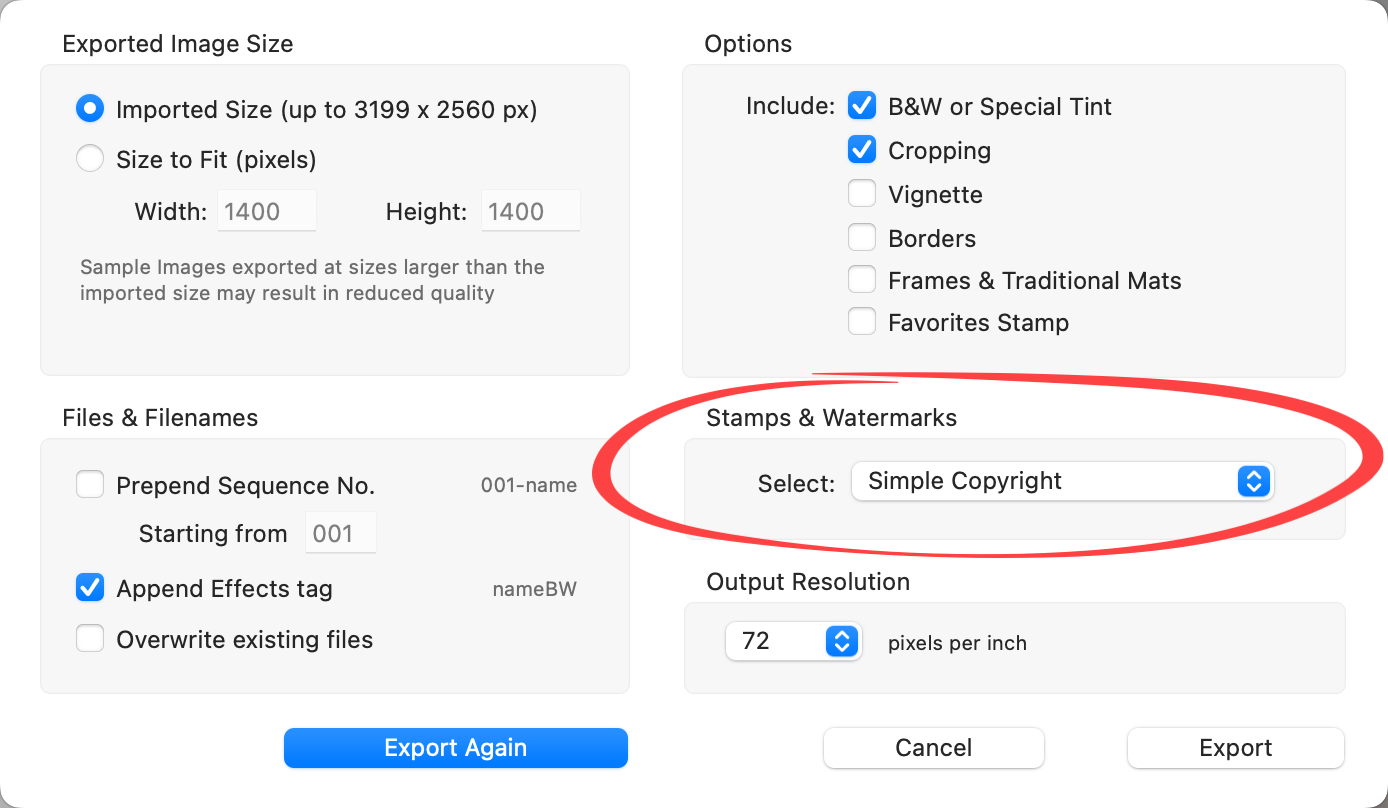
- Go to the top menu, File > Export > Sample Images.
- Select the desired stamp from the drop-down list under "Stamps & Watermarks."
- Click the Export button.
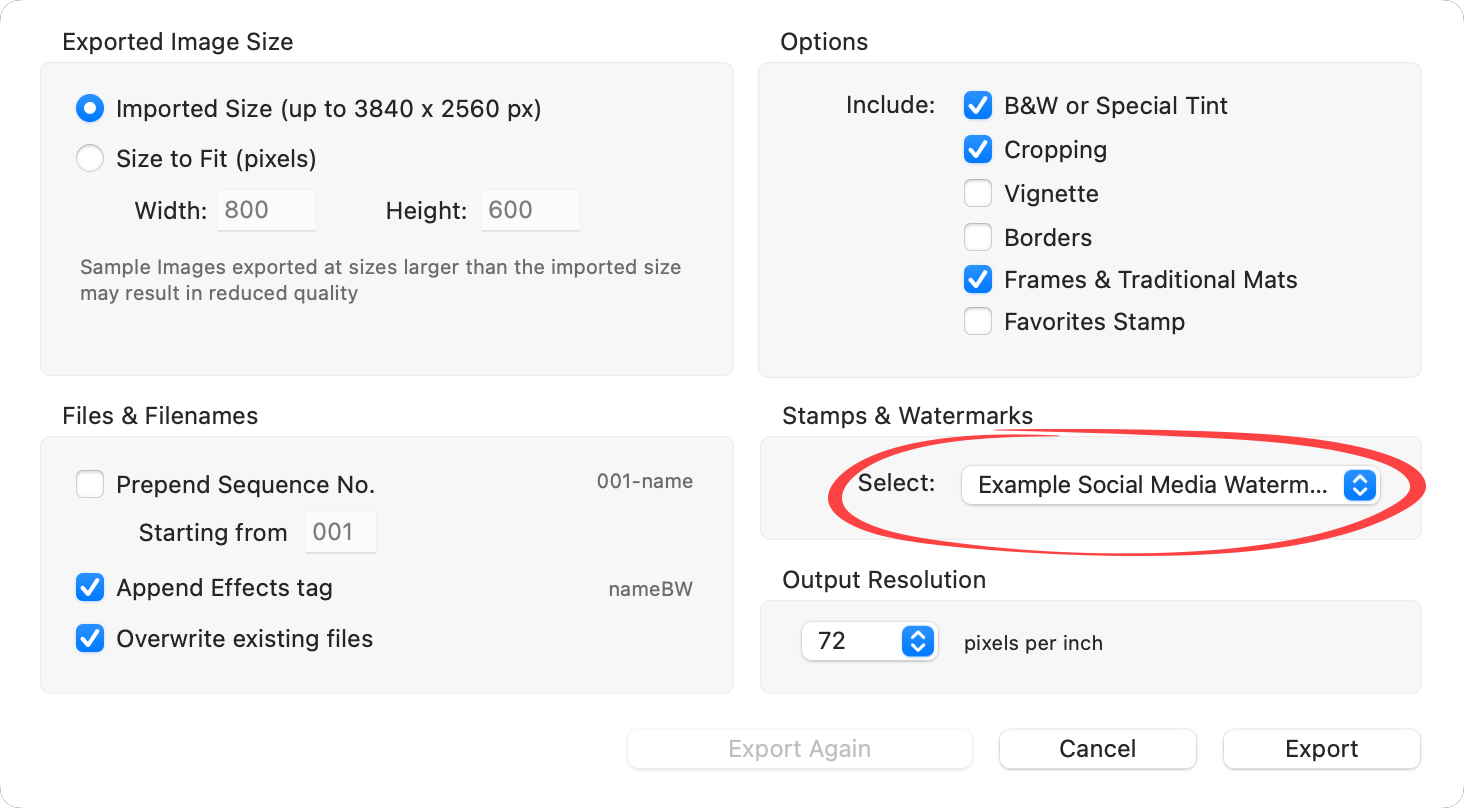
- Once exported, all images will have the selected stamp applied.
When exporting sample images, products, or room view images in ProSelect, you can select a stamp to use from the drop-down menu in the export settings. Your choice of stamp will be saved, so it will automatically be applied the next time you export, streamlining the process for future sessions.
- Go to the top menu, File > Export > Sample Images.
- Select the desired stamp from the drop-down list under "Stamps & Watermarks."
- Click the Export button.
Once exported, all images will have the selected stamp applied.

Order/Invoice Reports & Book Reports
When you save your Order/Invoice Reports as high-resolution PDF files, adding a copyright stamp can help protect against unauthorized copying of the images. This stamp serves as a visual deterrent and legal safeguard for the content within the reports. The following steps are for applying a stamp to an Order/Invoice Report. Book Reports work in the same way.
- Go to the top menu, File > Print > Order/Invoice Report.
- Click on the "Options 2" tab at the top.
- In the Images box, check "Add Copyright Stamp."
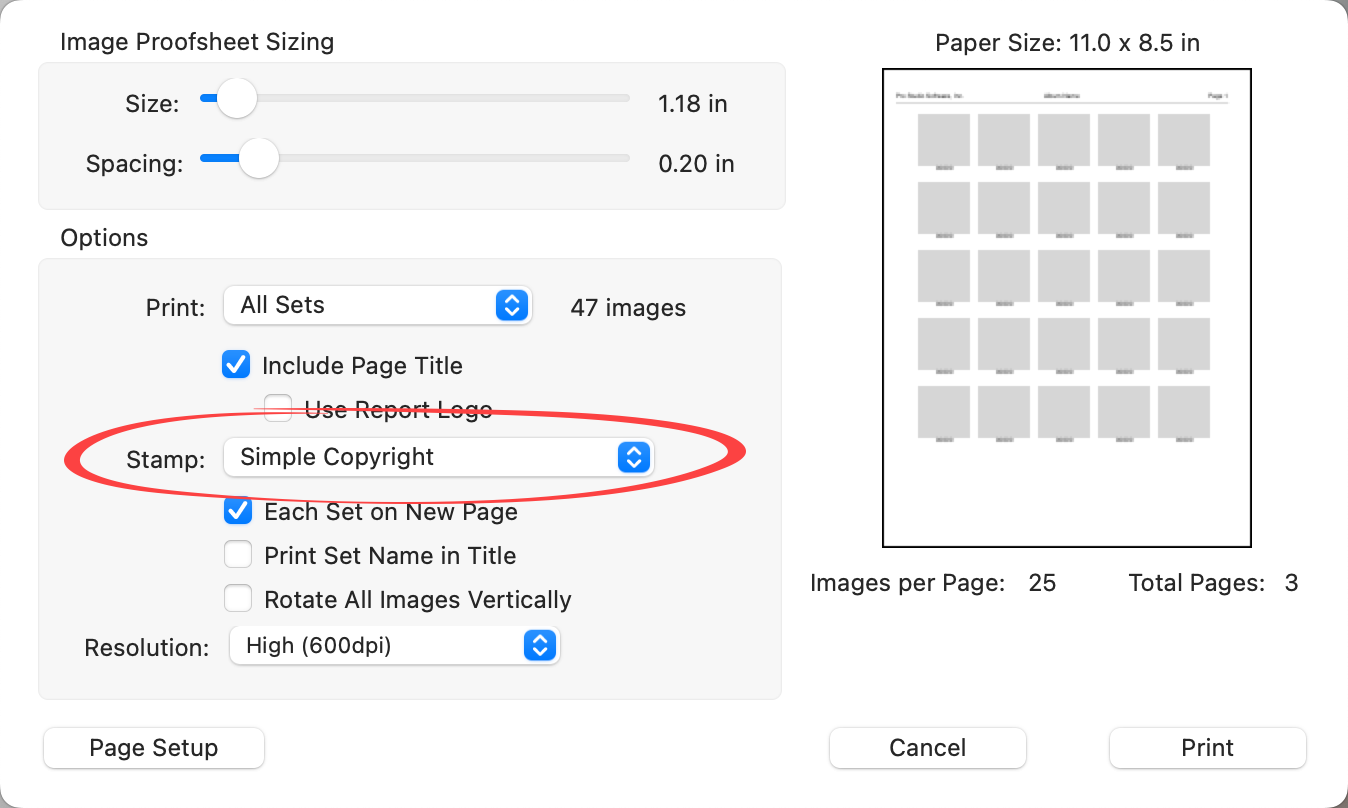
- Select the stamp you wish to apply from the drop-down menu.

- Print Report.
Proofsheets
Proofsheets work in the same way as Reports. Select a stamp to apply directly within the setup dialog.