Resources
ProSelect utilizes external images for both presentation and Pro Production. These images are stored in a dedicated folder called the ProSelect Resources Folder. Resource Images are used for various purposes including Mat Backgrounds, Room Views, Template Overlays, Slideshow Backgrounds, Title Slides, Copyright Stamps, Business Logos, and Report Headers.
Upon first running ProSelect, a ProSelect Resources folder is automatically created in a default location on your computer.
Subfolders
The Resources folder contains specific subfolders for different types of resources:
- Mat Backgrounds (jpg, tif, png, psd)
- Room Views (jpg)
- Slideshow Title Slides/Images (jpg)
- Template Overlays (png, psd for production)
- Shapes (jpg)
- Stamps, Watermarks & Logos (jpg, tiff, png)
- Music (mp3, aiff, midi, m4a, mp4)
- Video (mp4 and others)
- Frames (jpg)
Accessing the Resource Subfolders
- When selecting a resource image to use, choose "manage resources" to open the subfolder dialog.
- Go to the top menu, Resources > ProSelect Resources Folder > Manage Resource Images.
- If you want to work with your Resource Folder outside of ProSelect, you can access the folder by going to the top menu, ProSelect Resources Folder > Show in FinderExplorer.
Accessing Frames, Music, and Video Resources
Frames, Music, and Video resources are managed in a different way than the other ProSelect resources.
You can manage your Pro Select resources from the "Image Resource Folder." All ProSelect Resources use this type of window for management. The exceptions are Frames, Videos, and Music. See the ProSelect Legacy Manual for more information on those.
- This dialog displays a list of available images suitable for your current task.
- A preview of the selected image appears on the right-hand side.
- The "Used In" area lists where the selected image is currently being used.
All Image Resource Folders work in the same way. The following example is the "Template Overlays" dialog:
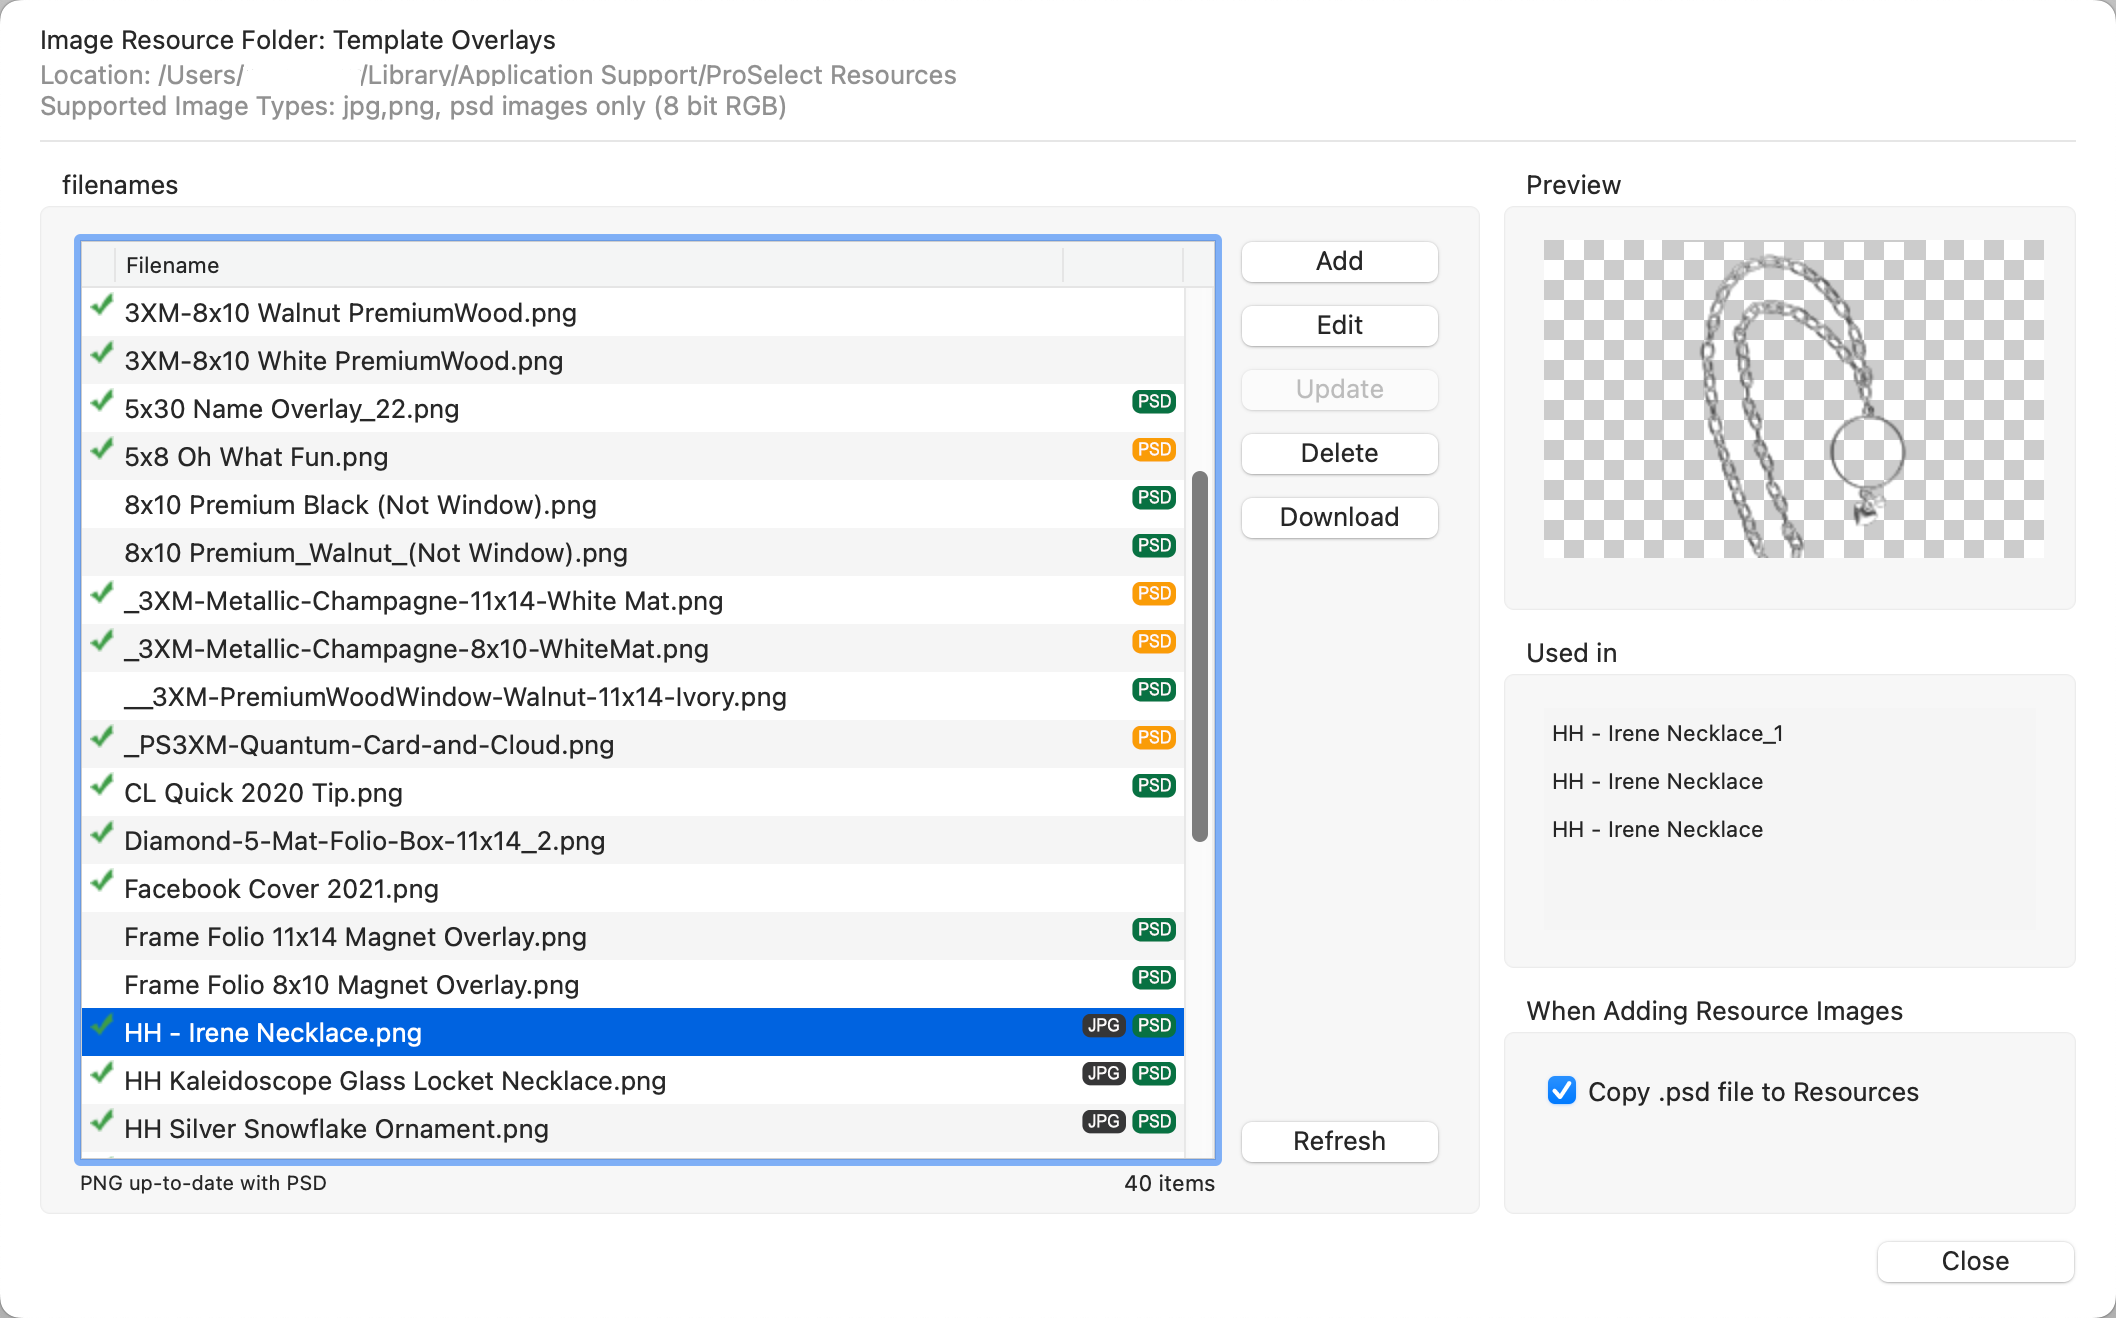
- Click the Add button to add an image to the resource folder. You can also drag and drop an image onto the list.
- Use the Edit button to open the image in Photoshop and make adjustments.
- Use the Update button if you have made modifications and need ProSelect to generate a new preview from the .PSD file.
- To remove an image from the resource folder use the Delete button. Deleting images should be done with caution. Ensure that images are not currently in use to avoid errors in displaying them in ProSelect.
- Access the Graphics Library using the Download button. From here you can use keywords to search the database for images.
- When adding resource images in ProSelect, the "Copy .psd file to Resources" checkbox is enabled by default. It is recommended to keep this box checked to ensure that the .psd files are copied to your Resources, allowing you to make changes to the original file directly within ProSelect. Only consider unchecking this option if your Resources folder becomes too large, as unchecking means that the .psd files will only be referenced and no changes can be made to the originals within ProSelect. Click on Managing PSD Files for more information.
- Use the Refresh button if you have made changes to the resource folder outside of ProSelect. All the items will then be reloaded.
- When applicable, use the Select button to use an image within ProSelect.
Filenames
 A green checkmark indicates the image file is currently being used in ProSelect. The specific usage will be listed under Used in.
 : The JPG icon appears next to the filename if an associated .jpg file is also present in the folder.
 : The green PSD icon appears next to the filename if an associated .psd file is up to date and present in the folder.
 : The orange PSD icon will appear if the .psd is outdated. Use the Update button to bring the .png up to date with the .psd file. Or use the Refresh button to update all of the images at once.
- Sorting: Click on the column header to sort by either "Filename" or "File Extension".
- ProSelect itself does not use .psd files for general use, it does utilize them for Pro Production if they are available in the Resources folder. This is particularly relevant if you've set ProSelect to use .psd files for overlay images (this is managed in the Photoshop Options in Production Profiles).
- Choosing to use .psd files is beneficial if you need to retain the original layers in the final High-Res output. This feature is crucial when using text substitution features within ProSelect, as it allows for dynamic text changes directly within the Photoshop layers.
- Ensure that when adding .psd files to ProSelect, you check the "Copy .psd to Resources" option. This ensures that the .psd files are properly copied to the ProSelect Resources folder.
- In the Resources folder, images that have an associated .psd file are indicated with a PSD icon next to them. This visual cue helps to quickly identify which images have editable Photoshop files available.
The Graphics Library offers ProSelect users access to over 200,000 high-resolution, royalty-free images. You can download these images at no additional cost and use them to enhance your projects with unique matt backgrounds, graphic blocks, and overlay images, although some may require editing. (subject to the Terms & Conditions in your ProSelect license agreement)
Access the Graphics Library:
- Click on the Download button in the Image Resource Folder dialog.
- Alternatively, go to the tope menu, Resources > Graphics Library.

- You can refine your search using filters such as Keywords, Type, Orientation, Category, Color, and whether the image has Transparent Areas (suitable formats include PNG, EPS, or PSD).
- Click on an image to select it. A green checkmark will appear.
- Use the Download Selected button to download these files directly into your ProSelect Resources folder (Applications > ProSelect > Resources) or into the specific Resource Image Folder where you accessed the Graphics Library.
Choosing a File Format
- Available file formats for each image (JPG, PNG, EPS, PSD) are indicated in orange on the right side of the selected image. The format currently selected will be highlighted in green.
- If more than one file format is available, right-click on the image to select which format to download.
If using ProSelect on multiple computers on a network, you can share your ProSelect Resources folder across machines. Check the "Sharing Data between Computers" section for guidance.
When you use images in your ProSelect album, such as overlay images in templates, ProSelect automatically saves a low-resolution version of these images within the album file. This feature allows you to transfer the album file to other computers and ensure that all the images used are still viewable, even if the original high-resolution images are not accessible on the new system.
Updating JPG or PNG Files
- Drag and Drop: Drag the new version of the image into the image list within ProSelect.
- Use the Add Image Button: Click on the Add Image button, navigate to your image, and select it to update the existing one in the resources.
- Direct Replacement: Go directly to the ProSelect Resources folder on your computer and replace the old image file with the new one.
For options one and two, ProSelect will alert you that the image already exists to confirm that you are intentionally replacing the old file with the new one. This ensures you are aware of the update and prevents accidental replacements.
Updating PSD and Associated PNG Files
When you add or modify a PSD file in ProSelect, it's important to ensure that both the PSD file and its associated PNG file are updated to reflect any changes.
- Edit the PSD File: Locate the PSD file within your ProSelect Resources folder. Use the "Open Image in Editor" button, or another selected image editing software, to make necessary changes to the PSD file.
- Save Changes: After editing, save the PSD file. This action updates the file within your resources directory.
- Refresh Resource List: Use the Refresh button (located at the bottom of the resource list in ProSelect). This will highlight the updated PSD file with an orange icon, indicating that it is newer than the associated PNG file.
- Update the PNG File: Select the updated PSD file from the list and use the "Update PNG from PSD" tool. This command instructs Photoshop to generate an updated PNG file based on the changes made to the PSD file. This ensures that both your PSD and PNG files in ProSelect are synchronized and reflect the most recent edits, maintaining consistency.
Keep in Sync
- If external resource files are updated outside ProSelect, update the files through "Check for Updated files" (Resources > ProSelect Resources Folder).
- For comprehensive updates, use "Rebuild Low-Res Cache" to refresh all images in the cache from the original high-resolution files. (Resources > ProSelect Resources Folder).
Force an Update
To ensure your PSD files and their corresponding PNG versions are up-to-date, you can force an update using the Refresh tool:
- Activate the Update: Hold down the OptionAlt key and click on the Refresh button. This action will highlight all PSD files marked as "out-of-date" with an orange icon.
-
Select and Update: With the PSD files all highlighted in orange, you can select them one at a time to update the associated PNG files to reflect any changes made in the PSD files.
To find where an image is stored on your computer using ProSelect, hold OptionAlt and click on the "Open Image in Editor" button. This action will open the image in a Finder window on Macs or an Explorer window on Windows. The image you are viewing will be located in a specific subfolder within your ProSelect Resources folder. This feature is particularly useful for quickly accessing and managing your image files directly from your computer's file system.
ProSelect also manages low-resolution versions of Resource images for efficient usage within the program. Whenever a high-resolution image from these folders is selected for use, ProSelect automatically generates a low-resolution copy along with any associated thumbnails. These low-res files are then stored in a designated folder called ProSelect Low-Res Resources.
This process helps optimize the performance of ProSelect, especially during presentations and previews, by reducing the load times and memory usage that high-resolution images would otherwise require.
When using resource images in ProSelect, you have options on how the image will be displayed. You can anchor the image to a specific corner or stretch it to fit the designated area. The choice of display method can influence the appearance of the image, depending on the image's content and the desired visual effect.
 : This method involves stretching or compressing the image to fit the dimensions of the target area. However, this can lead to noticeable distortion, as the image is altered in both height and width to match the new size.


 : This option anchors the image to a specified corner of the target area, such as the bottom right, and then expands it proportionally towards the opposite edges until it fills the space. Any portion of the image that extends beyond the boundaries of the target area is not displayed. This method maintains the original proportions of the image, preventing distortion and ensuring that important details or graphics positioned in the anchored corner are preserved. Similar anchoring options are available for all other corners, allowing the image to expand from any chosen anchor point.
 : Similar to the previous method, these options anchor the image at the bottom center or top center of the target area. The image then expands outward from the chosen anchor point until it fills the space, preserving its original proportions. Any part of the image extending beyond the target area's boundaries will not be displayed. This technique prevents distortion and is useful when key elements or graphics are centrally located along the top or bottom of the image.
 The "Fit Within" option is only available in the context of Slideshow Styles. This option ensures that the entire image, such as a logo, is visible without clipping or stretching, filling any remaining space with the Slideshow Style’s background. This option is ideal for maintaining the integrity of background images, especially logos.