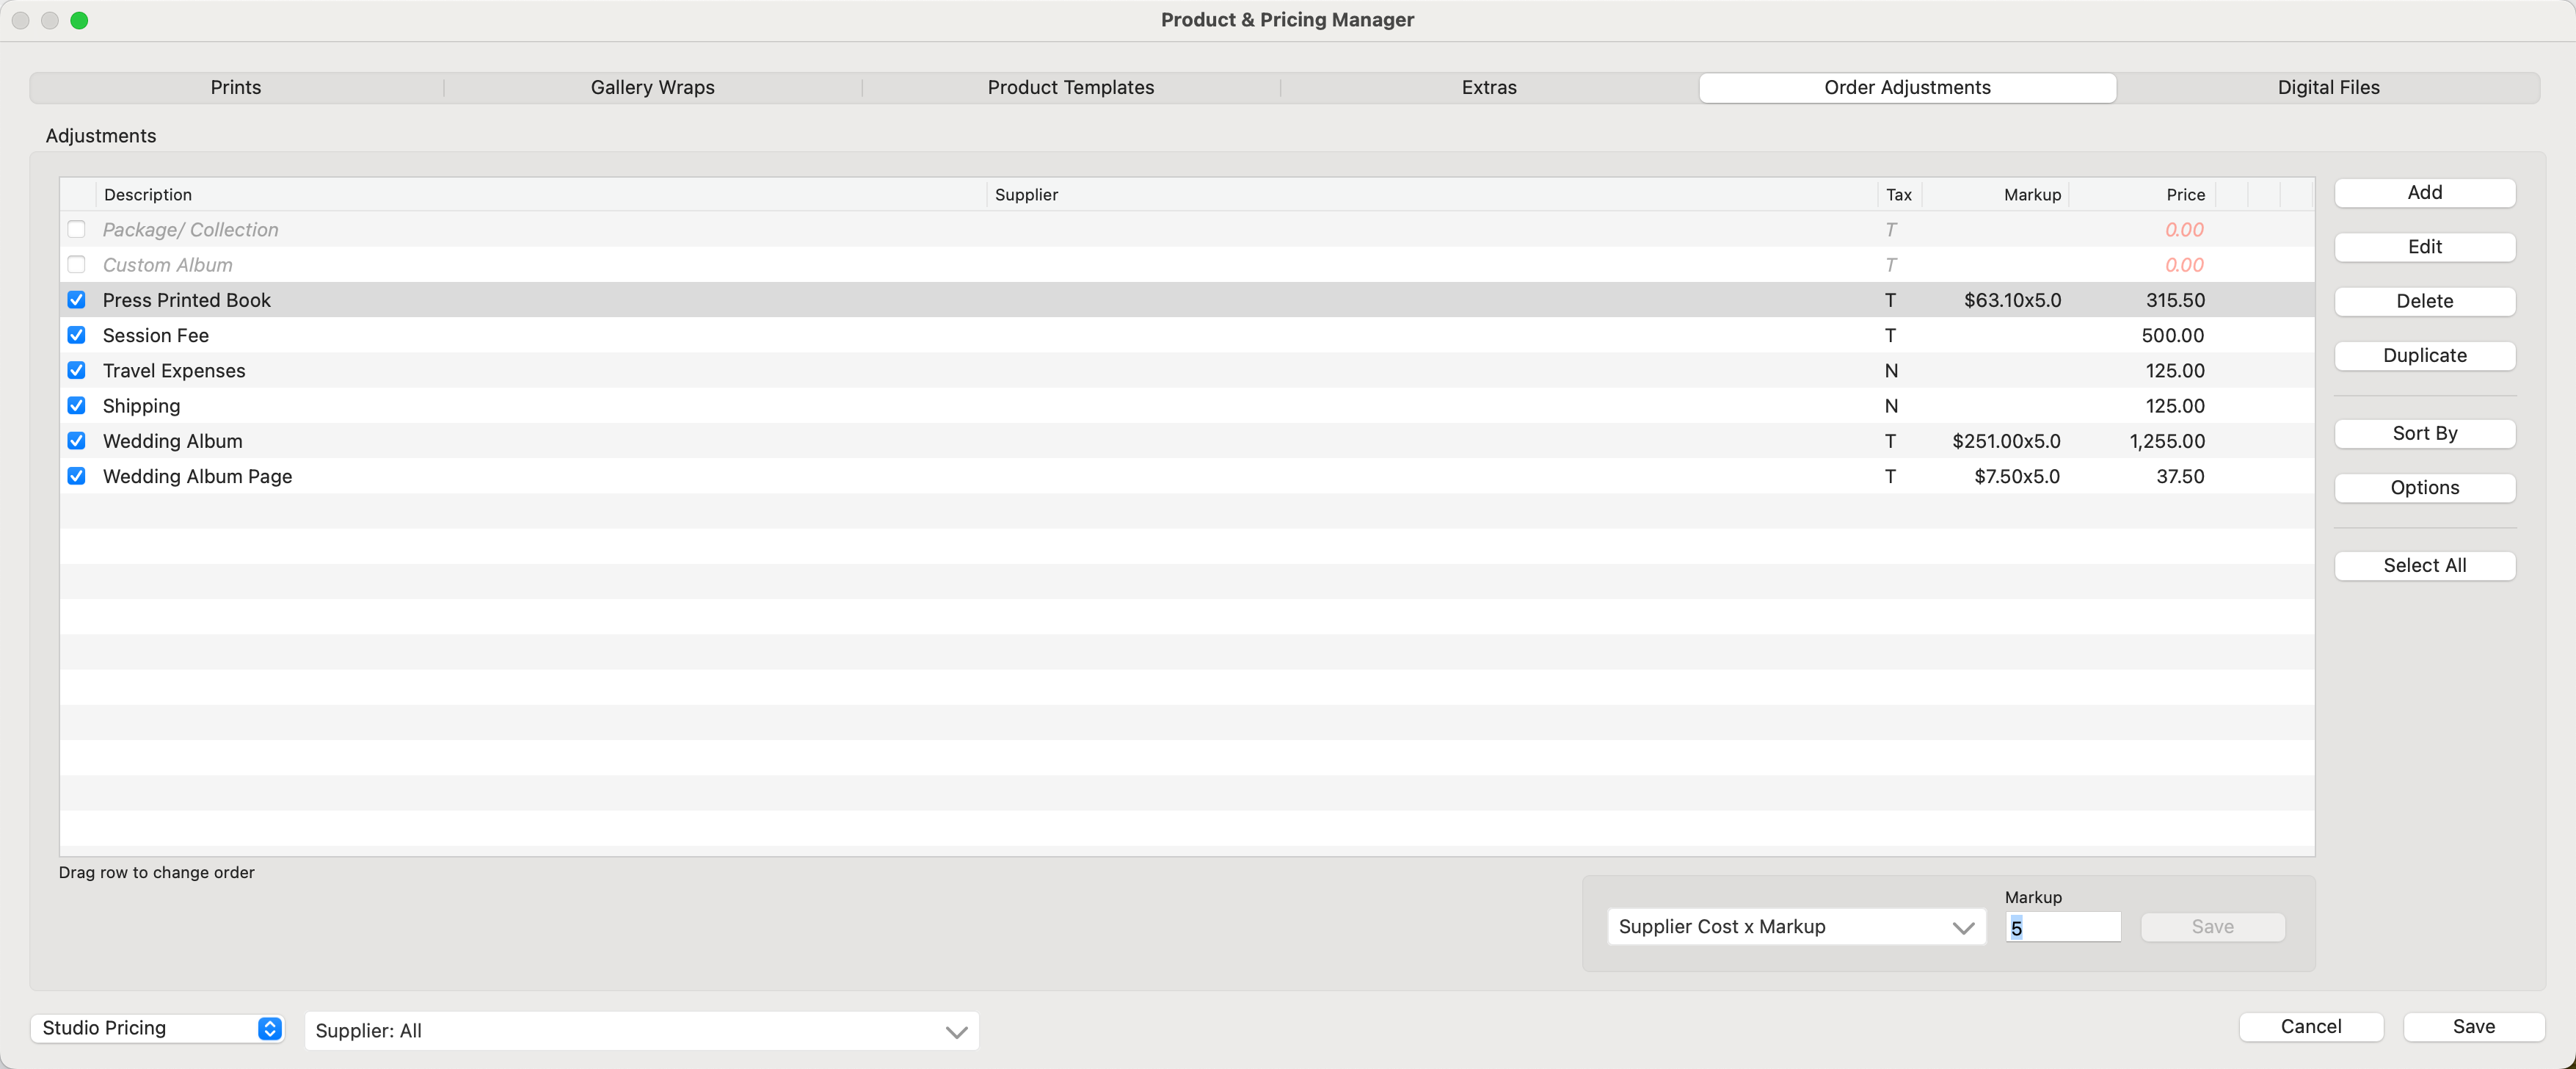
Order Adjustments
Order Adjustments are items that are not specific to a particular product. They encompass charges or fees that are applicable to the entire order, such as session fees, location fees, travel mileage, hourly charges, shipping costs, and other similar expenses. Books and Albums can also be added here. Alternatively, create Reference Products for any books or albums you want to sell.
These charges are applied to the overall order rather than to individual products. On the customer invoice (Order Report), order adjustments are displayed as text descriptions without a thumbnail image and appear as separate line items.
- Choose a Supplier from the drop-down list on the Bottom Bar to exclusively display products associated with a particular supplier.
- Toggle your pricing method between "Supplier Cost x Markup" and "Fixed Price."
Before you start pricing your products, be sure you have selected the applicable price list from the drop-down menu on the bottom left.
To toggle between pricing methods, use the drop-down arrow in the Pricing Method box (below the Pricing panel).
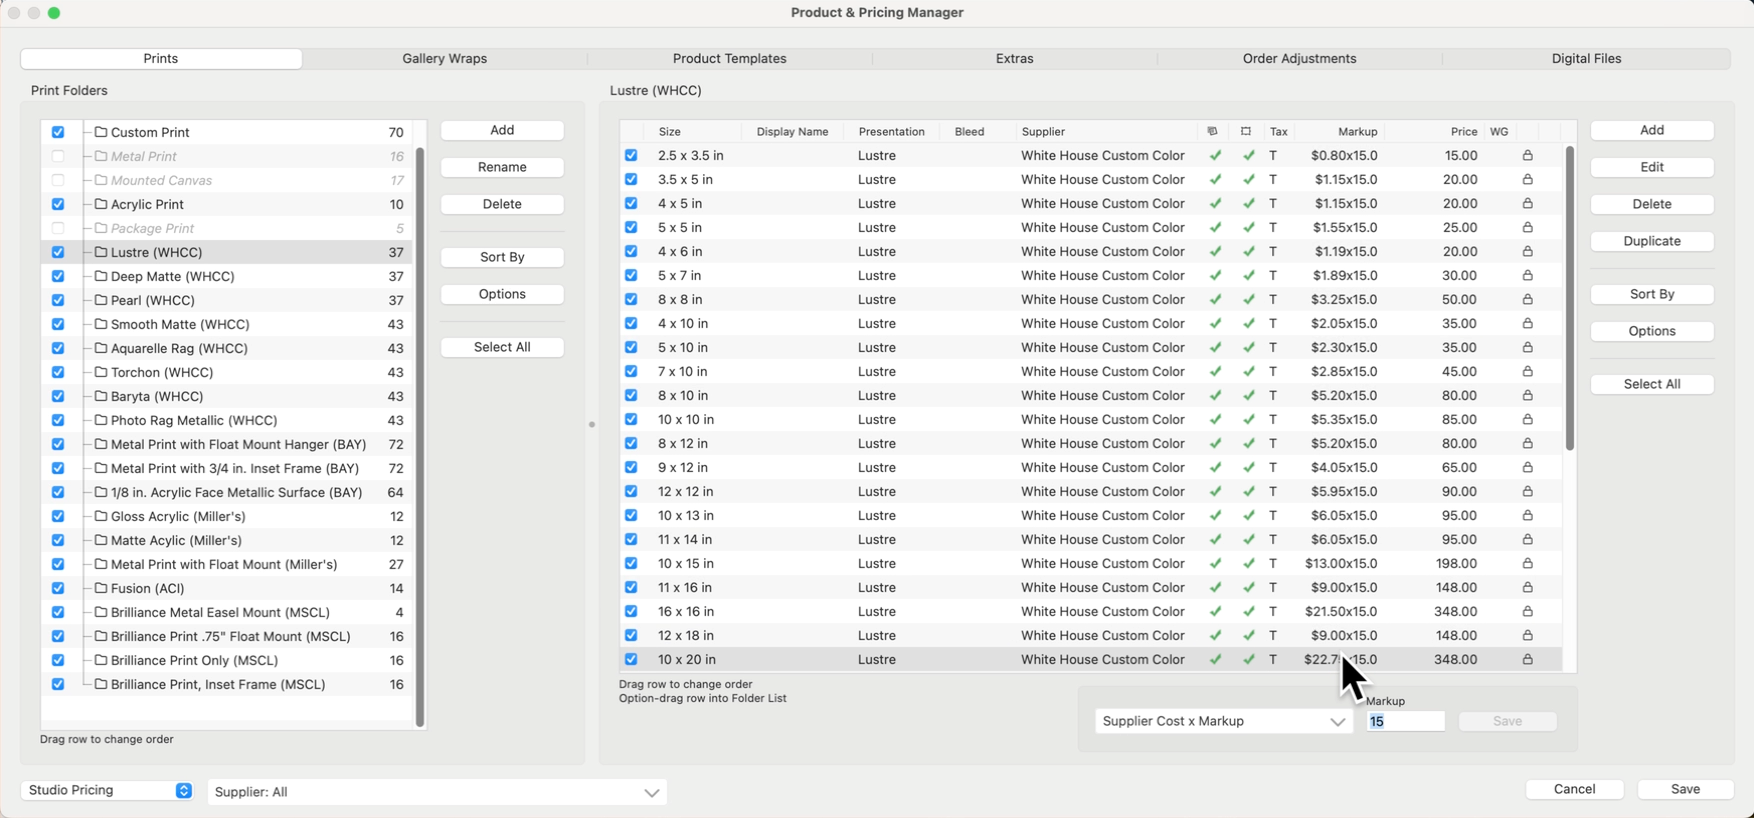
 : This checkbox indicates that the product is "turned on" and available in the current price list. Uncheck this box if you do not want a particular product to appear.
 - Description: This is a description of the item.
- Supplier: This column indicates the Supplier if one has been assigned.
- Product Code: If you have enabled product codes in your Settings, this is where they appear.
- Tax: a T indicates the item is taxable. An N indicates the item is non-taxable.
- Markup: If you choose to use a markup, the markup amount will be displayed here.
- Price: This column indicates the retail price of your product.
 : The shopping cart tag appears if the line item will be automatically added to new orders.
 : The lock tag appears if the line item is locked (part of a Supplier Collection).
 : Warnings will appear if the line item has been configured improperly or a duplicate of the same item is found.
- You can change the order of the products by selecting a row and dragging it to where you want it to be.
- Click the Add button on the right-hand side of the Order Adjustment Pricing panel. The Adjustments dialog will appear.

- Supplier: Choose a supplier from the drop-down list if you want to assign a supplier to the Order Adjustment.
- Description: Type in a description of the new order adjustment product you would like to add.
- Automatically add to new orders: check this box to automatically add an Order Adjustment to each new order.
- Product Code: If enabled, one will be auto-generated.
- Check the Taxable box if you wish the product to be taxed.
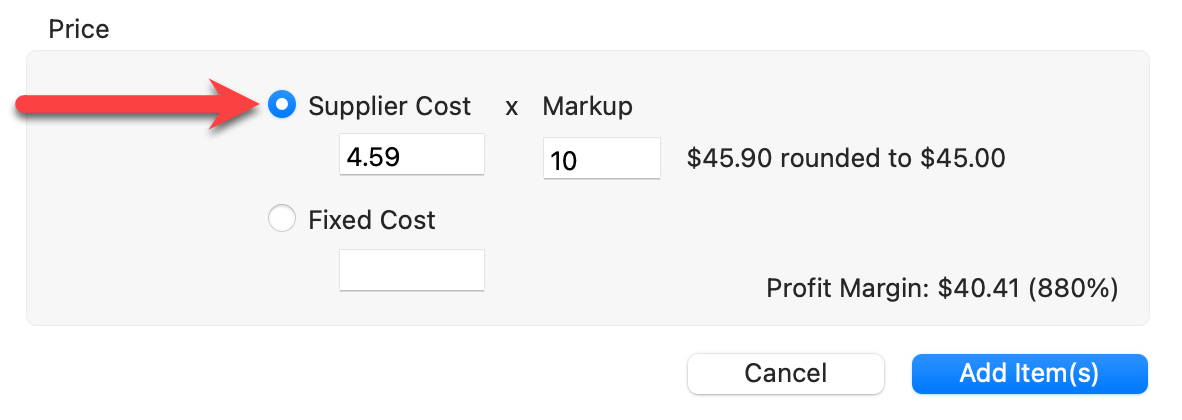
Price
Choose Either Supplier Cost x Markup or Fixed Cost:
- Supplier Cost x Markup: This pricing method is best used when Importing Pricing From a Spreadsheet.
- Enter the Supplier Cost and markup in this dialog.
- If you choose this method of pricing, price rounding (if enabled) will be shown.
- Profit Margins are also shown when using this pricing method.
- Fixed Cost: Select this option to enter a fixed price. This can also be done after you add the item.
- If you elect to use a fixed price, you can still have the Supplier Cost listed (just not selected).
- Profit margins will be shown if the Supplier Cost is entered.
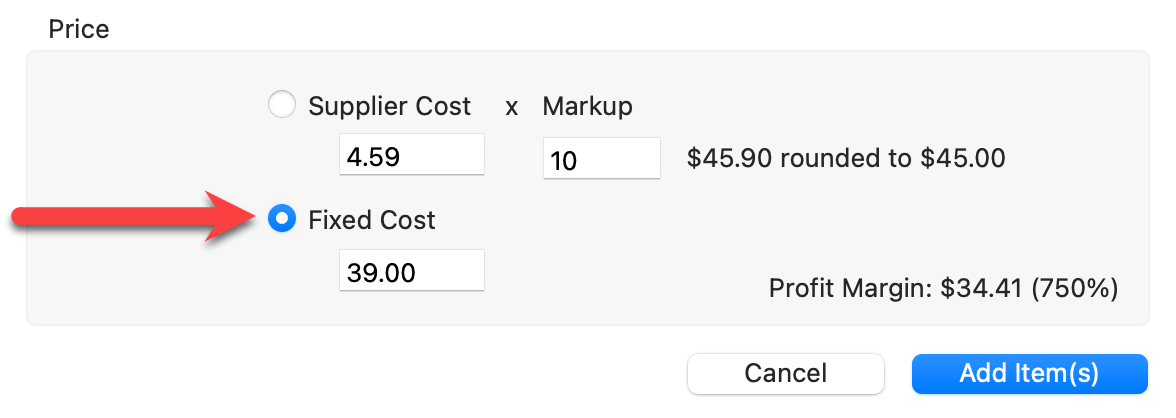
- Click the Add Item button.
- Your new order adjustment will appear at the bottom of the list by default. You can drag and move it to wherever you like in the list.
This method for pricing your products works in the same way for Prints, Gallery Wraps, Extras, Order Adjustments, and Digital Files. To toggle between pricing methods, use the drop-down arrow in the Pricing Method box (below the Print Pricing panel).
Price Using "Fixed Price"
- Click on the row you wish to price.
- Type in a price in the Fixed Price box.
- Press ReturnEnter on your keyboard or click the Save button. You will automatically move to the next row.
- Once you are finished pricing all your products, click the Save button in the bottom-right of the Product & Pricing Manager. This will save all changes and close the window.

Price Using "Supplier Cost x Markup"
- This pricing method is best used when Importing Pricing From a Spreadsheet. You can also modify the markup of a locked Supplier Collection.
- Select each size individually and click Edit button to modify the supplier cost.
- Use the Select All button to select all print products to modify the markup on all the products at the same time.
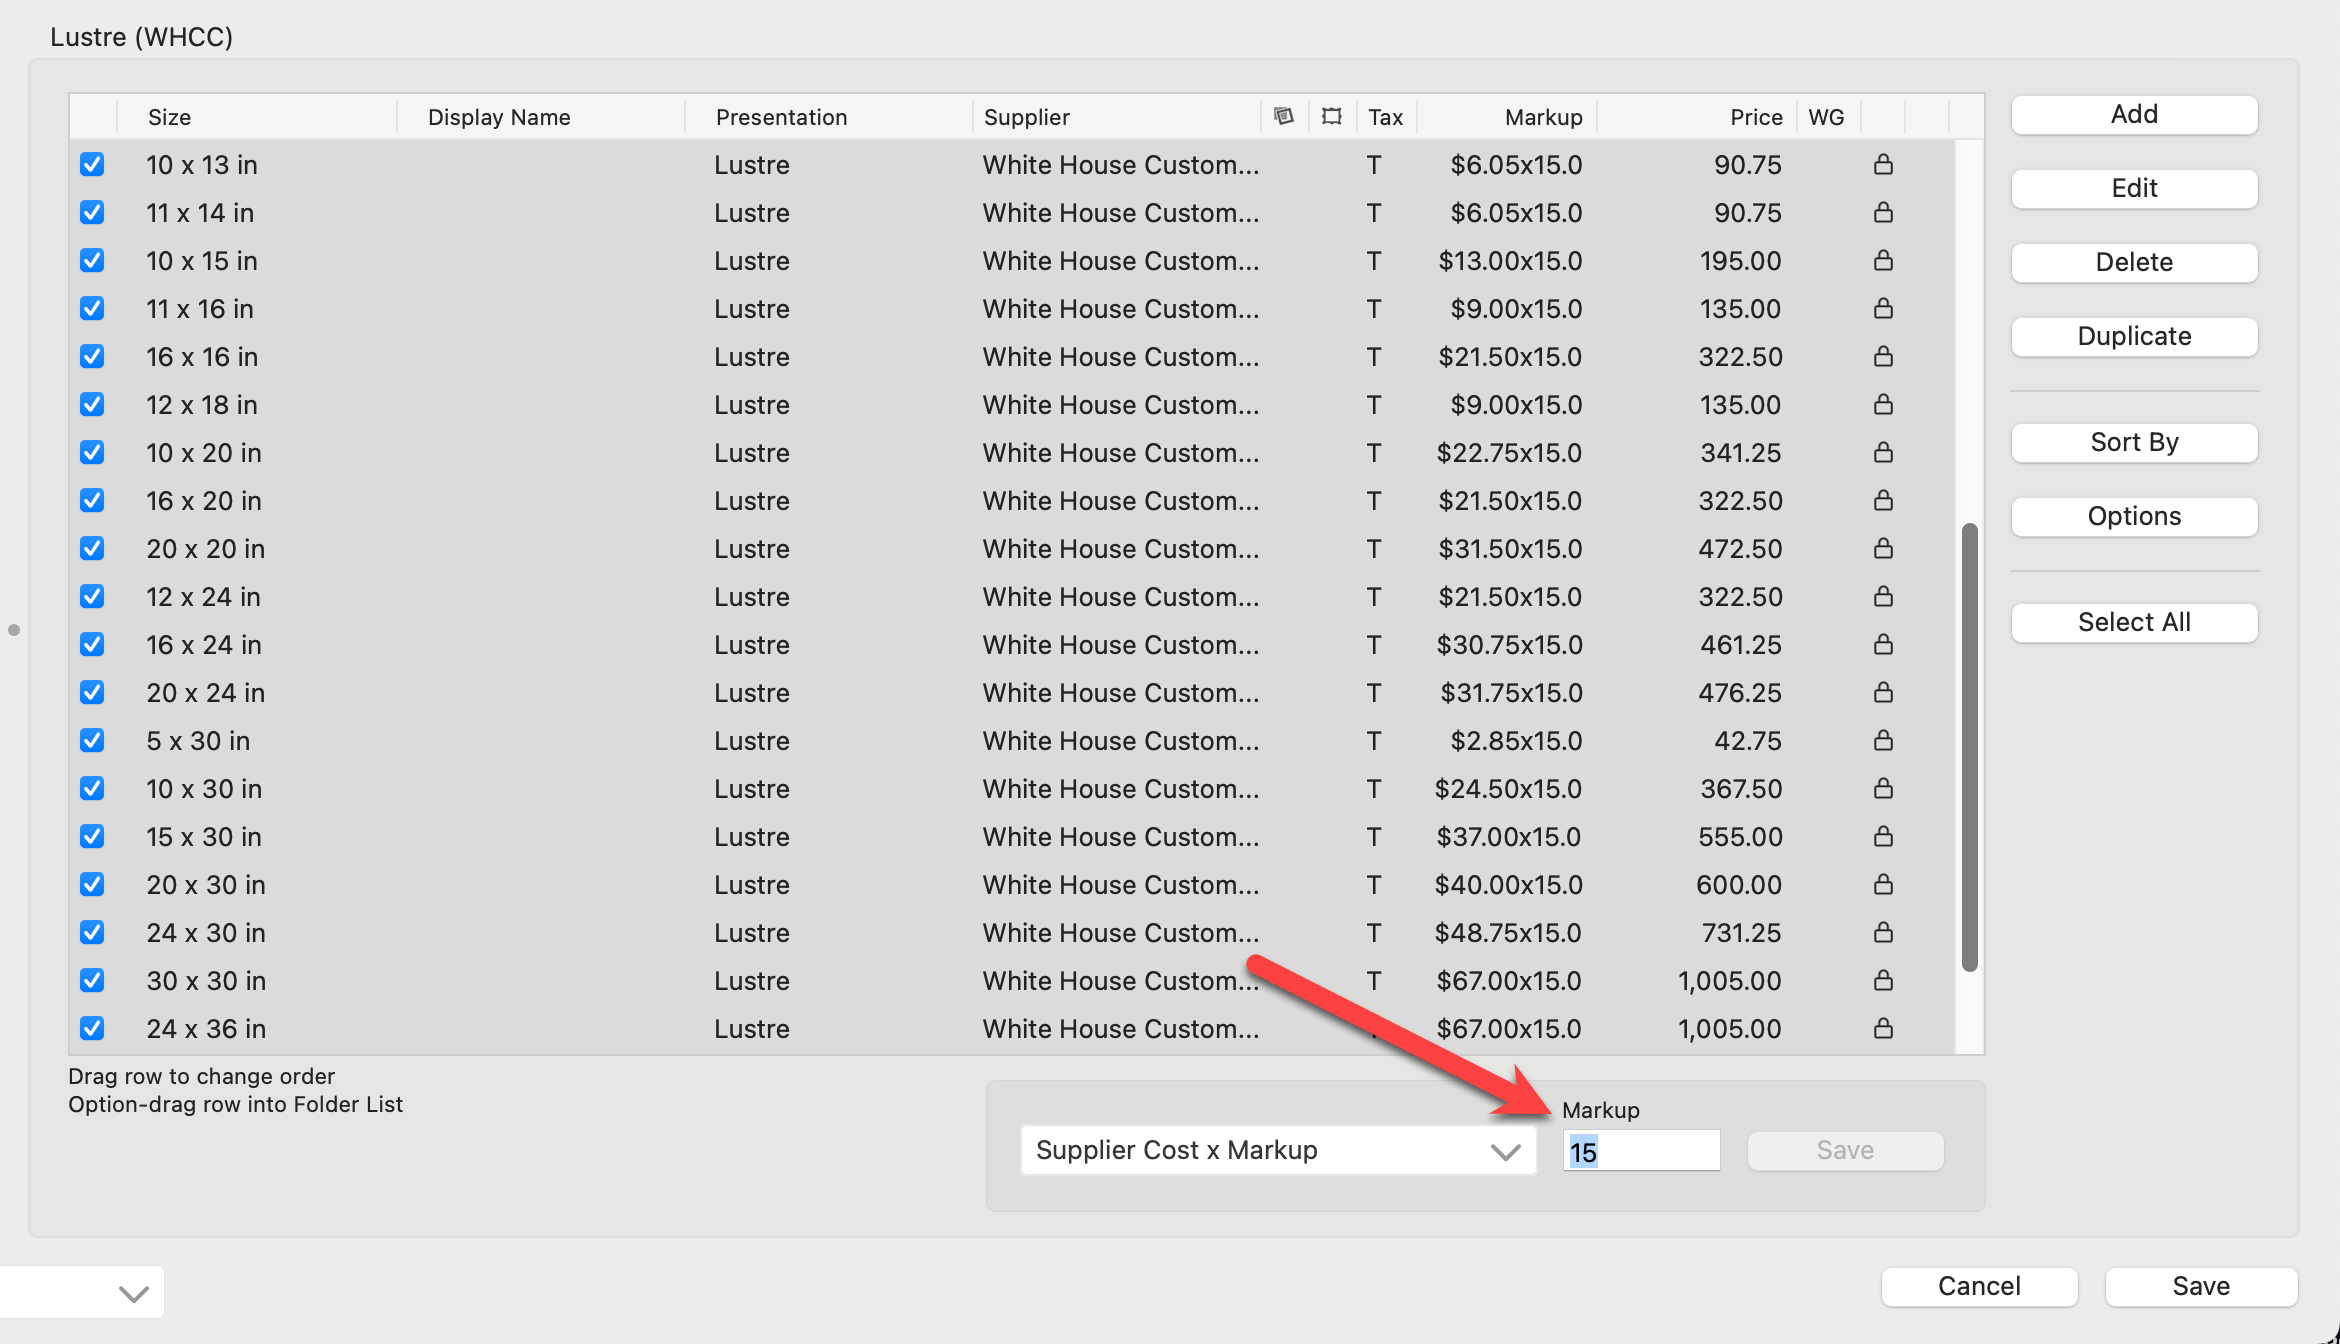
When entering a price, hold down the OptionAlt key while clicking the Save button. This will save that price across ALL price lists.
- You can manage and update your prices using CSV file spreadsheets. Click here to learn more.
- Use the Select All button to make changes to all of the products at the same time. This works well when you are adding a universal markup.
- Select the product template you wish to work with.
- Click on the Pricing button.
- Click the Edit button on the right-hand side of the Price List Items dialog.
- The Product Pricing dialog will appear.
- Make changes to the presentation option, size, price, etc.
- You will notice the Reset Changes tool
 appear next to each line item that was edited. To clear your changes for that particular line item, click the Reset Changes tool.
 - Click the Change Item button when you are finished.
Products from Supplier Collections cannot be modified (except for price). They are locked.
You can select multiple products at a time and make changes. This method works the same for all products in the Product & Pricing Manager.
Note: If one property is the same for all the selected items, it will be displayed. If the properties are different, then that property will be displayed blank.
- Individually select the rows of products you wish the change. Or use the Select All button.
- Click the Edit button on the right-hand side of the Product Pricing panel.
- Make the change(s) you wish to make.
- You will notice the Reset Changes tool appear next to each line item that was edited. To clear your changes for that particular line item, click the Reset Changes tool.
- Click the Save button to apply your changes to all of the selected products.
Important note: instead of deleting a product, consider unchecking the checkbox. This will remove it from the price list, but you can always turn it on again at a later time.
- Select the row of the product you wish to delete.
- Click the Delete button on the right-hand side of the Pricing panel.
- A confirmation window will open, click Yes to remove the price list item.
Hold the OptionAlt key down while clicking the Delete button. This will delete the price list item immediately without asking for confirmation first.
It is possible to end up with more than one price list item being exactly the same by changing multiple items at once or by using the Duplicate button. In general, you want to avoid the confusion of duplicates. It is recommended that you delete any remaining duplicates after you have finished with your changes.
![]() Duplicates have a warning symbol next to them on the right-hand side.
Duplicates have a warning symbol next to them on the right-hand side.
There may be instances where you want to create a duplicate. For example, you may want to duplicate a product and edit it rather than create a new product altogether.
Duplicate a Product
- Select the row of the product you wish to duplicate.
- Click the Duplicate button on the right-hand side of the Pricing panel.
- A confirmation window will open, click Yes to duplicate the item.
- The duplicate will appear by default at the bottom of the list.
The Sort By button is contextual. This means that depending on which type of product you are working with, different options will appear in your sort button. Sorting takes place within the individual folders. Some common ways of sorting are:
- Width
- Height
- Presentation Option
- Price
- Available To
- Display Name
If you have manually moved your products around by dragging them, the Sort By button will override this. In case you accidentally sort your products and wish to reverse it, click the Cancel button. Using the Undo button will not undo sorting.
- Supplier: Attach the selected item(s) to a supplier.
- Export/Update Prices: Use these options to update your pricing using a CSV spreadsheet.
- Copy Price to All Price Lists: Use this button to copy the selected item(s) prices across all price lists. To copy the entire folder, click on the Select All button first, and then "Copy Price to All Price Lists."