Presentation Options
Presentation options are print finishes. They are key components in product creation within ProSelect. Generally, you cannot order a print from a supplier without selecting a size and a print finish. For prints, the combination of a size and a presentation option creates a distinct product. Similarly, for product templates, selecting a presentation option determines the final product's finish type. Suppliers can be assigned to Presentation Options to represent lab products more accurately. It is best to match your presentation options to your lab's print finish options.
- When an image is imported into ProSelect, it is assigned a Presentation Option based on your Starting Product. Click on the currently assigned Presentation Option in the info bar to bring up a list of other options in that print size.
- Prints could be Glossy, Smooth Matte, Pearl, or Photo Rag Metallic, among others.
- For products created from templates, Presentation Options can range from Lustre or Pearl Prints and Press Printed Cards to Designer Jewelry, Matted Prints, Image Boxes, etc.
- When dealing with Digital Files, the Presentation Type categorizes the licensing terms, for example, Social Media Use, Under License Agreement, or permissions for printing up to a certain size like 8x10.
- For Gallery Wraps, specific Presentation Options such as Premium Canvas Wrap or Economy Gallery Wrap further customize the product.
Setting Up Presentation Options
To configure and manage your Presentation Options, go to the top menu, Products > Presentation Options.
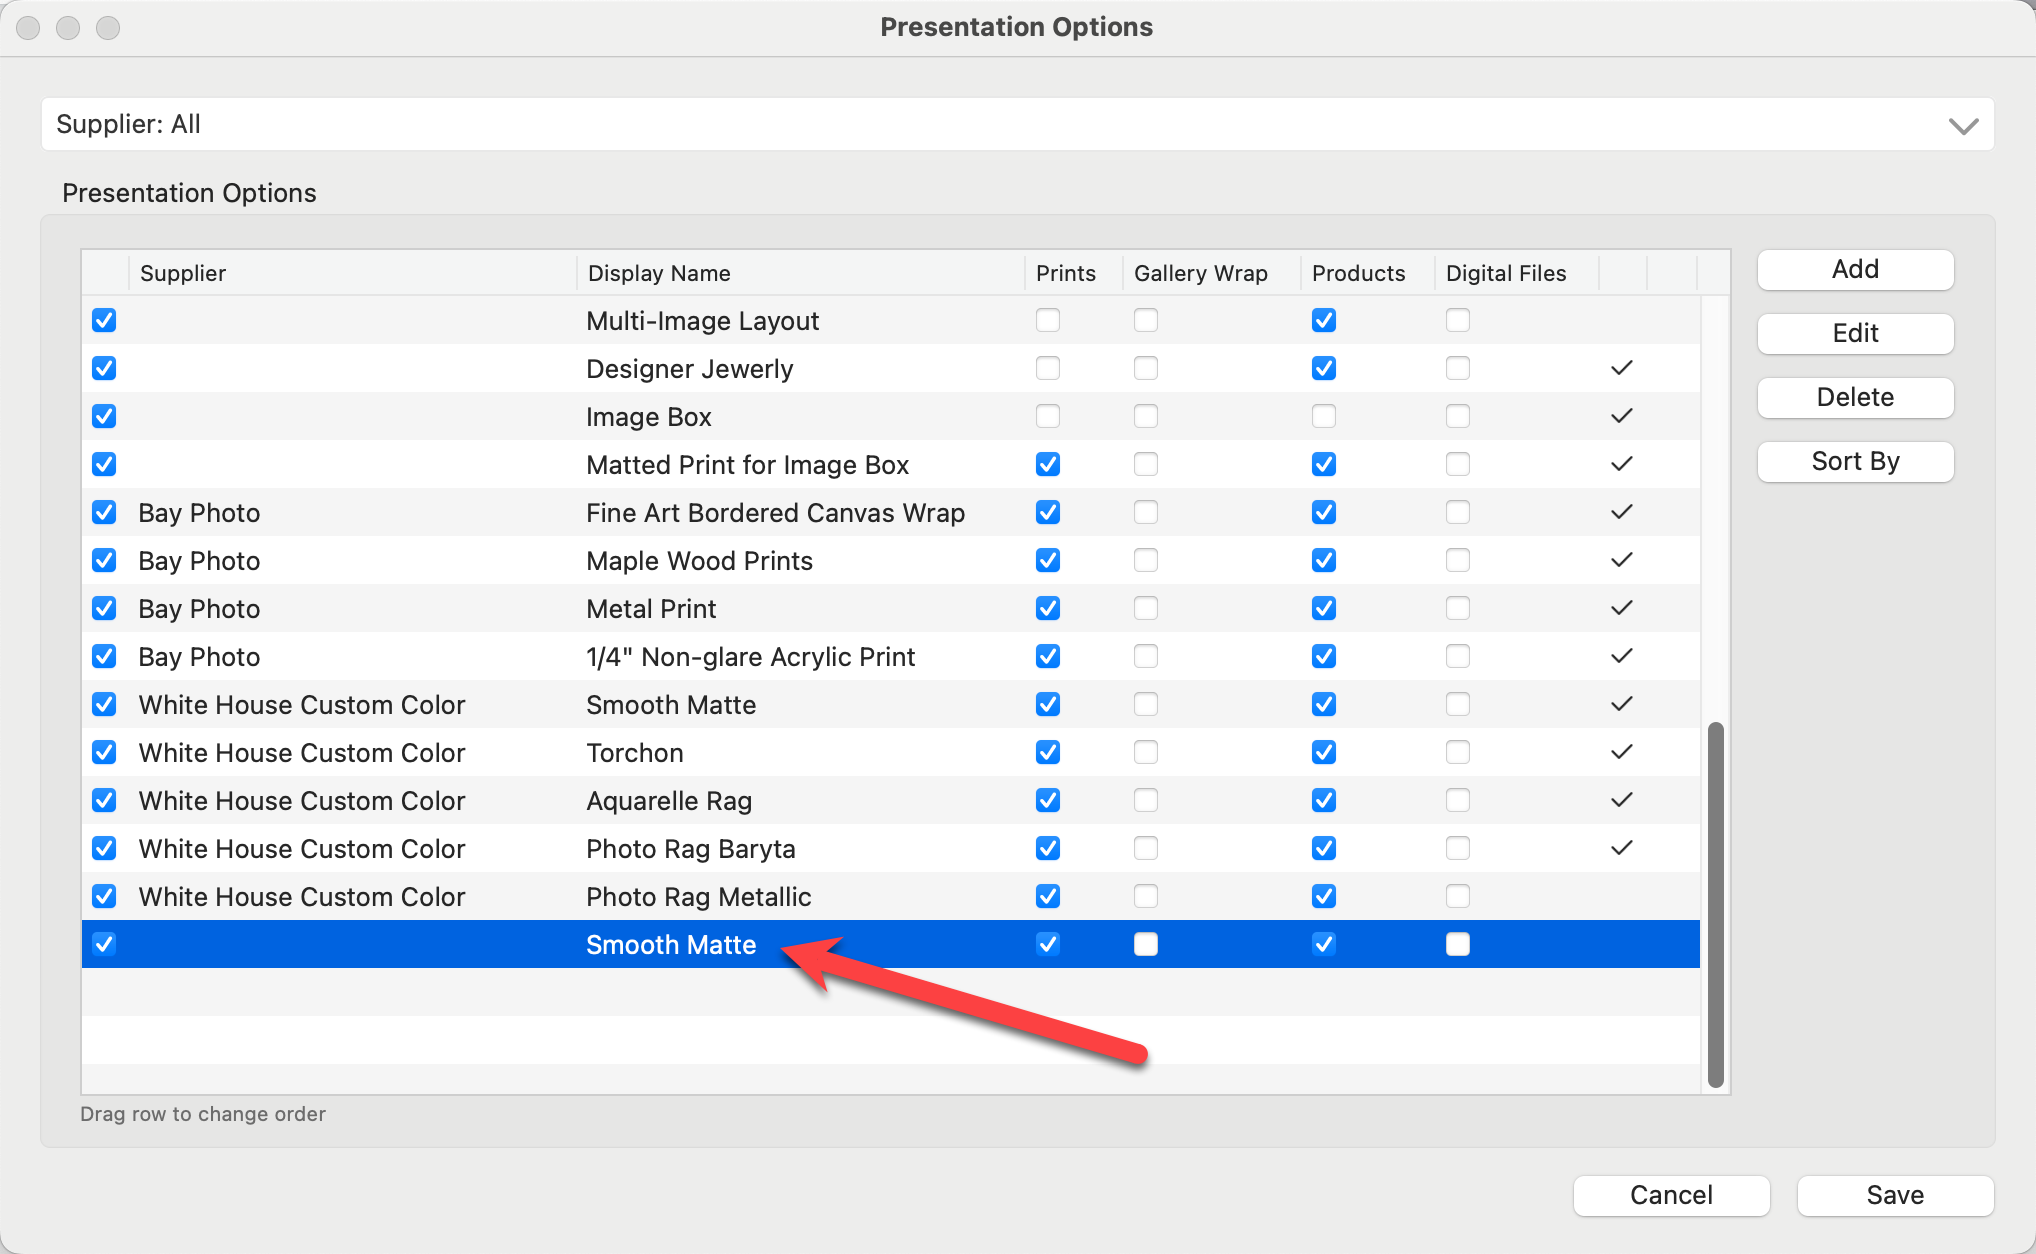
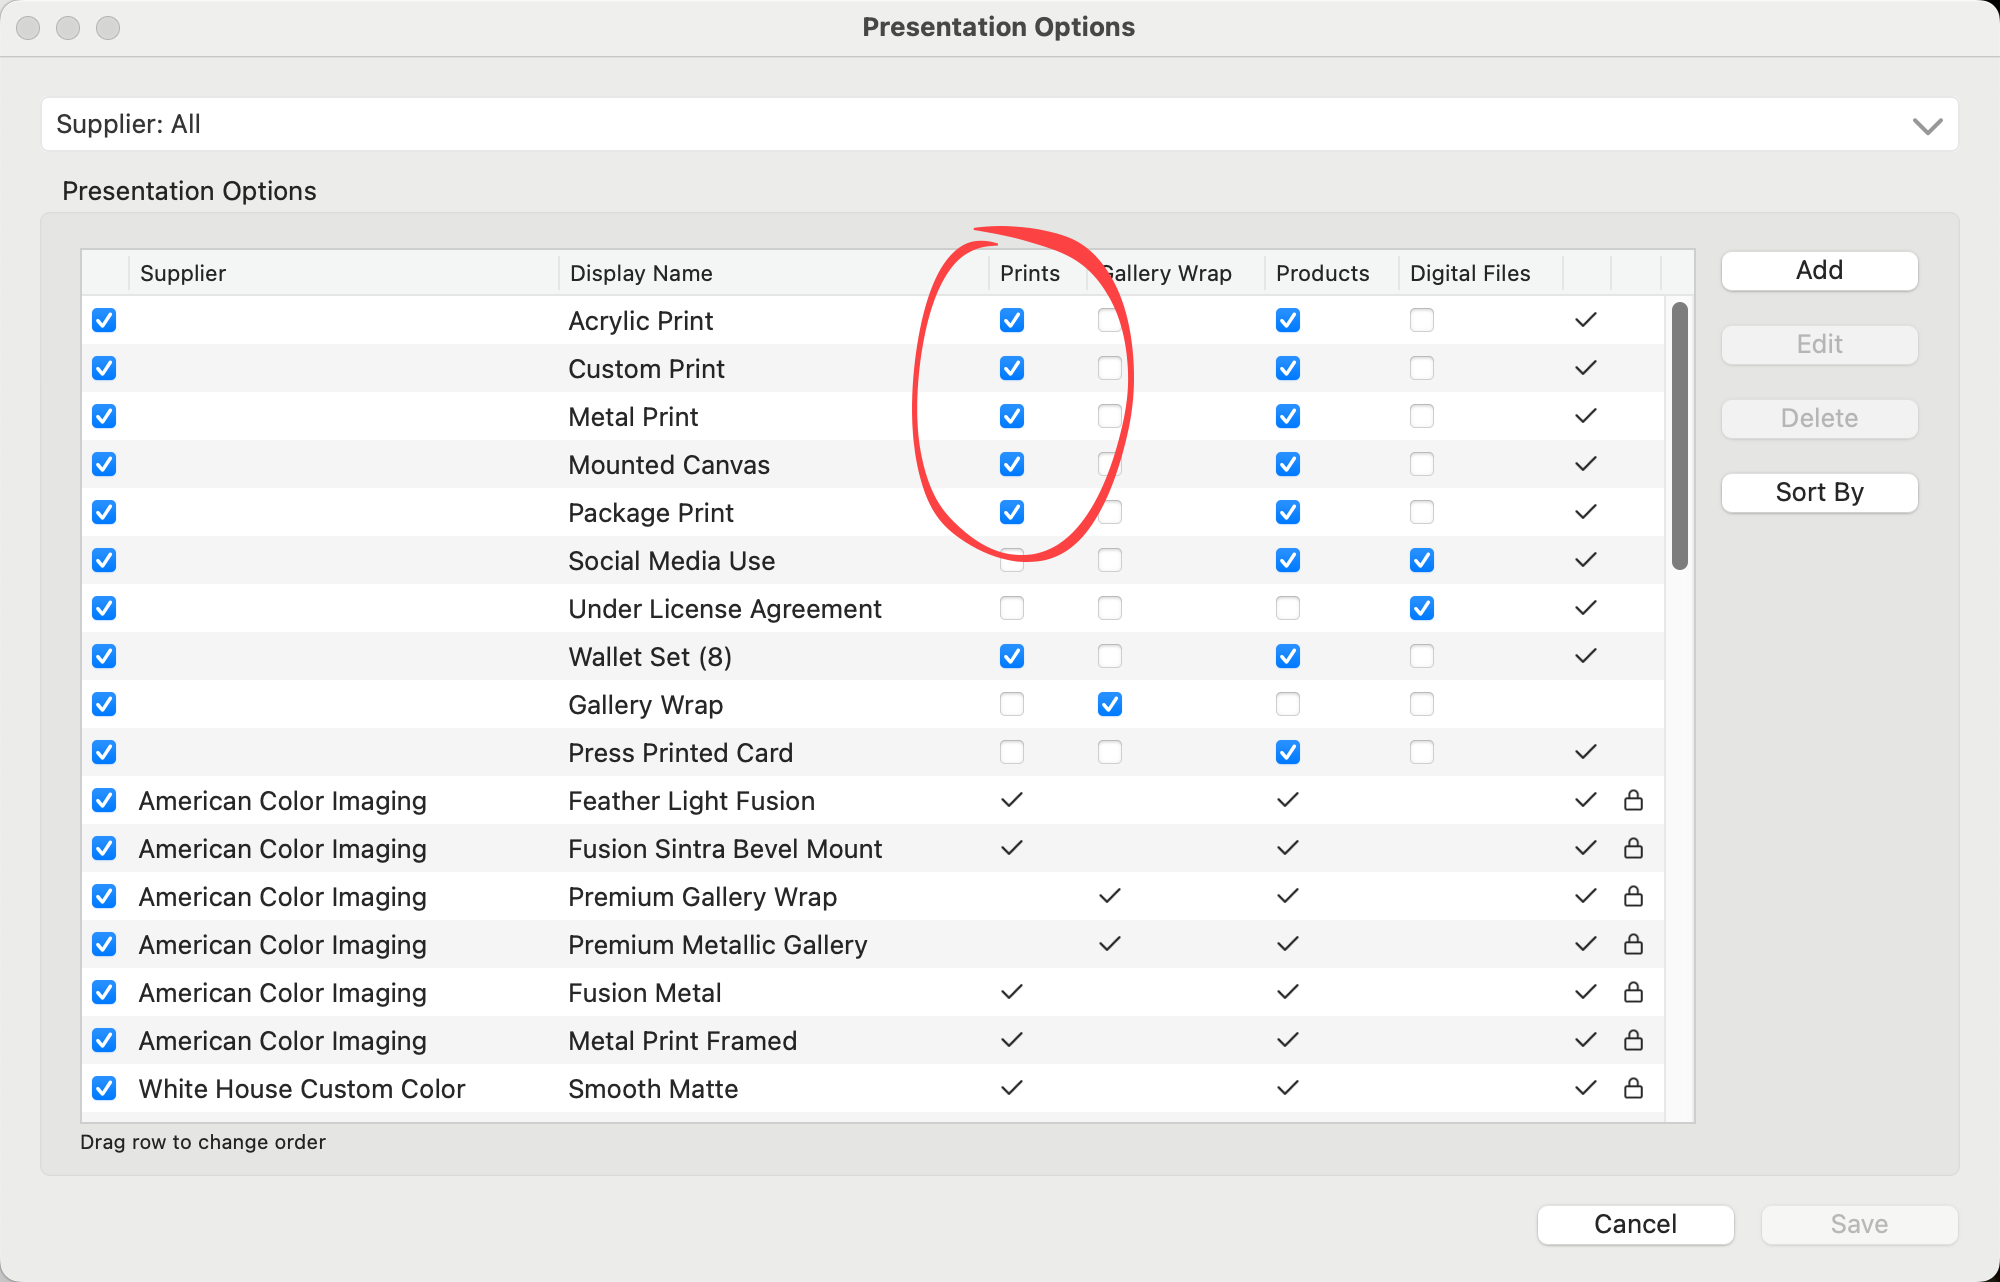
The Presentation Options dialog lists all Presentation Options, which products they are available to, and which supplier they are attached to (if applicable). Each presentation option can be linked to different types of products. The four available options are Prints, Gallery Wraps, Products, and Digital Files. By limiting the types of products you want the presentation option to be available for, creating priced items and assigning them during ordering becomes easier, as the options list is more focused.
For example, if you're setting up an option for Acrylic Prints, you would typically check both 'Prints' and 'Products'. Including 'Products' allows acrylic prints to be used in wall groupings and templated items. Generally, if a presentation option is assigned to 'Prints', it is also advisable to select 'Products'. However, ensure 'Digital Files' is not checked, as this would incorrectly imply you could order an acrylic digital file.
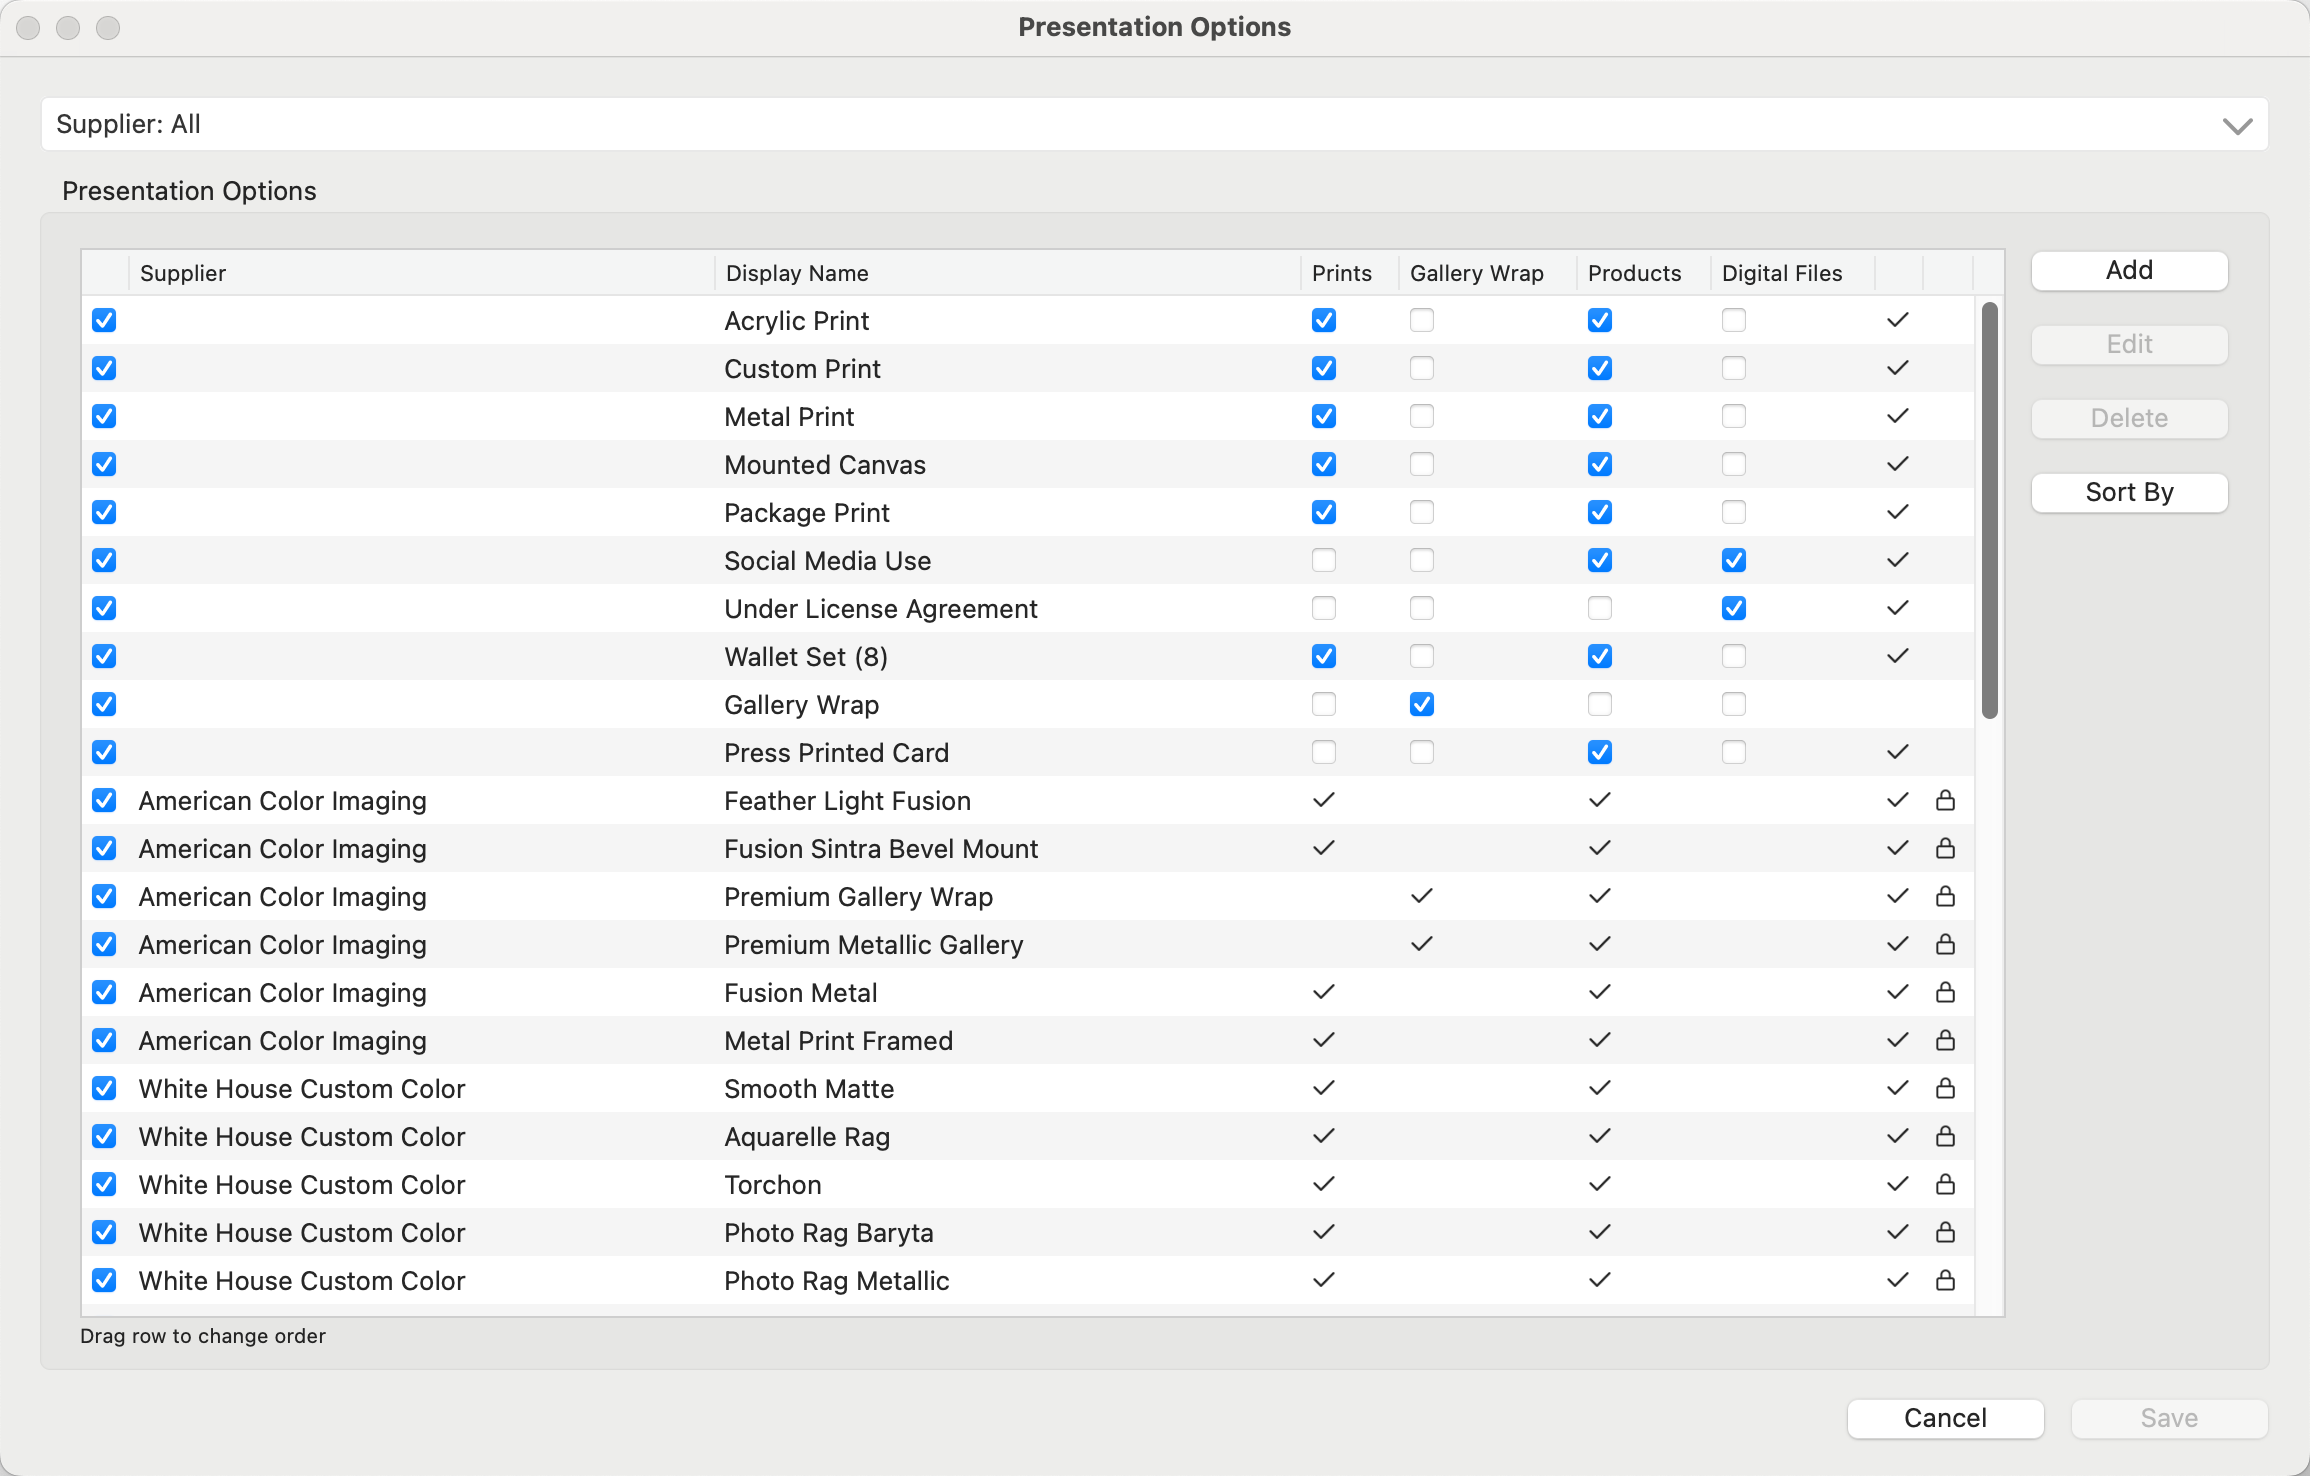
- Leftmost Check box: Options checked (on) will be available for use. Options unchecked (off) will be disabled.
- Supplier: The Supplier column indicates a Supplier has been assigned to the Presentation Option. To view a single supplier, choose the supplier name from the drop-down list at the very top of the dialog. Note: when viewing a single Supplier, you cannot drag and reorder the Presentation Options.
- Display Name: This is the name that will be displayed throughout ProSelect when orders are built. It will also display on invoices.
- Product Type: Options include Prints, Gallery Wraps, Products, and Digital Files. If a checkbox is checked, then the corresponding Presentation Option will be made available in that product type. It is important to note that if the Presentation Option is linked to a Supplier Collection, the product types are locked and cannot be changed.
 Used In Checkmark: This appears if a Presentation Option is currently assigned to a product in ProSelect. Hover over the checkmark to view how many products are currently using the Presentation Option.
 Lock: This particular presentation option is linked to a Supplier Collection and cannot be modified (except its Display Name and Production Profile).
A Presentation Option does not refer to session fees, additional charges, shipping, mileage, or similar aspects.
- Click the Add button.
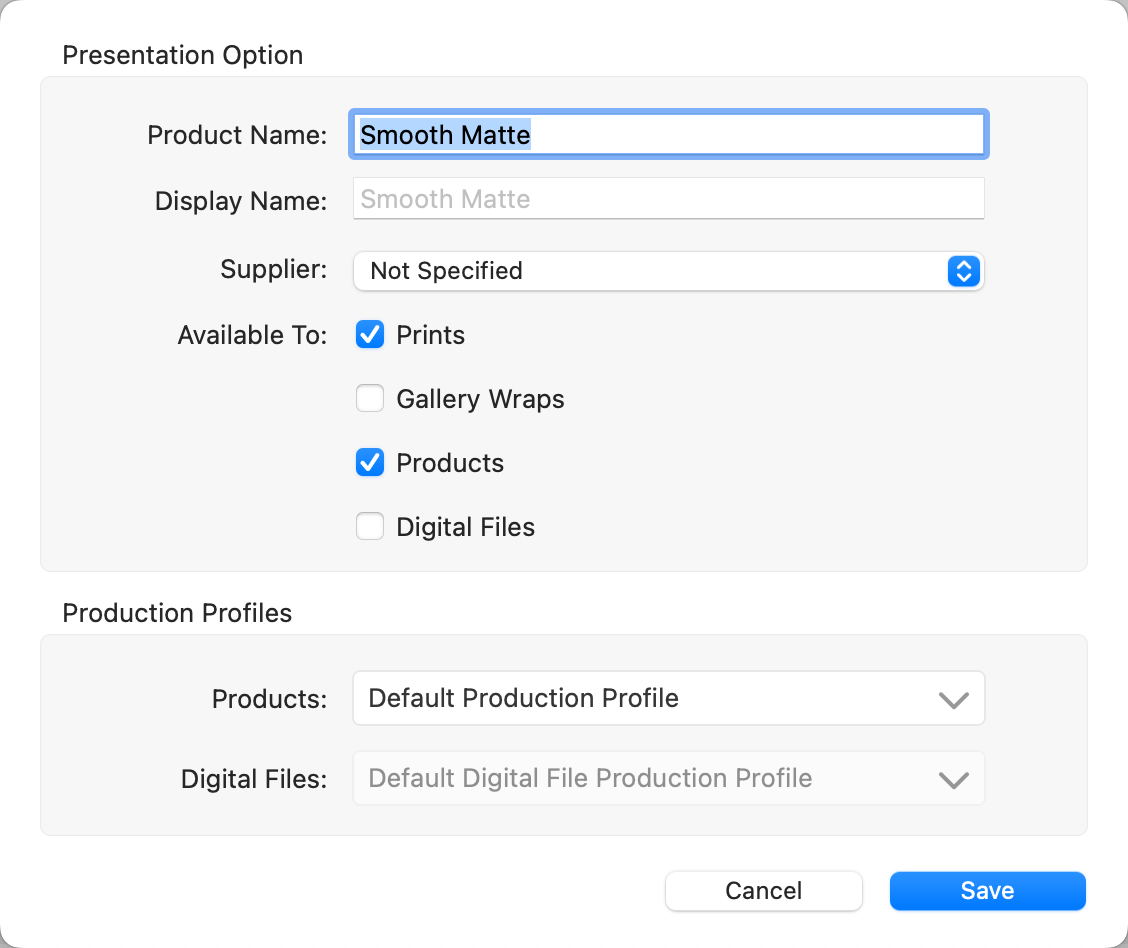
- Product Name: Enter a name for the Presentation Option.
- Display Name: Unless modified, the display name will match the product name. Typically, having a different display name is used when dealing with Supplier Collections. A display name may better align with your Studio's brand, while a product name is based on a particular lab product.
- The display name will appear throughout ProSelect.
- Pro Production: When images are produced, the presentation option subfolder will revert back to the original name provided by the Supplier, not the display name. This is to aid in placing lab orders.
- Supplier: Optionally choose a supplier from the drop-down list.
- Available To: Check the boxes to indicate which product types the presentation option will be available to.
- Production Profiles: If your supplier is not specified, use the default production profile. If a supplier is assigned, use the production profile assigned to the specific supplier. See Production Profiles to learn more.
- Click Save.
- The newly created presentation option will appear at the bottom of the list.
- You can click and drag the presentation option to reposition it in your list.
Edit
- Click the Edit button.
- Make any changes required to the presentation option. This could include changing the display name, attaching a supplier, adjusting which products it is available to, or changing the production profile.
- You will notice the Reset Changes tool
 appear next to each line item that was edited. To clear your changes for that particular line item, click the Reset Changes tool.
 - Click Save.
Sort the Presentation Option List
- Click and drag a Presentation Option to manually move its position in the list, or
- Click the Sort By button.
- Select the sorting method from the list.
It is important to note that you cannot undo the "Sort By" button. If you make a sorting mistake, click the Cancel button on the Presentation Options dialog. You will lose all changes, and you can start again.
Deleting a Presentation Option
If there is a Presentation Option you do not wish to use, consider turning it off (uncheck the checkbox on the left side). This will disable the Presentation Option, and it will not be shown anywhere on the main display. However, you will still have the option of using the Presentation Option at a later time. Simply check the box to turn it back on.
- Select the Presentation Option you wish to delete.
- Click the Delete button.
- If the Presentation Option is currently being used in a product, a warning will pop up. Click Yes to continue.
When you build a new album in ProSelect, a Presentation Option is automatically applied to all images on import. This is part of the "Starting Product." The default Presentation Option should represent your most common or preferred product type (or print finish). The default gives you a starting point. At any time after import the assigned Presentation Option can be changed.
Go to the top menu, ProSelectEdit > Settings > Importing Images to set the default Starting Product. Choose a Presentation Option from the drop-down list. If the option you want is not there, create it by selecting "Manage Presentation Options." You will also need to select a Size to go with it. Click on Create New Starting Product to learn more.
Supplier-based presentation options are linked to specific lab products. Usually, these Presentation Options are already set up and associated with products in the Product and Pricing Manager. When a Supplier Collection is downloaded, the associated presentation options and production profile are automatically added to this list.
Filter by Supplier
Presentation Options can be filtered to show only those assigned to a particular supplier. Click on the drop-down arrow on the top right of the presentation Options dialog to reveal the available list.
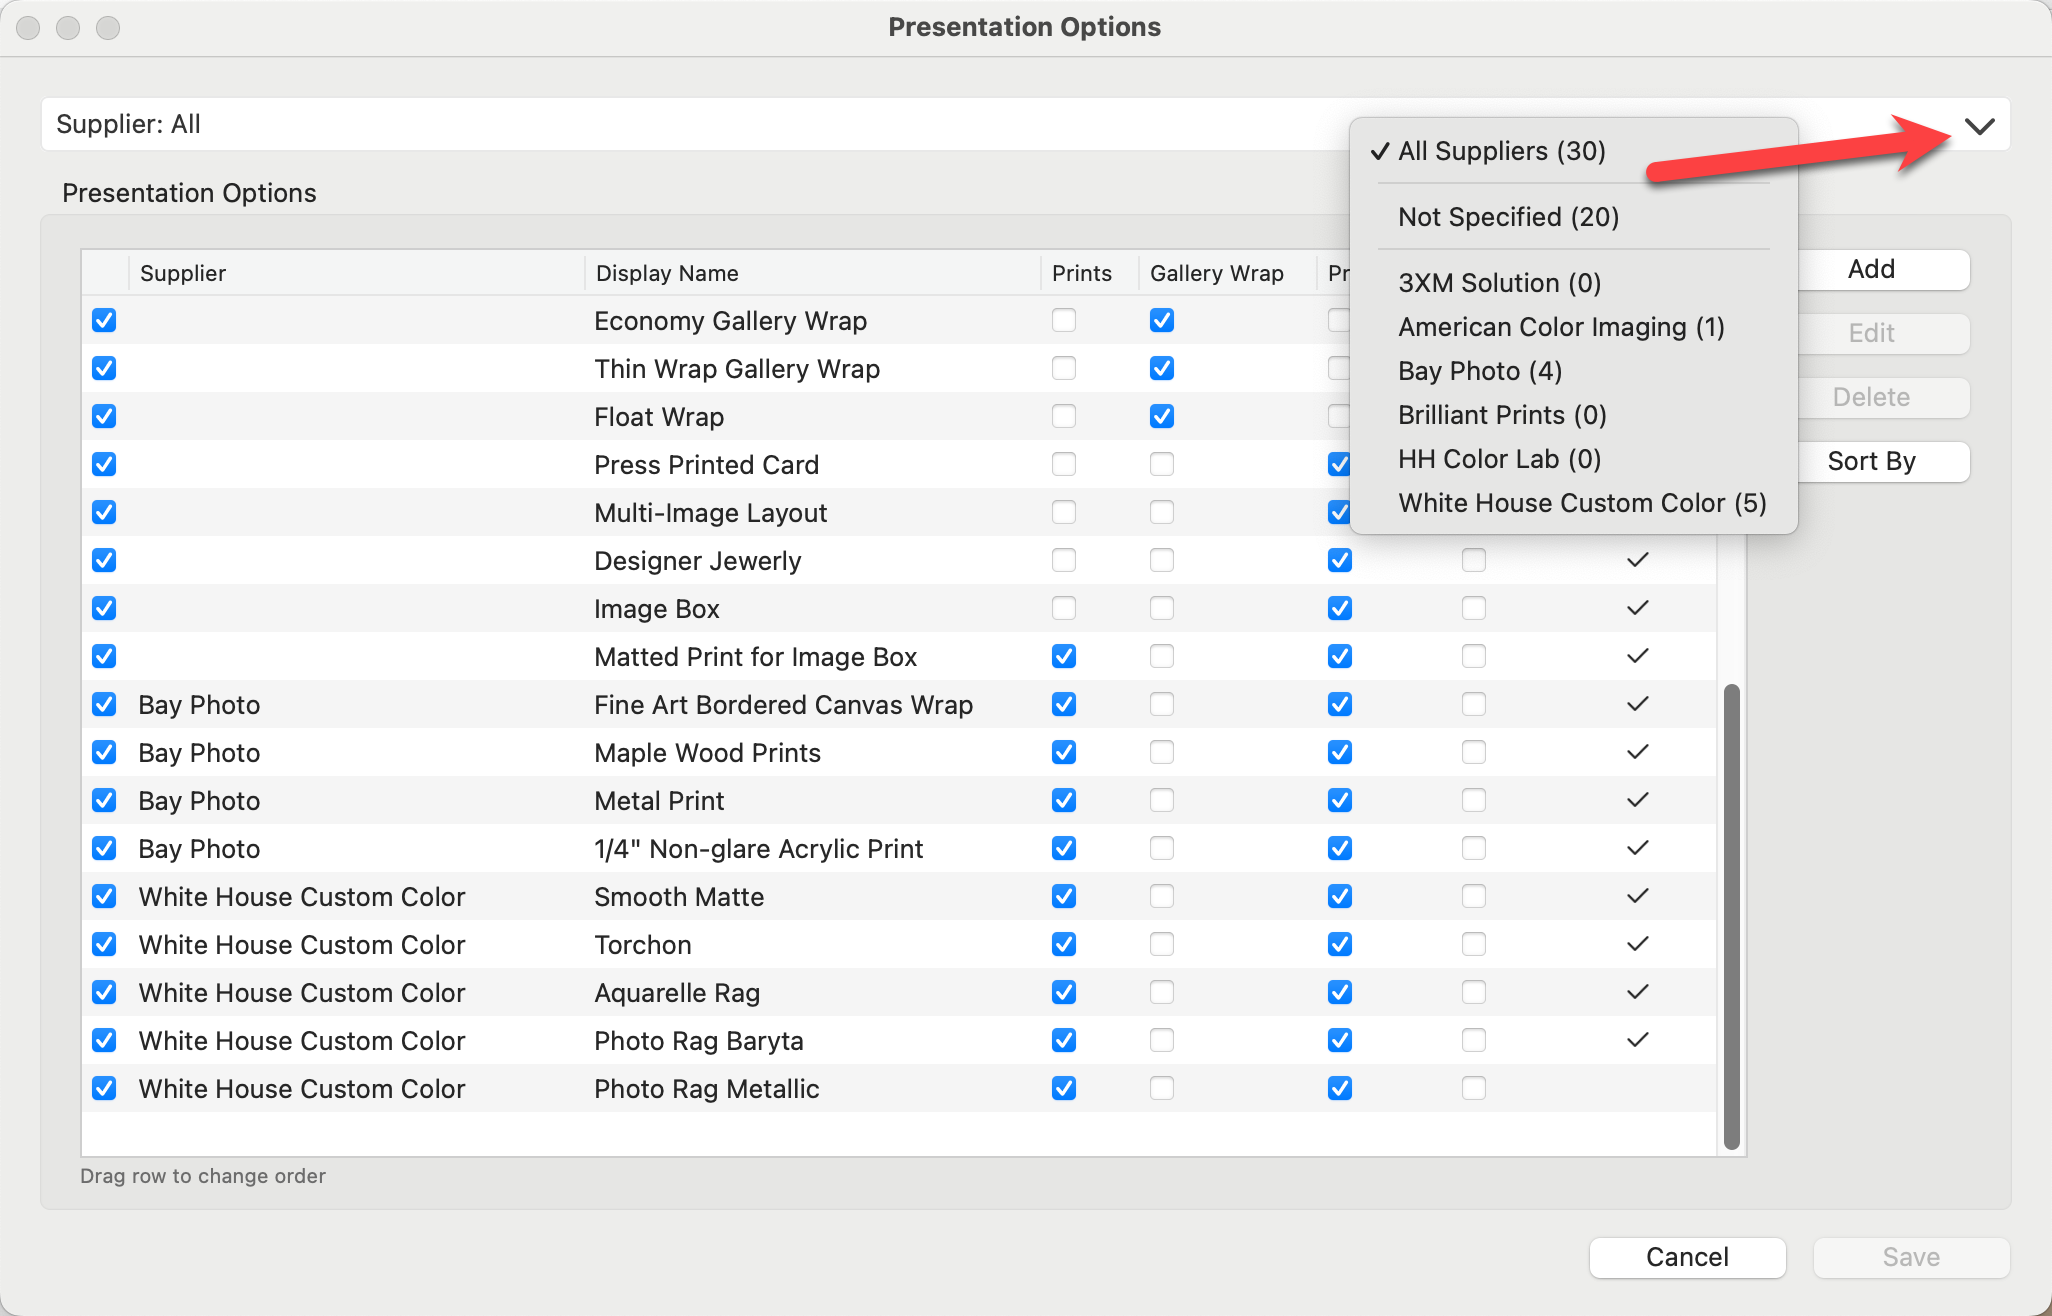
- All Suppliers: By default, all suppliers will be displayed.
- Not Specified: This group includes all Presentation Options created with NO supplier attached.
-
Select a supplier from the list to view the Presentation Options linked to that particular supplier. The Supplier List shown is determined by which suppliers you have "turned on." See Supplier List for more information.
Hiding Supplier Presentation Options
If you do not wish to use certain Presentation Options from a specific supplier, uncheck the box on the far left of the dialog next to the supplier name. This will hide the Presentation Option throughout ProSelect. You can always check the box to turn it back on. To hide all Presentation Options from a specific Supplier, go to the top menu, Products > Suppliers. Uncheck the box next to the supplier you wish to remove. Please note: this will remove ALL references to that particular supplier throughout ProSelect.
When creating Presentation Options, always keep in mind that they are combined with other factors that define the product. Here are some examples of different product types and the Presentation Options they use:
For Prints:
[Image Name] + [Size] + [Presentation Option]
- 1234.jpg 16x20 Metal Print
- 2345.jpg 24x36 Bonded Canvas Print
- 3456.jpg 8x10 Custom Print Matted and Framed
For Gallery Wraps:
[Image Name] + [Face Size] + [Edge Depth] + [Presentation Option]
- 1234.jpg 16x20 1.5" Economy Gallery Wrap
- 2345.jpg 24x36 1.5" Premium Canvas Wrap
- 3456.jpg 8x10 1.5" Gallery Wrap Framed
For Composite products, Advanced Composites, Traditional Matted products, and Advanced Gallery Wraps:
[Product Name] + [Size] + [Presentation Option]
- Square 4-up - Composite 20x20 Multi-image Print
- 9-up Layout 20x20 Custom Print Matted and Framed
Specialty and Reference Products: (Reference Products do not support sizing)
[Product Name] + [Presentation Option]
- HH Irene Necklace Designer Jewelry
- 3XM - Walnut - 11x14 Image Box
- Includes 20 Matted Prints
Wall Groupings:
Wall Groupings are shown like Prints, listing the individual print items.
Using Presentation Options to Build Orders in ProSelect
When you create a new ProSelect album or add images to one, your default Starting Product—consisting of a specific presentation option and size—is automatically applied to these images. You can modify this setting at any time after importing the images.
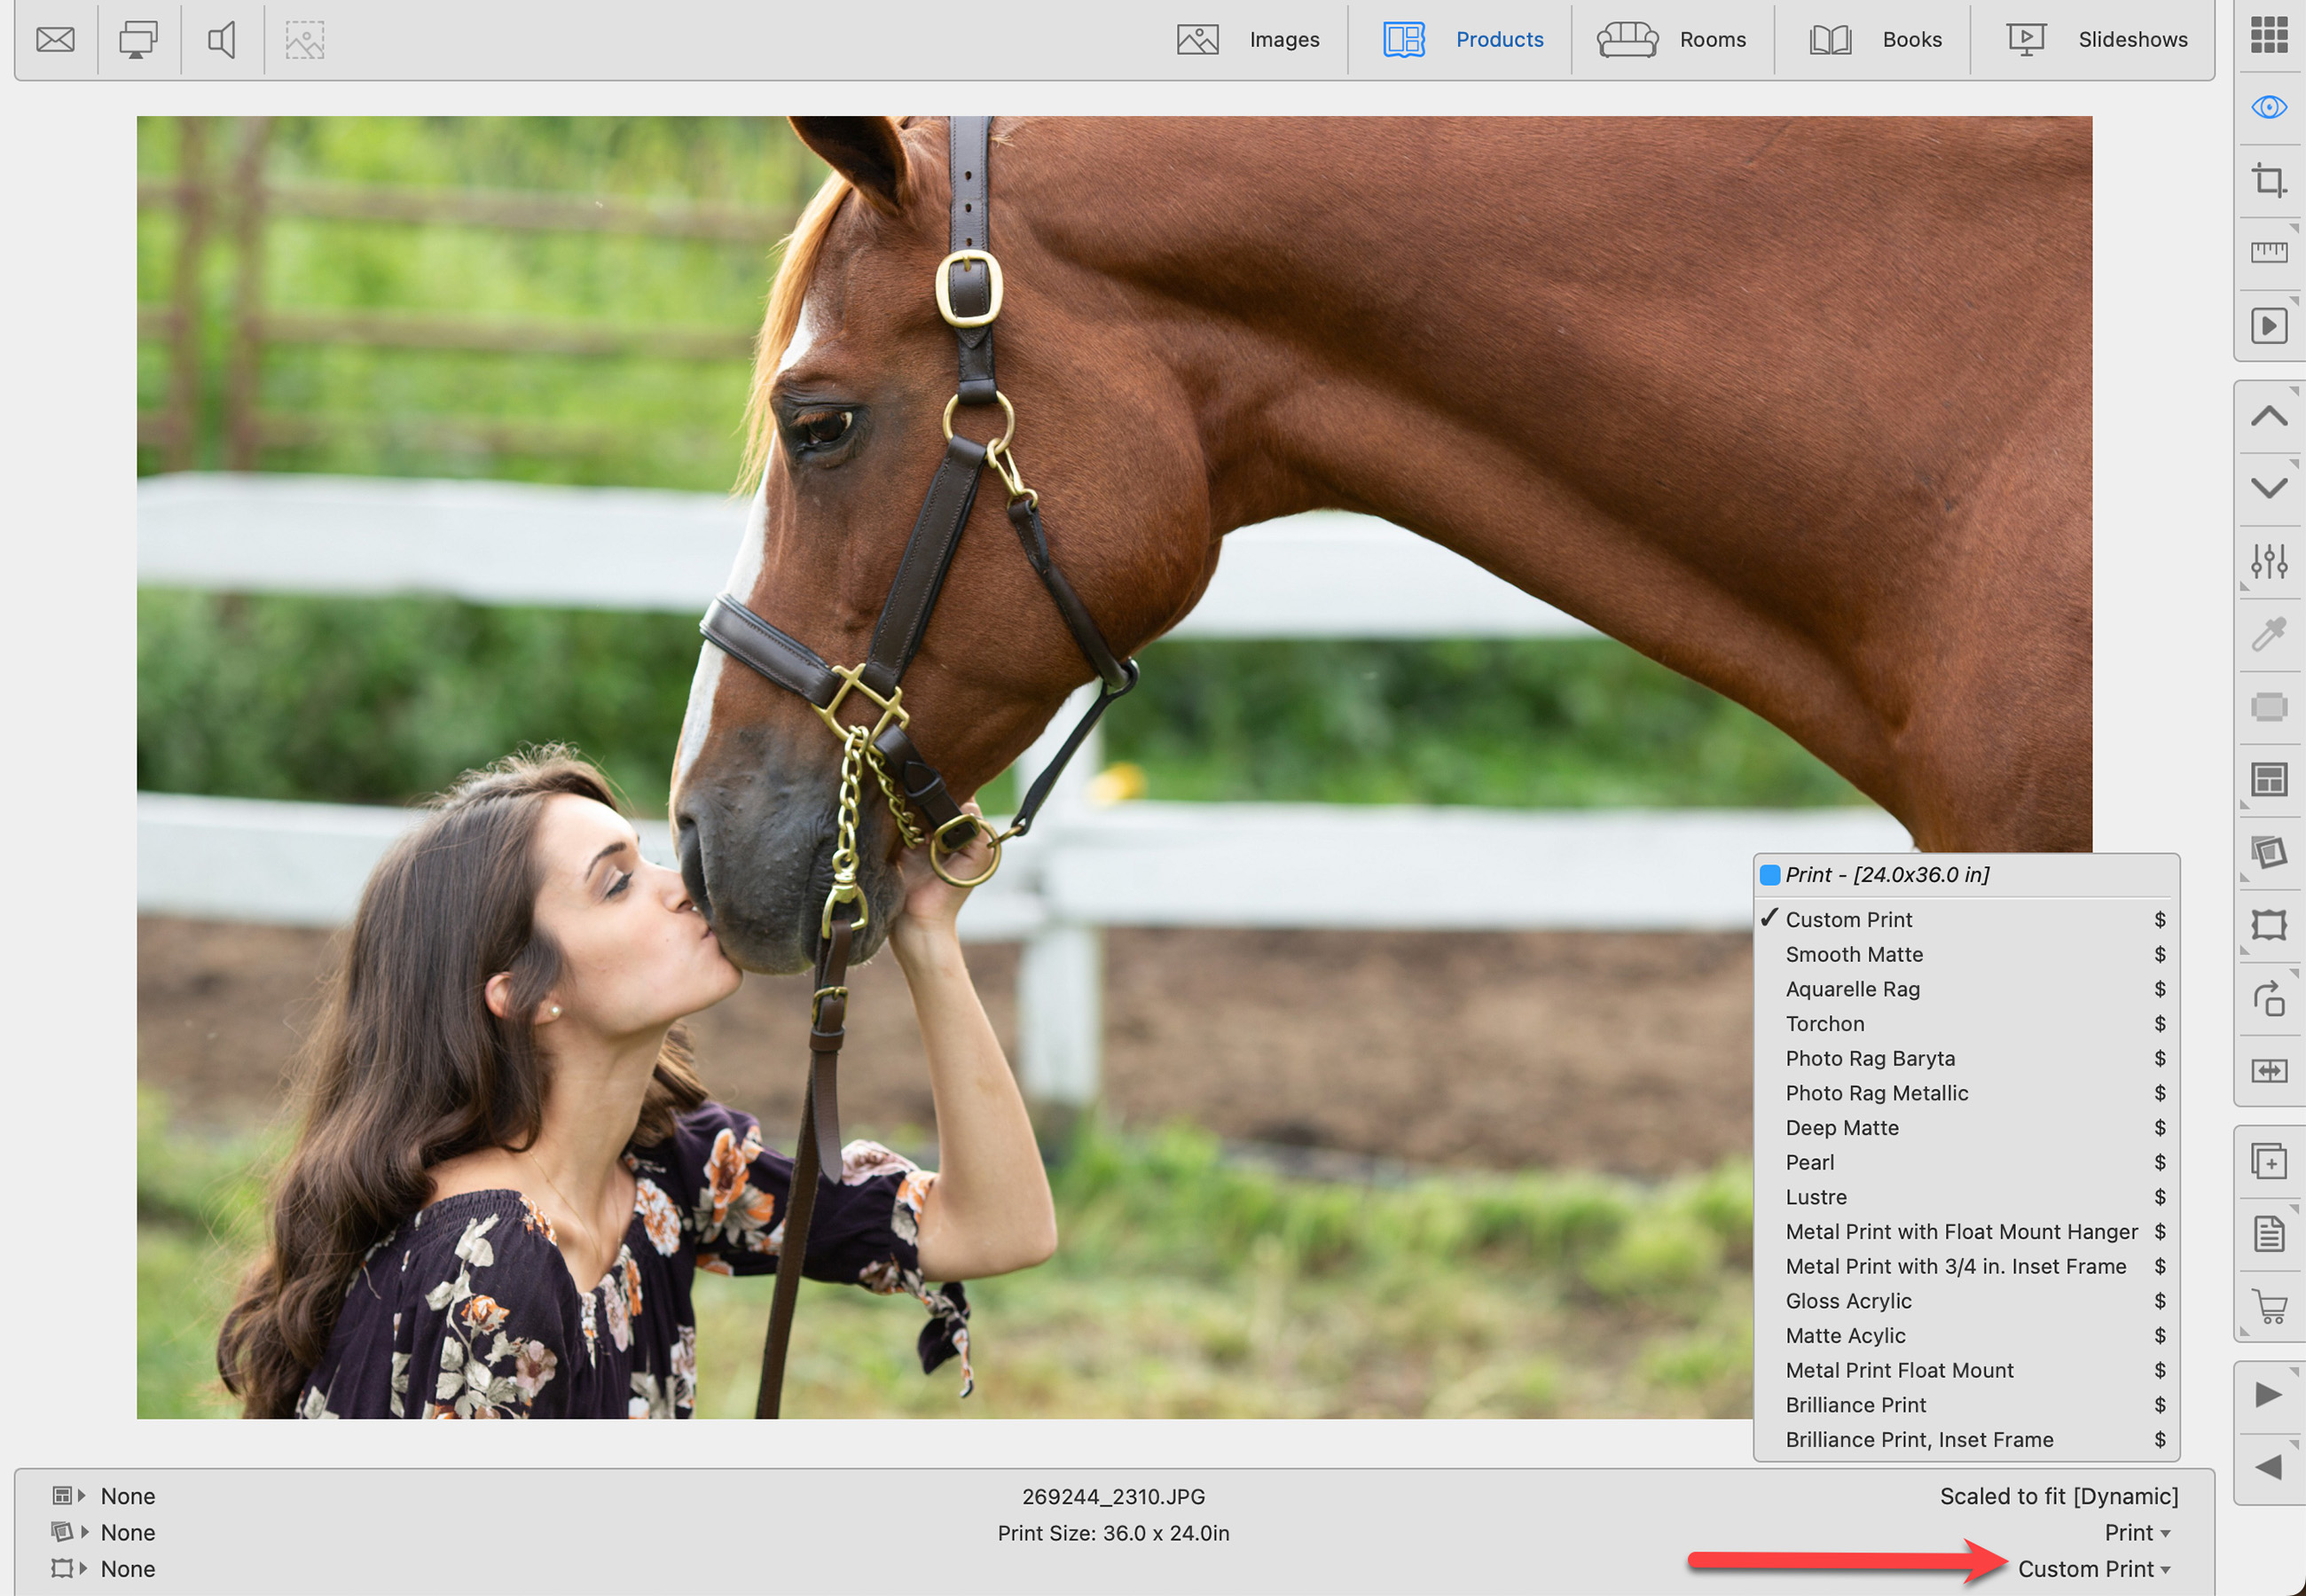
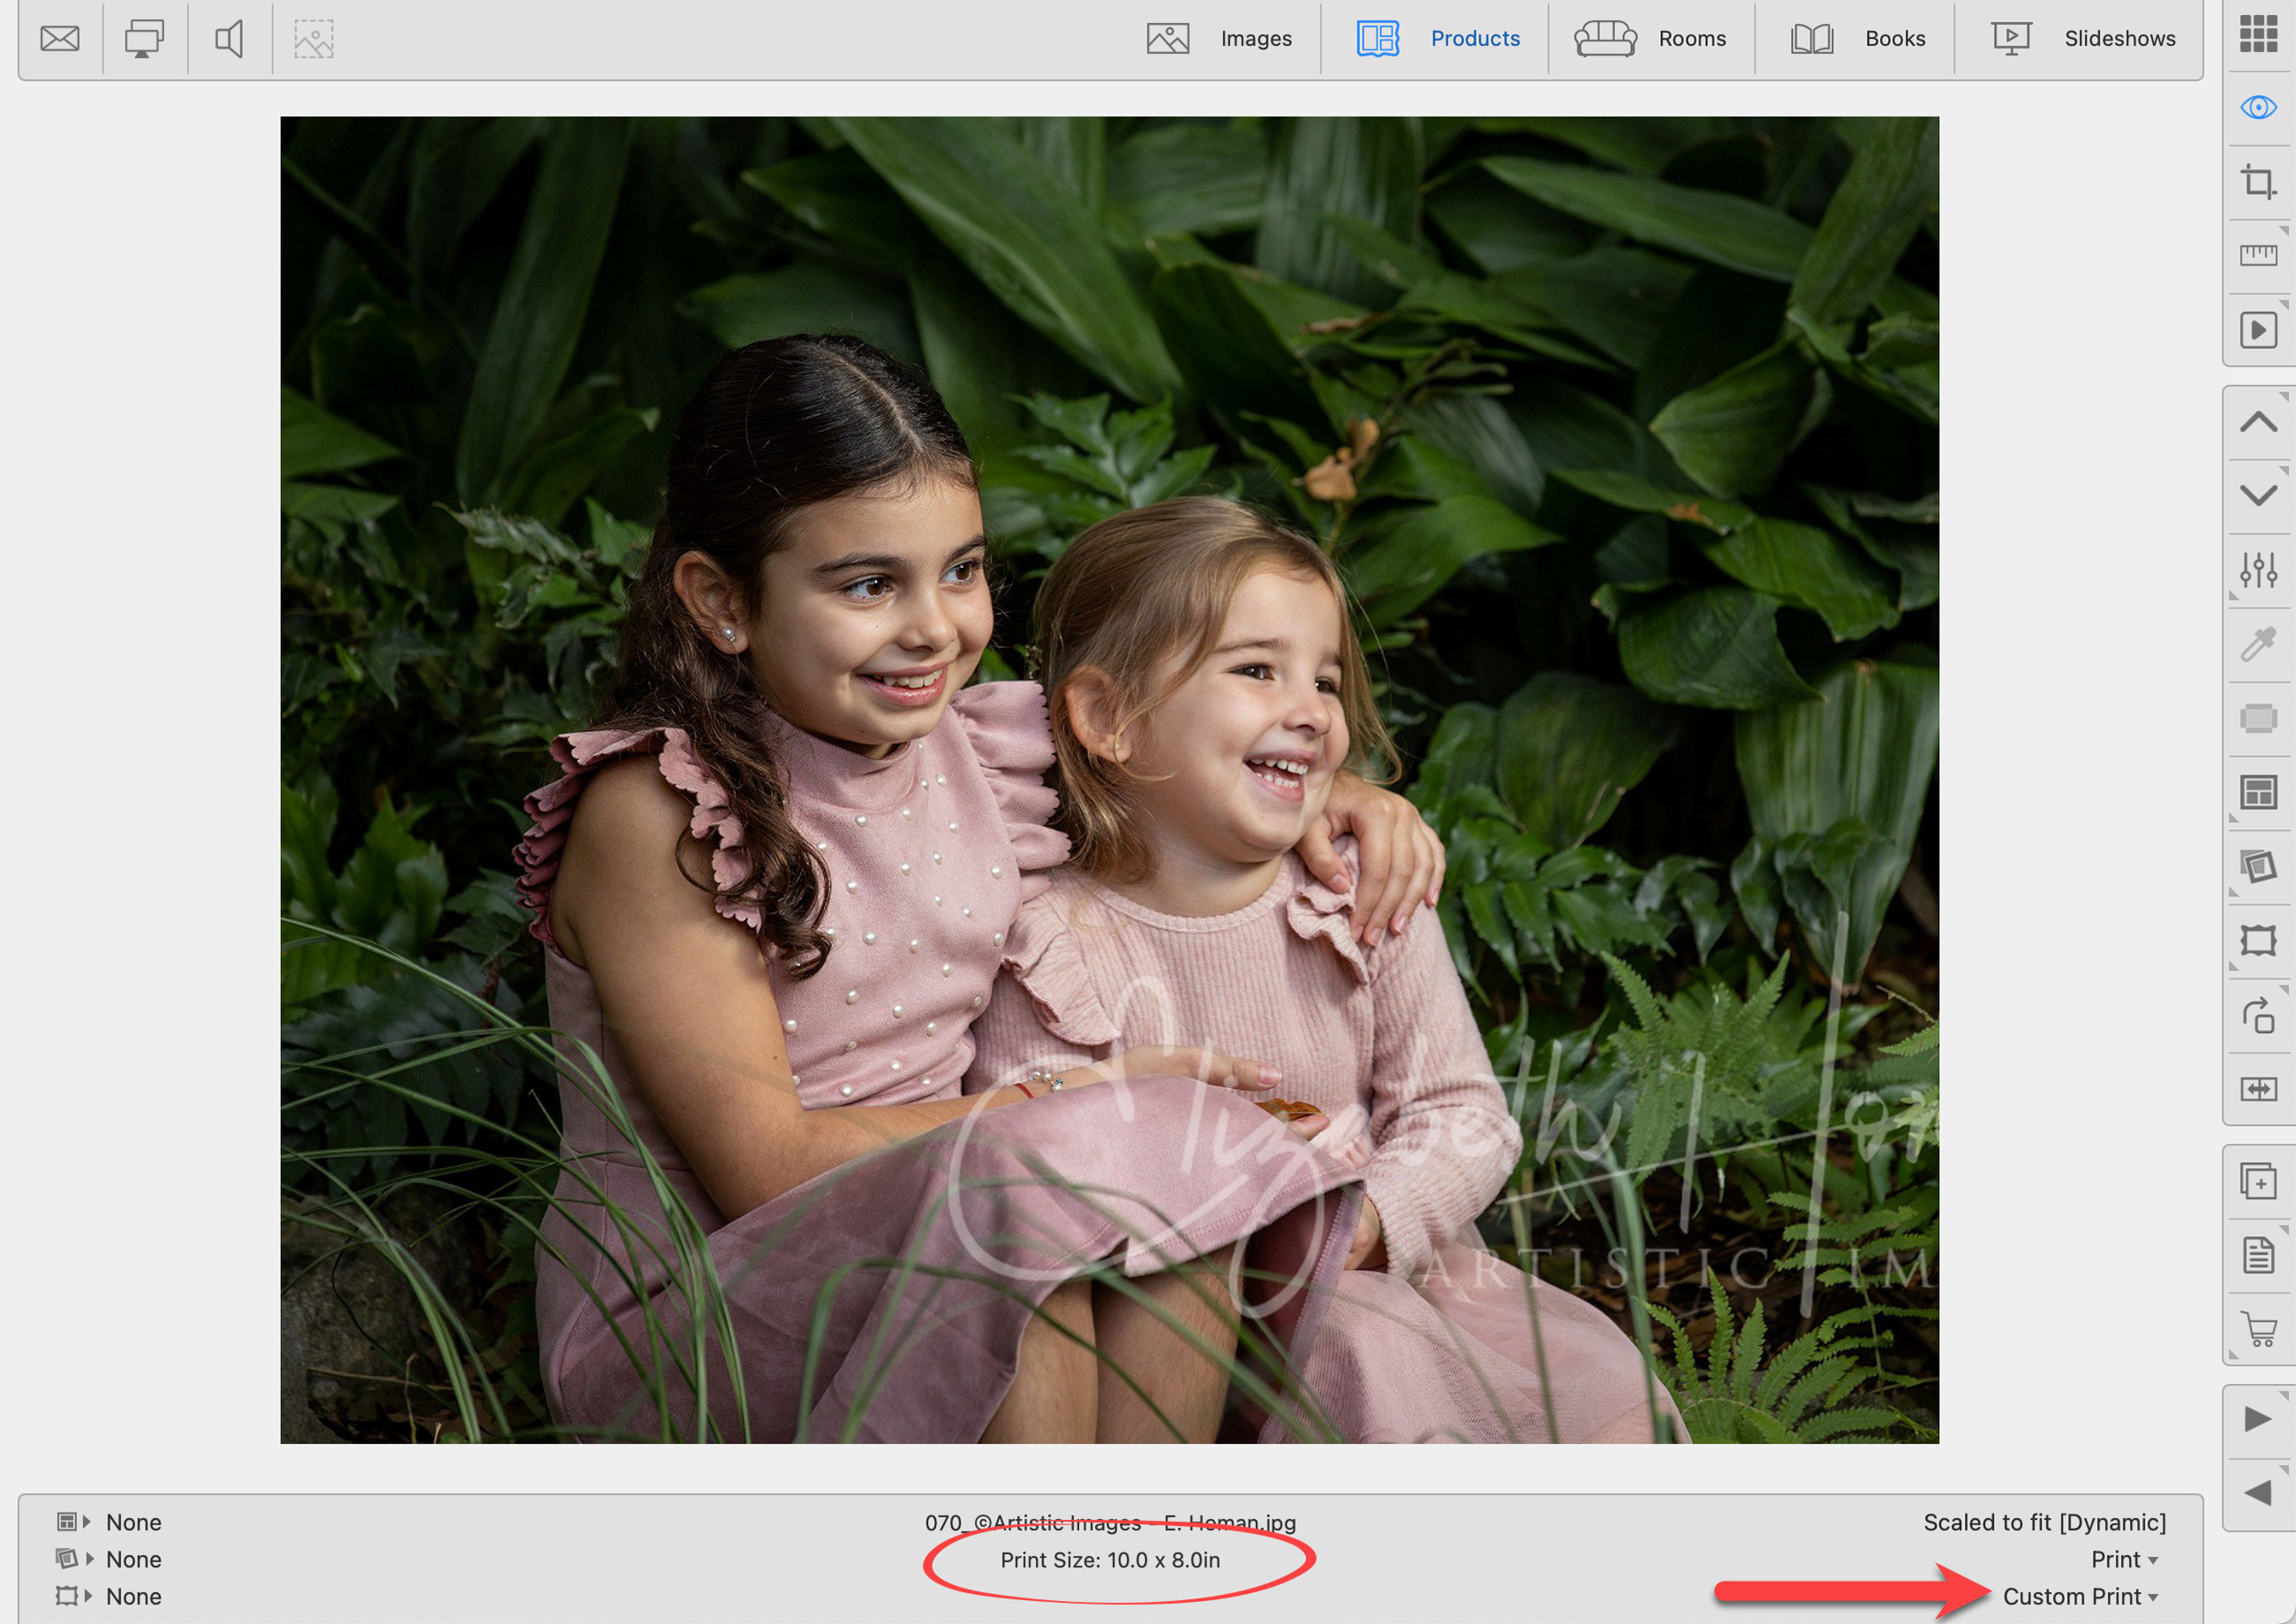
When an image is selected, the currently assigned presentation option is displayed on the bottom right of the info bar. Click on the drop-down arrow next to the presentation option to reveal a list of all other presentation options available.
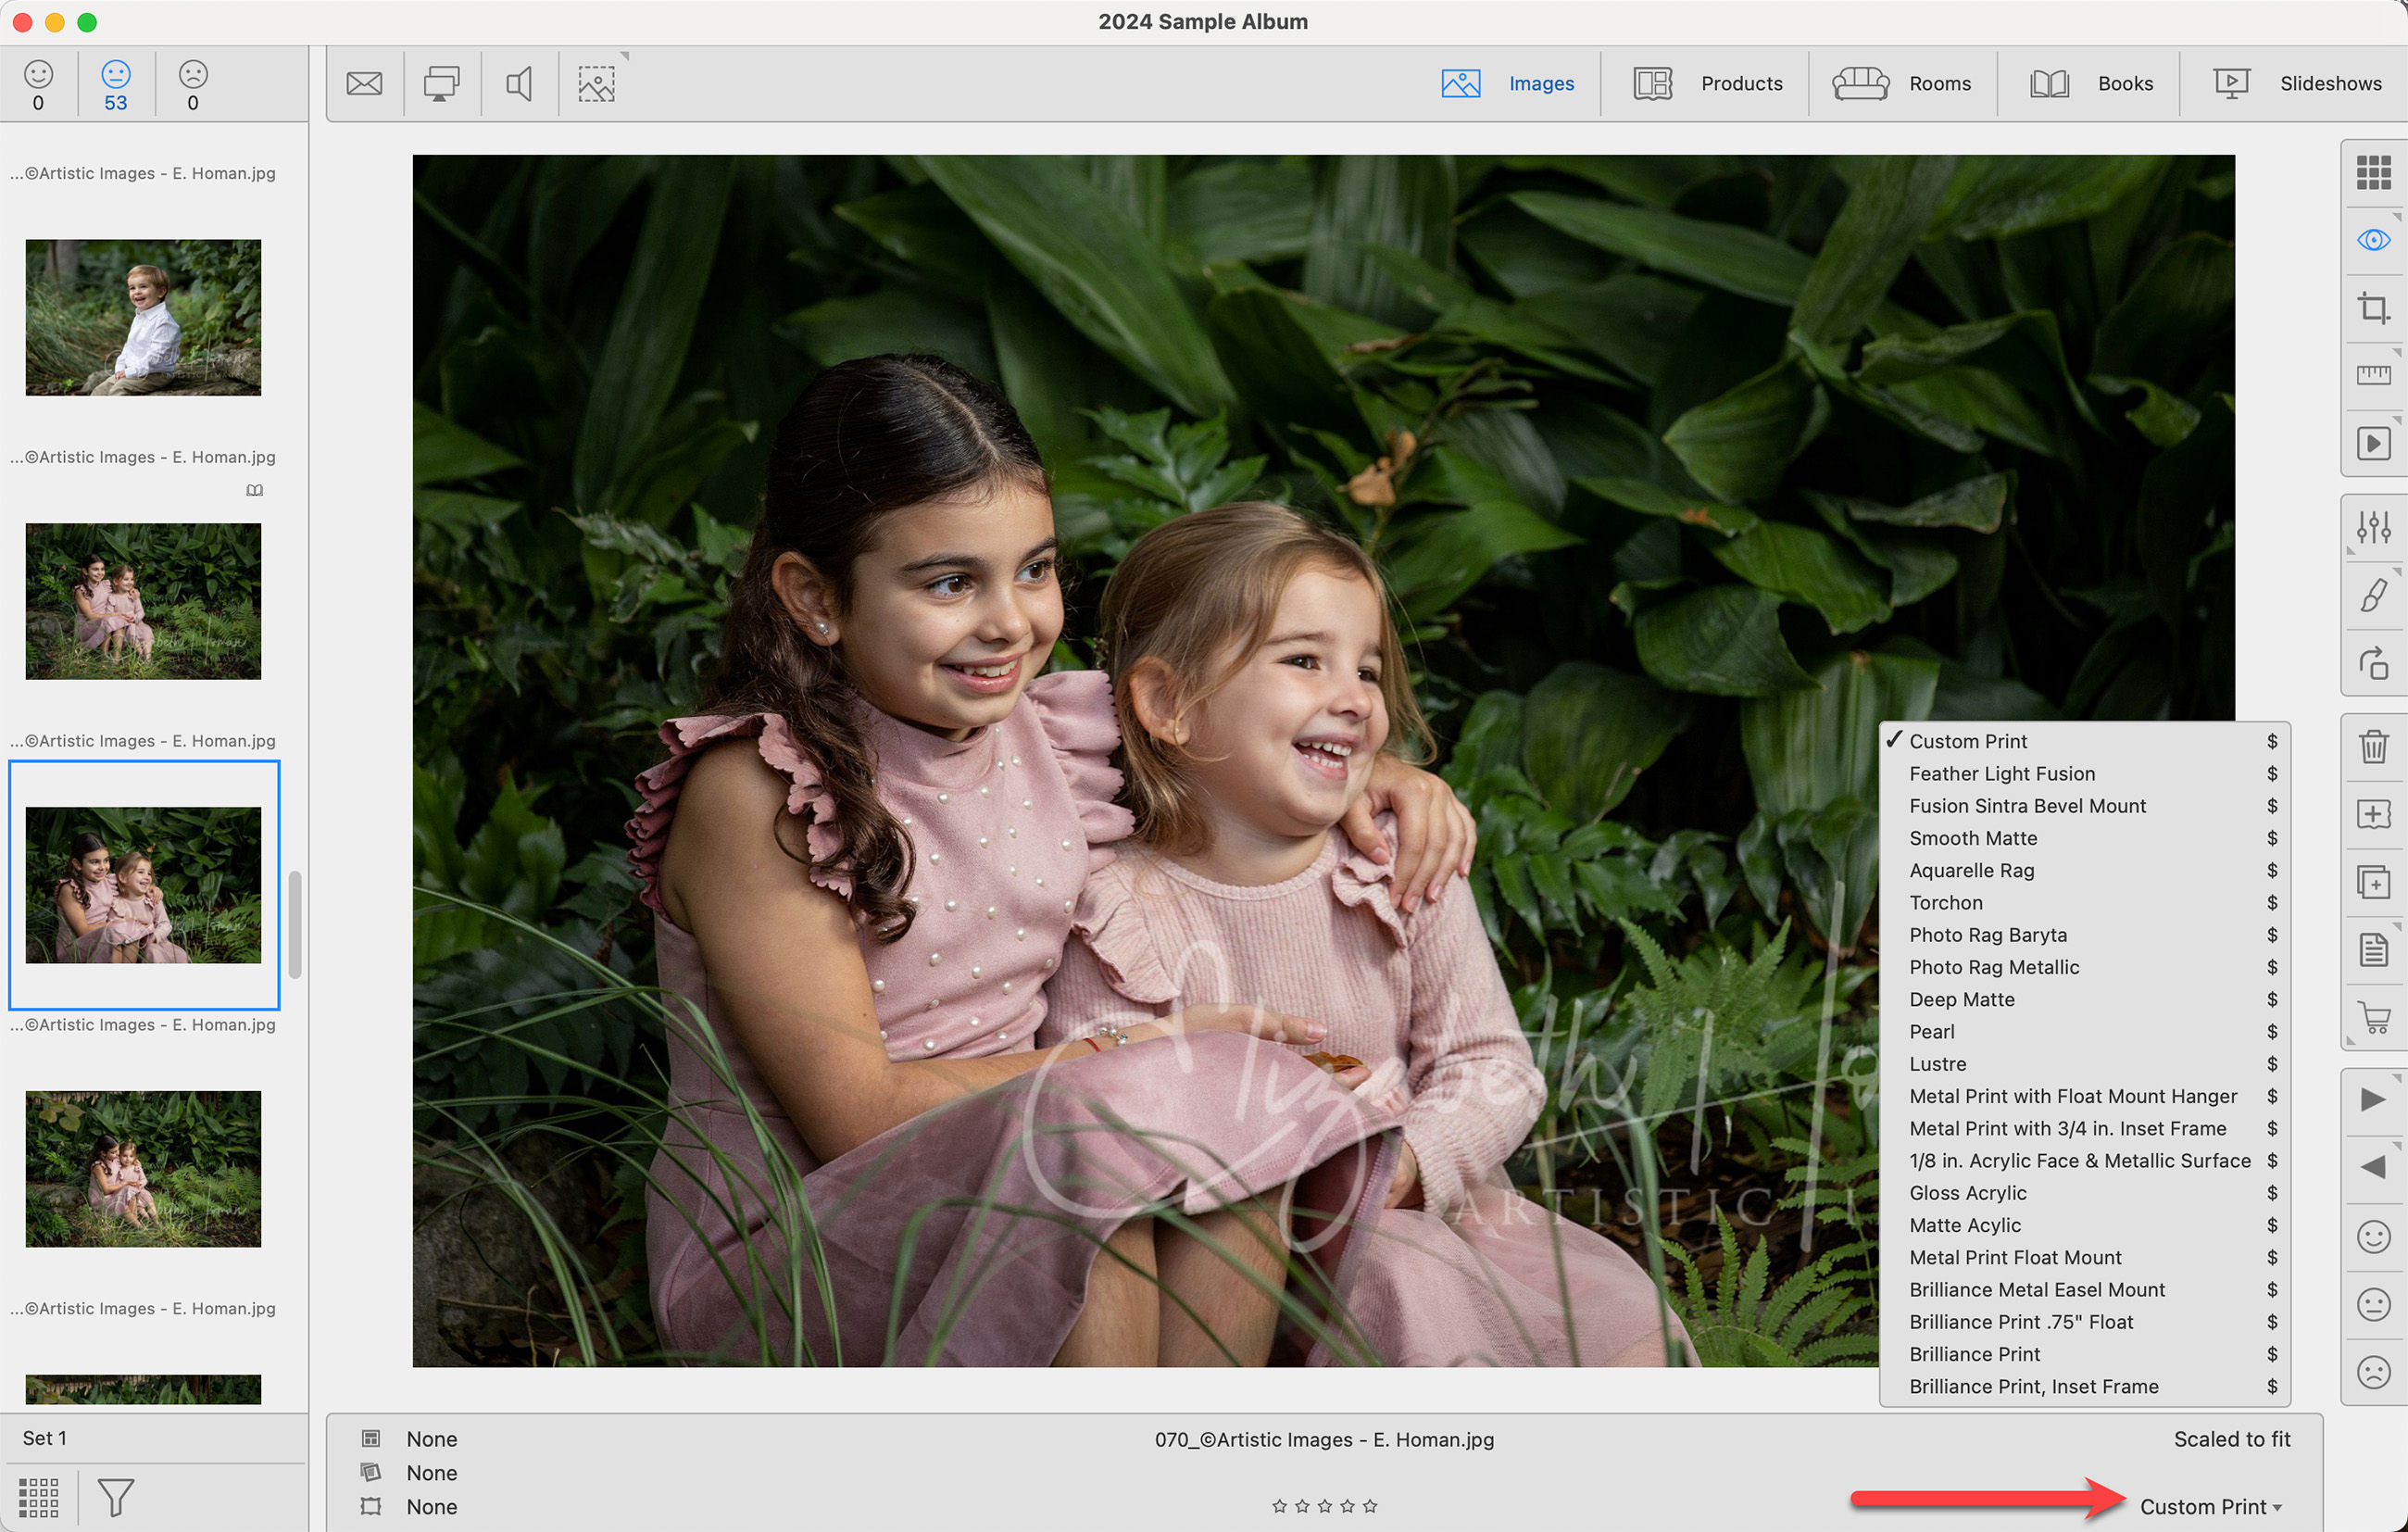
- This image was assigned "custom print" when it was first imported. This is based on our starting product.
- If we want to change this, simply click on the drop-down arrow next to "custom print" and select a different presentation option.
- Only the presentation options assigned to your "prints" will appear in this list. This is done in an effort to reduce the list size and only show relevant print options. To reveal a complete list of every presentation option you have set up, hold the OptionAlt key while clicking the drop-down arrow.
- When working with other types of products such as Gallery Wraps or Composites, only presentation options relevant to those products will be listed.
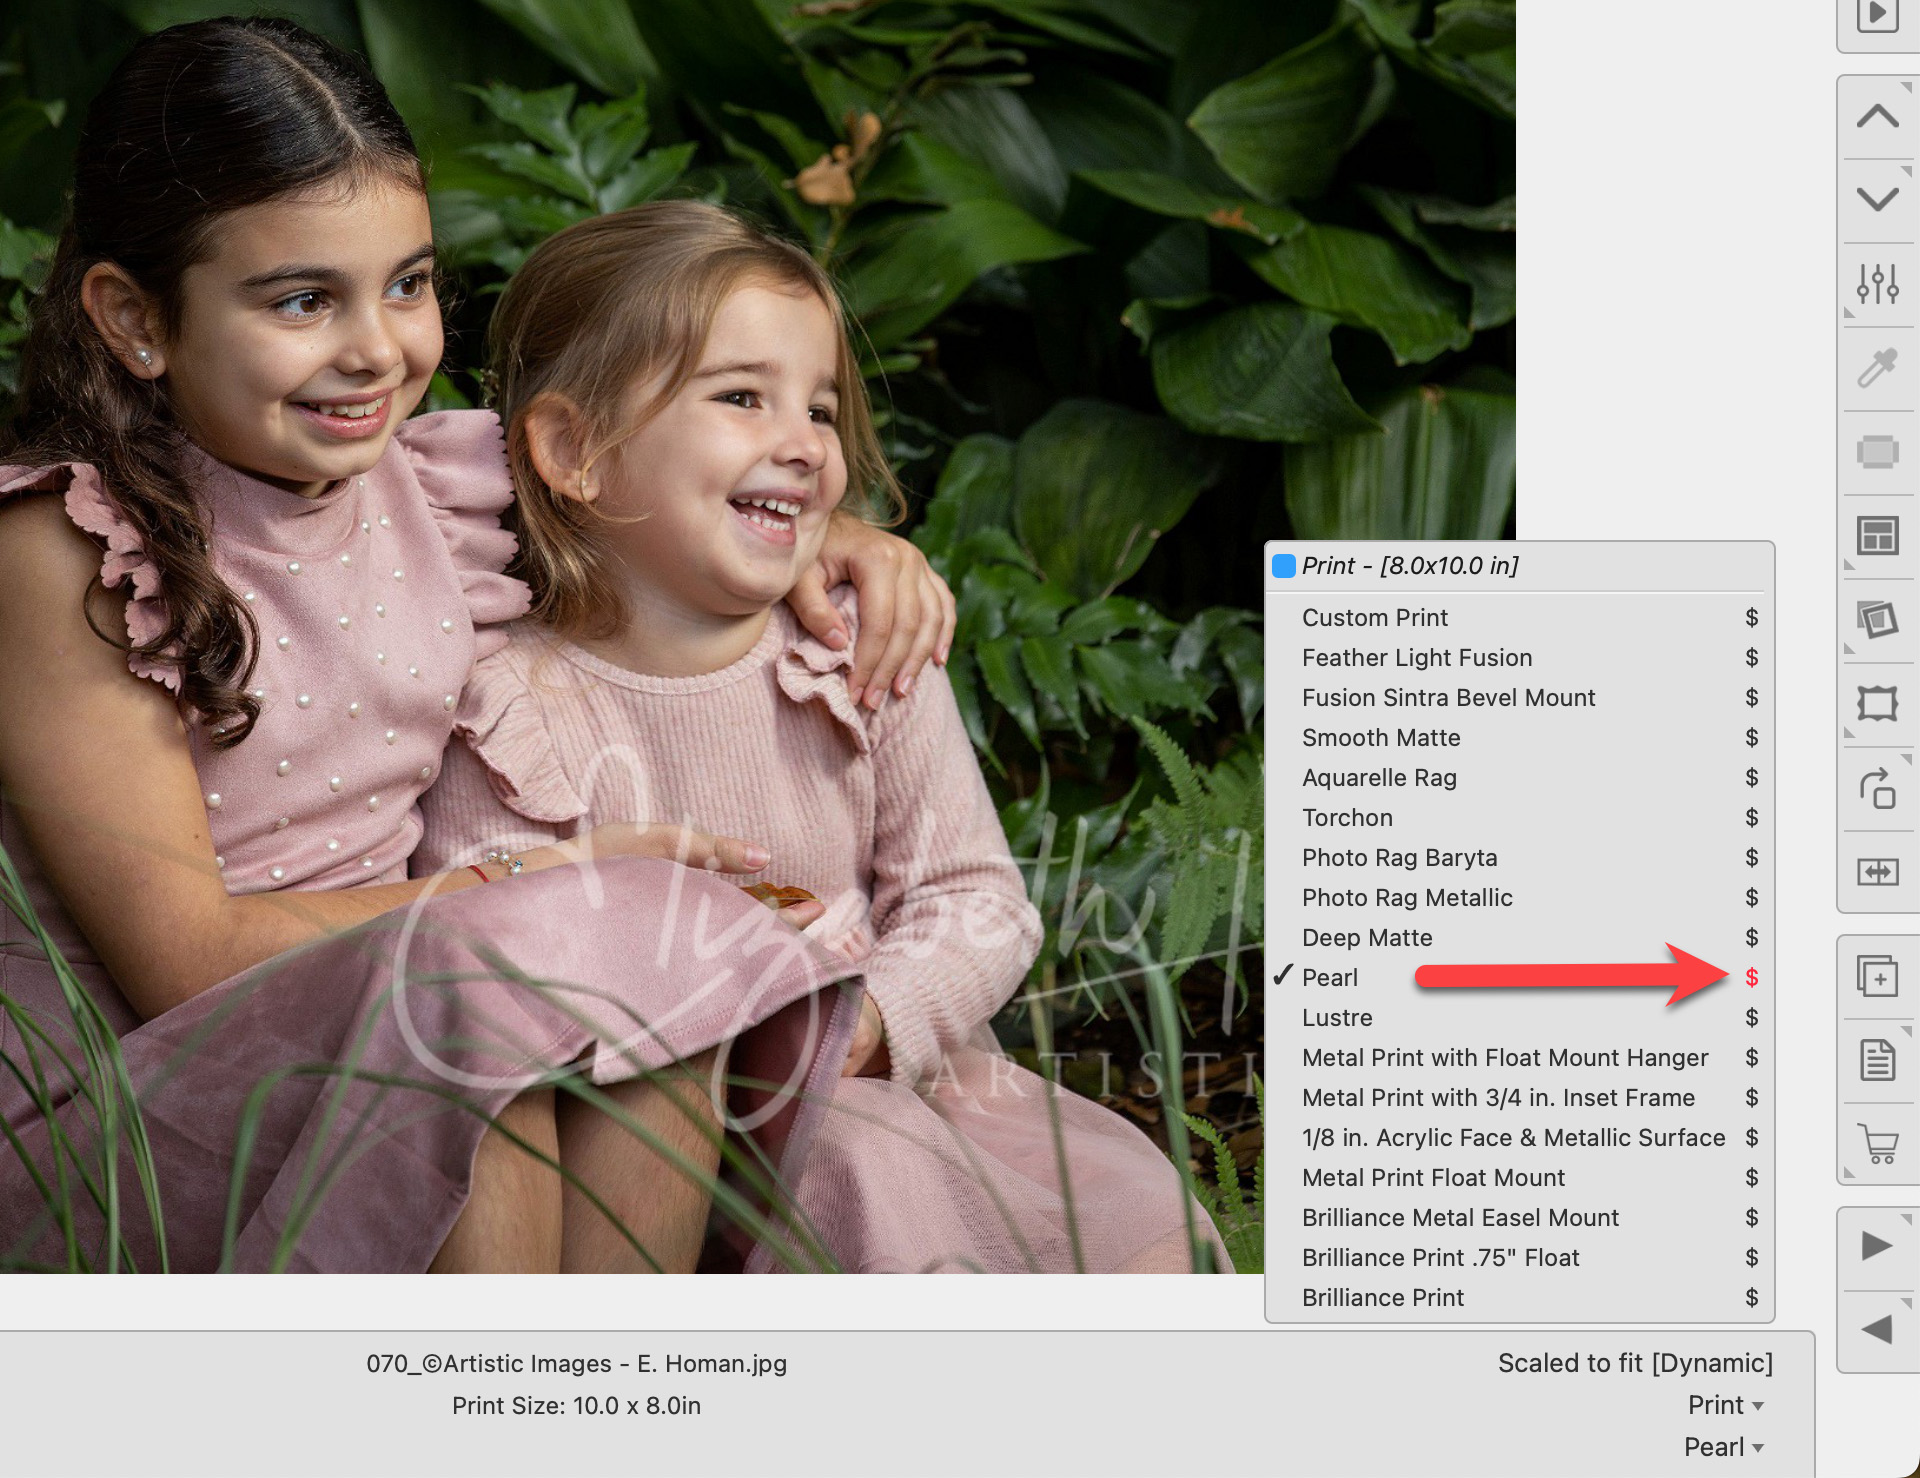
- The $ next to the presentation option indicates price list items have been set up using this option.
The presentation options listed in the menu are determined by the configurations set in the Product & Pricing Manager. This setup dictates which presentation options are offered, when they are available, and if they are priced.
Show Available, Priced Presentation Options
To see the available options, click the drop-down arrow next to the currently assigned presentation option. All of these options are available and priced for this product at the currently selected size.
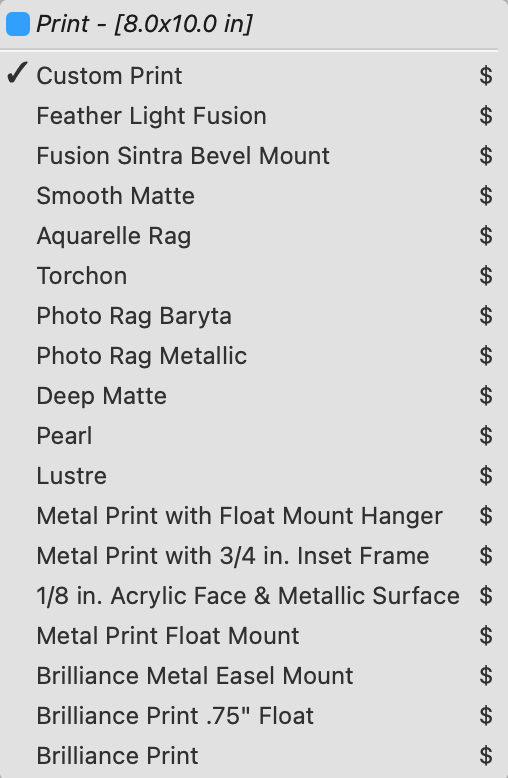
Reveal ALL Presentation Options
When you optionalt click on the drop-down arrow next to the presentation option, you will get the complete list of presentation options. The list is considerably longer, as it includes all presentation options, regardless of availability, with "prints" enabled.
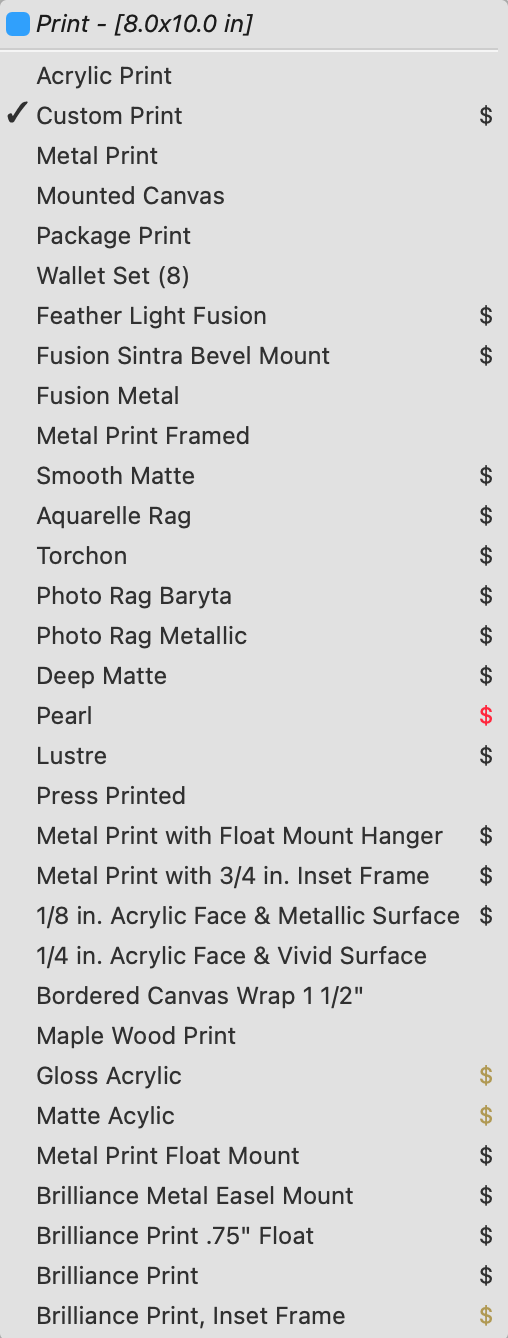
- $ Black/Gray: The presentation option is available for this product, and priced at the currently selected size.
- $ Amber: The presentation option is available for this product, but NOT at the currently selected size. Select an alternate size to use this option.
- $ Red: The presentation option is available for this product, but it is priced at 0.00. Return to the Product & Pricing Manager to price this option.
- No $: The presentation option has been created, but no products are attached to it.
Working with Products functions similarly to Working with Images. Once you create a print product, it includes a specific size and presentation option. The chosen presentation option appears in the bottom-right corner of the info bar, while the print size is displayed in the middle.
- Once a size is assigned to a product, only the presentation options available in that size will appear in the drop-down list.
- For instance, metal prints may not be available in all sizes offered for custom prints.
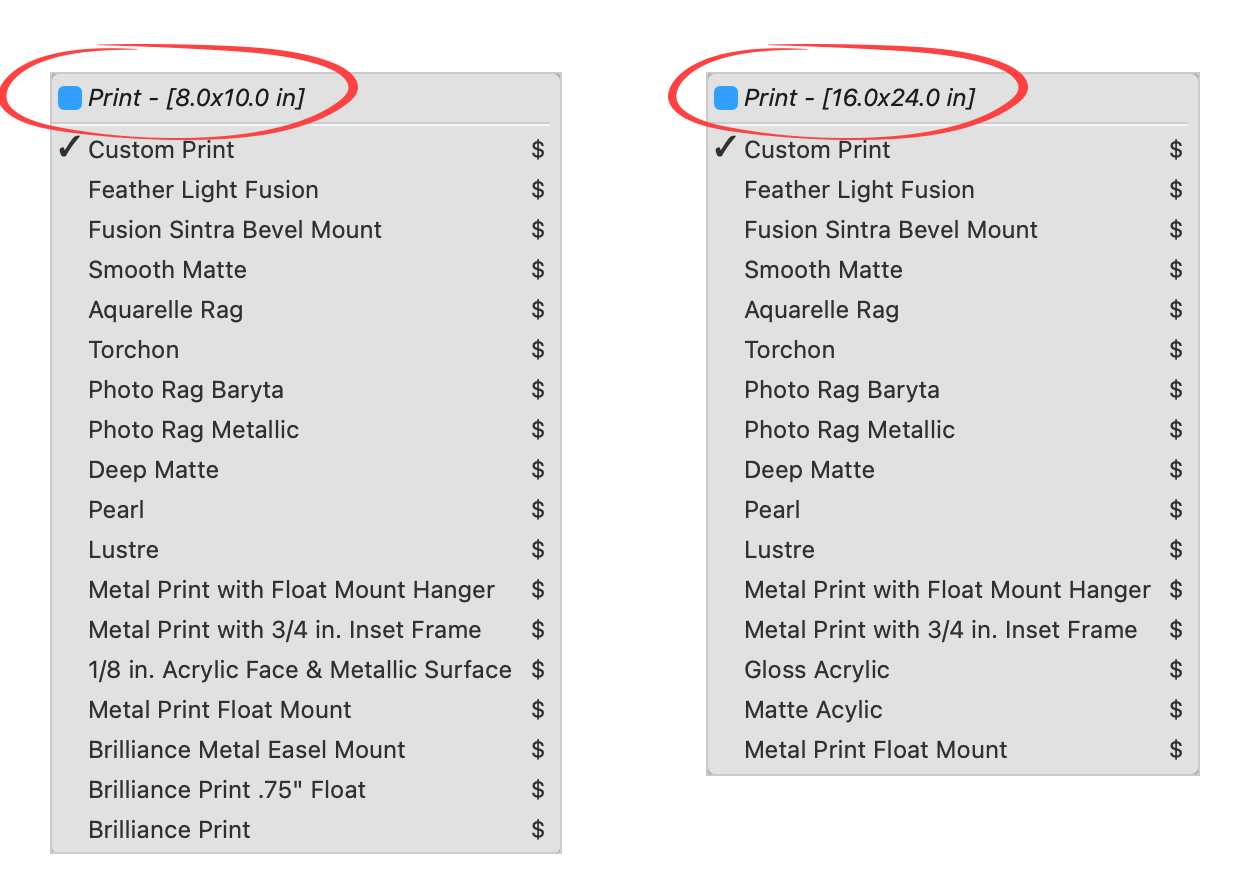
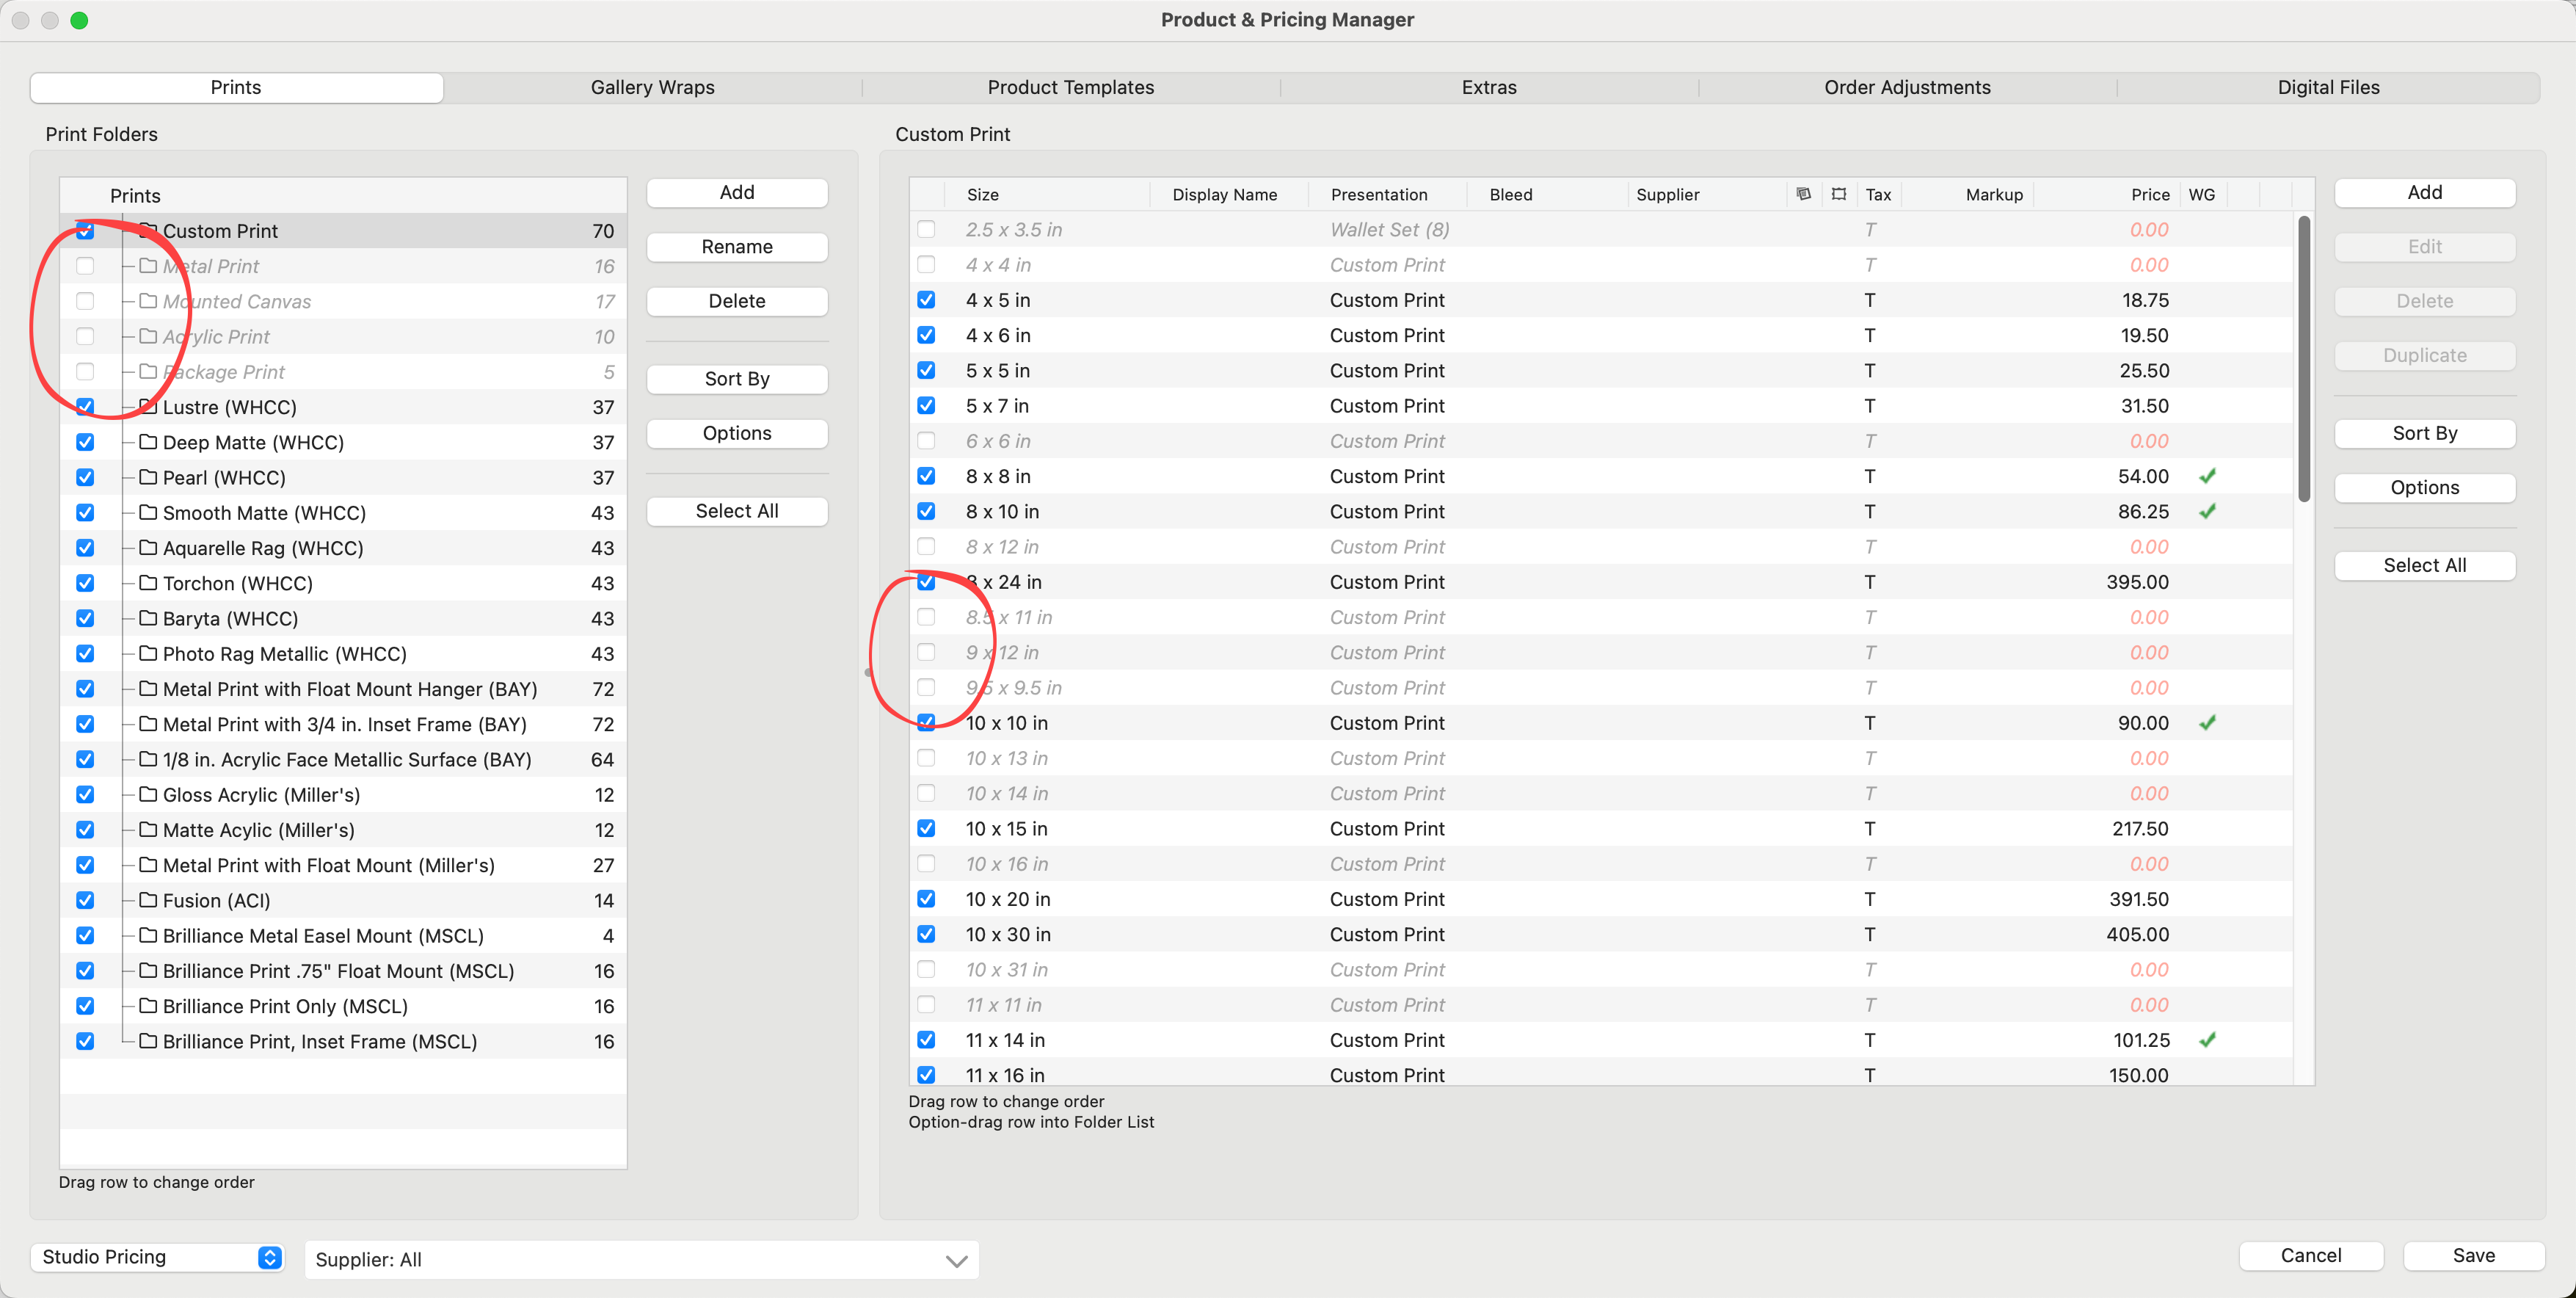
Comparing Print Sizes
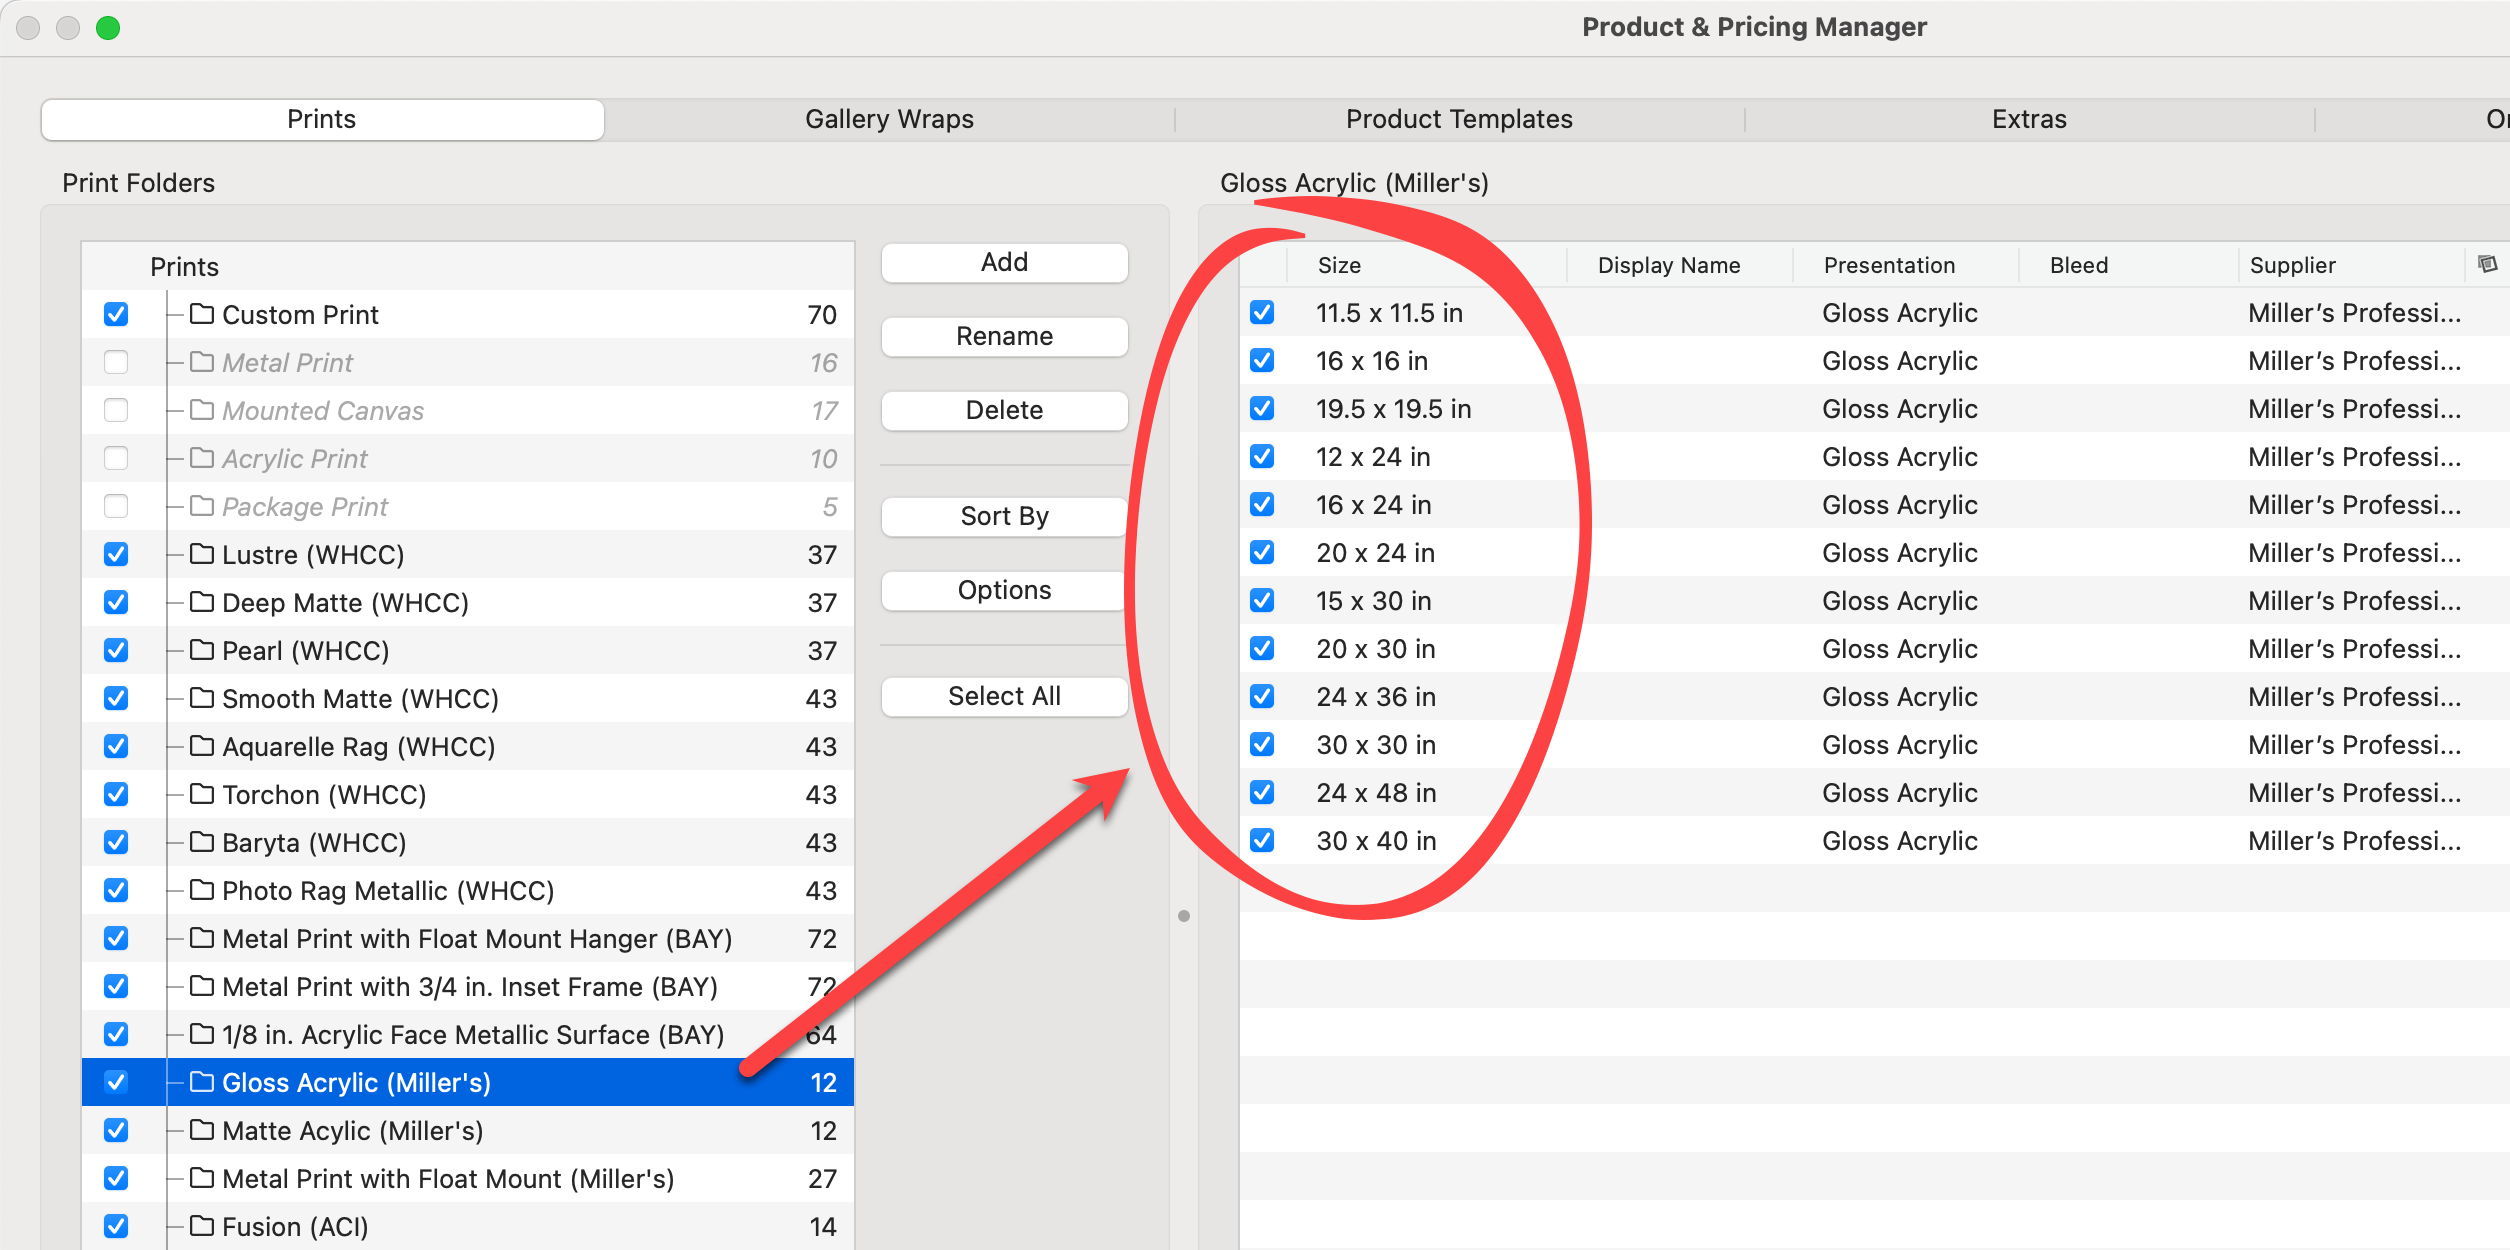
The presentation options available are determined by the size assigned to the print. This ensures that you do not inadvertently offer a print option that cannot be produced by a supplier. i.e. "Gloss Acrylic" is not listed as an 8x10 print option, this is because it is not producible by the Supplier.
When Working with Rooms, the chosen presentation option as well as the associated price appears in the bottom-right corner of the info bar. The product size is displayed in the middle. When changing the presentation option, the total price will update as well.
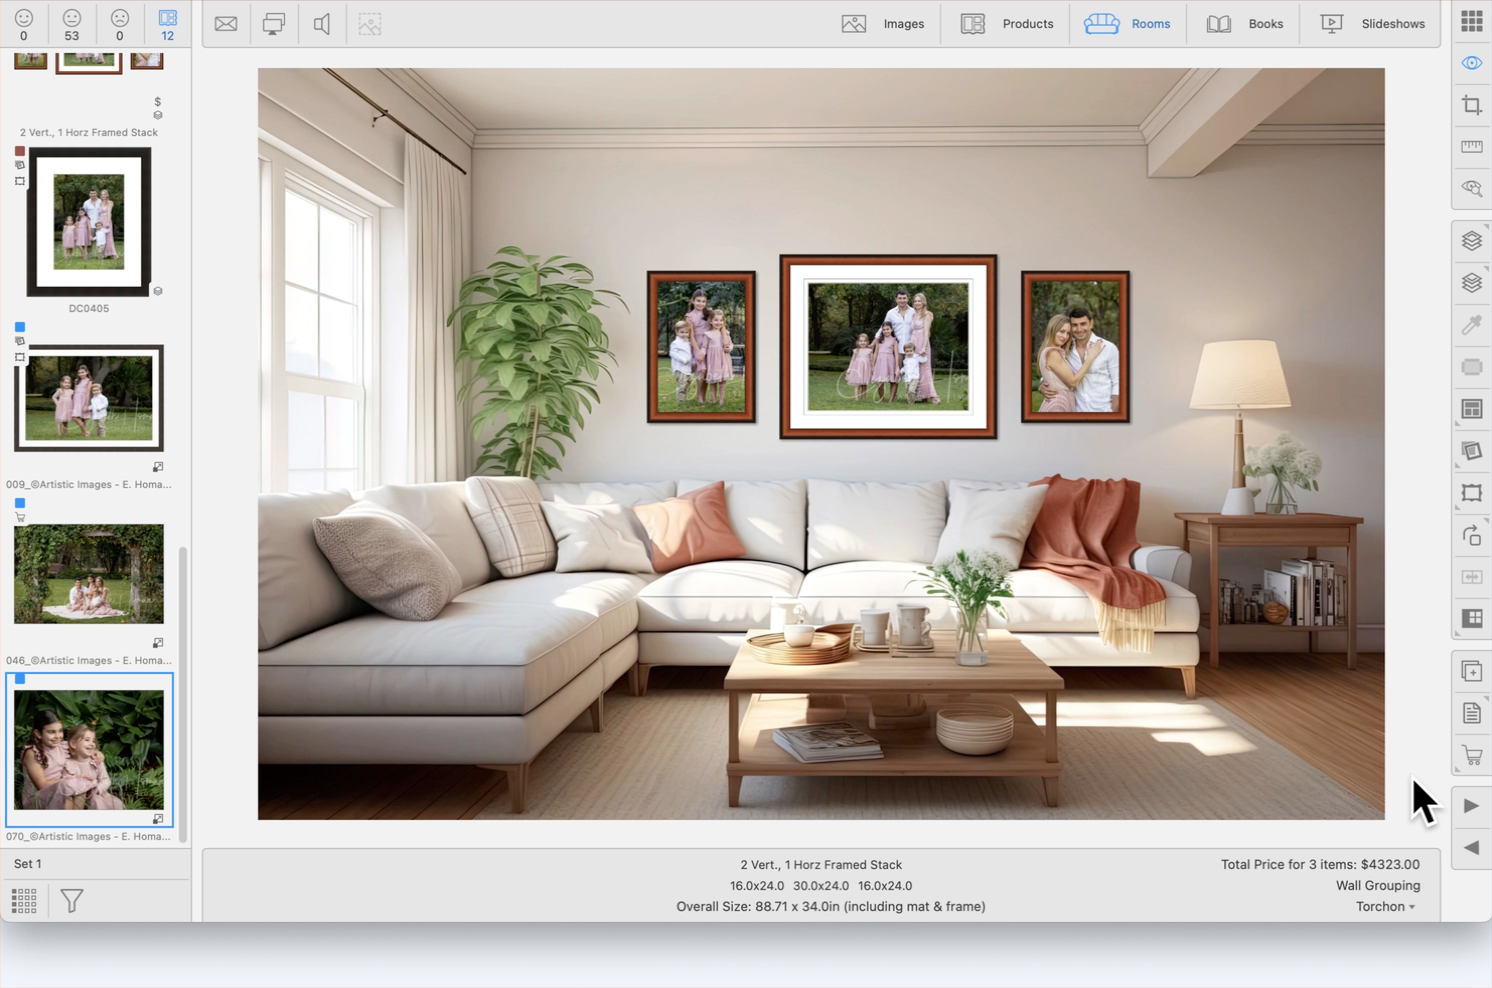
If the Presentation Option you want to apply to a product in a room isn't listed or the options appear empty, several factors could be at play. This might occur if the incorrect price list has been selected, the specific presentation option is not available for the chosen size of the product, or the desired presentation option has not been properly configured or enabled for that particular product type.
1: The Selected Size is Not Available
Only sizes set up in the Product & Pricing Manager will appear in the ProSelect main interface. It is possible you have selected a paper size which is not available in the desired Presentation Option.
- Hold down the OptionAlt key and click on the presentation option currently assigned (on the bottom right-hand side of the info bar).
- All presentation options will be revealed. Select the desired Presentation Option.
- Now use the up and down arrow keys or the toolbar to select a producible size.
- See the page Understanding the Presentation Options Menu List for more information.
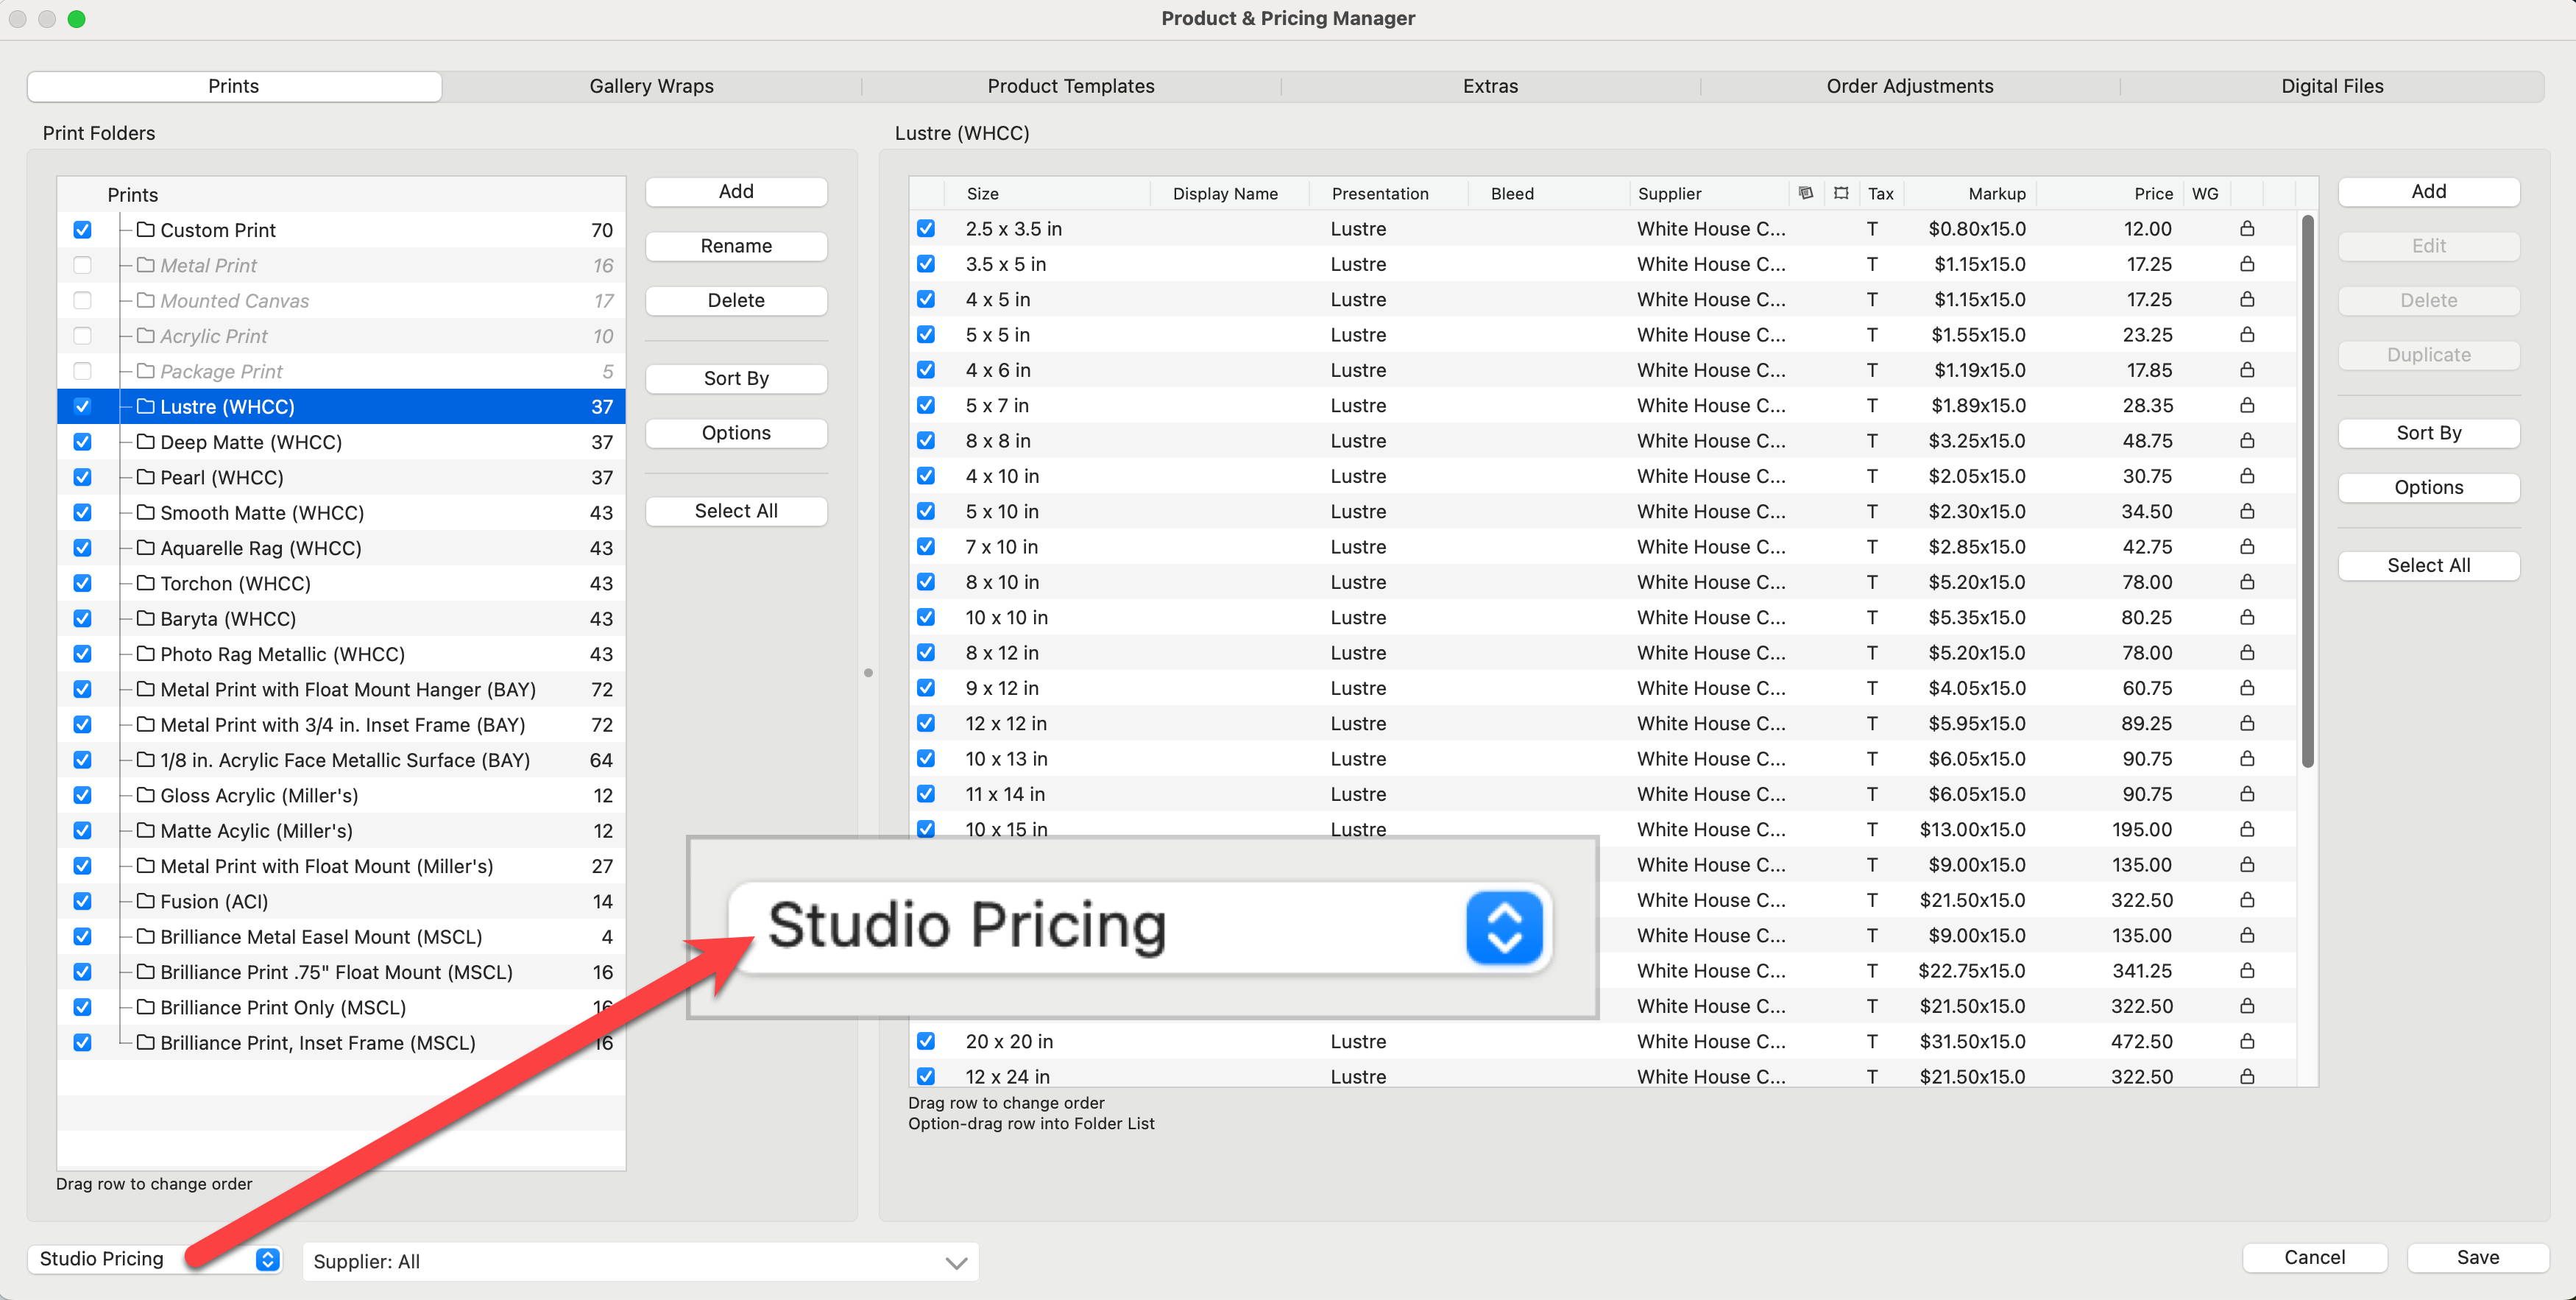
2: Check Your Price List
Make sure you are using the correct price list. You may be using a price list in which that particular option has not been set up.
- On the top menu, go to Orders > Select Price List.
- Alternatively, you can click on the Order Product tool
 and choose your price list from there.
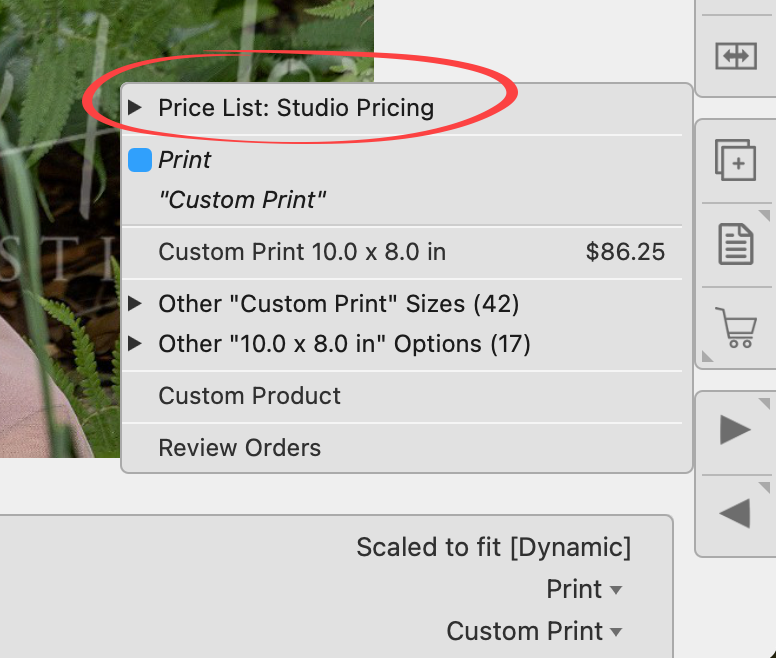
- The price list you have selected to use when building orders in Pro Select directly reflects what you set up in the Product & Pricing Manager.
3: Ensure the Presentation Option is Enabled
Presentation options need to be "turned on" for the specific product type. If you are selecting a presentation option for a print, you must check the boxes under the "print" column in the Presentation Options dialog.
- On the top menu, go to Products > Presentation Options.
- Use the checkboxes to enable the presentation options.
4: Ensure the Product is Enabled
Products can also be "turned on or off." Make sure the boxes are checked in the Product & Pricing Manager if you want to offer a specific product and have it appear in the main interface. If a line item is grayed out, it will not appear on the main interface.
- On the top menu, go to Products > Product & Pricing Manager.
- Ensure the checkbox of your particular product is checked (turned on).
If the dollar sign ($) next to a presentation option appears in red, it means that the option is available for the product but is priced at $0.00. You can still choose and order this option; the red text simply serves as a warning about the zero pricing. See the page Understanding the Presentation Options Menu List for more information.
Solution
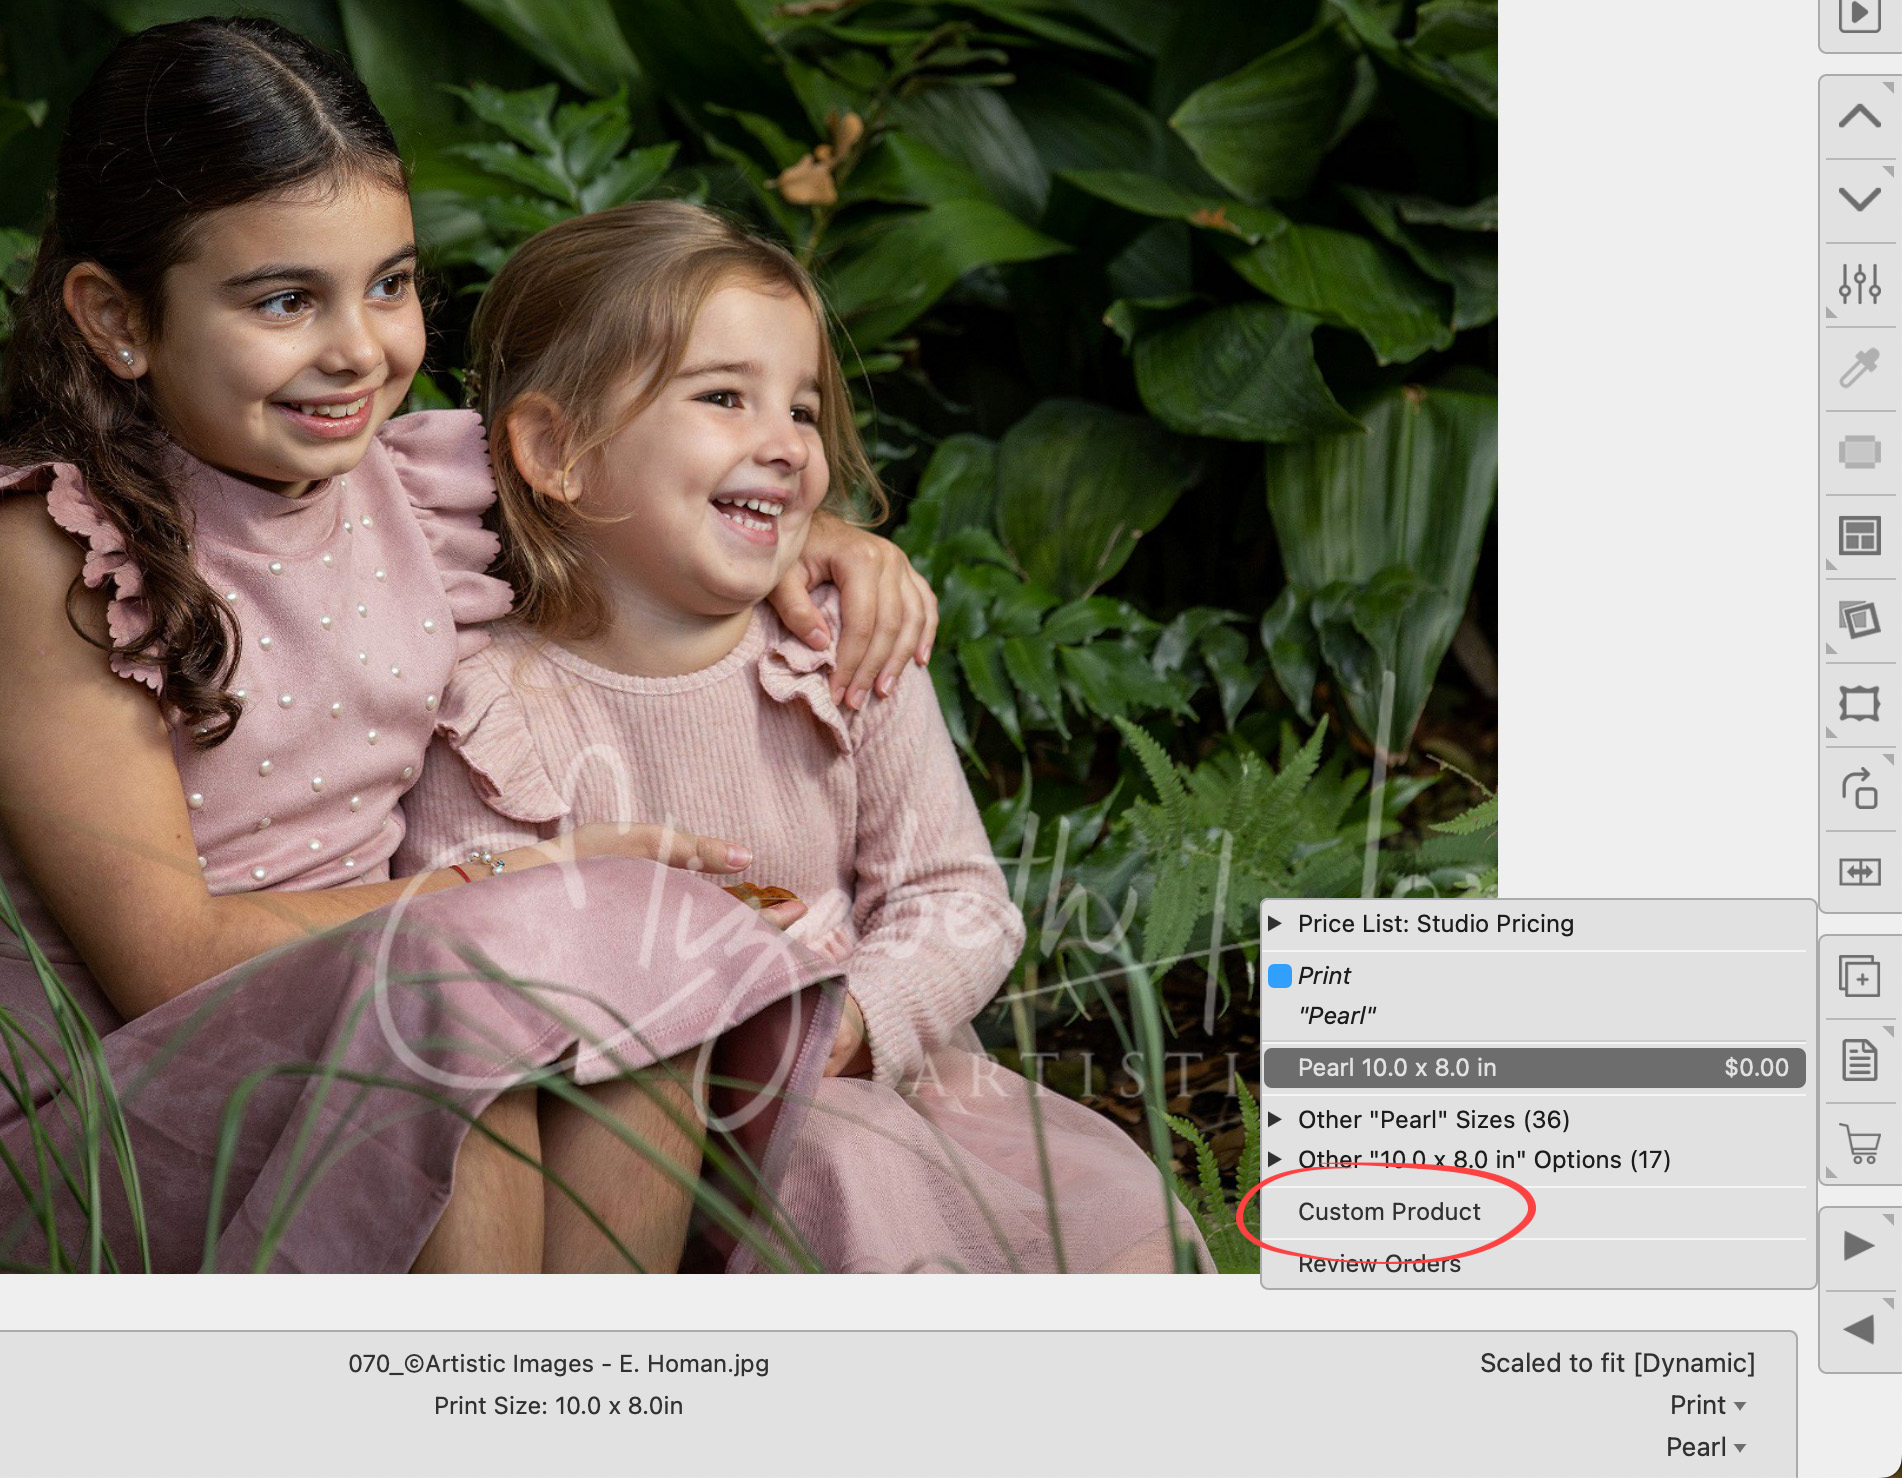
Option 1: Select the presentation option and order the print as a Custom Product. You can manually type in a price.
Option 2:
- Right-click on the product, and select "Go To Pricing" from the drop-down list.
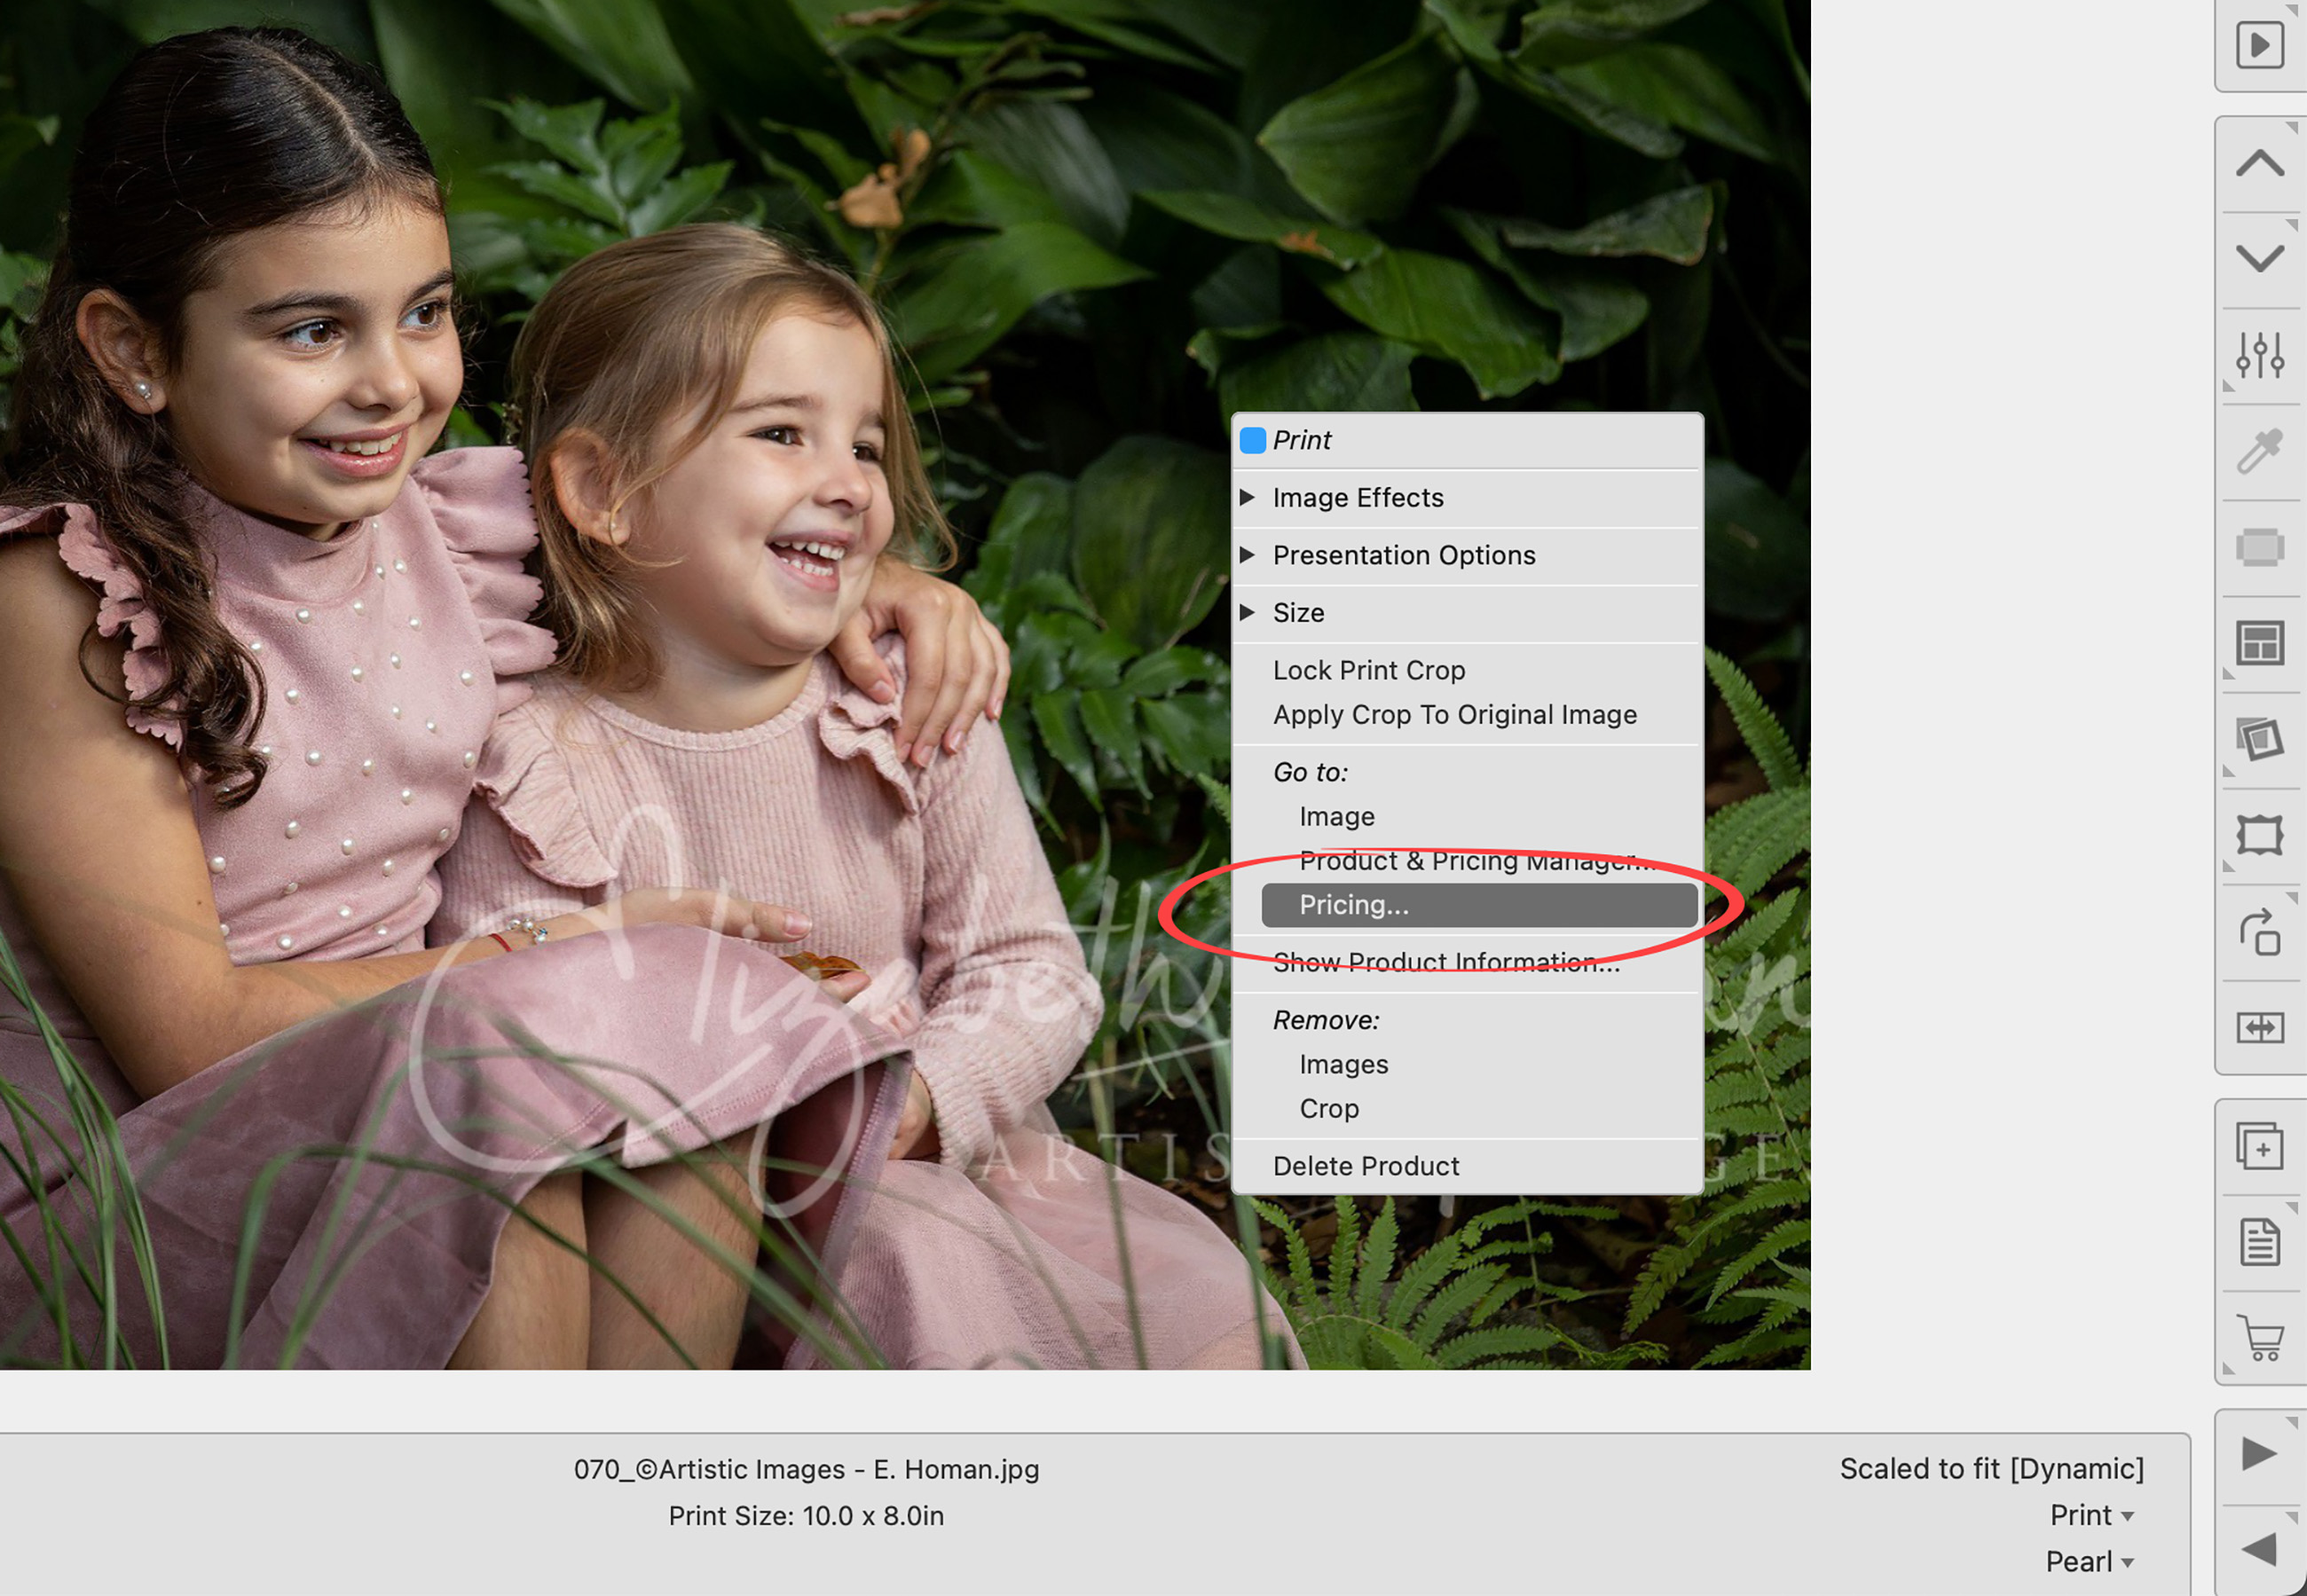
- Type in a price for the product.
- Click "Change Item."
- Once the print is priced, the red dollar sign will be replaced with a black one.
It's possible, through importing or manual setup, to end up with duplicate versions of the same Presentation Option in ProSelect. This can lead to confusion and complications when setting up pricing or building products.
To avoid errors, it's recommended that you remove any duplicate Presentation Options. However, if both the original and the duplicate have already been assigned to products, you’ll need to reassign those products to the correct option before deleting the duplicate.
Follow these steps to safely reassign and remove duplicate Presentation Options:
- Identify which products are using the duplicate.
- Edit each affected product to assign the correct Presentation Option.
- Once all products have been updated, delete the duplicate option.
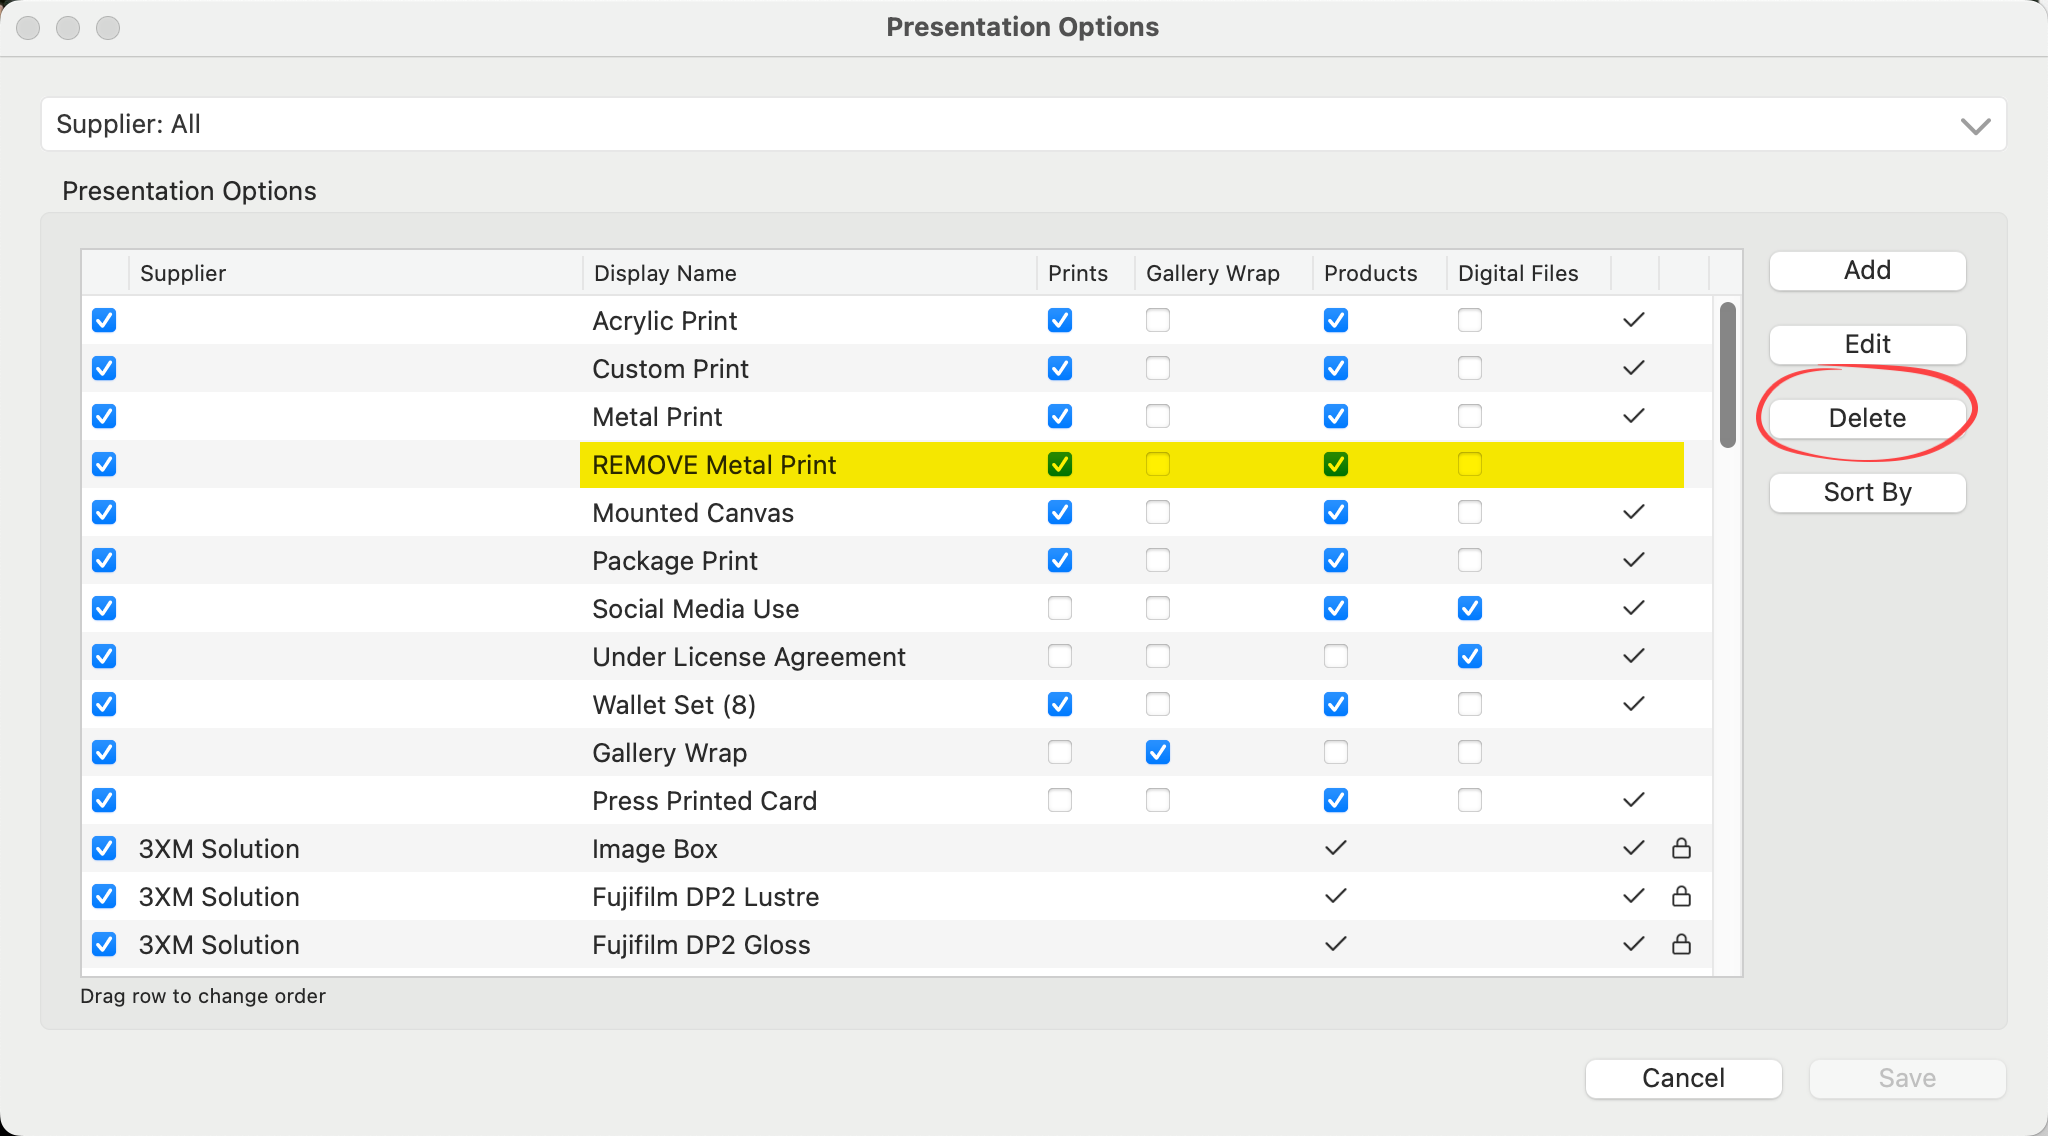
Identifying duplicates can be tricky when multiple presentation options have the same name. In this example, we have two options named "Metal Prints." When you hover over the warning icon, ProSelect shows how many items are linked to each version. One is used by 22 items, the other by 8.
Since we’re reassigning presentation options, it's usually easiest to start with the smaller group. So, we need to find the 8 items using the second "Metal Prints" option and reassign them accordingly.

- To make sure you're reassigning the correct items, first, rename the duplicate presentation option you plan to remove. It's recommended to add the word "REMOVE" to the beginning of its name. This is done by selecting the presentation option, then clicking the Edit button.

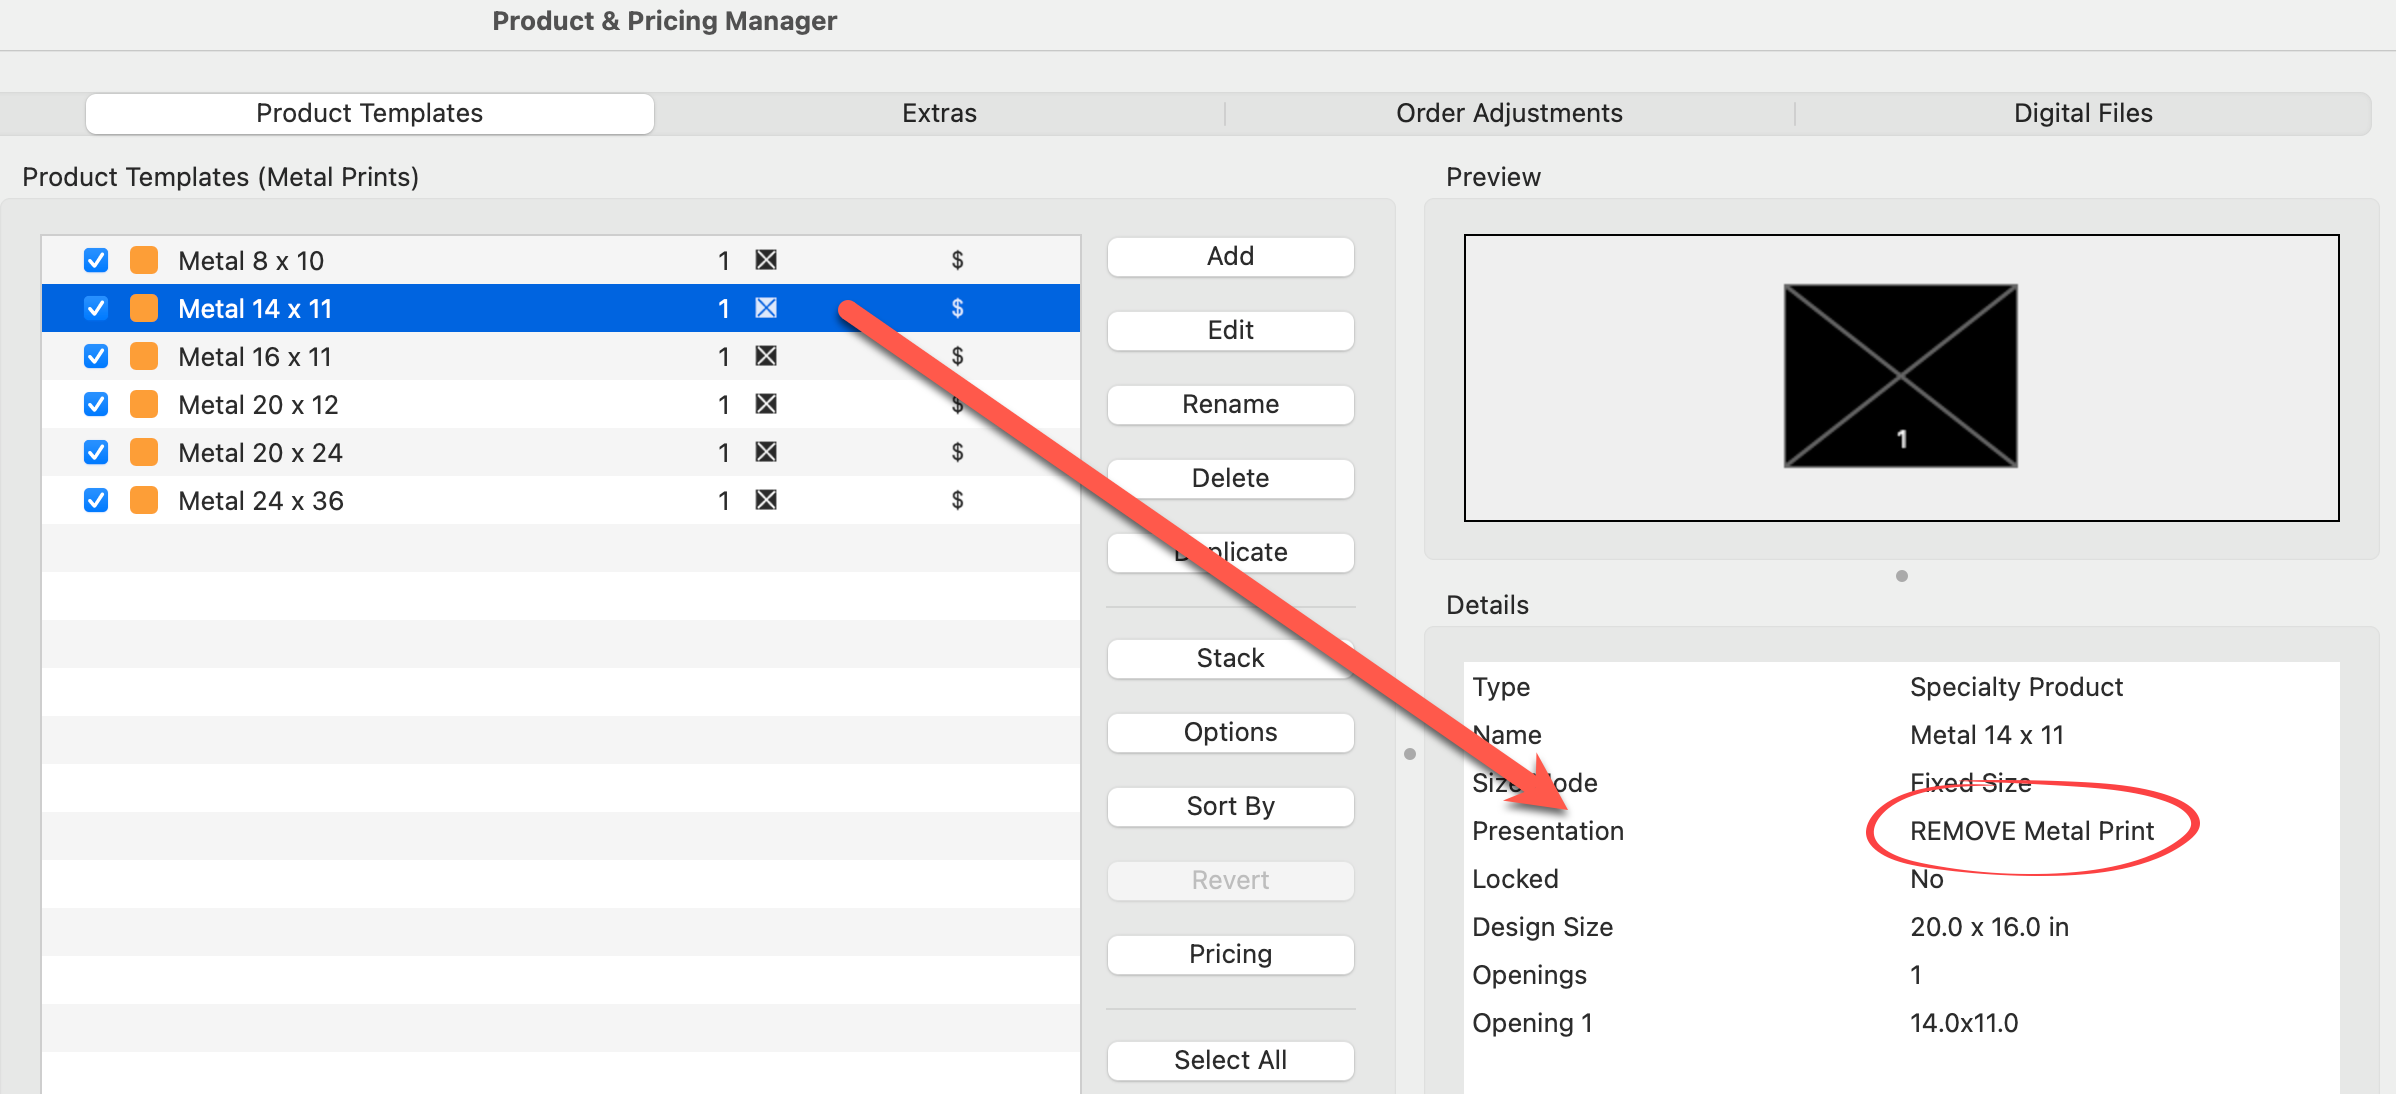
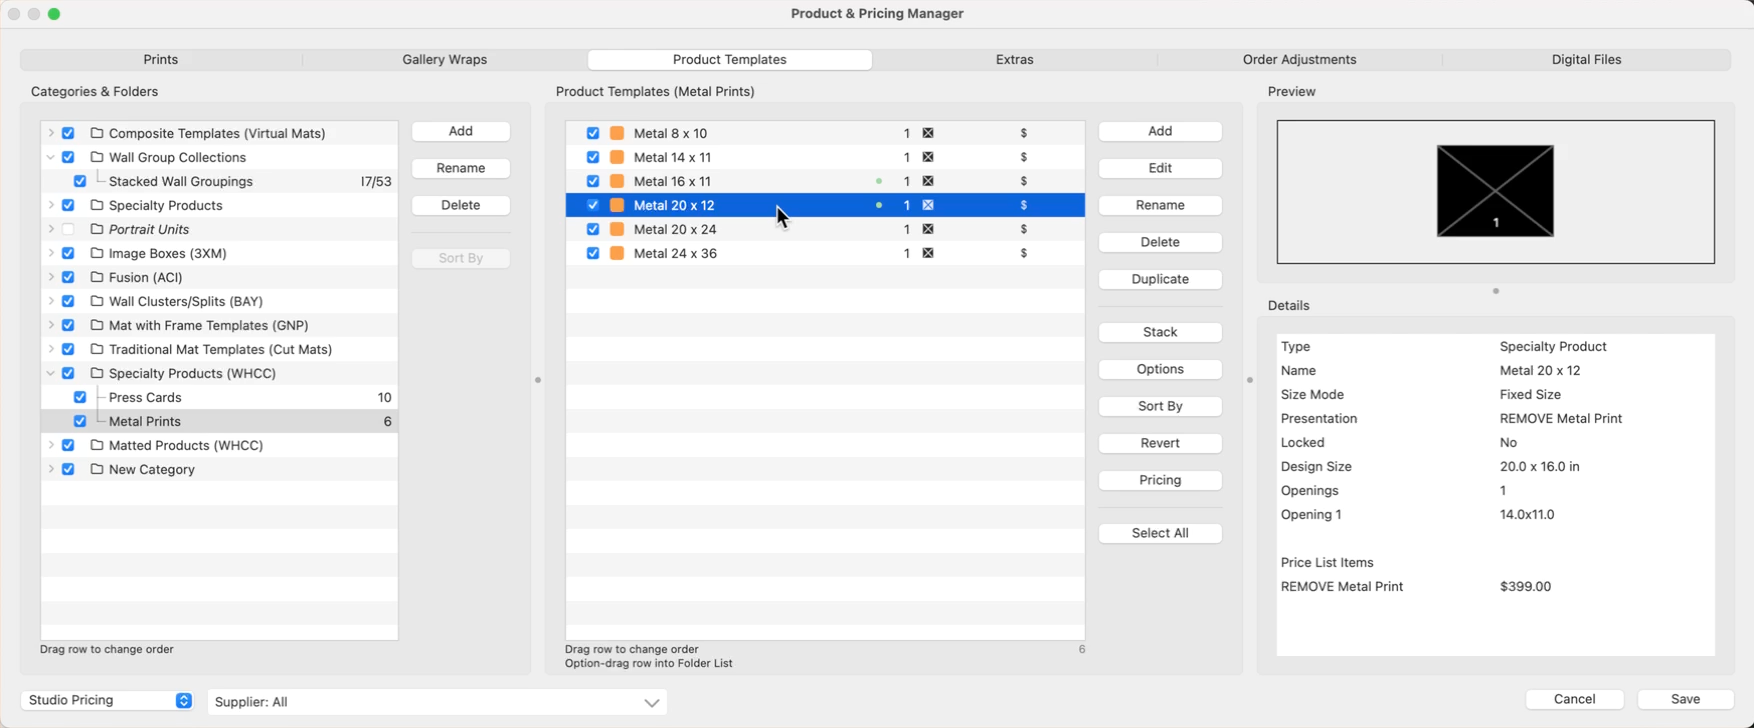
- Open the Product & Pricing Manager and locate all products using "Metal Print" as their presentation option. You'll likely see multiple metal products, some using the original option, others using the duplicate. Because you've renamed the duplicate with "REMOVE," it's easy to spot these in the details panel on the right.
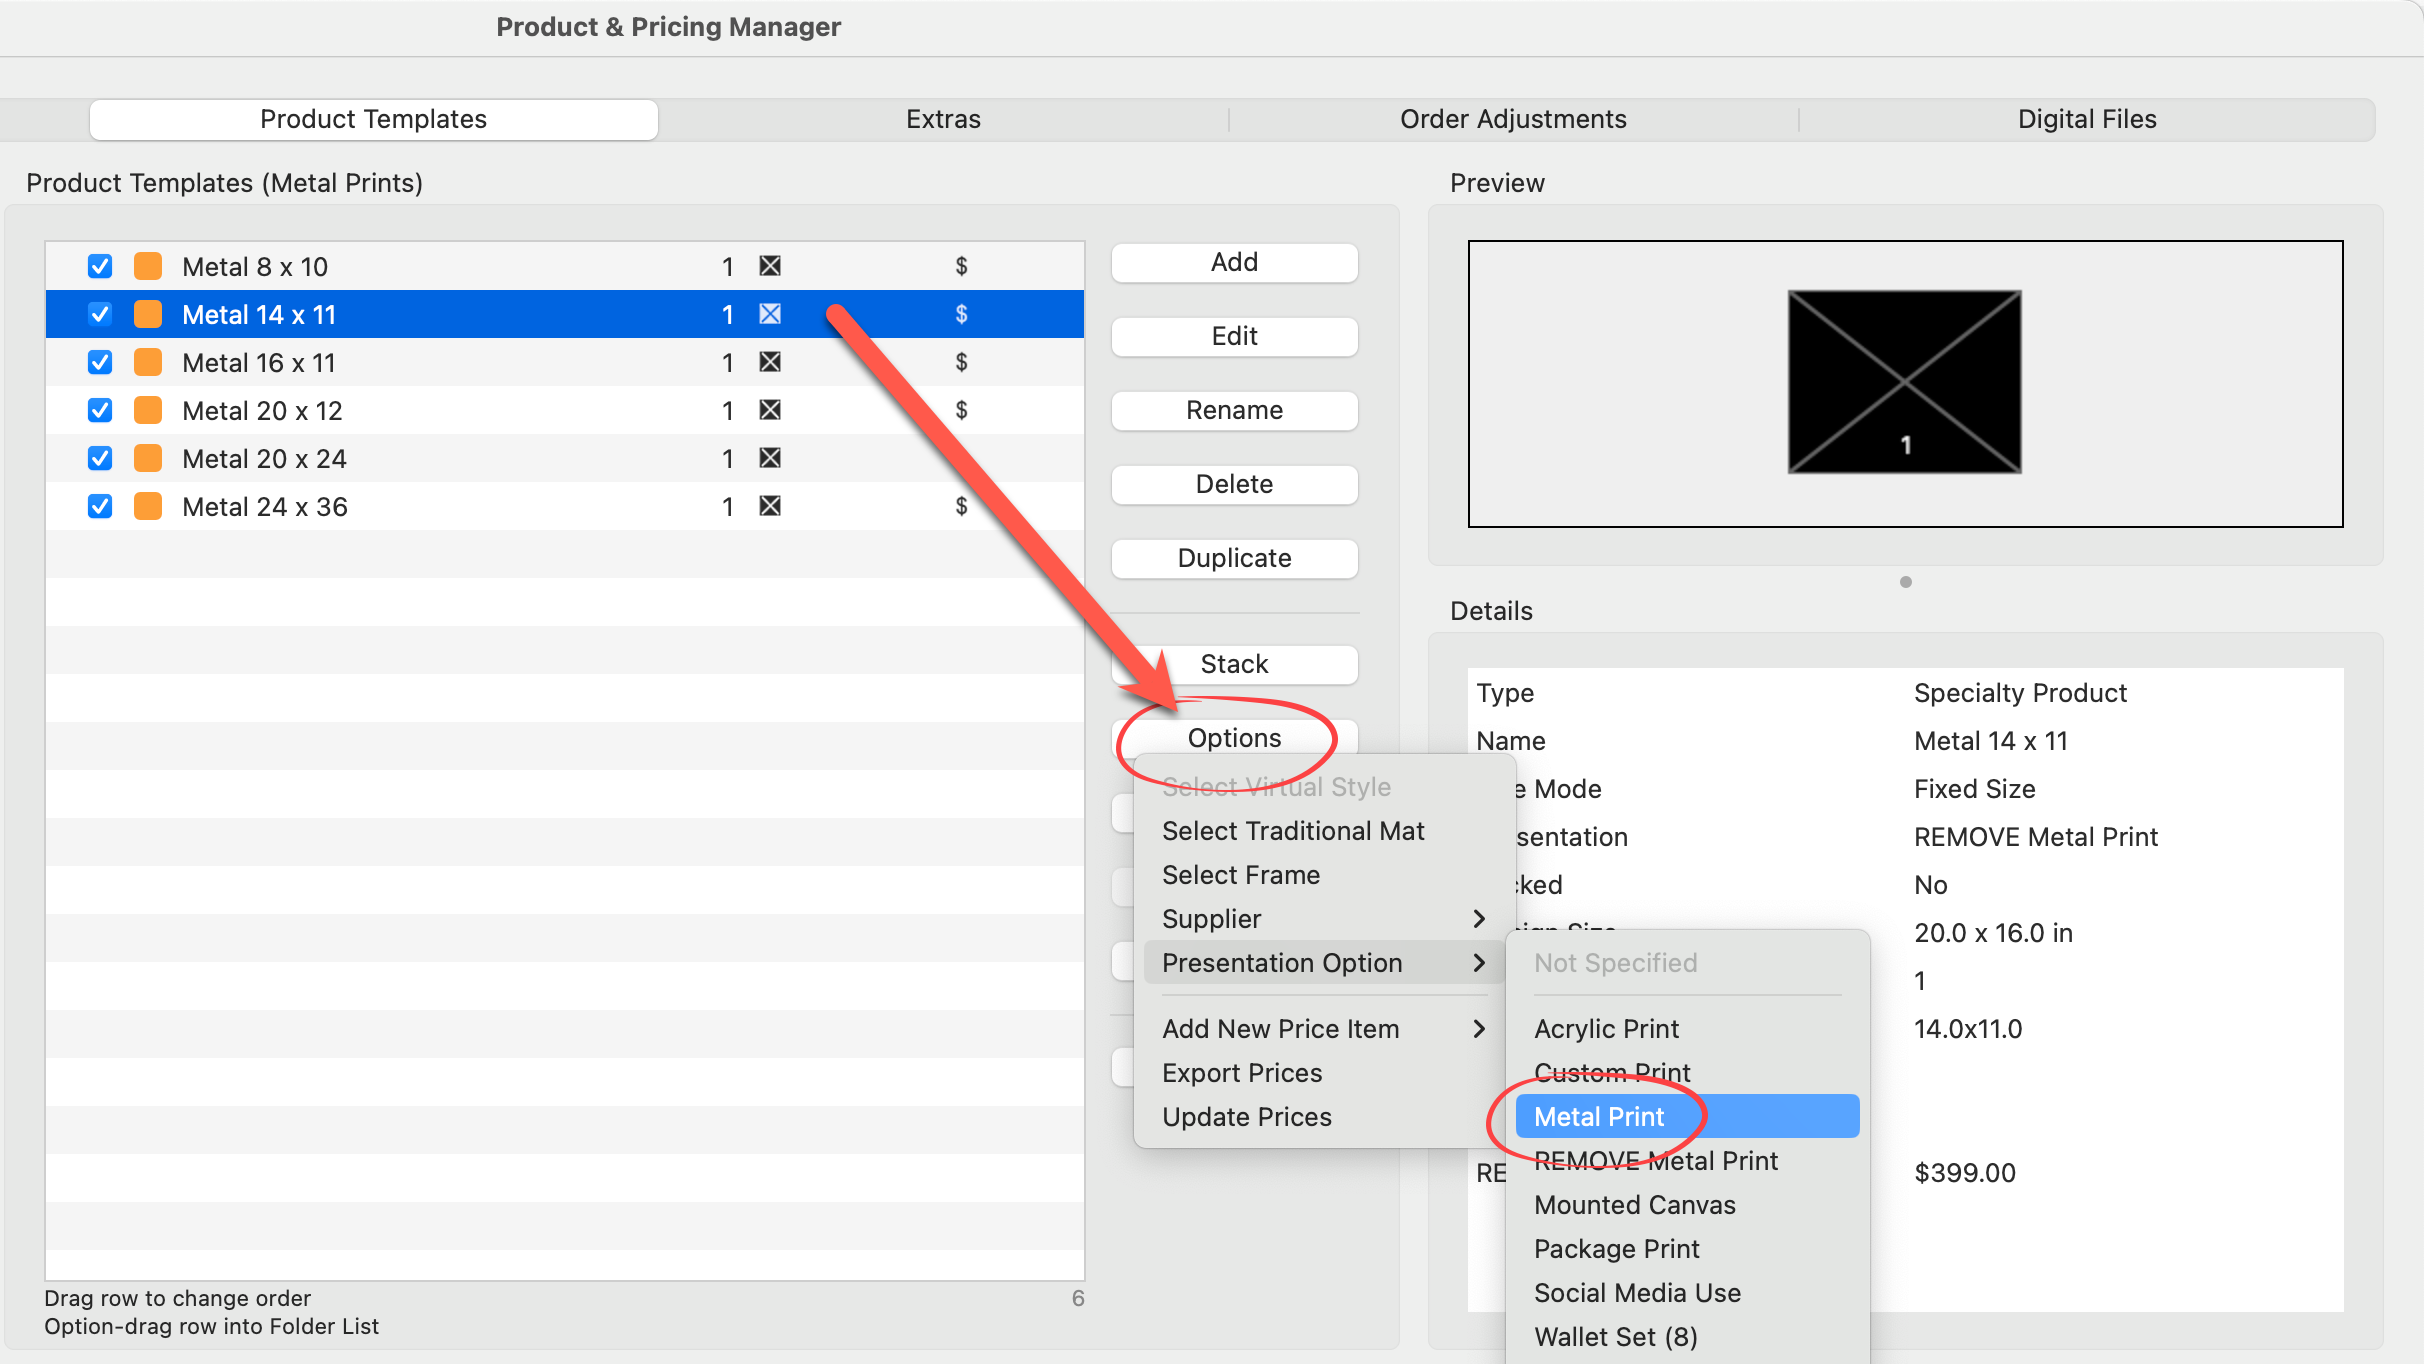
- Select the product using the "REMOVE Metal Print" presentation option and click on the Options button. From here, you can reassign the presentation option to "Metal Print." Continue with this process for ALL items using the "REMOVE Metal Print" presentation option.
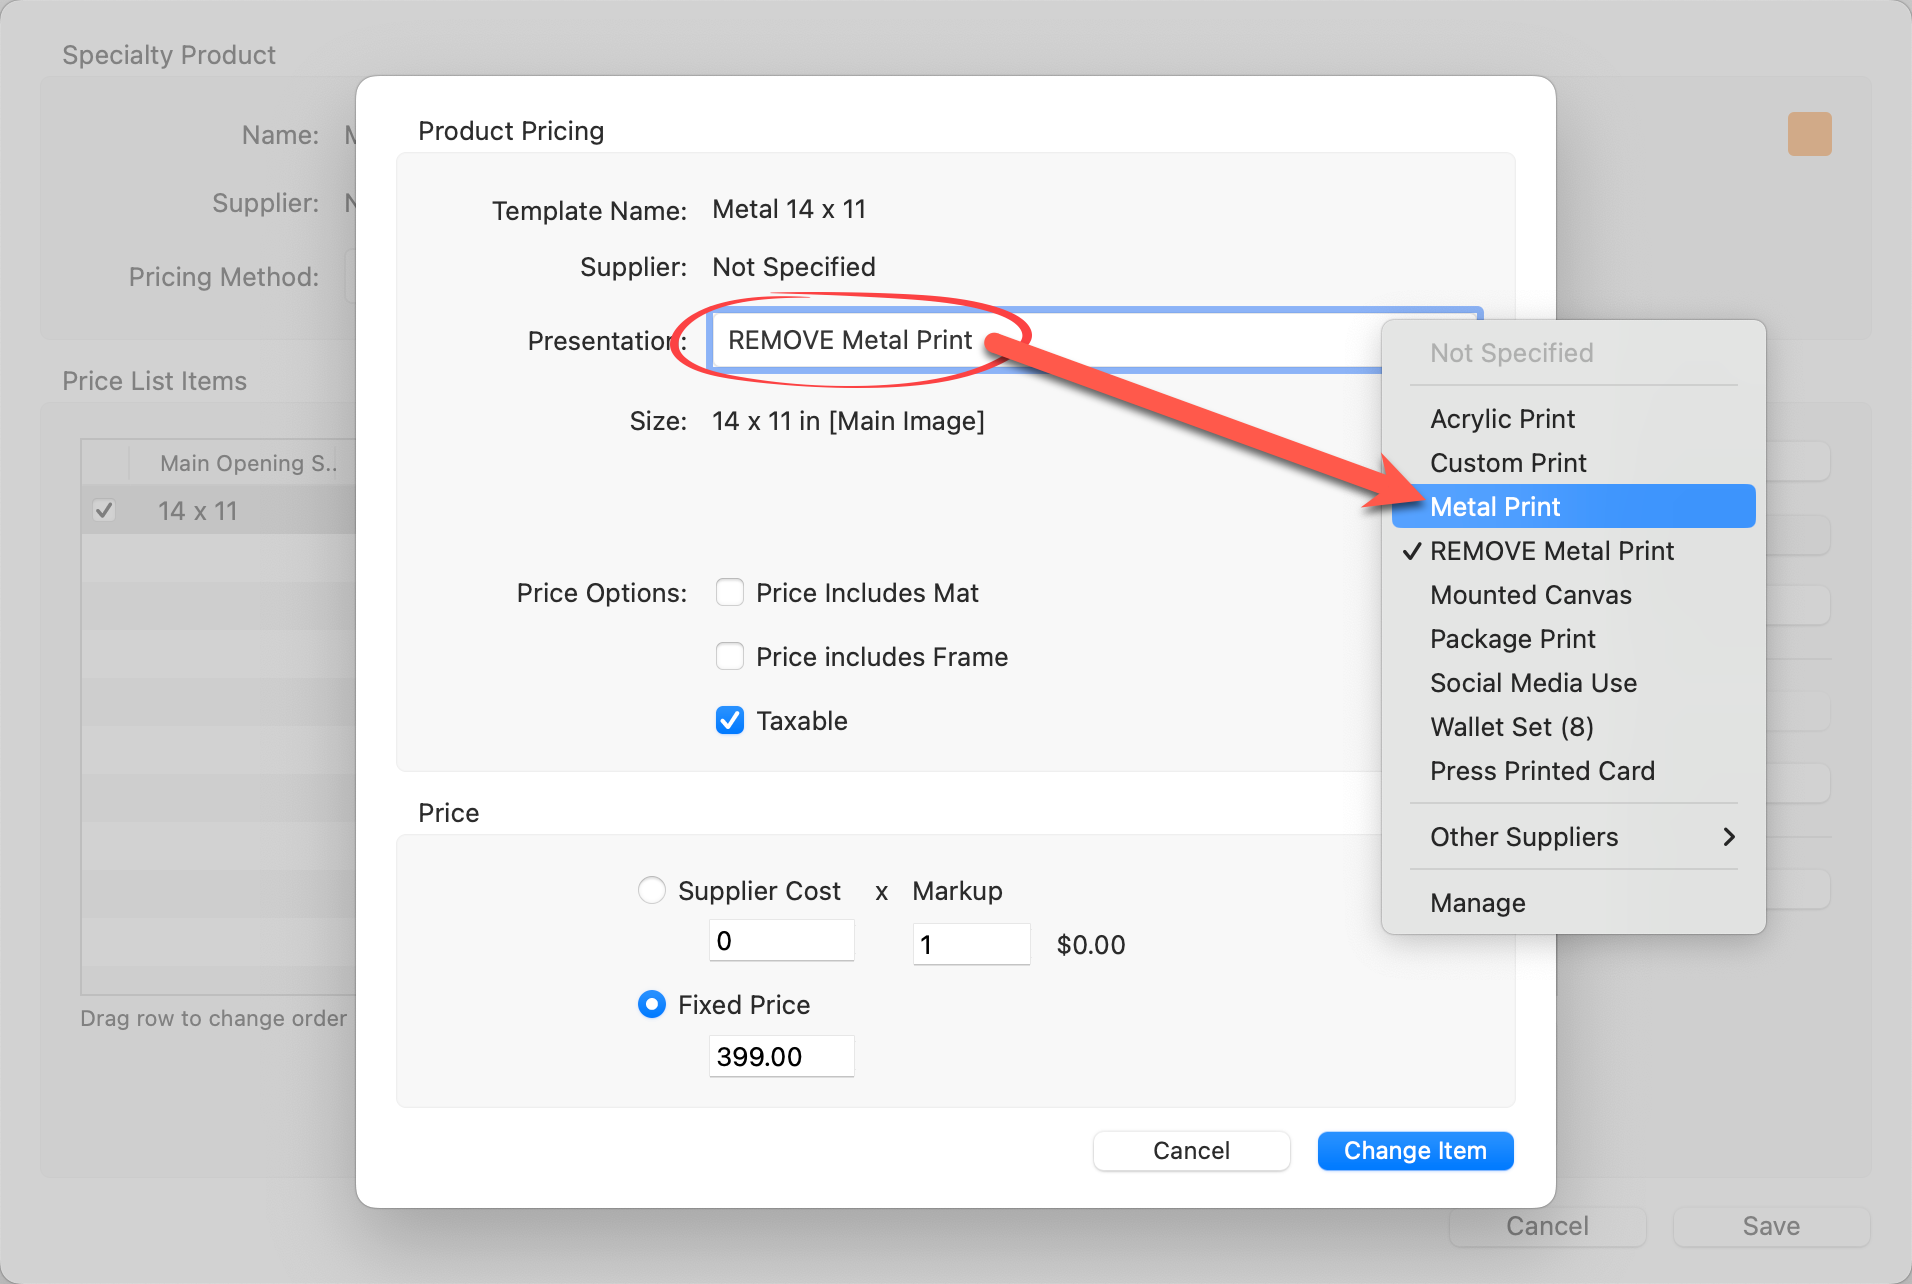
- It is important to note that if you have pricing attached to the presentation option, it may also be using the duplicate. Select the item and click on the Pricing button. From here you can reassign the presentation option to "Metal Print."
- Once all items using the duplicate presentation option have been reassigned, go back to the Presentation Options window. You should now see that "REMOVE Metal Print" is no longer used by any items (no check mark). If the usage count is zero, you can safely delete that presentation option.