Handling Tax
ProSelect gives you full control over how taxes are applied to your sales. You have the ability to set up multiple tax options, including combined State and Federal Taxes (as used in some provinces of Canada). Once set up, you can select a different tax (including no tax) for each client and have the correct tax automatically calculated.
- Start by creating a Tax Setup in the Tax Setup window, where you define your tax requirements (See below).
- When creating your tax setup, you can choose to apply it to All Price List Items or only Selected Price List Items.
- Set this as your Default Tax Setup so it will automatically be applied to all new clients.
- In the Client Setup window, the default tax setup is assigned automatically whenever you create a new client.
- Finally, enable tax on the specific products that require it. Some products (such as services or non-taxable items) may not need taxation, so you can leave those unchecked.
This flexible system ensures that your sales tax is applied correctly and only where required. Go to the top menu, Orders > Tax Setup. Check the "Enable Tax on Orders" checkbox.
![]() Set as Default: To set a tax option as default, select it and then click the Set as Default button. The percentage tag
Set as Default: To set a tax option as default, select it and then click the Set as Default button. The percentage tag ![]() will appear to the right of the default tax option. The default tax will be used for new clients. You can change the tax for an existing client in the Client Setup window.
will appear to the right of the default tax option. The default tax will be used for new clients. You can change the tax for an existing client in the Client Setup window.
Your Tax Setup is saved in the ProSelect Data file for easy sharing between computers or locations. Your selected default tax is saved in your Settings and can be different for each machine.

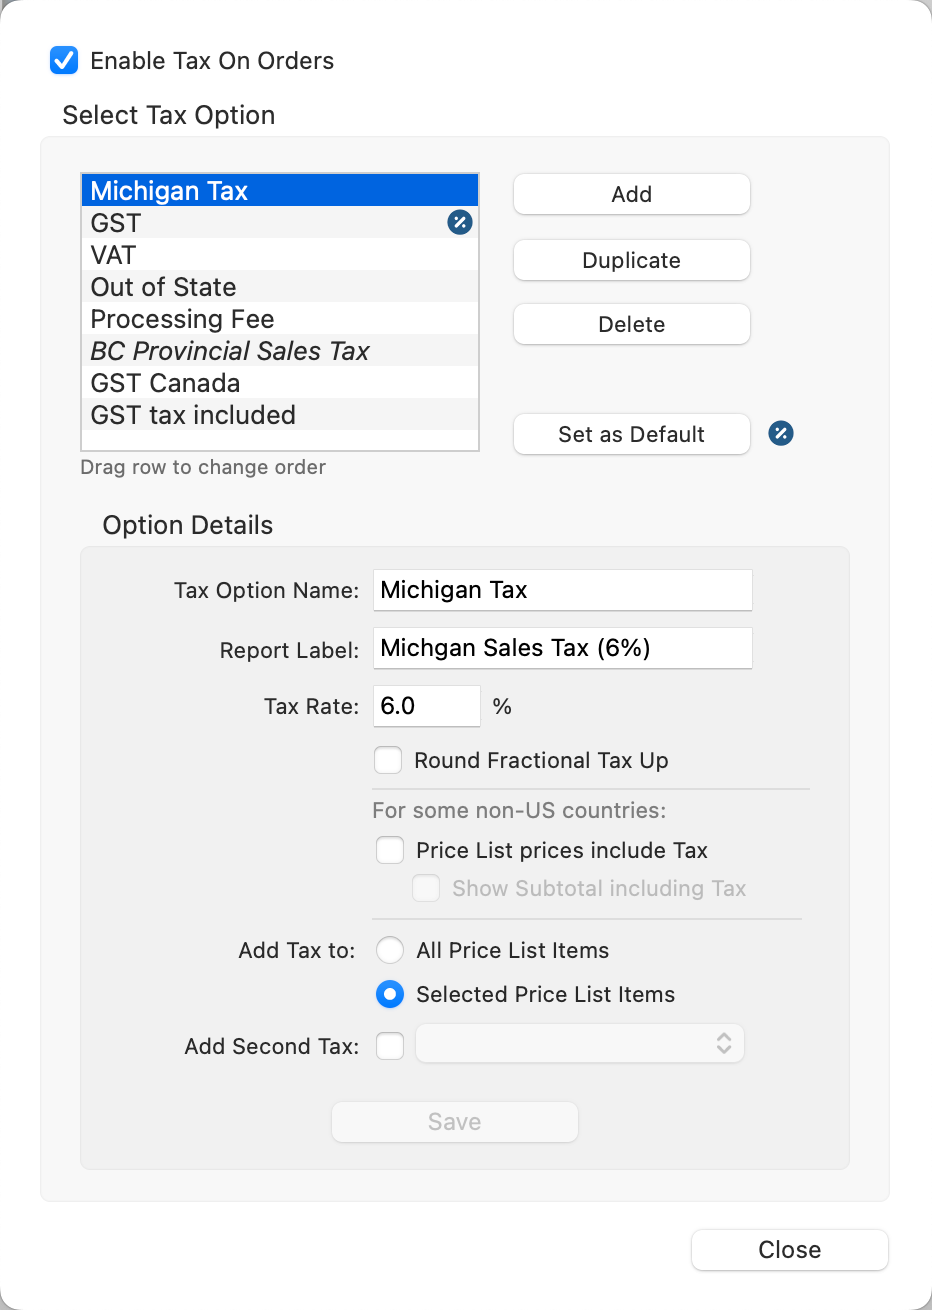
- Click the Add button. A new tax option will appear at the bottom of the list (No Name).
- Type in the Tax Option Name. This will be shown when you are selecting the tax for a Client.
- Type in a Report Label. This will be shown next to the tax amount in the Review Order window as well as Order Reports.
- Enter a Tax Rate. This is a percentage.
- Round Fractional Tax Up: If checked, tax amounts that come to 0.5 cents or higher, will be rounded up to the next cent. If left unchecked, any fractional parts of the tax are rounded down. For example, 1.6 cents would be rounded down to 1 cent.
- Price List Prices Include Tax: Only check this box if you would like your prices to be inclusive of tax.
- Add Tax To: Choose All Price List Items or Selected Price List Items (recommended).
- Add Second Tax: Only check this box if you are creating a Dual Tax option.
- Click the Save button.
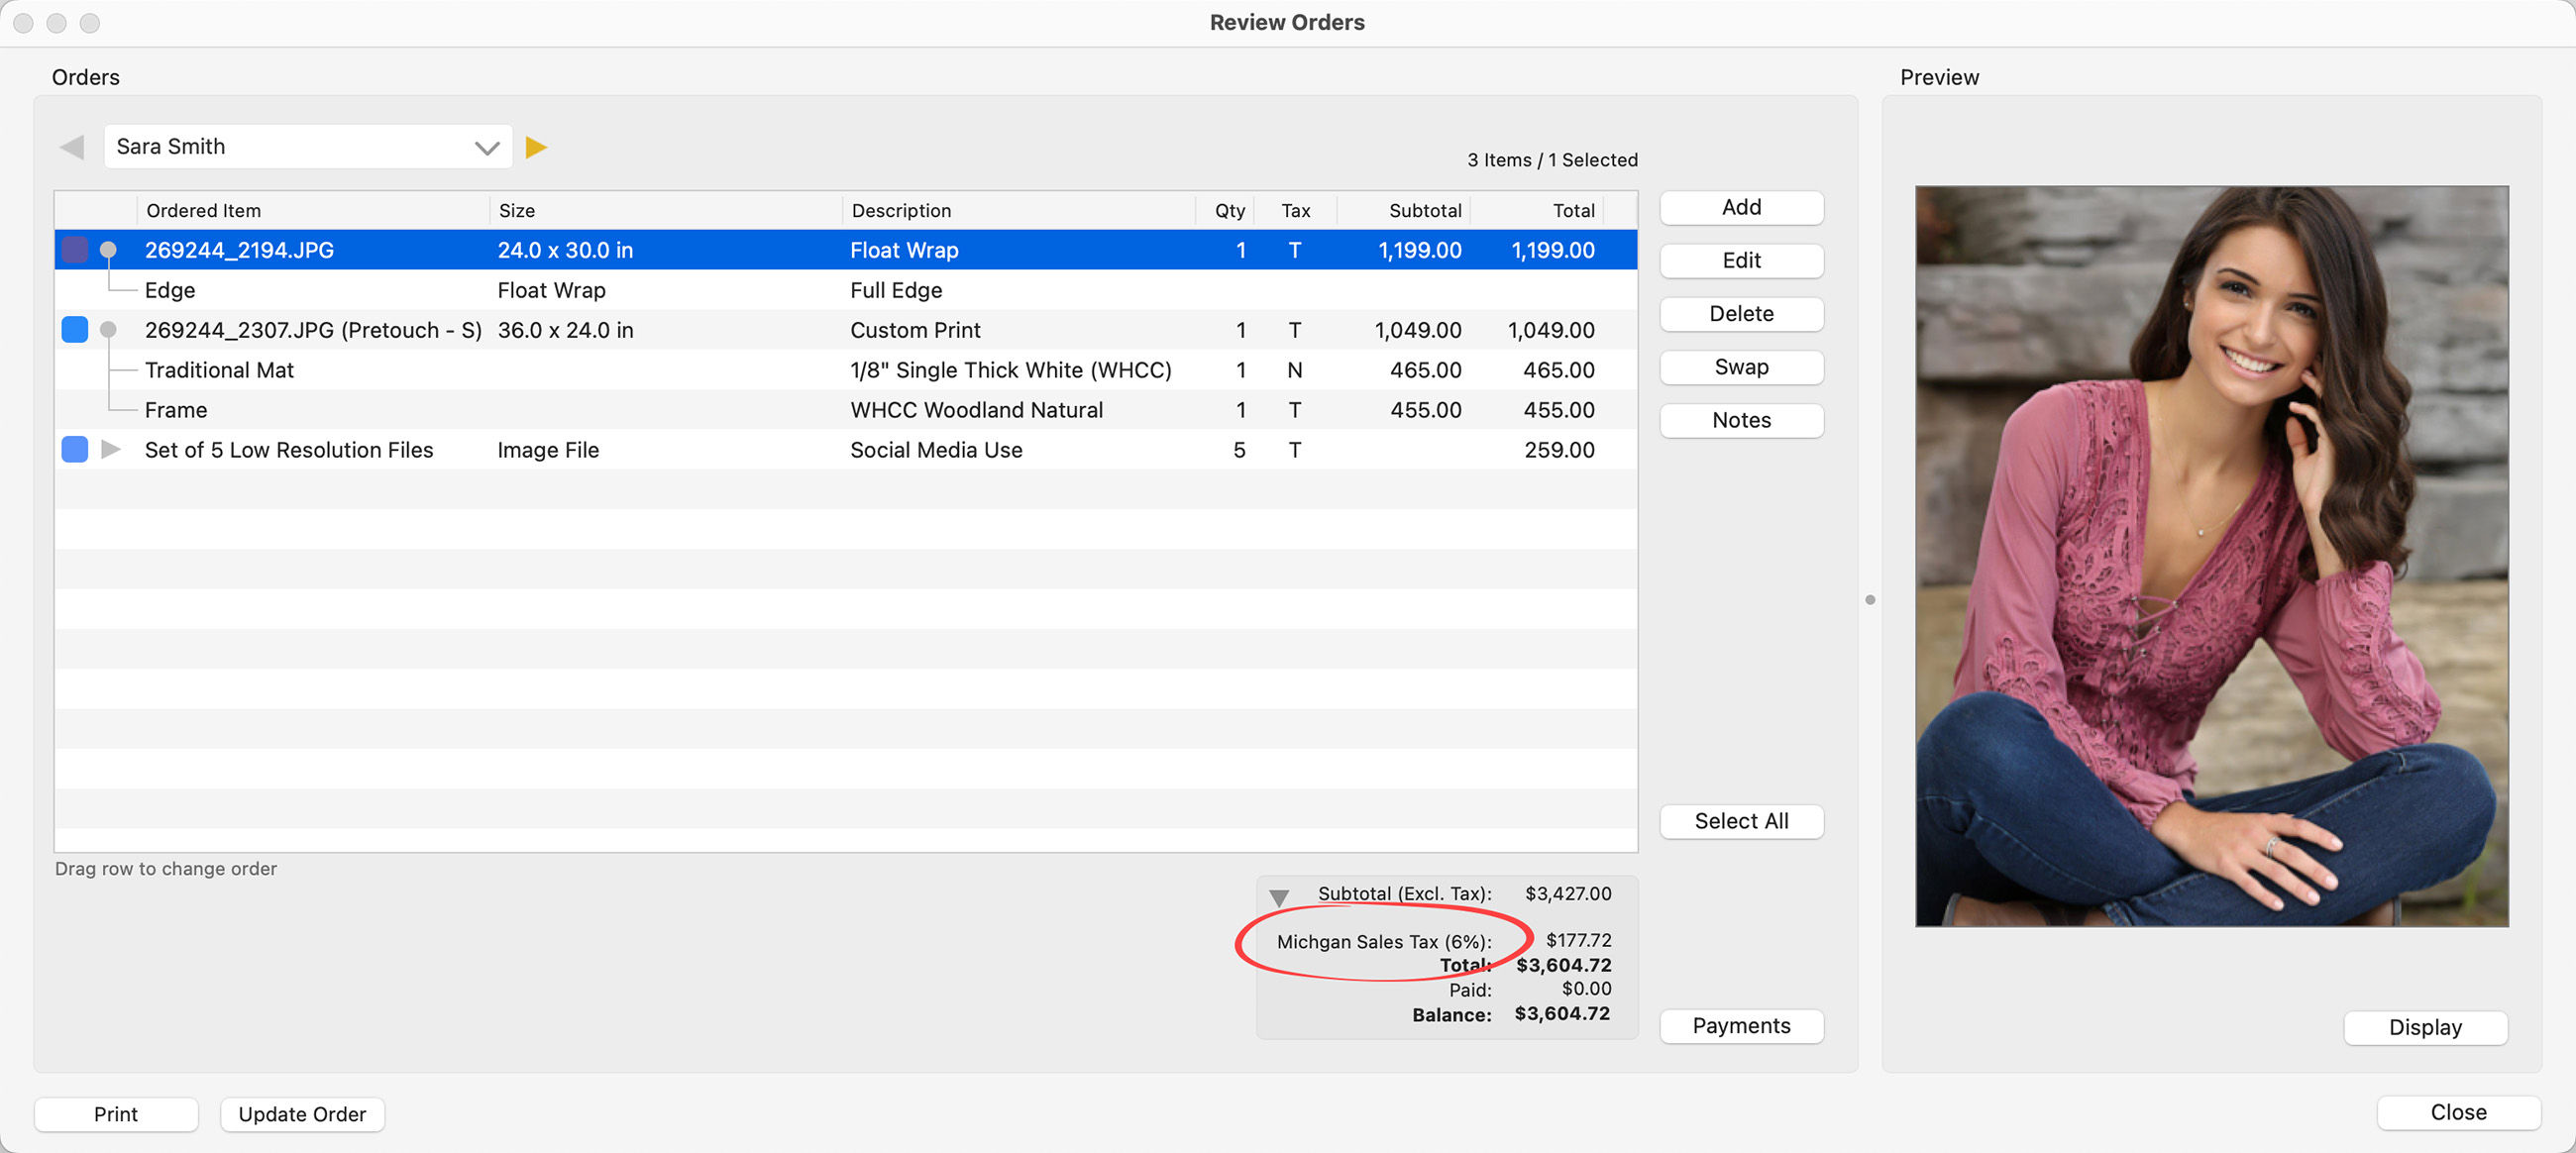
When this Tax Option is selected, this is how it is displayed in the Review Order window:
Creating Dual Tax Options is essentially just adding two taxes together. A good example is charging PST and GST (Canadian taxes).
- Follow the steps to create a Single Tax Option. (Click the Add button, enter the Name and other parameters for the tax).
- Do not check the Add Second Tax button...this will come later.
- Click Save.
Now that we have our first tax created (BC Provincial Sales Tax), we need to create the second and add them together.
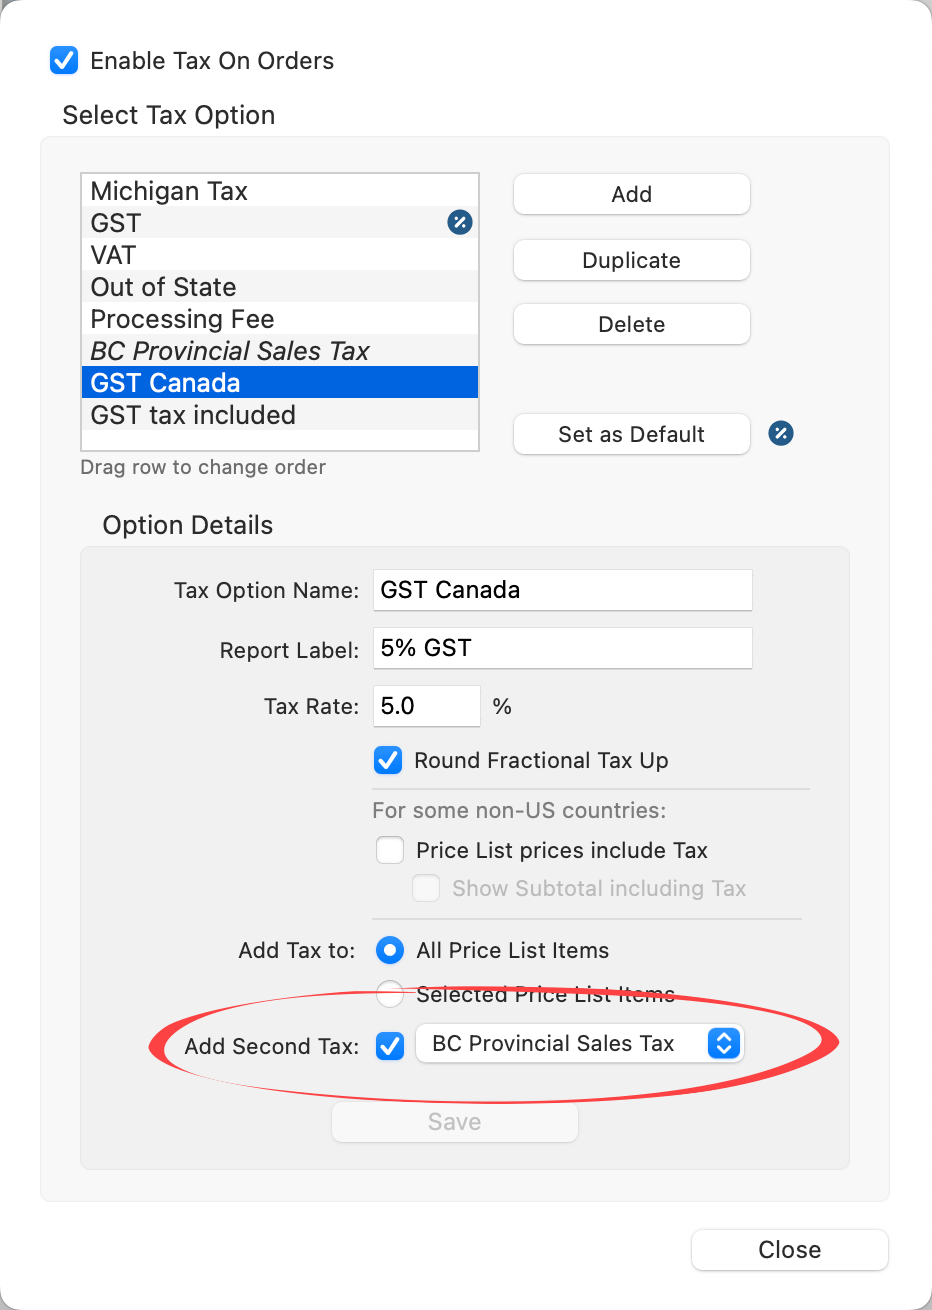
- Click the Add button. Enter the Name and other parameters for the tax.
- Check the Add Second Tax button.
- Select the tax you wish to add (in our case, BC Provincial Sales Tax) from the drop-down menu.
- Click the Save button.
The Dual Tax Option is now set up. When linked to a Client, BOTH taxes will be charged.
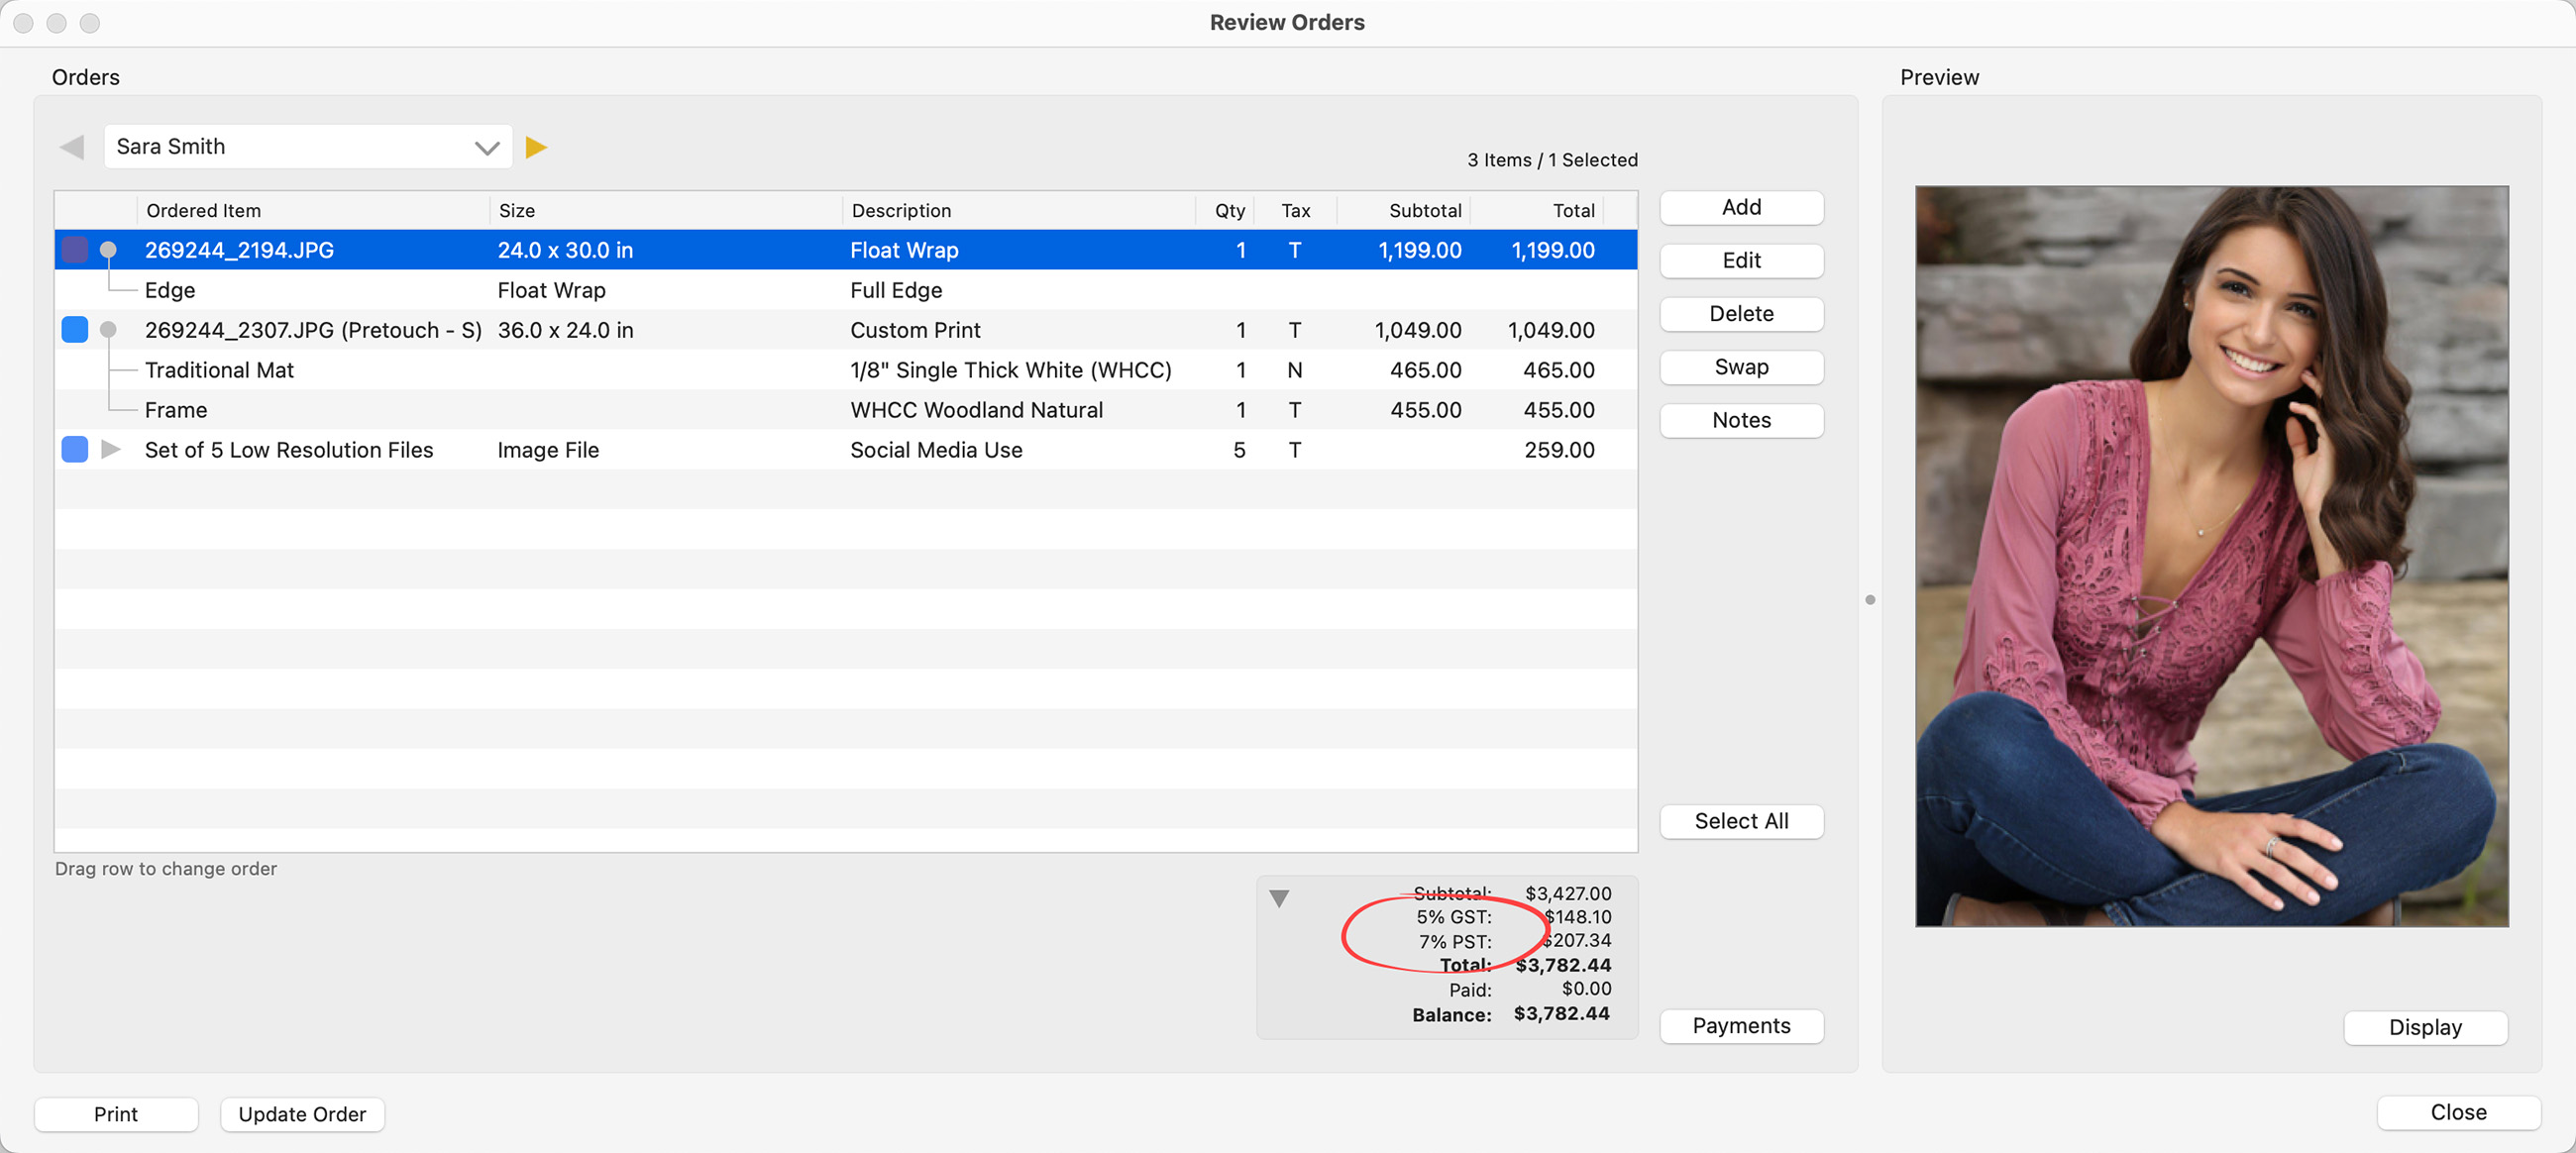
When this Tax Option is selected, this is how it is displayed in the Review Order window:
This pricing option is for items already priced with tax included. The tax amount listed is calculated by taking the total value of taxable items in the order (including tax) and determining the tax based on the entered tax rate.
- Click the Add button.
- Type in the Tax Option Name. This will be shown when you are selecting the tax for a Client.
- Type in a Report Label. This will be shown next to the tax amount in your Order Reports. It is recommended that you use the format "Includes 10% GST". This makes it clear to the Client that the tax is already included.
- Enter a Tax Rate. This is a percentage.
- Round Fractional Tax Up: If checked, tax amounts that come to 0.5 cents or higher, will be rounded up to the next cent. If left unchecked, any fractional parts of the tax are rounded down. For example, 1.6 cents would be rounded down to 1 cent.
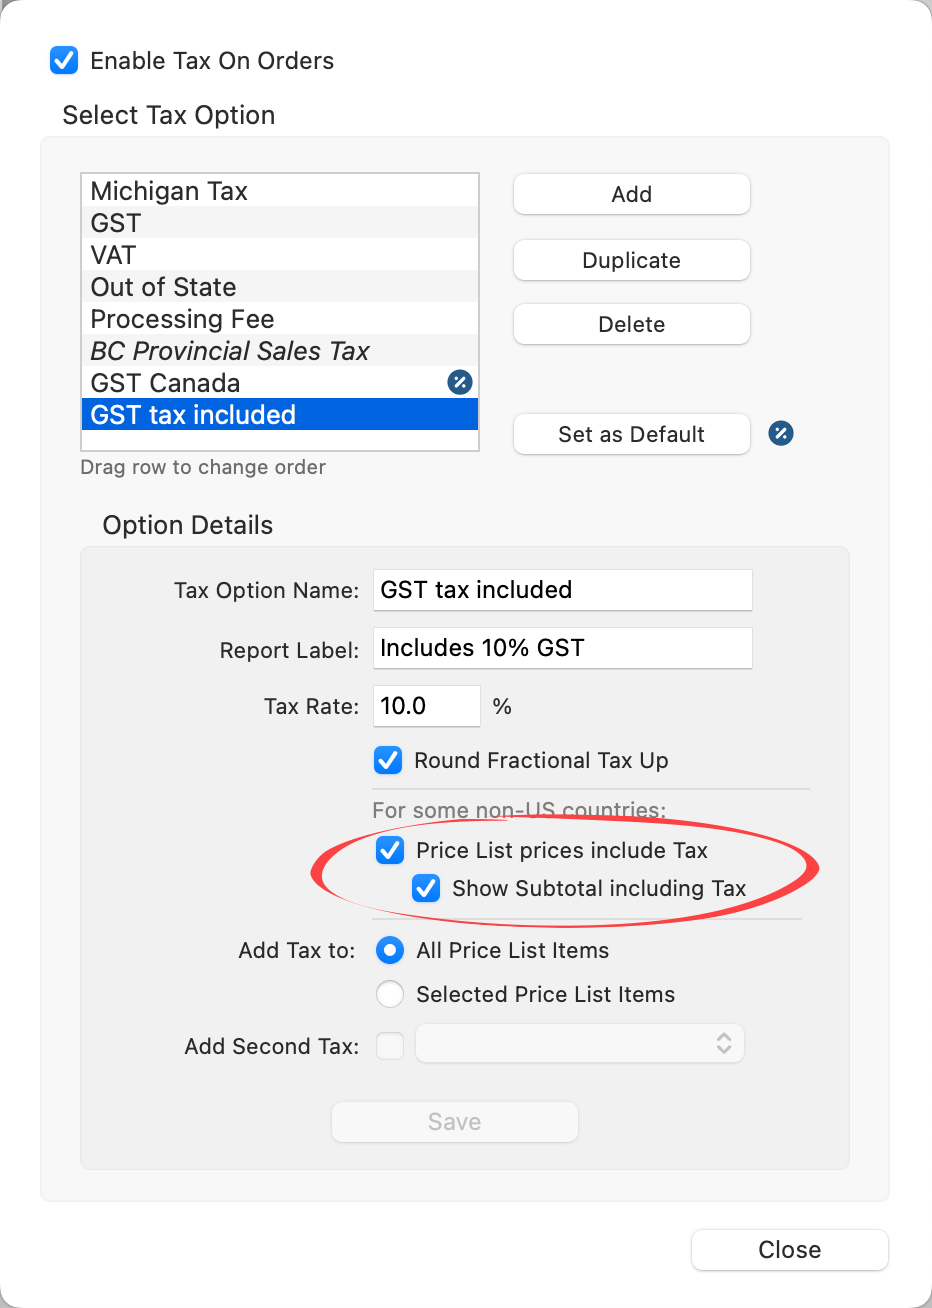
- Price List Prices Include Tax: Check this box to have your prices to be inclusive of tax.
- Show Subtotal Including Tax: Check this box if you would like to have the subtotal shown including tax.
- Add Tax To: Choose either All Price List Items or Selected Price List Items.
- Add Second Tax: This option is disabled when using this method of tax.
- Click the Save button.
When this Tax Option is selected, this is how it is displayed in the Review Order window. Notice the subtotal matches the Total. No additional tax has been added, it has been calculated and subtracted from the subtotal: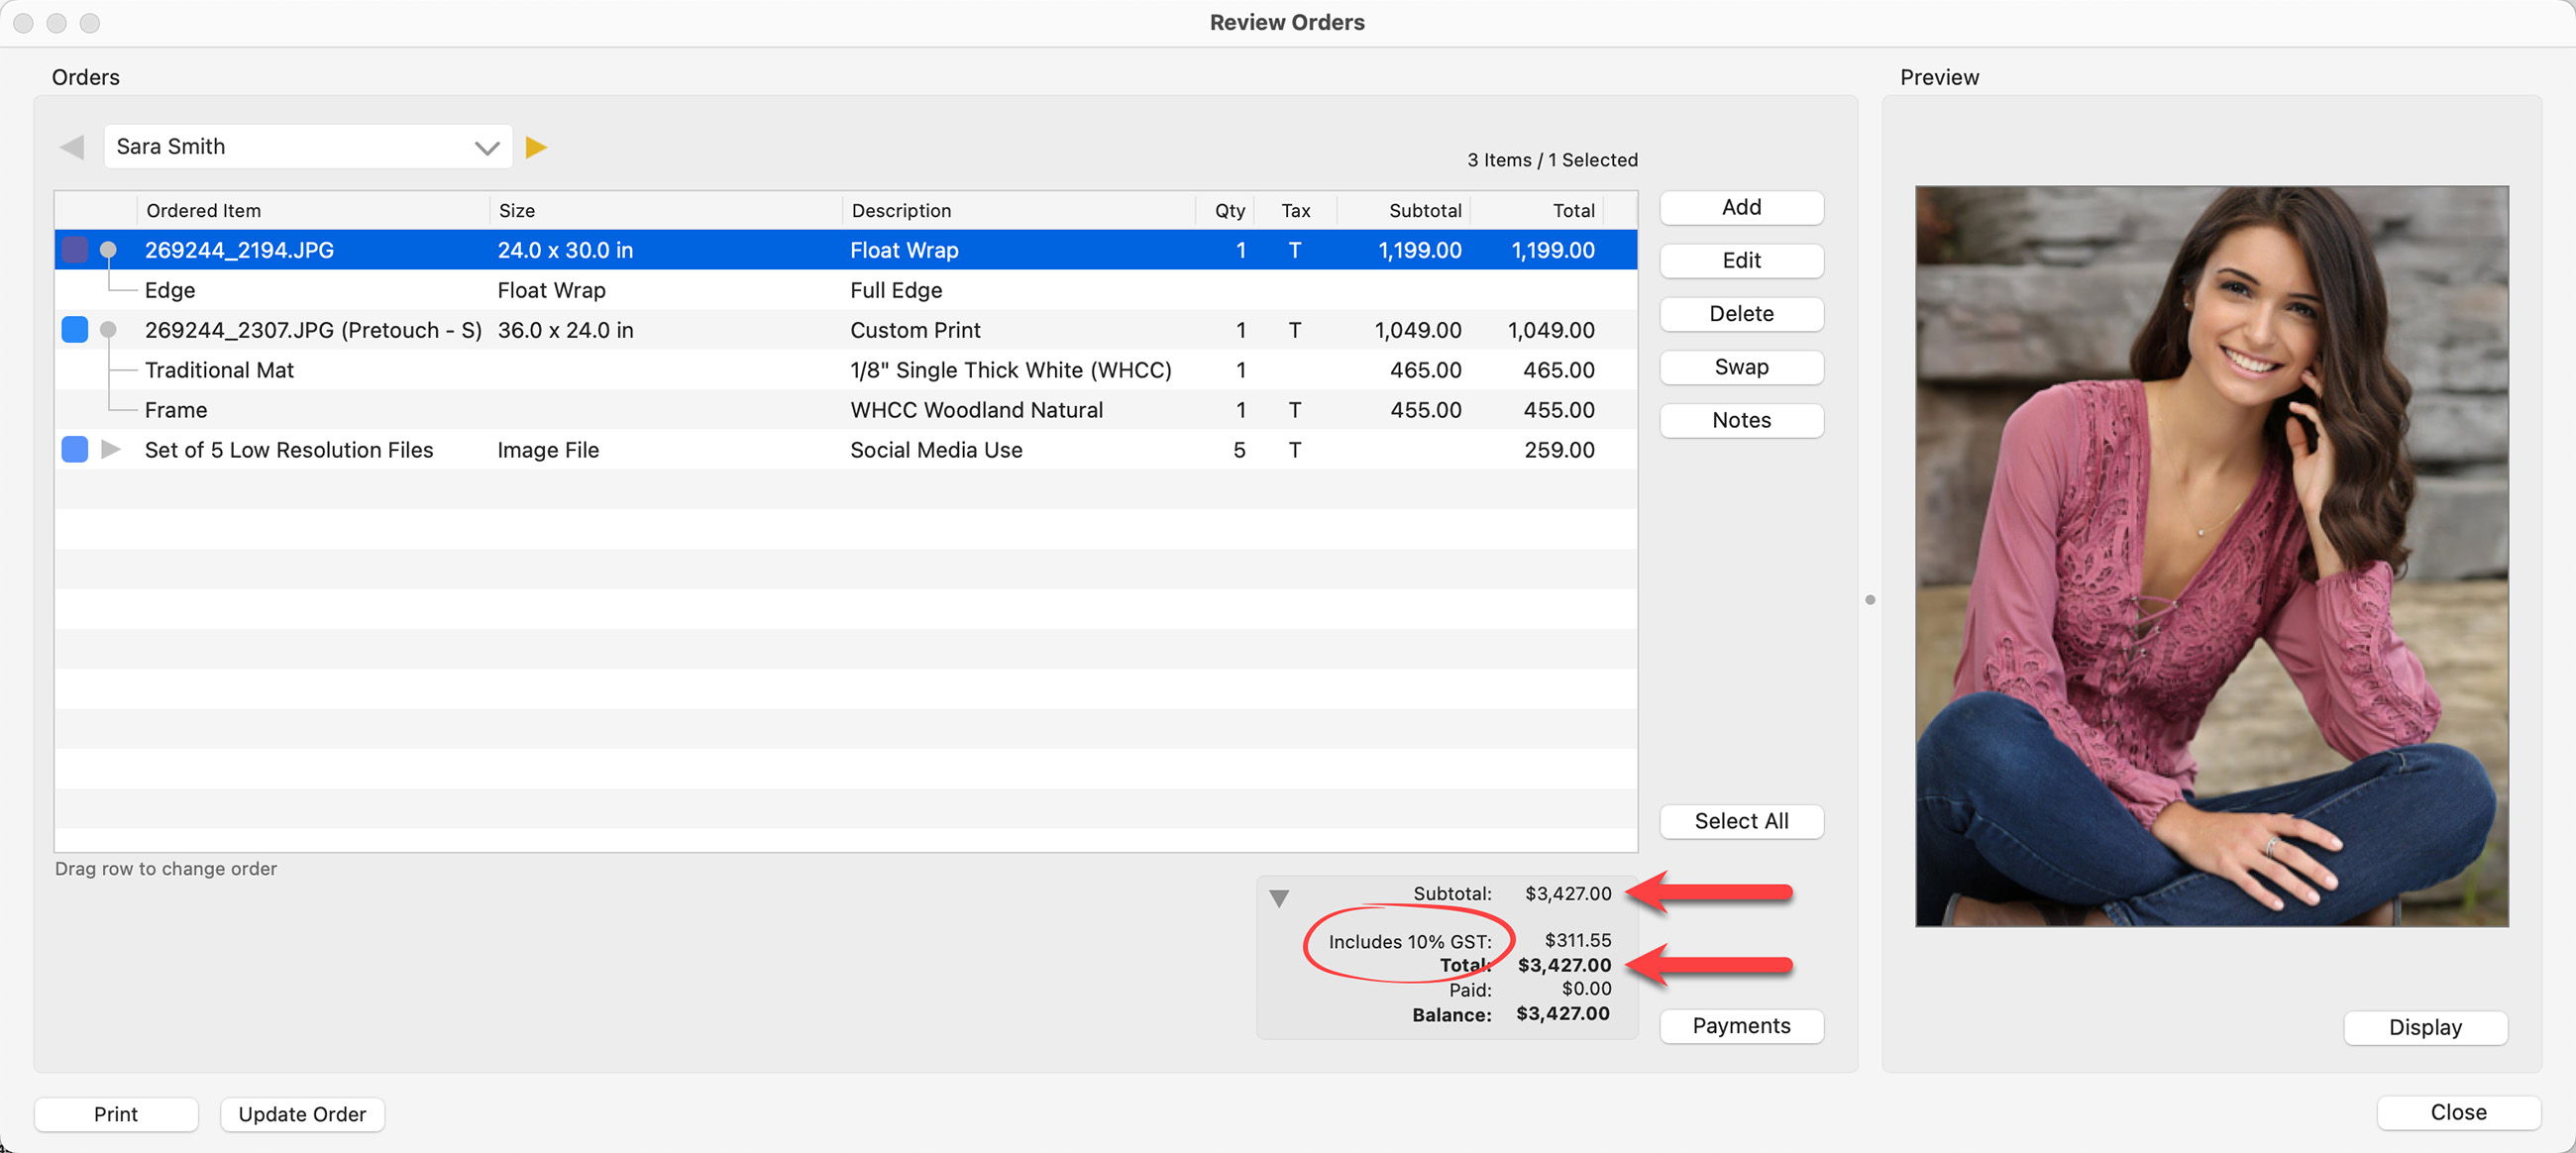
The tax option you set as default (using the Default Tax button) will automatically be used for each new client (including the ones automatically created when you start a new album). If you need to change the tax setting for a client that is already set up, follow these steps:
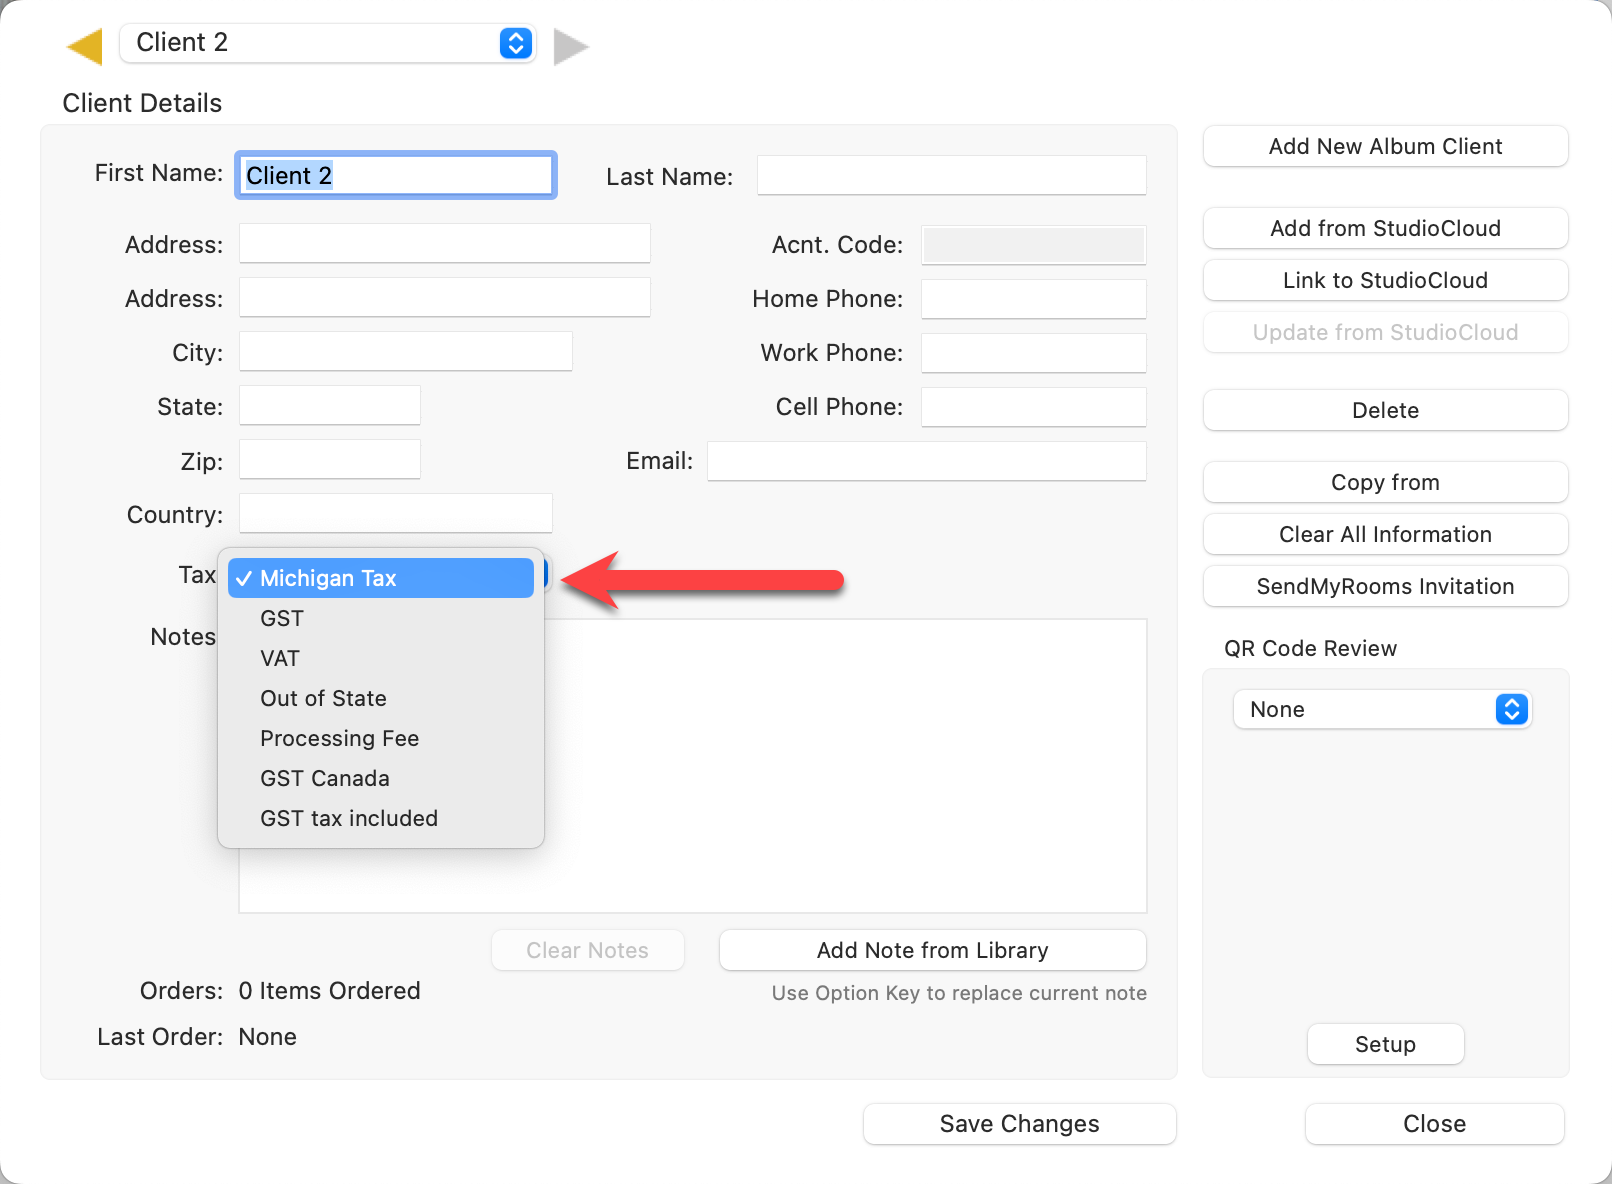
- Go to the top menu, Orders > Client Setup.
- Choose your client from the drop-down list at the top.
- Select the new tax option from the drop-down list next to "Tax."
- Once you have selected the new tax option for the Client, click the Save Changes button to apply.
ProSelect saves the tax setup used for your client in the Client’s Album File. If you make changes to your tax setup and then open an album file that used a different tax setup, then the previous tax setup will be used. If that particular tax option is deleted, it will be added back in. When this tax setup is imported, it will contain a prefix EXT, so you can see the item was added from an external source. To address this, go to the top menu, Orders > Client Setup and change the tax option.
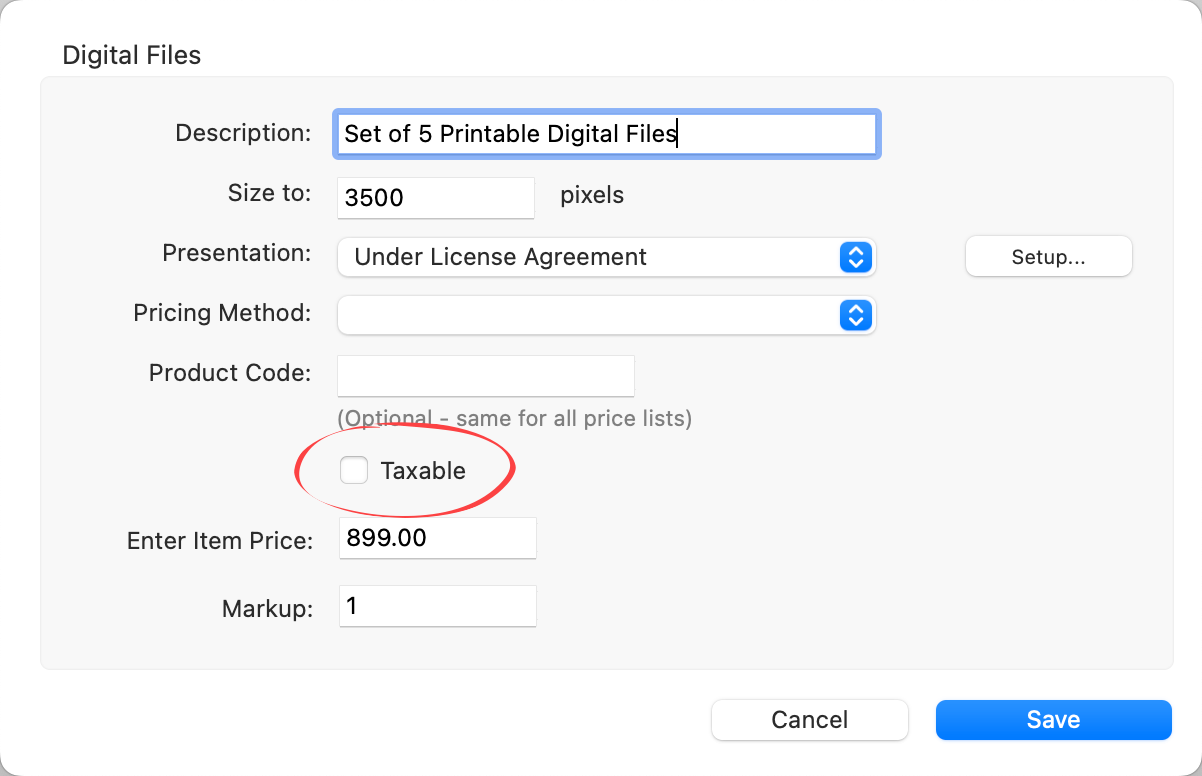
Depending on your taxing authority, all products sold may be subject to taxation, or in some cases, certain products may be tax-exempt. As a general guideline, choosing "Selected Price List Items" when you set up your tax offers the most flexibility. When this option is checked, you have the opportunity to disable taxes on individual products that are taxable by default.
For instance, in certain jurisdictions, digital files are not subject to taxation if they are electronically delivered. In such cases, you can disable taxes for that specific product. It’s always best to consult a tax professional for setup guidance.
When setting up taxes in ProSelect, if you enable "Selected Price List Items" in the Tax Setup, you’ll see a Taxable flag (T) when adding a discount. This setting can be confusing because it suggests a discount can also be taxed, which is a bit counterintuitive. When the tax setup is for “All Price List items”, the taxes are based on the final sale amount. There are two options available when offering discounts. For the majority of users, option 2 is the most common.
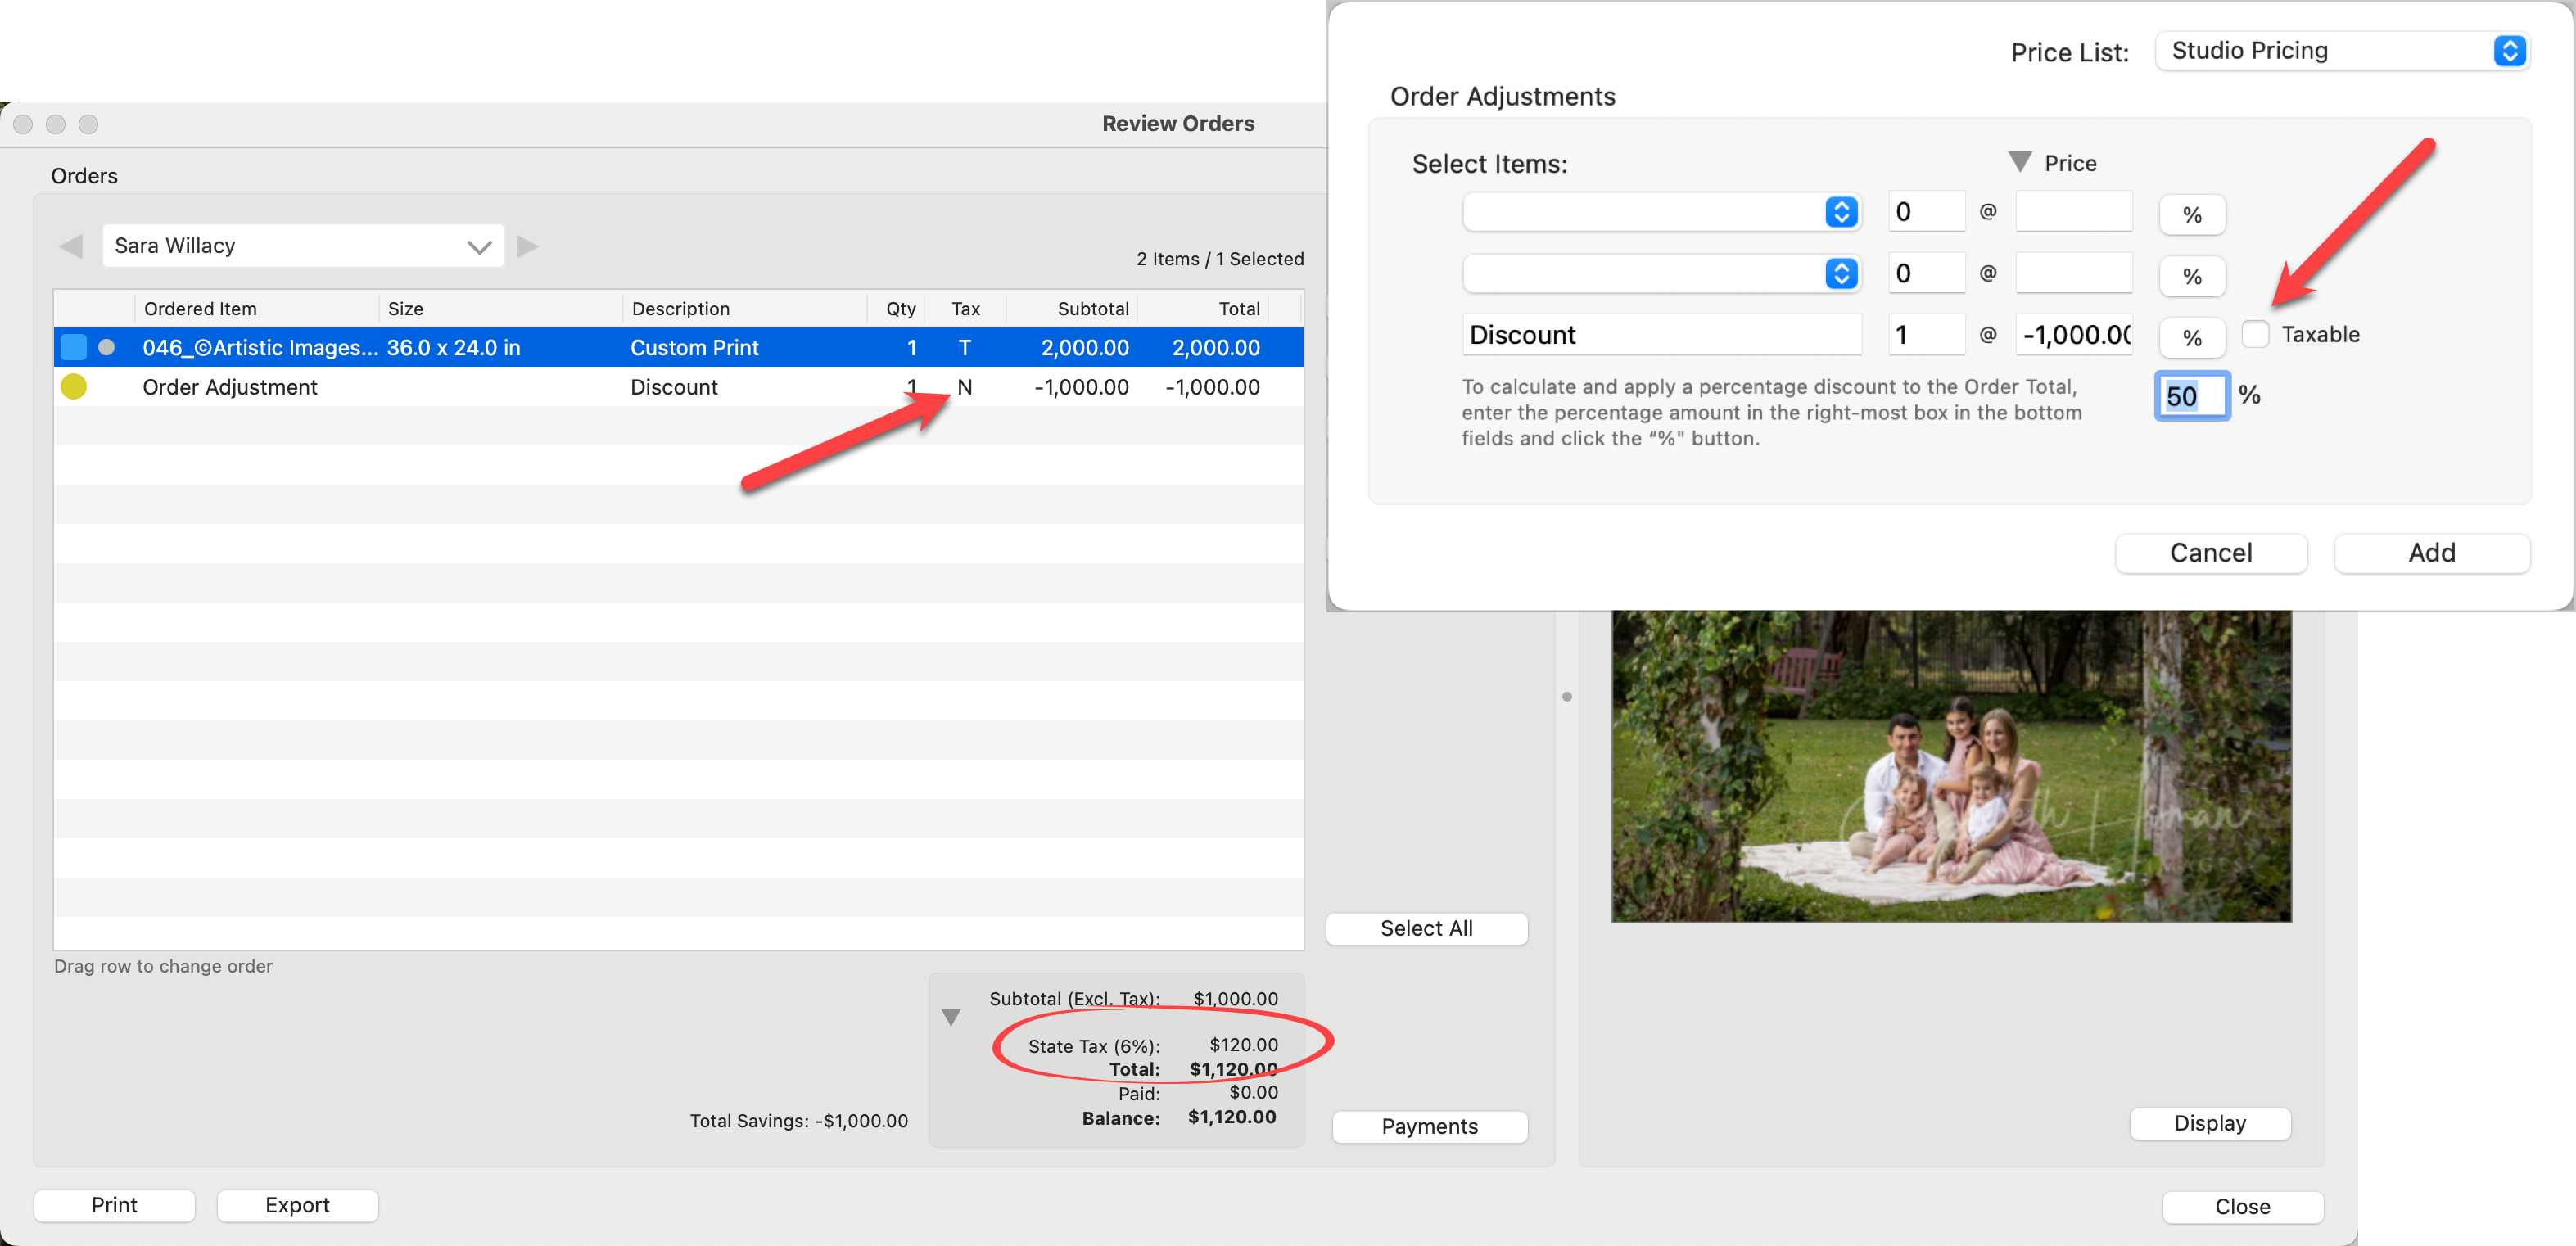
- Taxes on the Prediscount Amount:
- In some jurisdictions, taxes are calculated based on the original price of the product before any discounts are applied.
- In this case, ensure the discount is set to "Non-Taxable" (i.e., the "Taxable" option is turned off). This way, the discount won't affect the taxable amount, and taxes are collected on the full, prediscount price.
- In the example below, despite the 50% discount, tax is being charged on the full $2,000 amount - which equals $120.00.
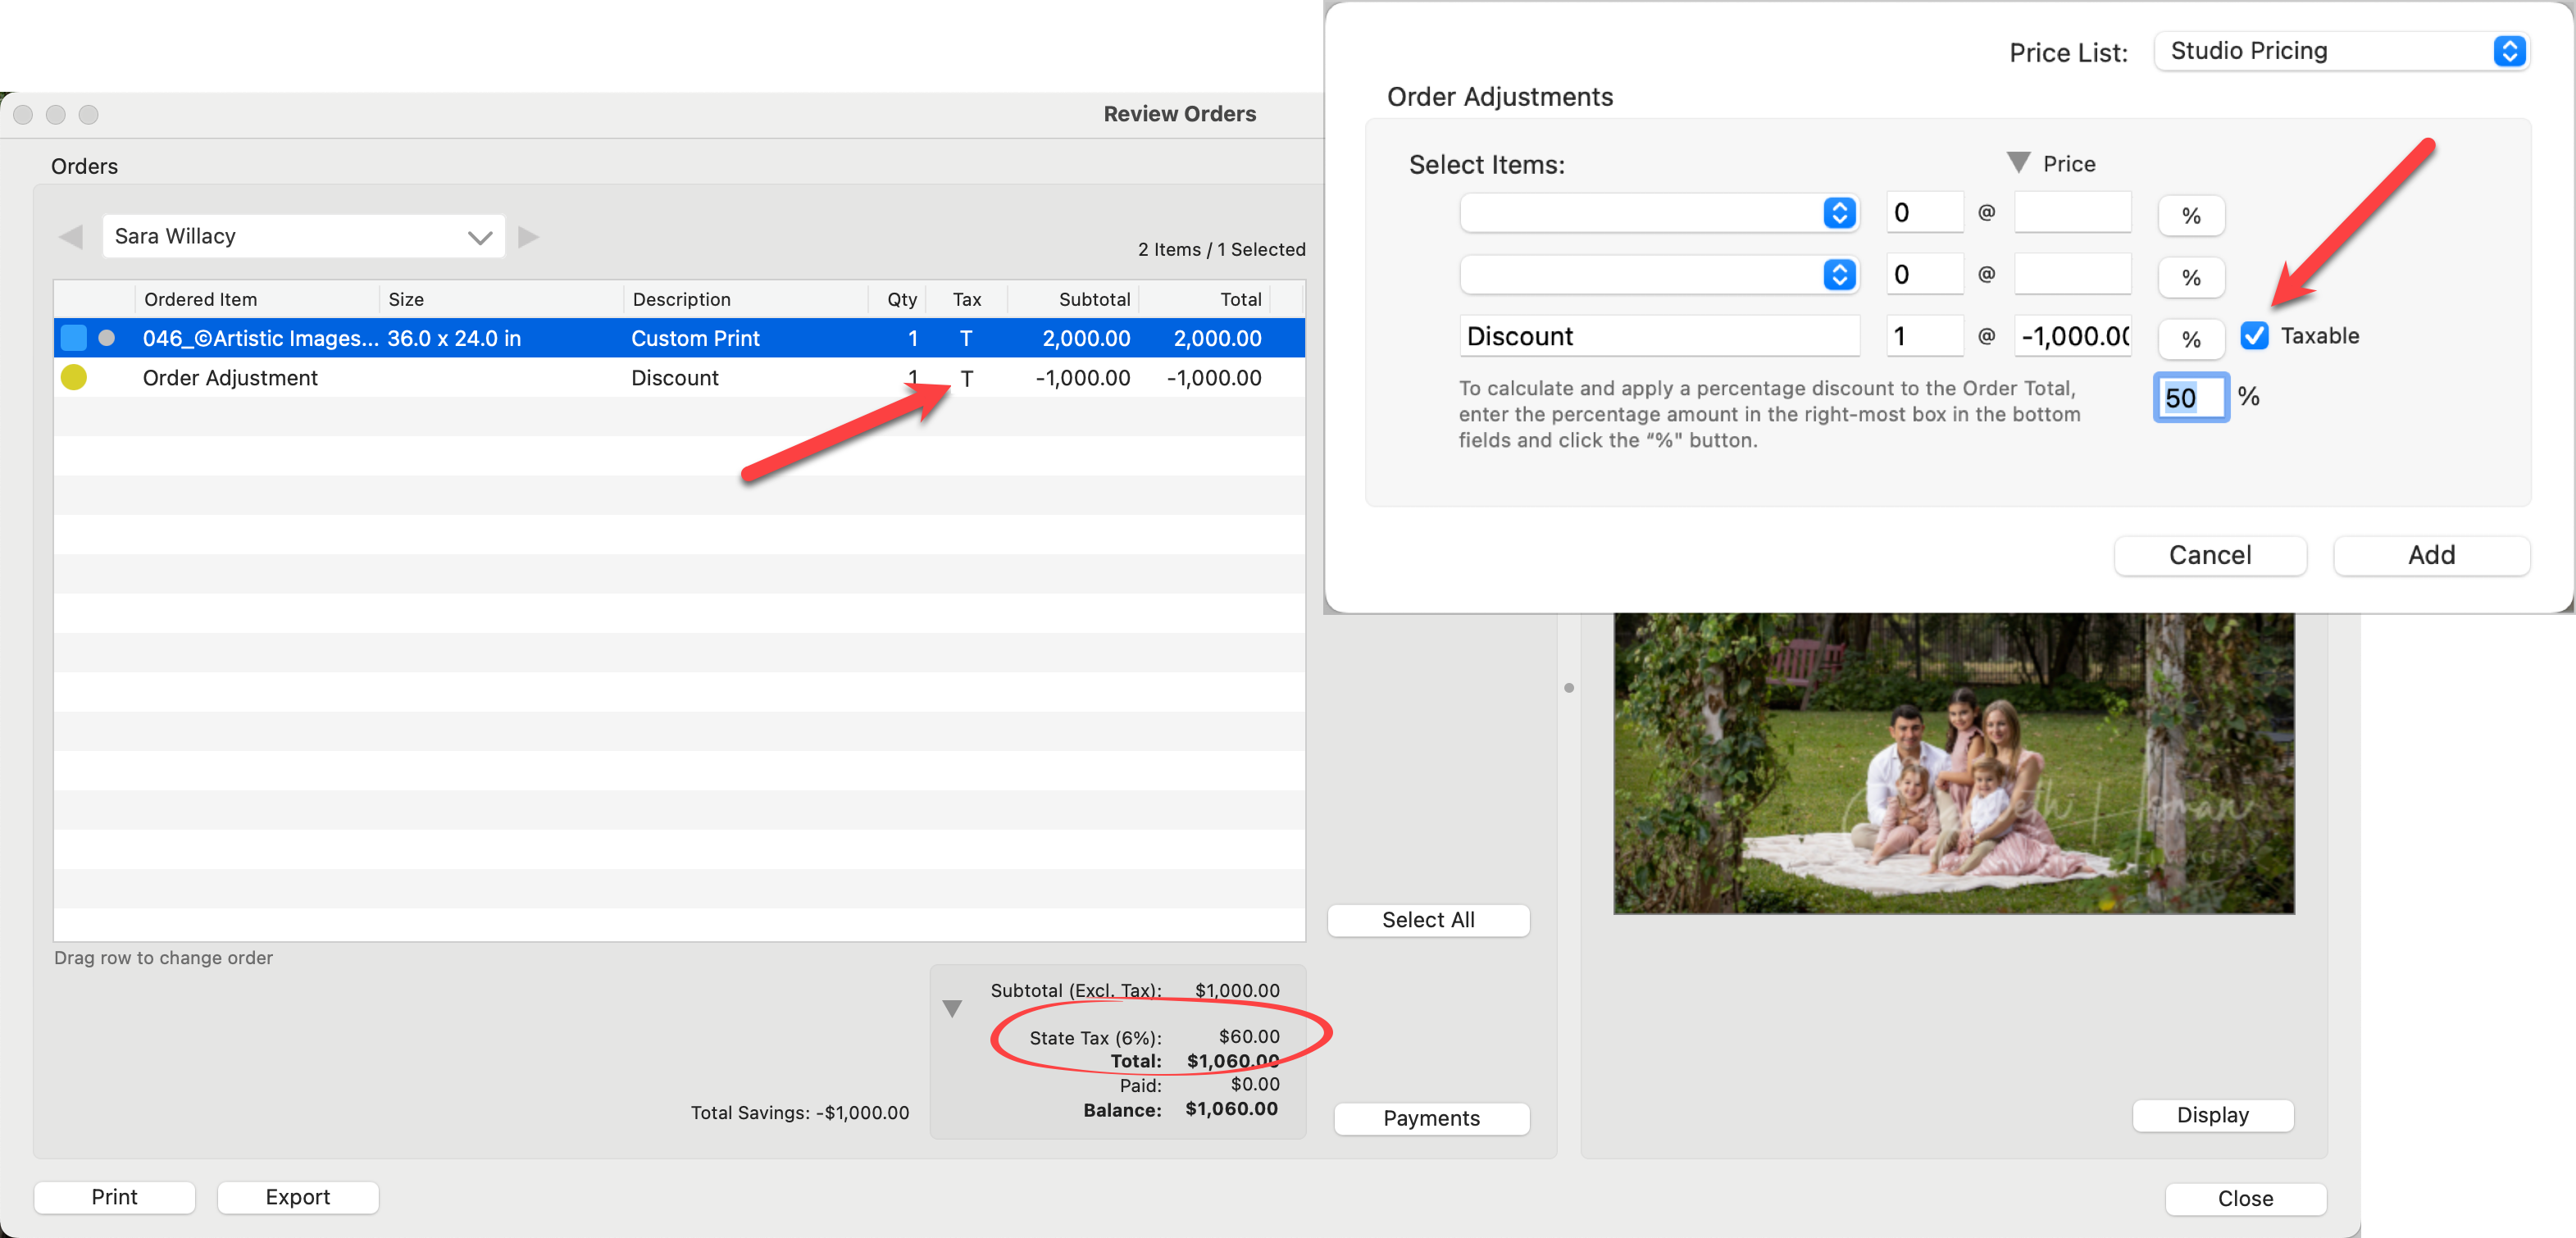
- Taxes on the Final Sale Amount:
- In other jurisdictions, taxes are applied to the final sale price after the discount is applied.
- In this case, set the discount to "Taxable." Since the discount reduces the total amount, the taxable amount will be based on the final, discounted price. In this case, the tax on the discount (which is a negative value) is subtracted from the total.
- In the example below, tax is being charged on the discounted final price of $1,000 - which equals $60.00.
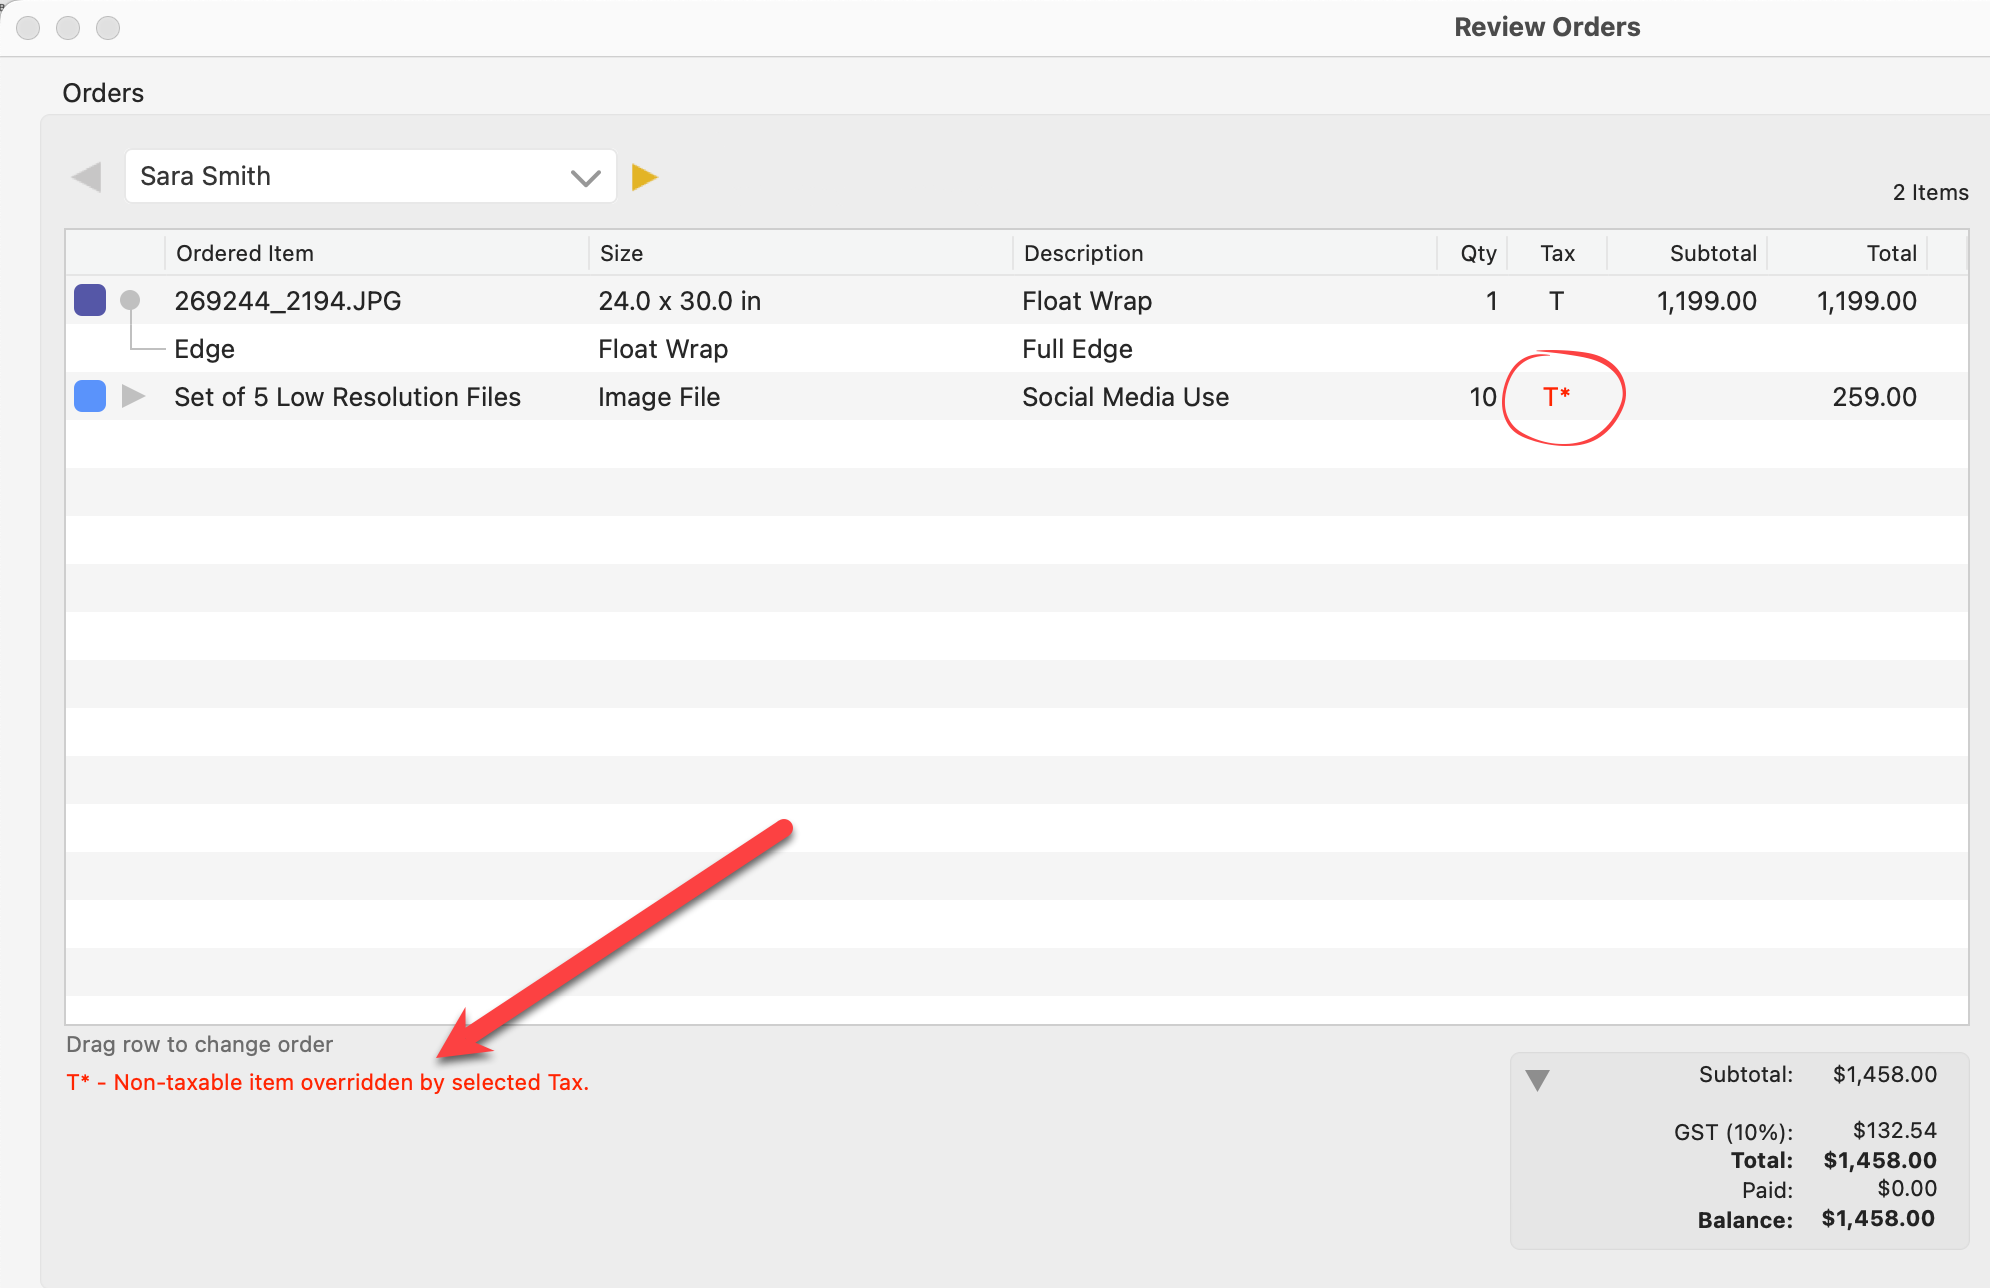
It is important to note that the tax option you choose from the Tax Setup dialog will override individual price list items. e.g. If you select a tax option that includes ALL price list items, this will override a product you have created to be non-taxable. In this instance, a red T will appear in the Review Orders window notifying you of the override.