Management Area
The Management Area homepage allows you to send invitations, monitor client activity, and change viewing times. Enter the management area in one of two ways:
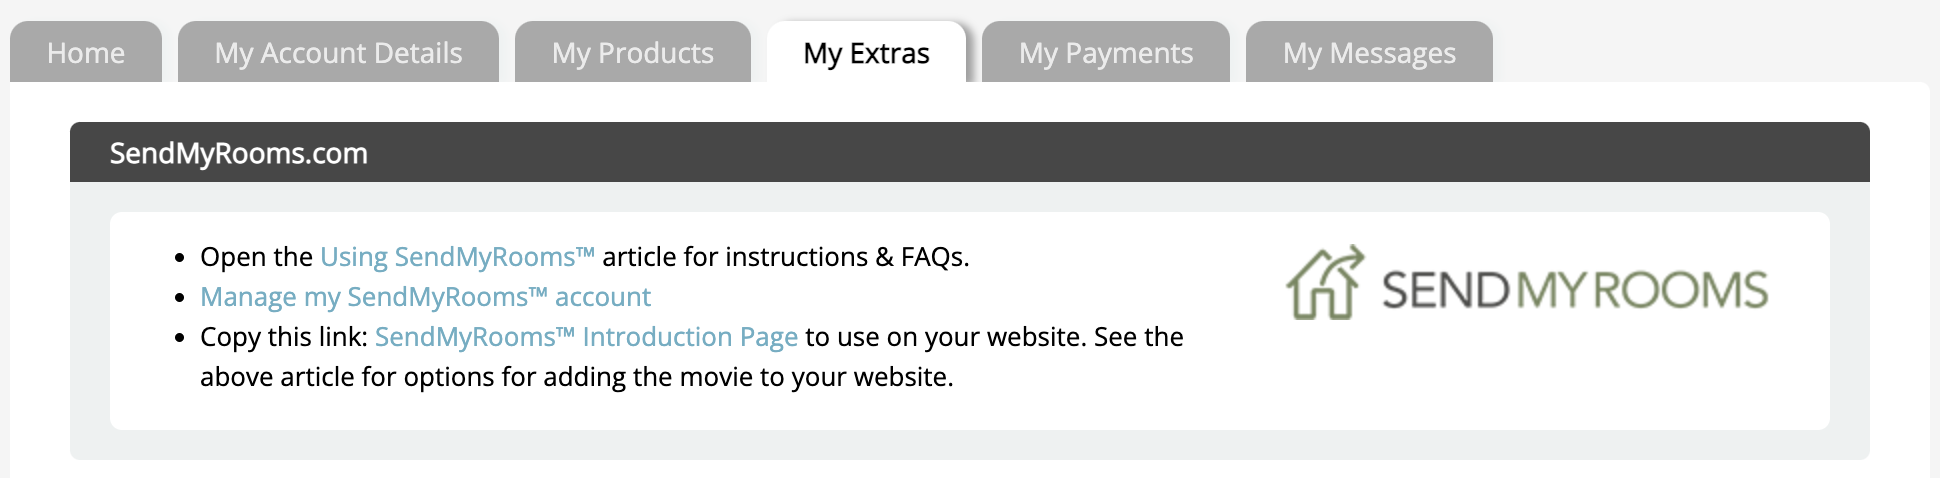
- Your ProStudioSoftware.com My Account area (under the My Extras tab).
- In ProSelect, navigate to Orders > SendMyRooms > Management Area.
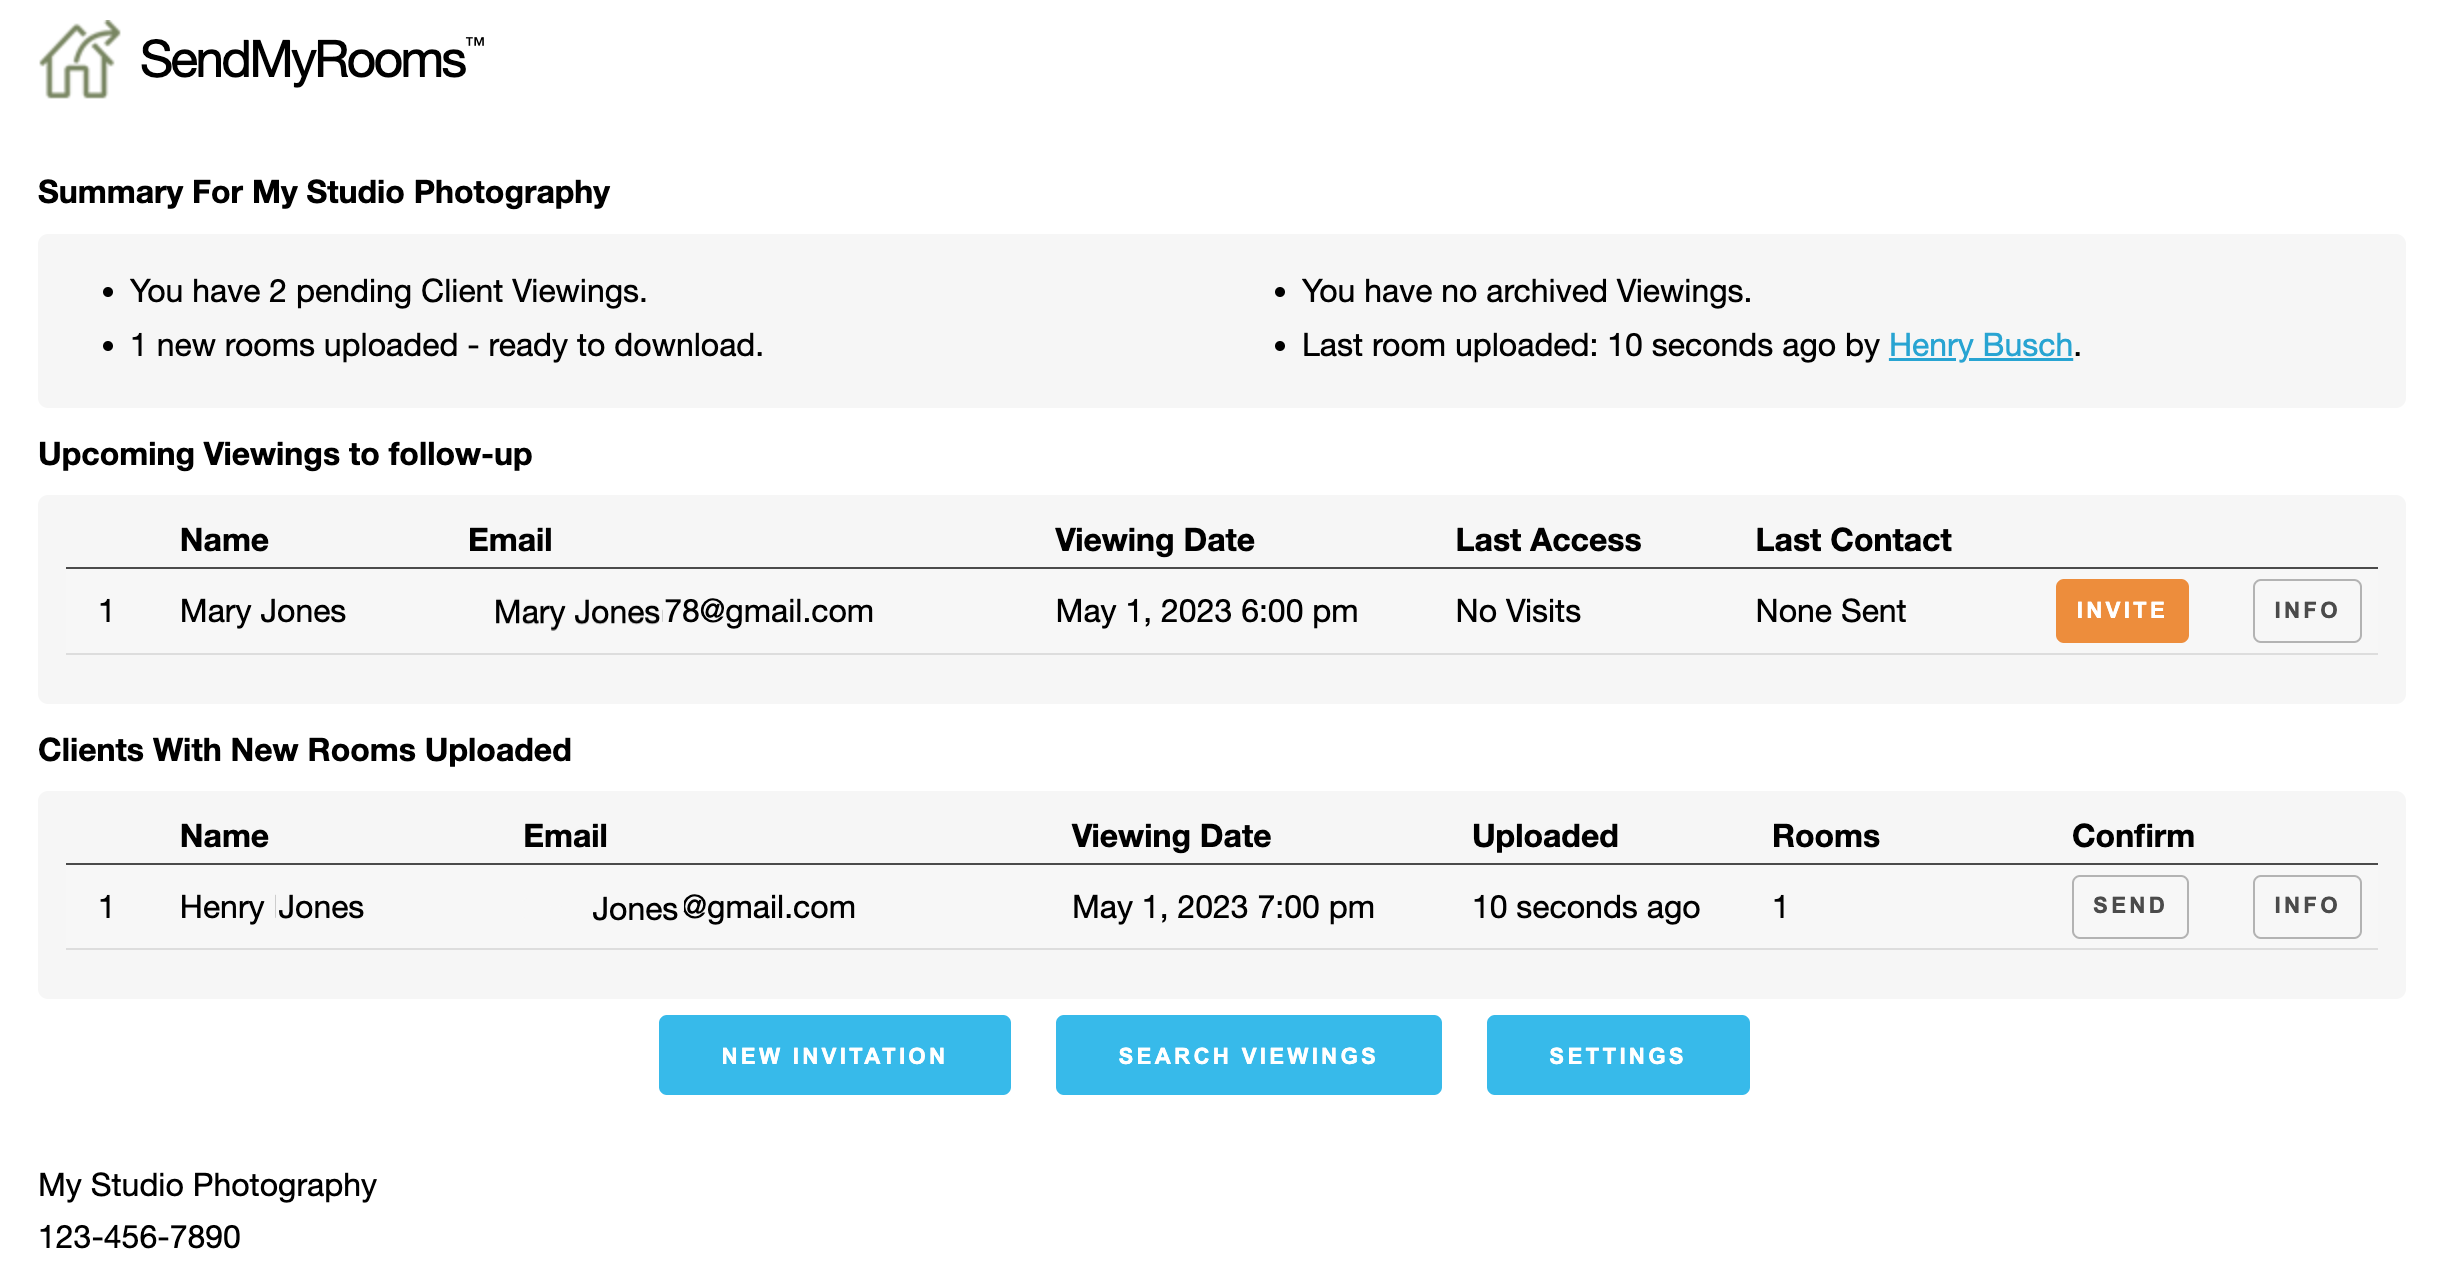
- A summary of client viewings, rooms ready to upload, and archived viewings appears at the top of the window.
- The homepage lists any upcoming viewings as well as any rooms that have recently been uploaded by Clients.
- From here you can Send a New Invitation, Search Viewings, or access your Settings.
- Invite your clients to SendMyRooms™.
- In ProSelect, go to Orders > SendMyRooms > Send Invitation OR
- Click on the New Invitation button from the SendMyRooms™ Management Area.
- The New Invitation dialog will appear. If you have already entered your client's details into ProSelect’s Client Setup window, that information will be automatically transferred to this page. Otherwise, enter the Client's details.
- Enter the Viewing Date and Time. You can only enter a viewing date that is within the next 6 months.
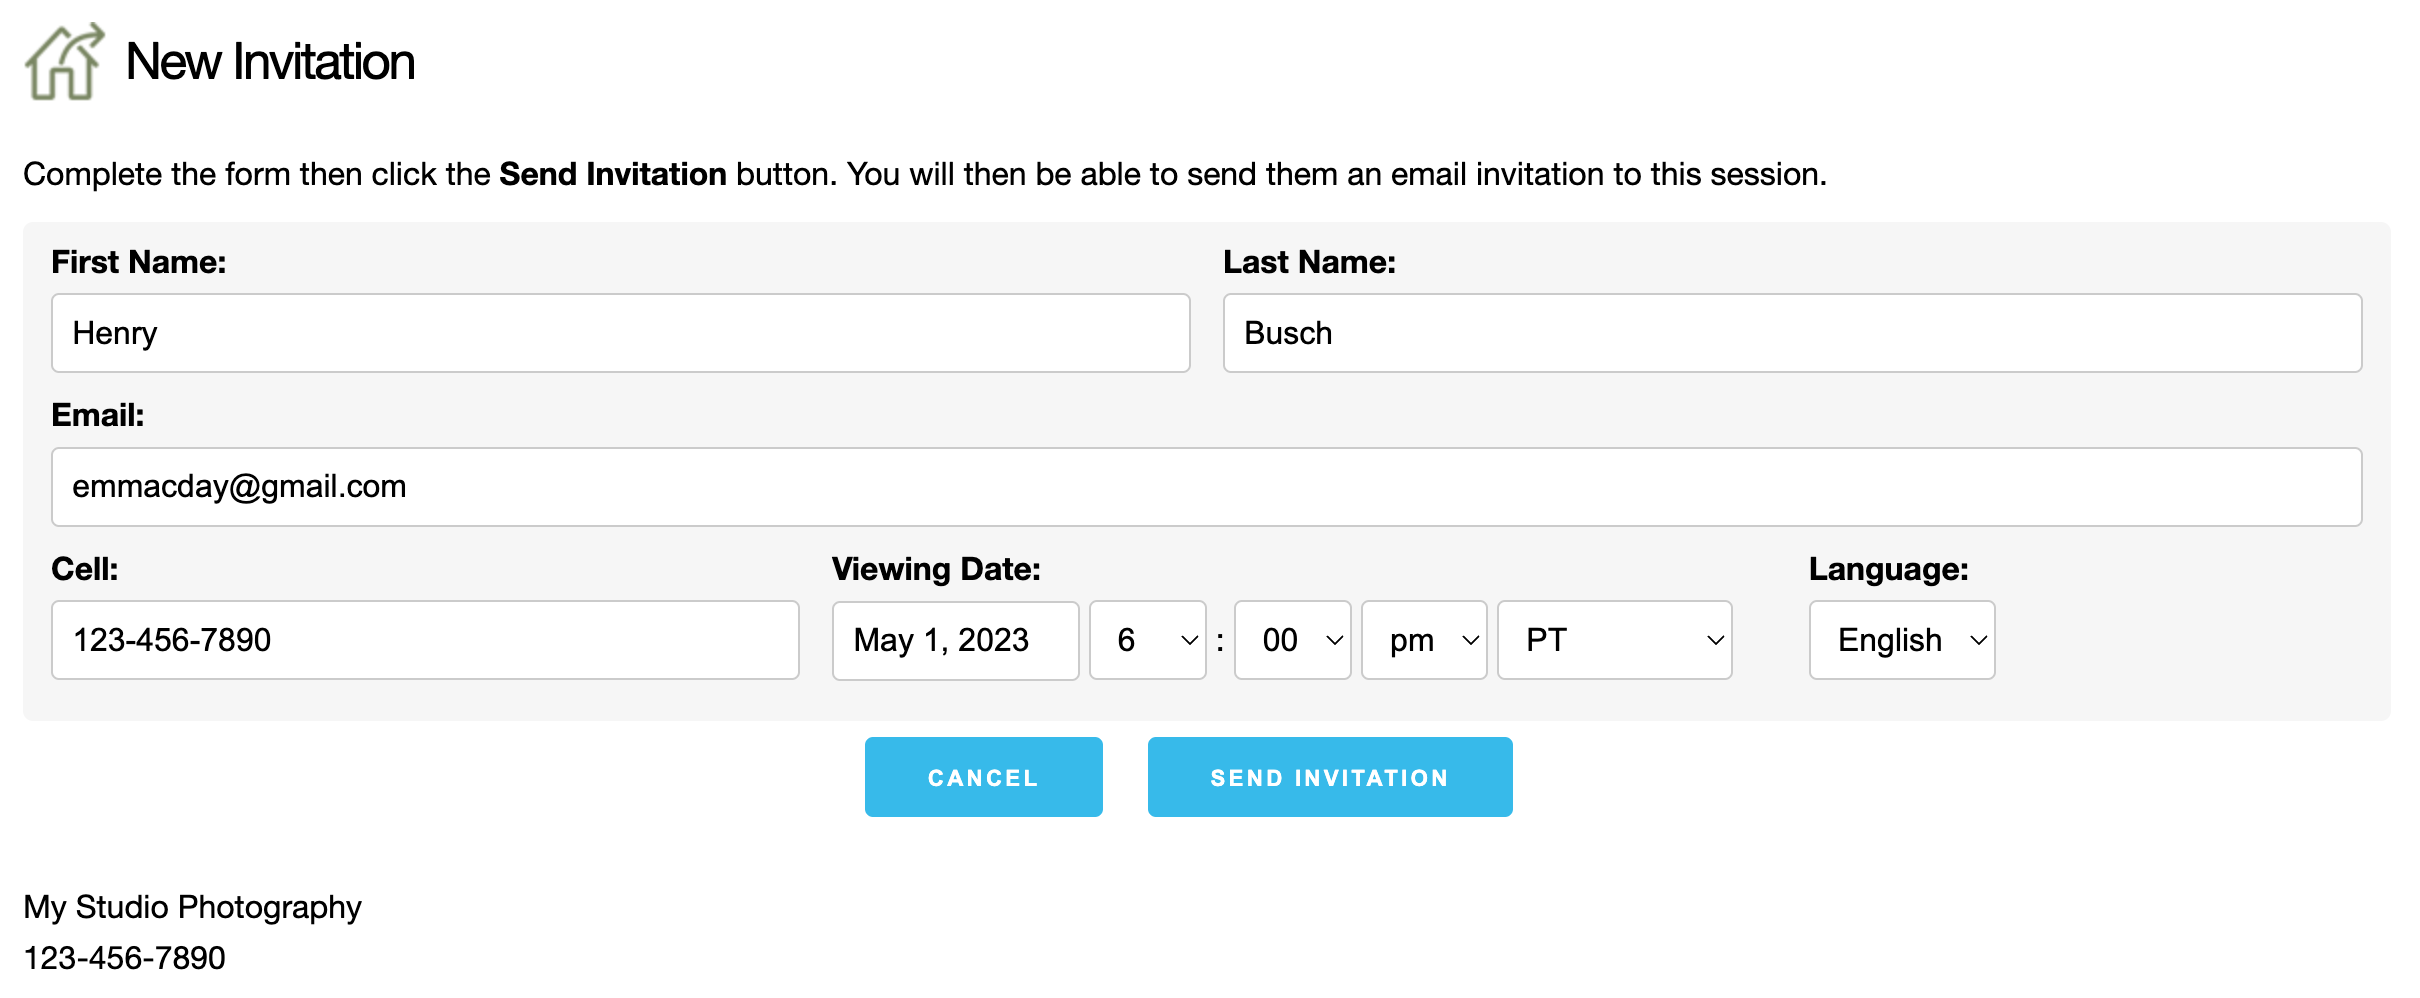
- Click the Send Invitation button.
- This will open the Send Invitation dialog. Confirm that the details are correct. From here you can use the Show Preview button to preview the email before sending it.
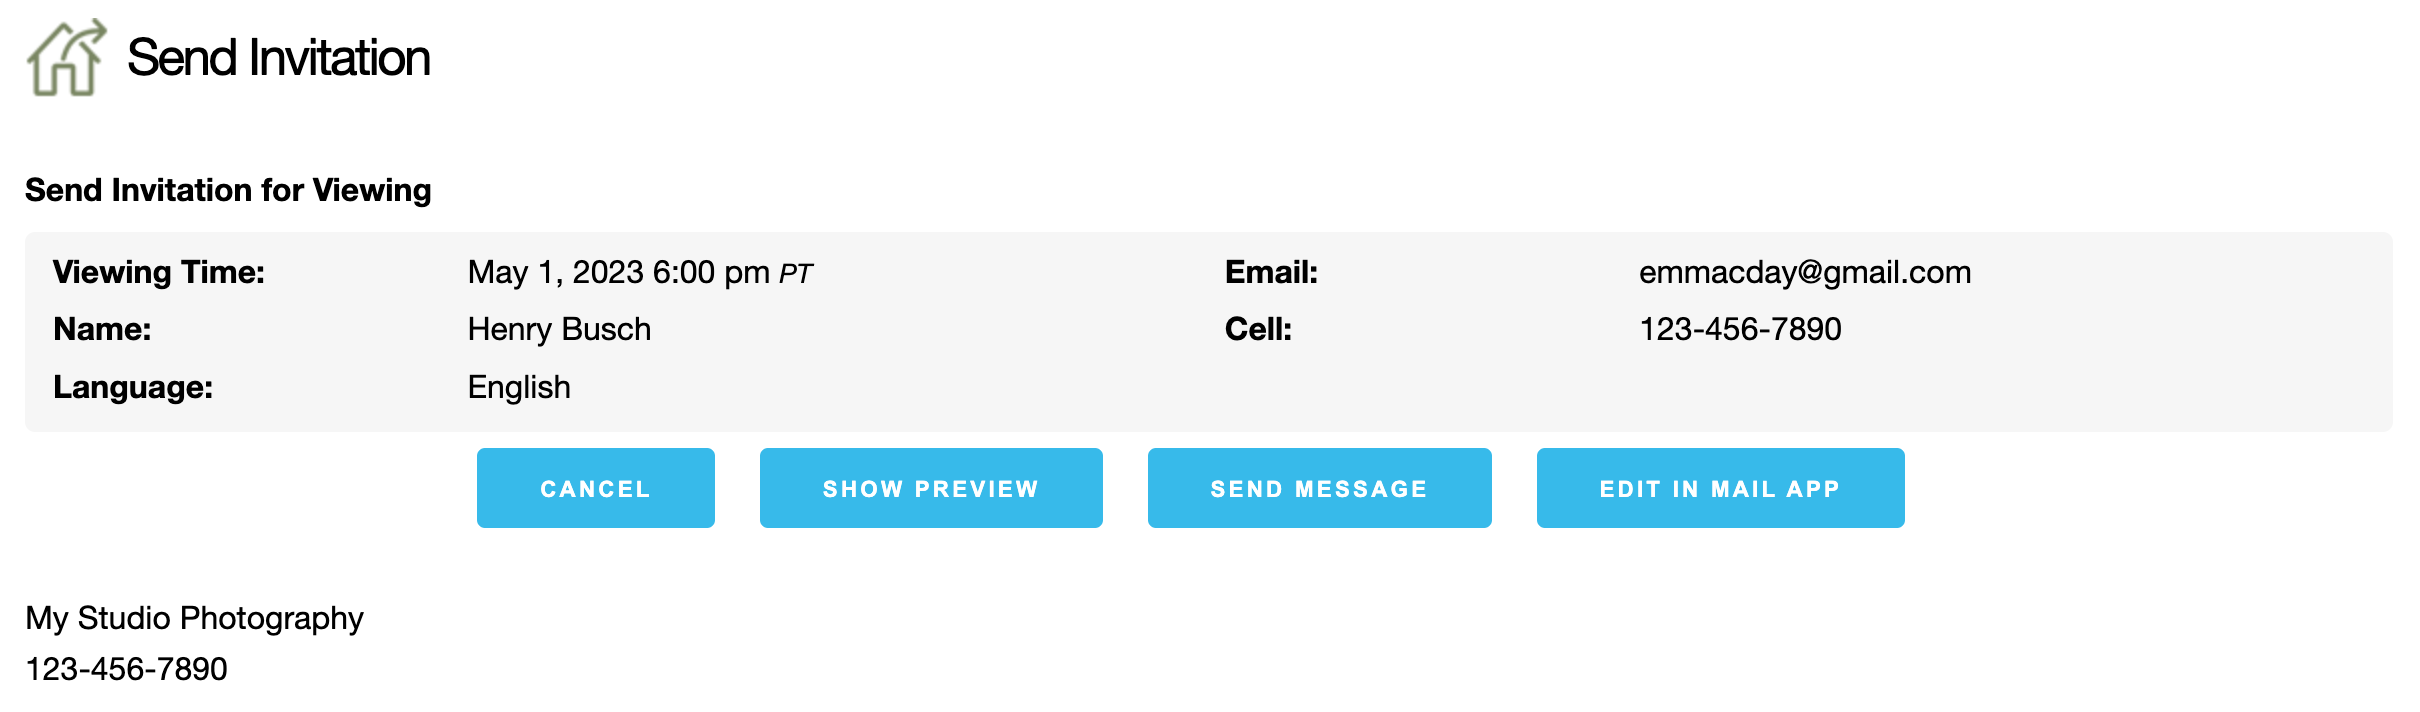
- Click the Send Message button to send it.
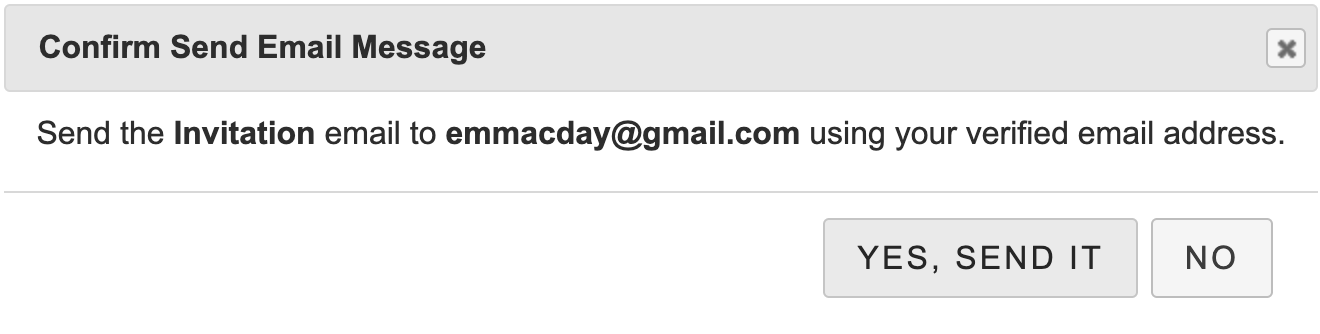
- Click the YES, SEND IT button to confirm.
- Follow steps 1-5 for Sending a New Invitation.
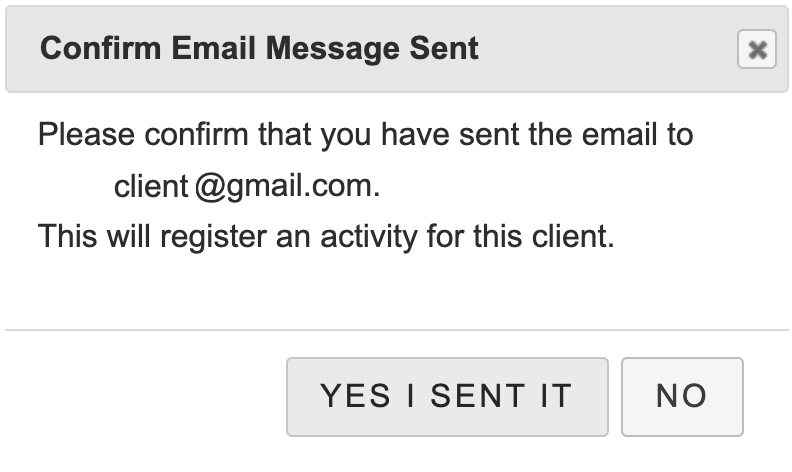
- When you reach the Send Invitation window, click the Edit in Mail App button.
- The message will be transferred to your email application where you can edit and send the message yourself.
- Once you have sent the email, you must click the YES I SENT IT button. This lets the system know that you have sent the email yourself, so it can record the action as completed.
The Management Area allows you to keep track of the various stages of client viewings.
Summary
A Summary at the top of the page serves as a quick reference for all your viewings.
Upcoming Viewings - Send Reminder
The "Upcoming Viewings to Follow-up" area lists clients who have been invited to SendMyRooms™, but have not yet uploaded any rooms. This page does not show any viewings that have already passed their scheduled viewing date. However, these can be found on the Search Viewings page.
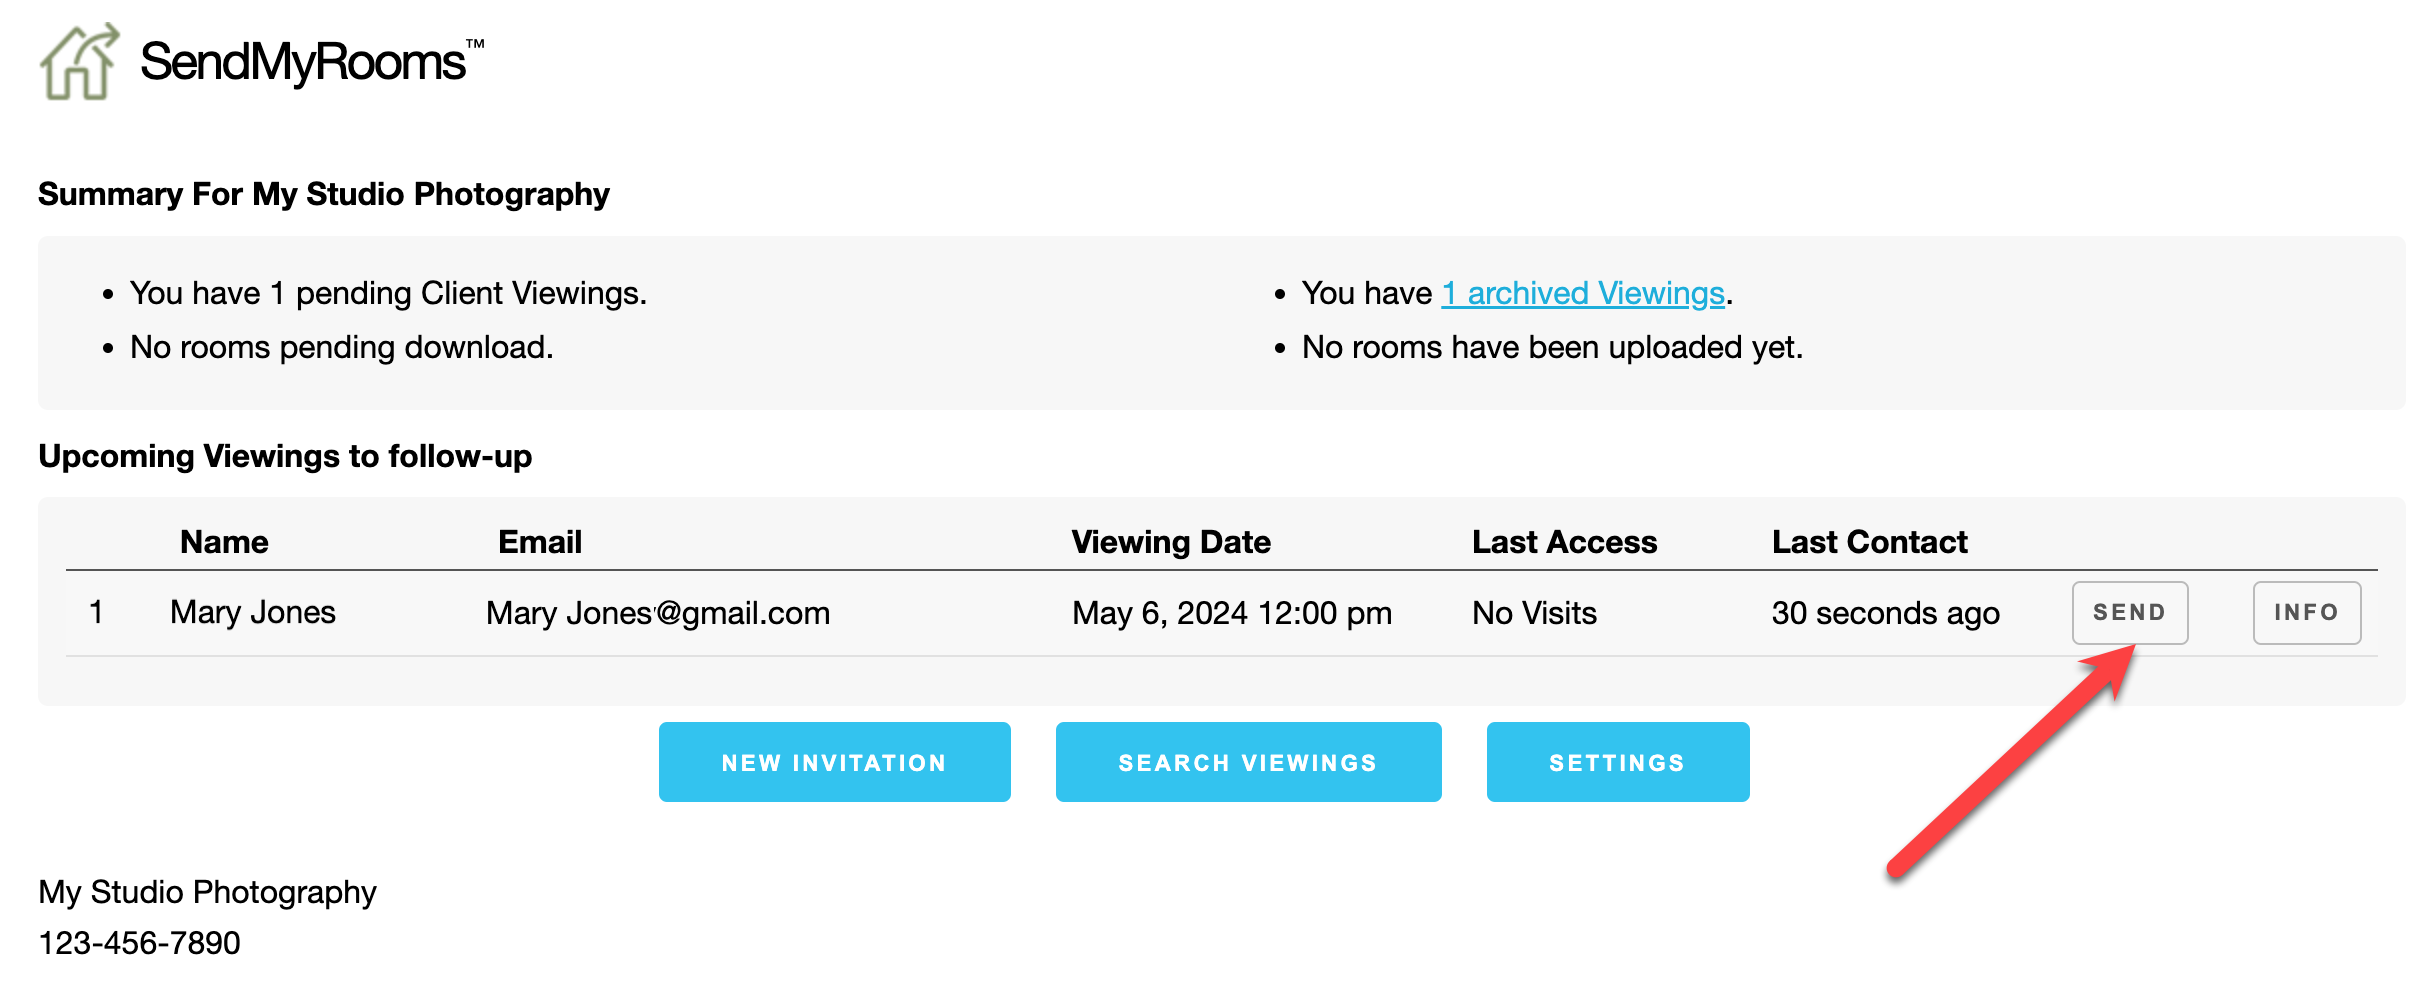
- Use the Info button to access information about the upcoming viewing appointment.
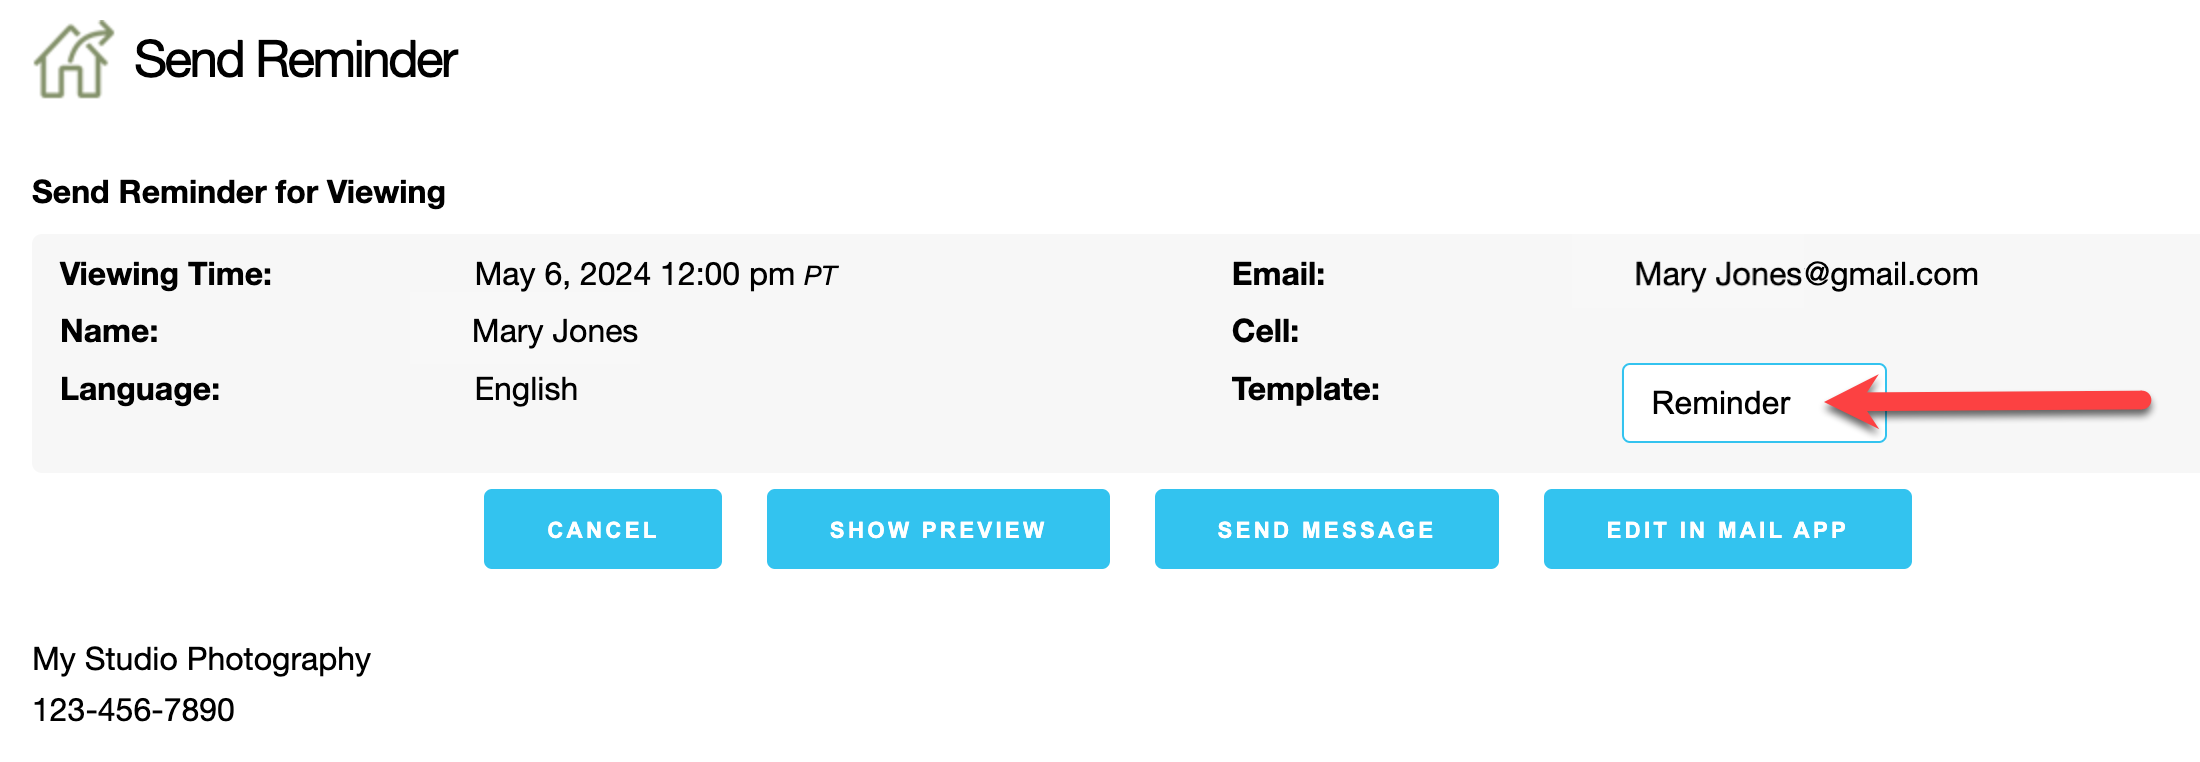
- Use the Send button to resend the invitation, a reminder, or a confirmation email. *reminders and confirmation emails can be enabled to automatically send to Clients. This option is activated in your Settings.
- Select which kind of email you would like to send from the Template drop-down list.
- Click on the Send button.
Clients With New Rooms Uploaded
The "Clients With New Rooms Uploaded" area lists clients who have uploaded one or more rooms. The rooms have not yet been downloaded into ProSelect.
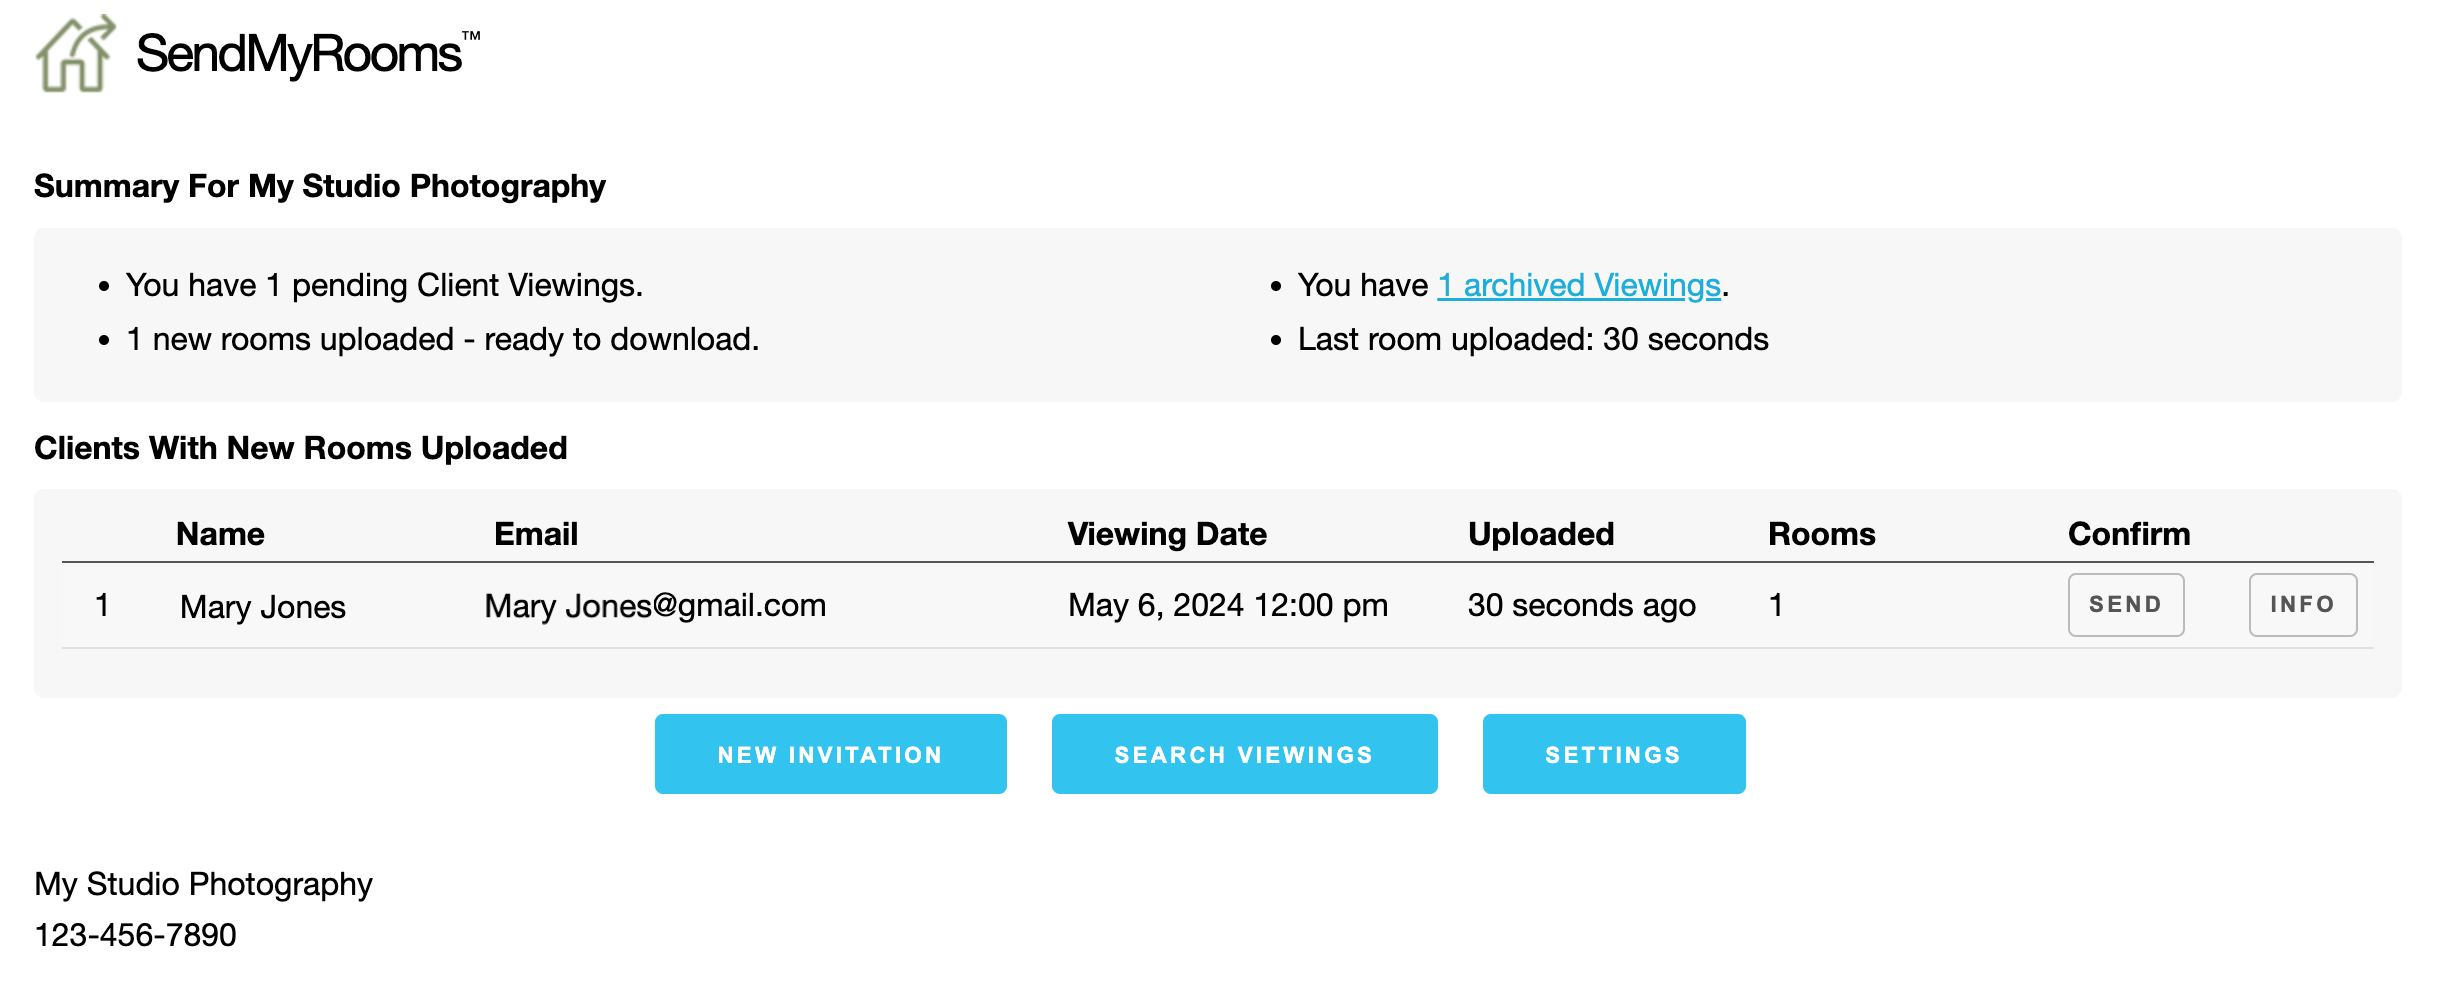
- Use the Info button to access information about the upcoming viewing appointment, as well as view uploaded room images.
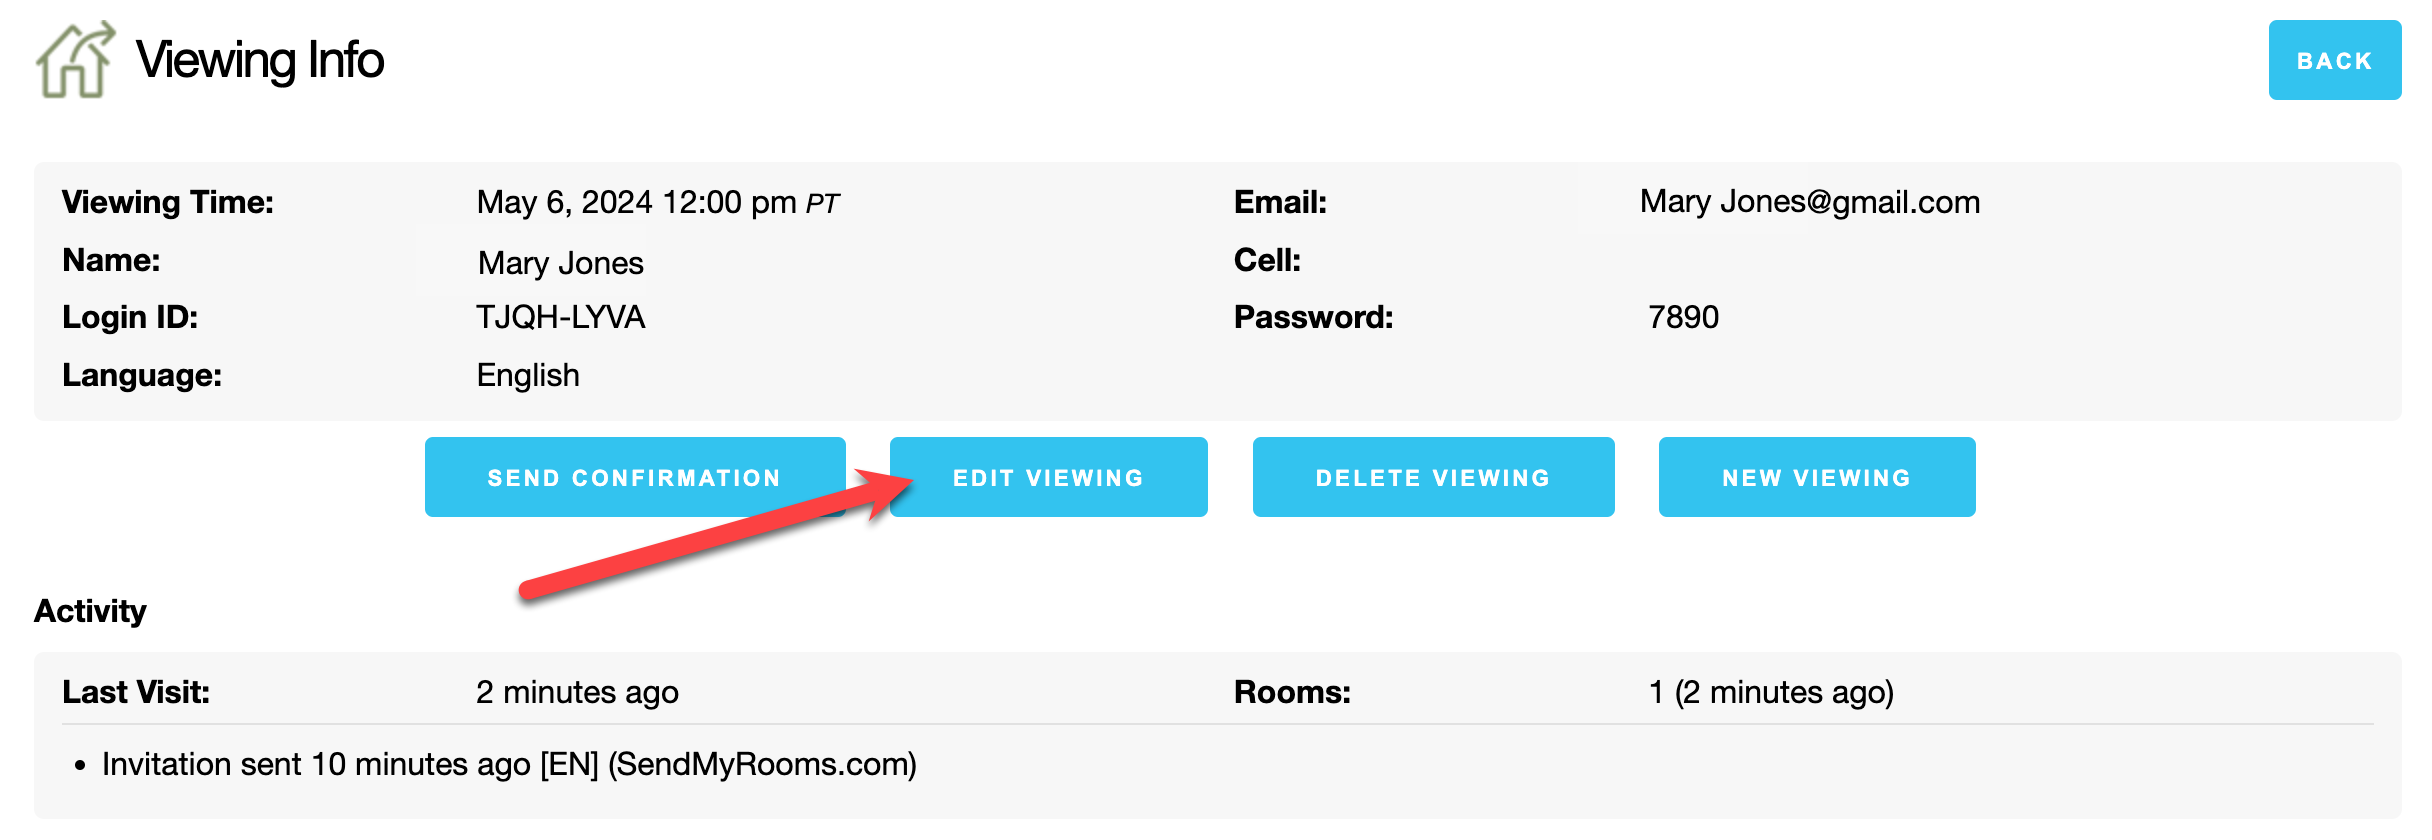
Viewing Info
The Viewing Info dialog appears when you click on the Info button next to a listed viewing. It contains all the details, activity history, and thumbnail images of any rooms Clients have uploaded. From here you can Send a Confirmation Email or Reschedule the Viewing Appointment.
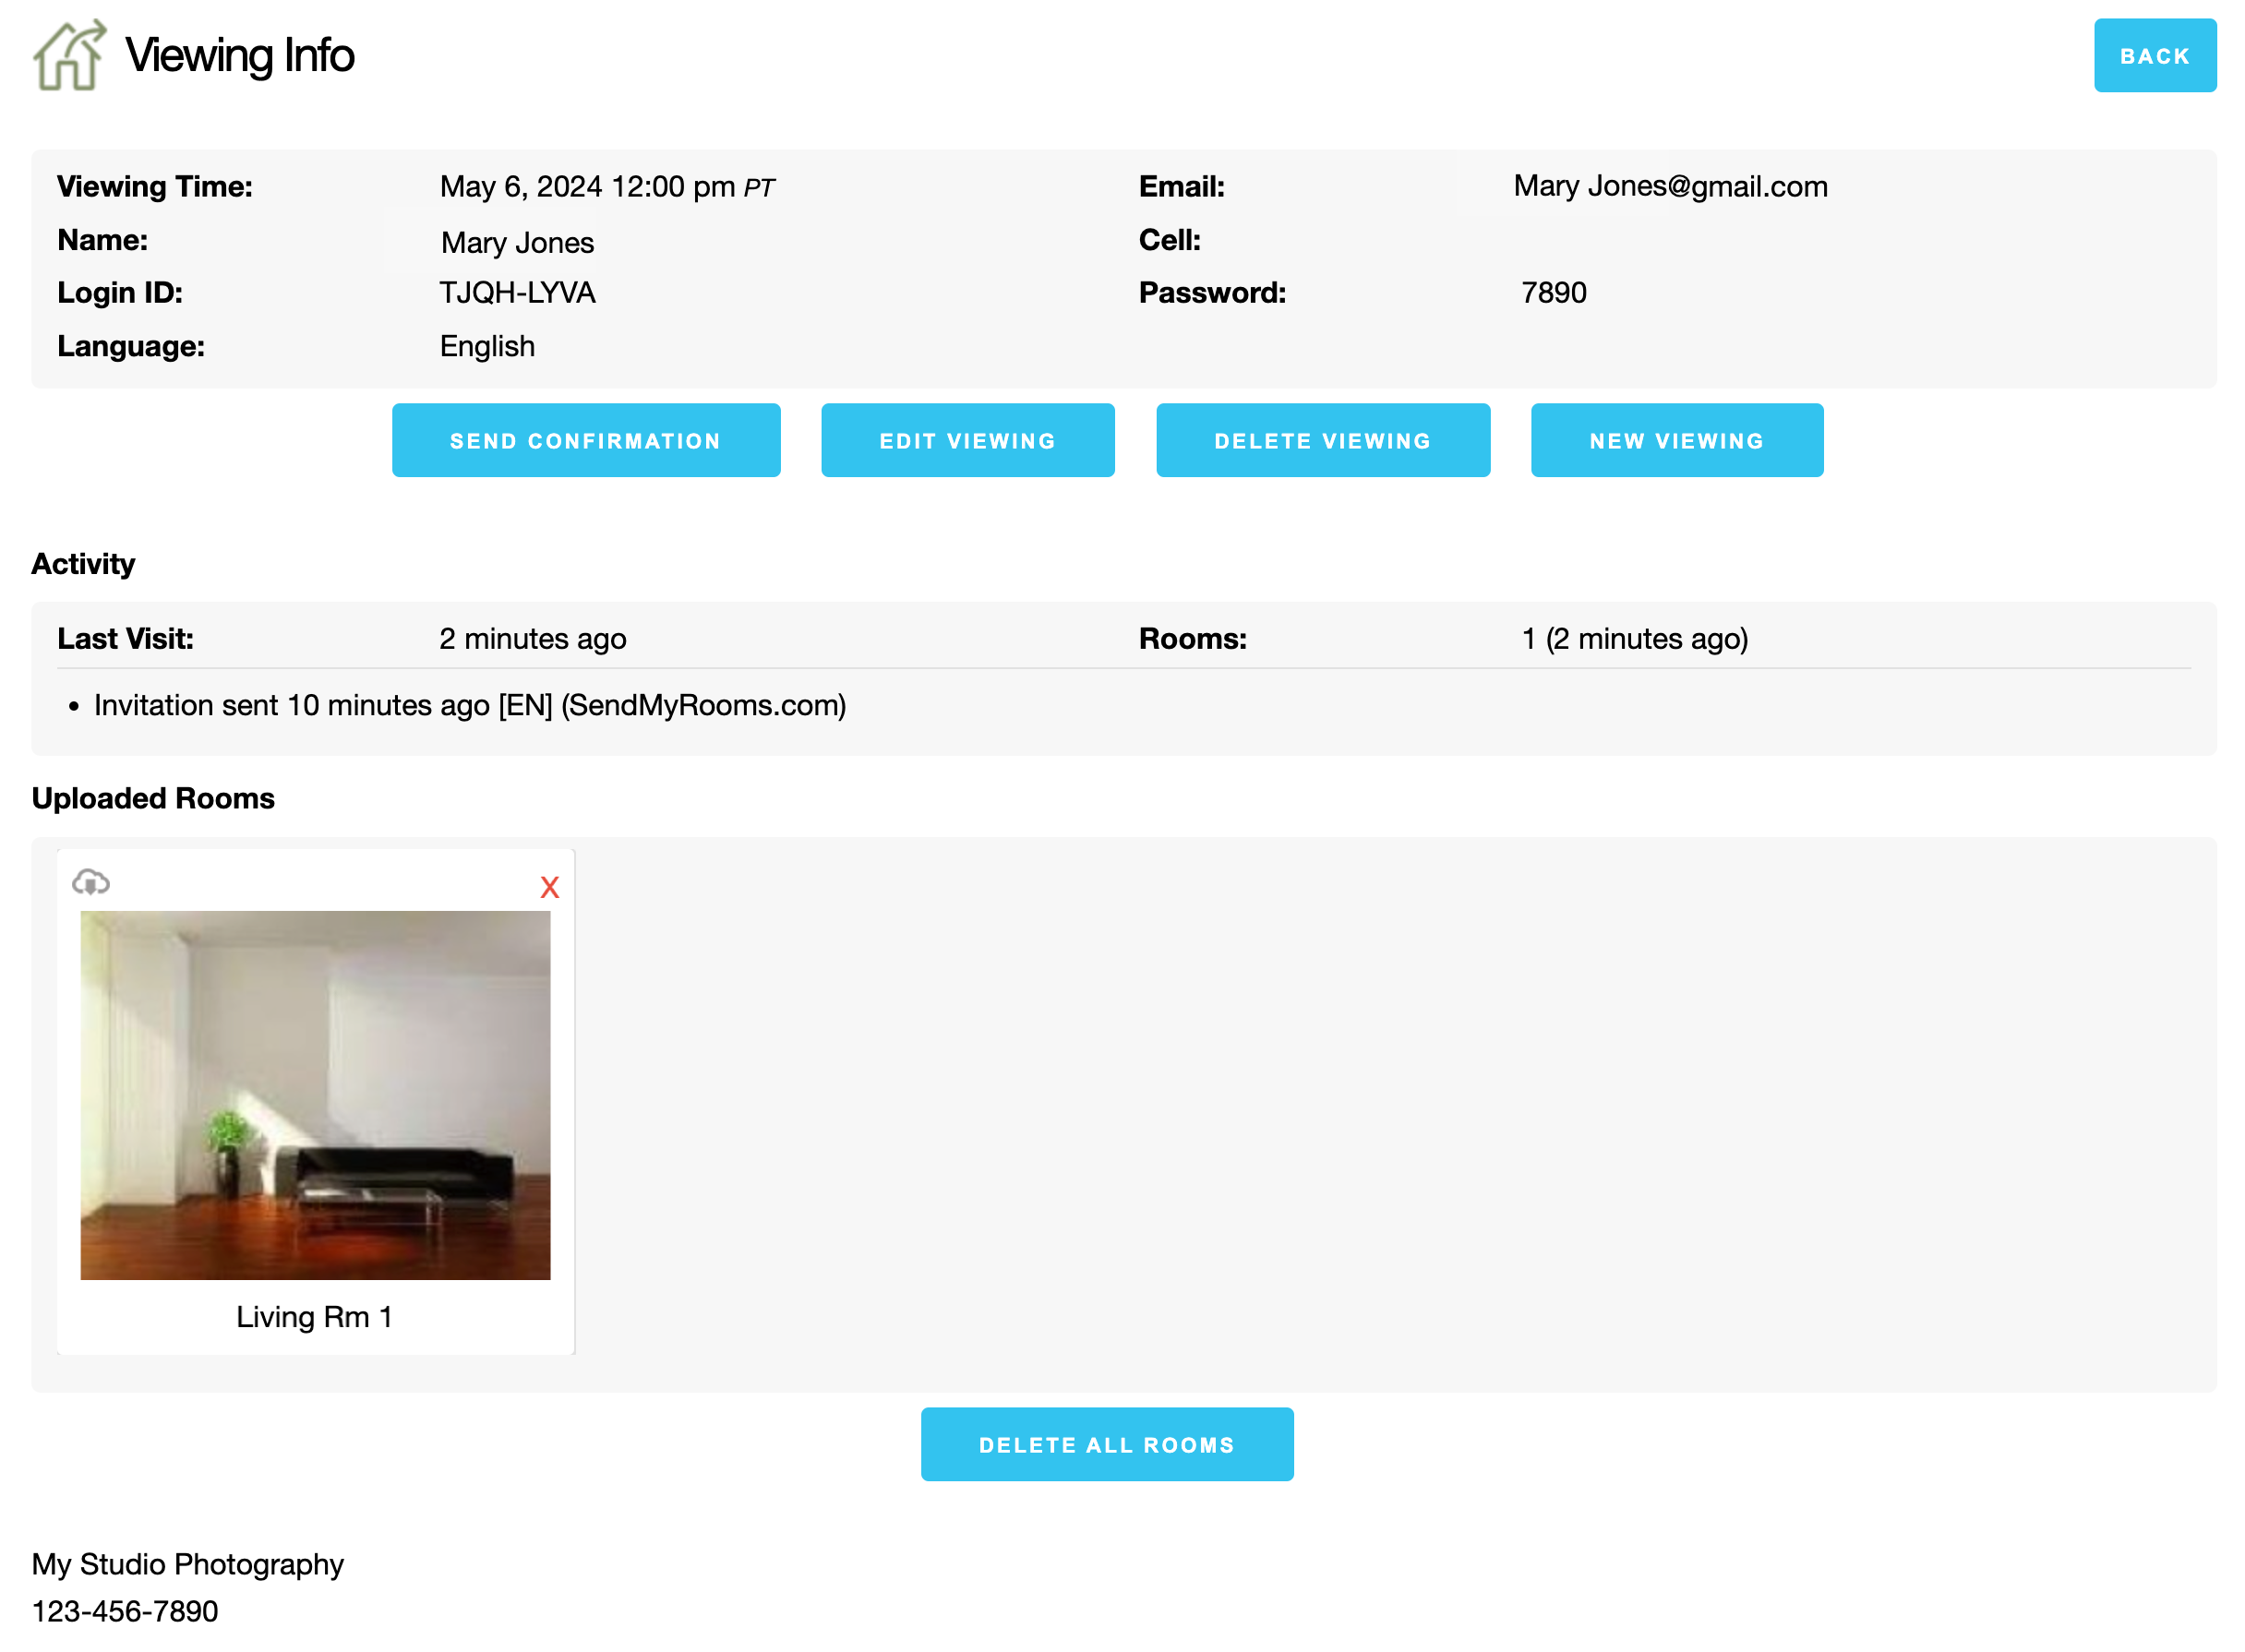
- Use the Delete Viewing button to permanently delete a viewing. Removing the viewing will also remove any uploaded rooms. Because of this, you will be asked to confirm before deleting.
- Use the New Viewing button to create another viewing for the same client already populated with their details.
- The Activity Bar displays all emails sent to the Client.
- Thumbnails of the images Clients upload to SendMyRooms™ will appear here. You can delete an image using the red X, or directly download it to your computer using the cloud icon. A green checkmark will appear after the image is downloaded into ProSelect. Click on Adding SendMyRoom Images for more information.
While uploaded images will be removed from the server approximately 7 days after the viewing date, the viewing information will be kept in the archive unless you delete it.
You can manually send or re-send any of the template emails. You can enable reminder and confirmation emails to be automatically sent to your clients. To activate this feature, configure the auto-send options in your settings.
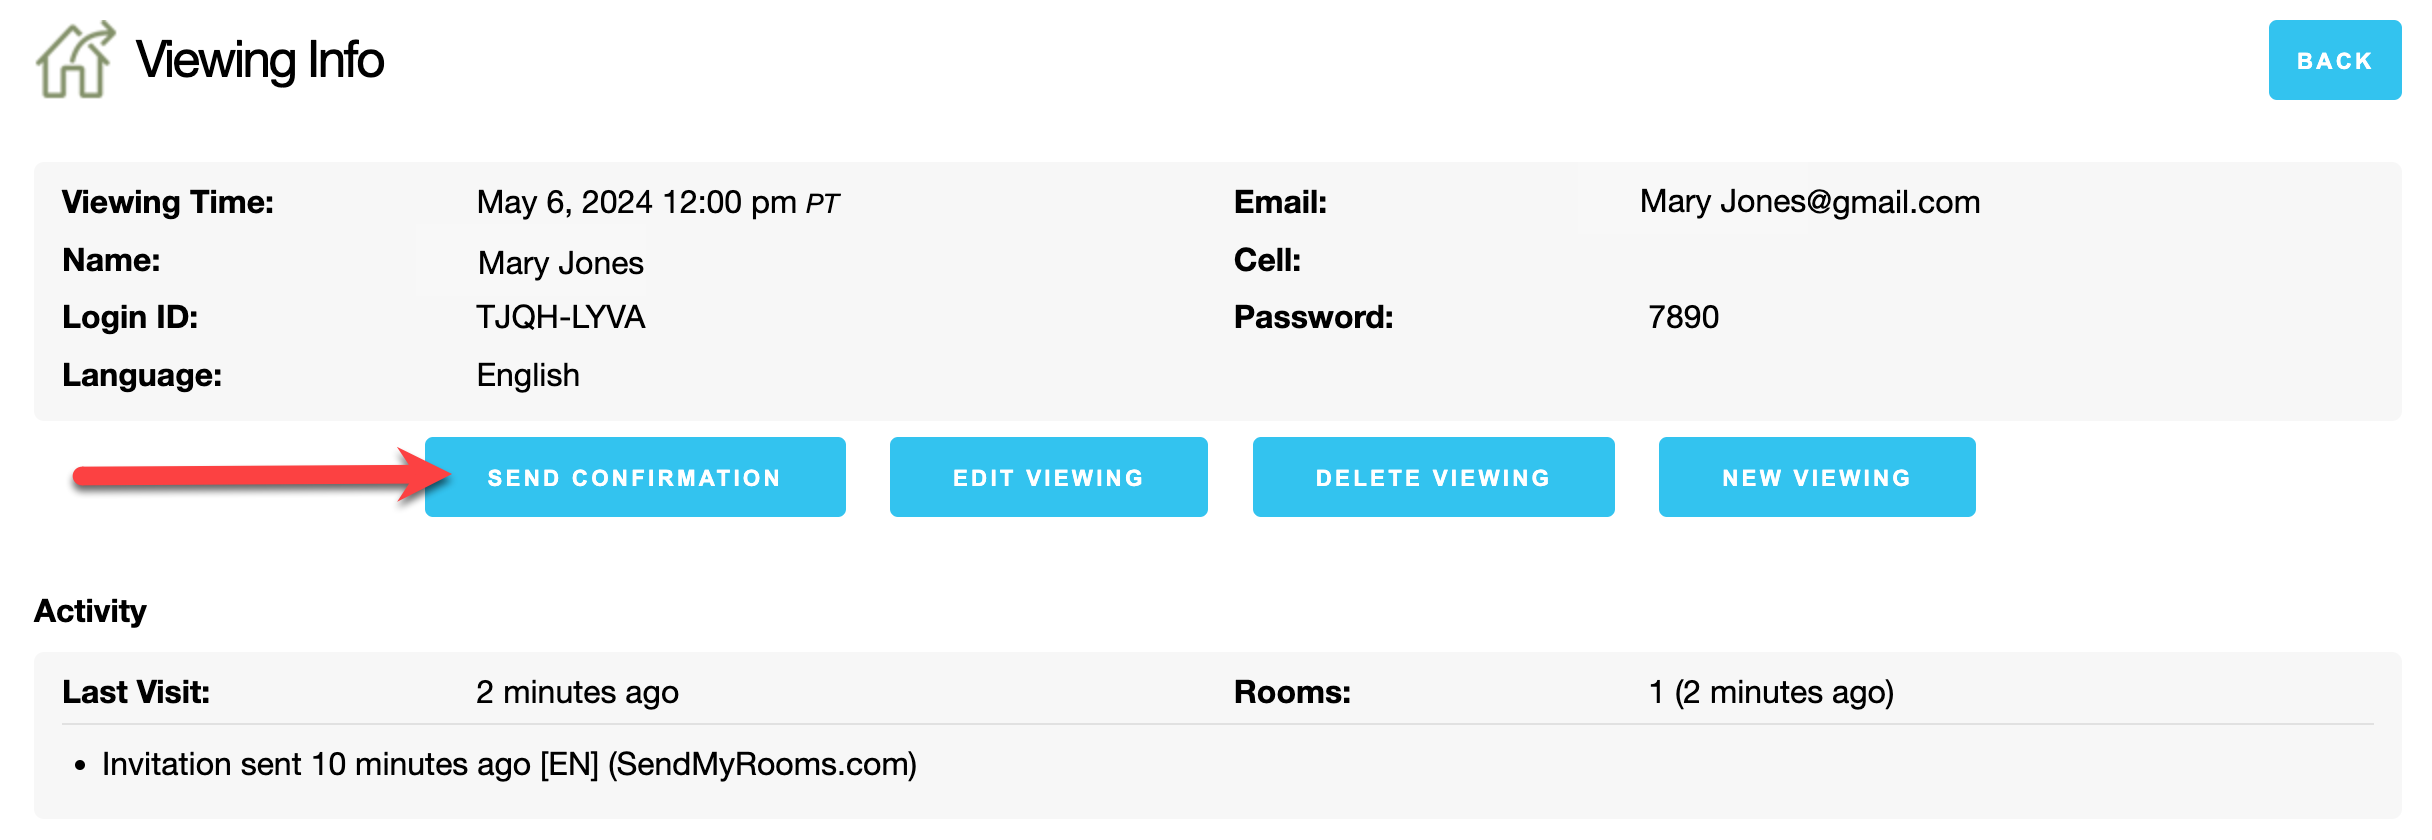
- Click on the Info button next to the viewing you wish to confirm.
- From the Viewing Info dialog, click on Send Confirmation.
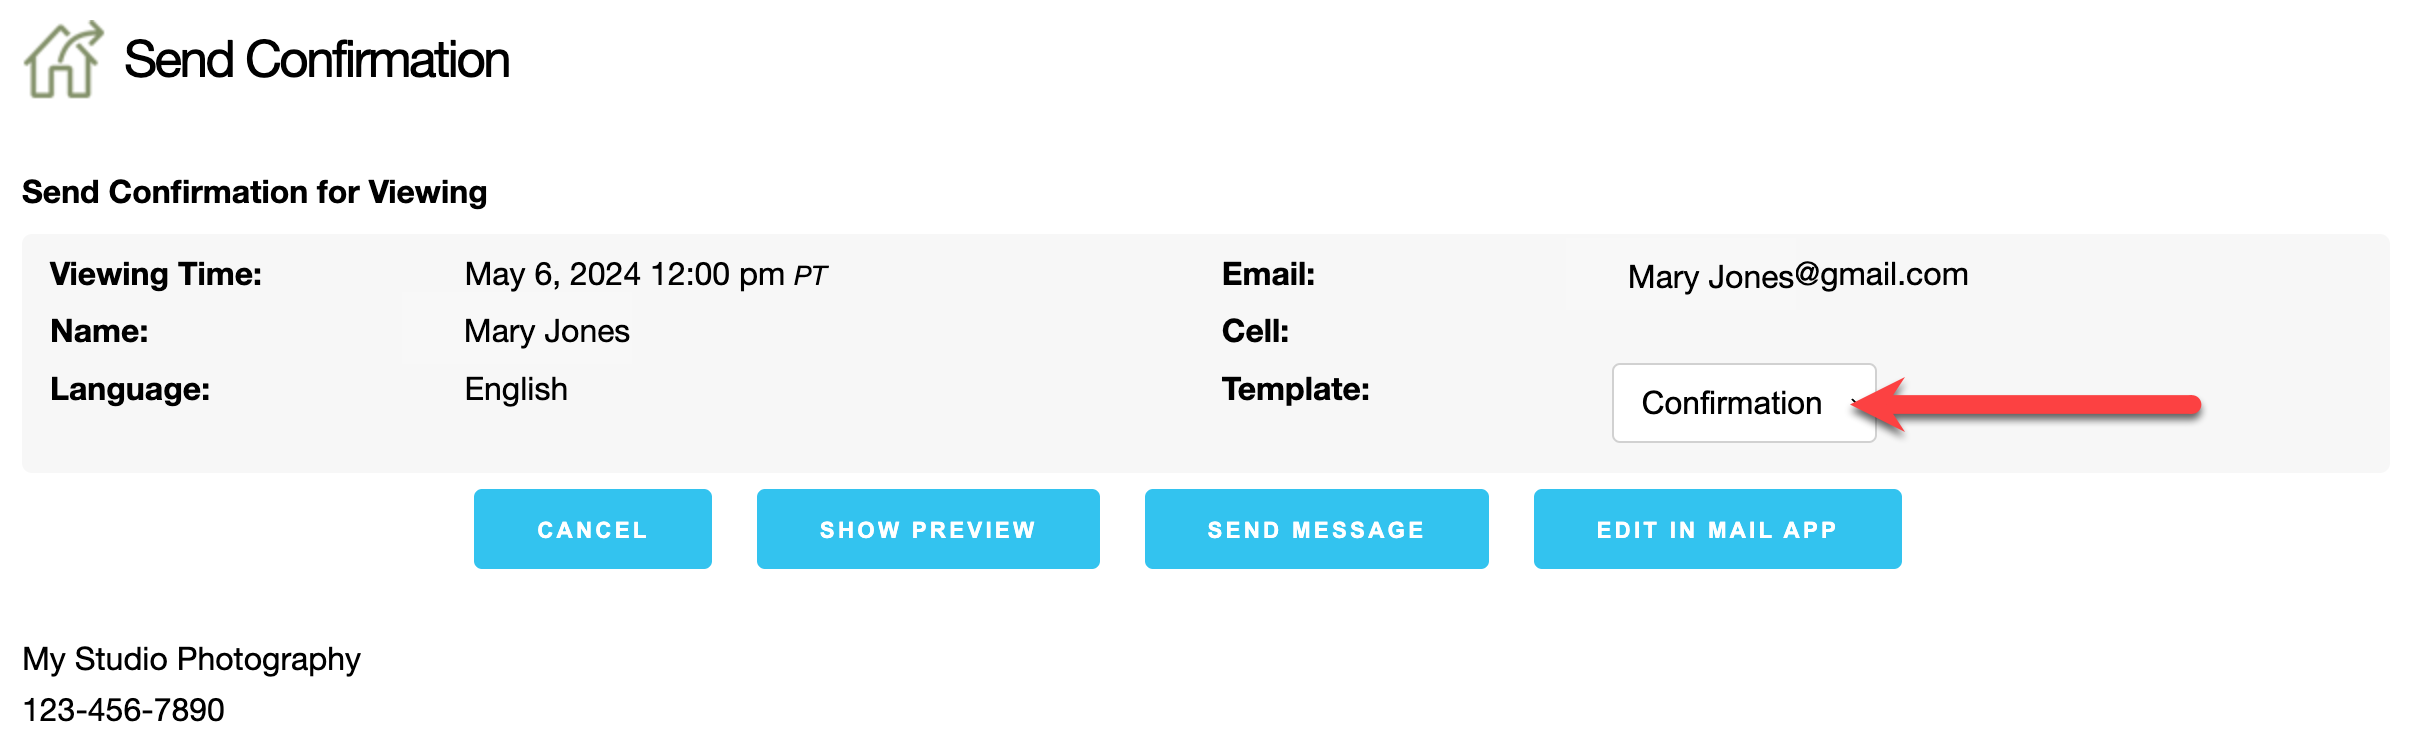
- By default, SendMyRooms™ will show you the next email that is due to be sent (based on what has already been sent or has happened). However, you can select a different email from the Template drop-down list and send that instead.
- Use the Show Preview button to preview the email before it is sent.
- Click Send Message.
If you need to reschedule a viewing appointment, follow these steps:
- Click on the Info button next to the viewing you wish to change.
- From the Viewing Info dialog, click on Edit Viewing.
- Make the adjustments required to the viewing date.
- Click Save Changes.
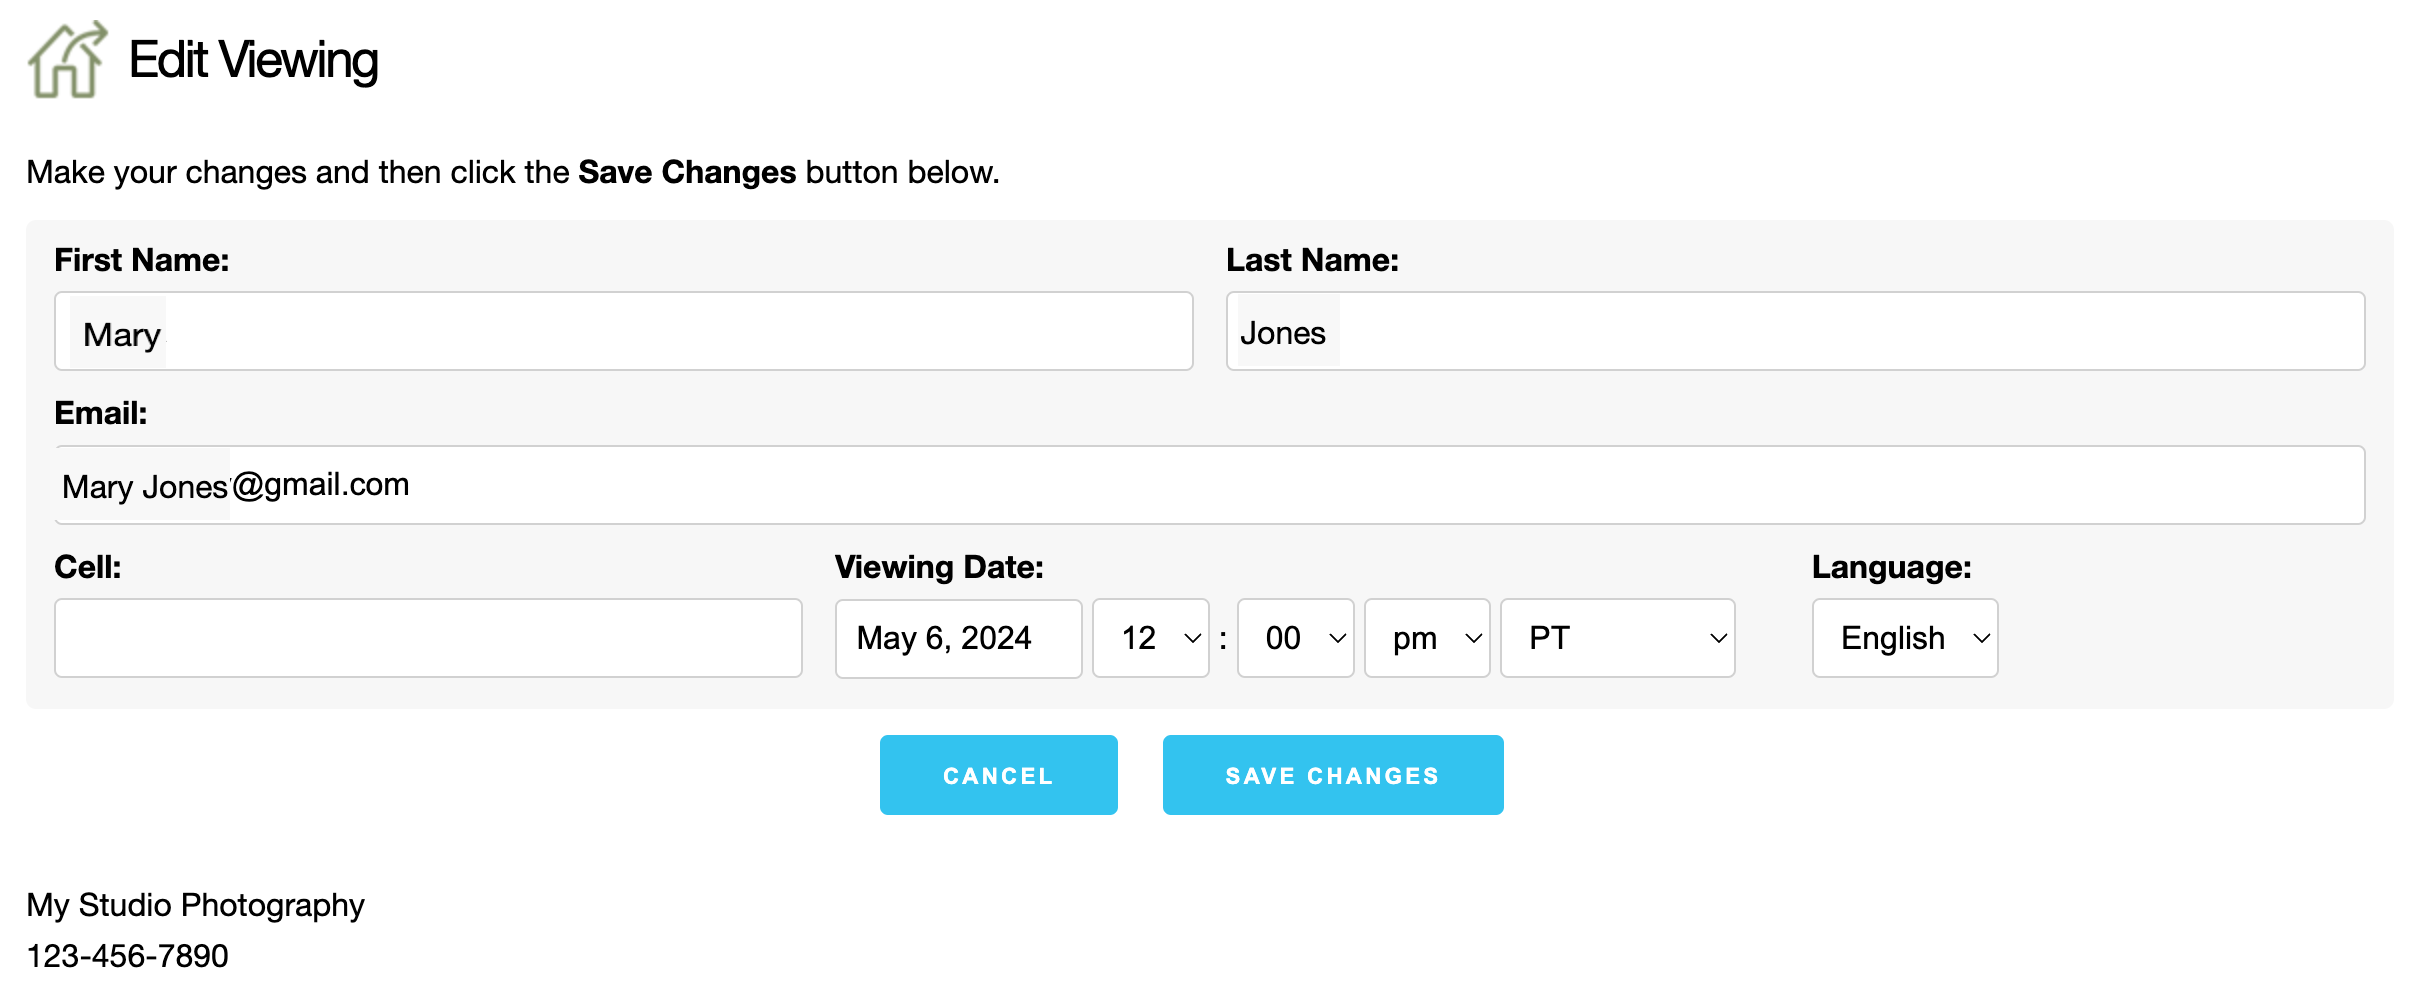
- At this point, the time of the viewing has been changed internally.
- Notify your Client of the change, by using the Send Confirmation button.
- If you change the viewing date for an expired viewing, it will appear in the upcoming lists on the home page once again.
When rescheduling a Clients viewing, use the Confirmation Email template if the Client has uploaded images already. However, if they have not yet uploaded room images, you can send the Reminder Email. This email template will also give the rescheduled appointment time as well as prompt them to upload room images. Use the Show Preview button to confirm the type of message you are sending.
From the Management Area Home page, click on Search Viewings.
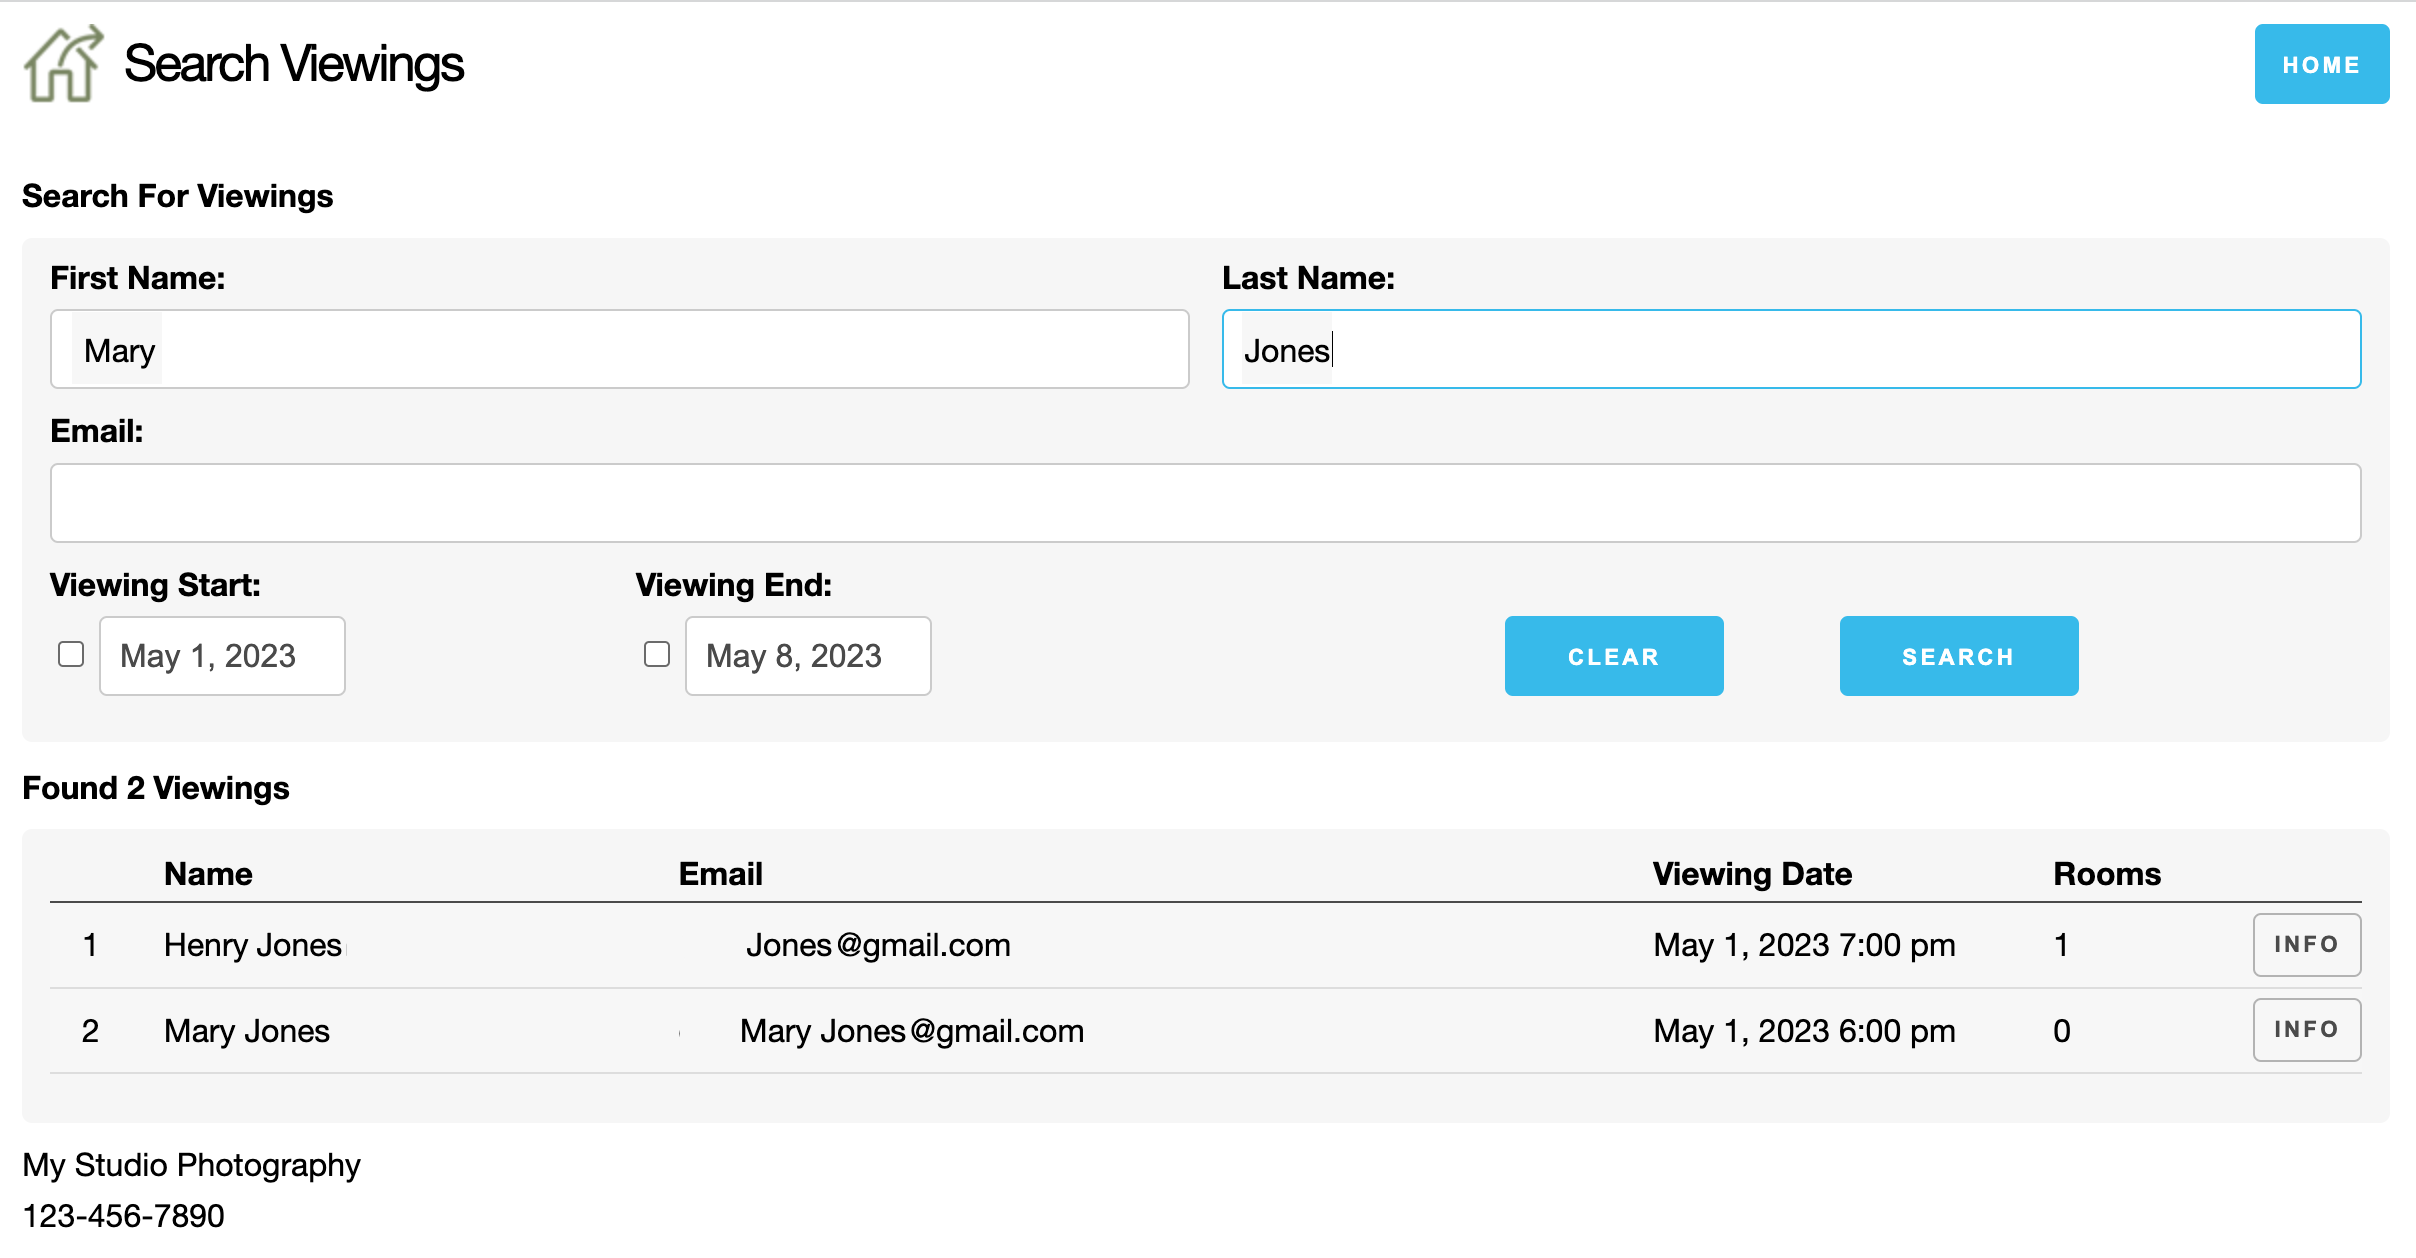
- In the system, you can search for viewings using full or partial names, email addresses, or by selecting a specified date range for upcoming or past viewings.
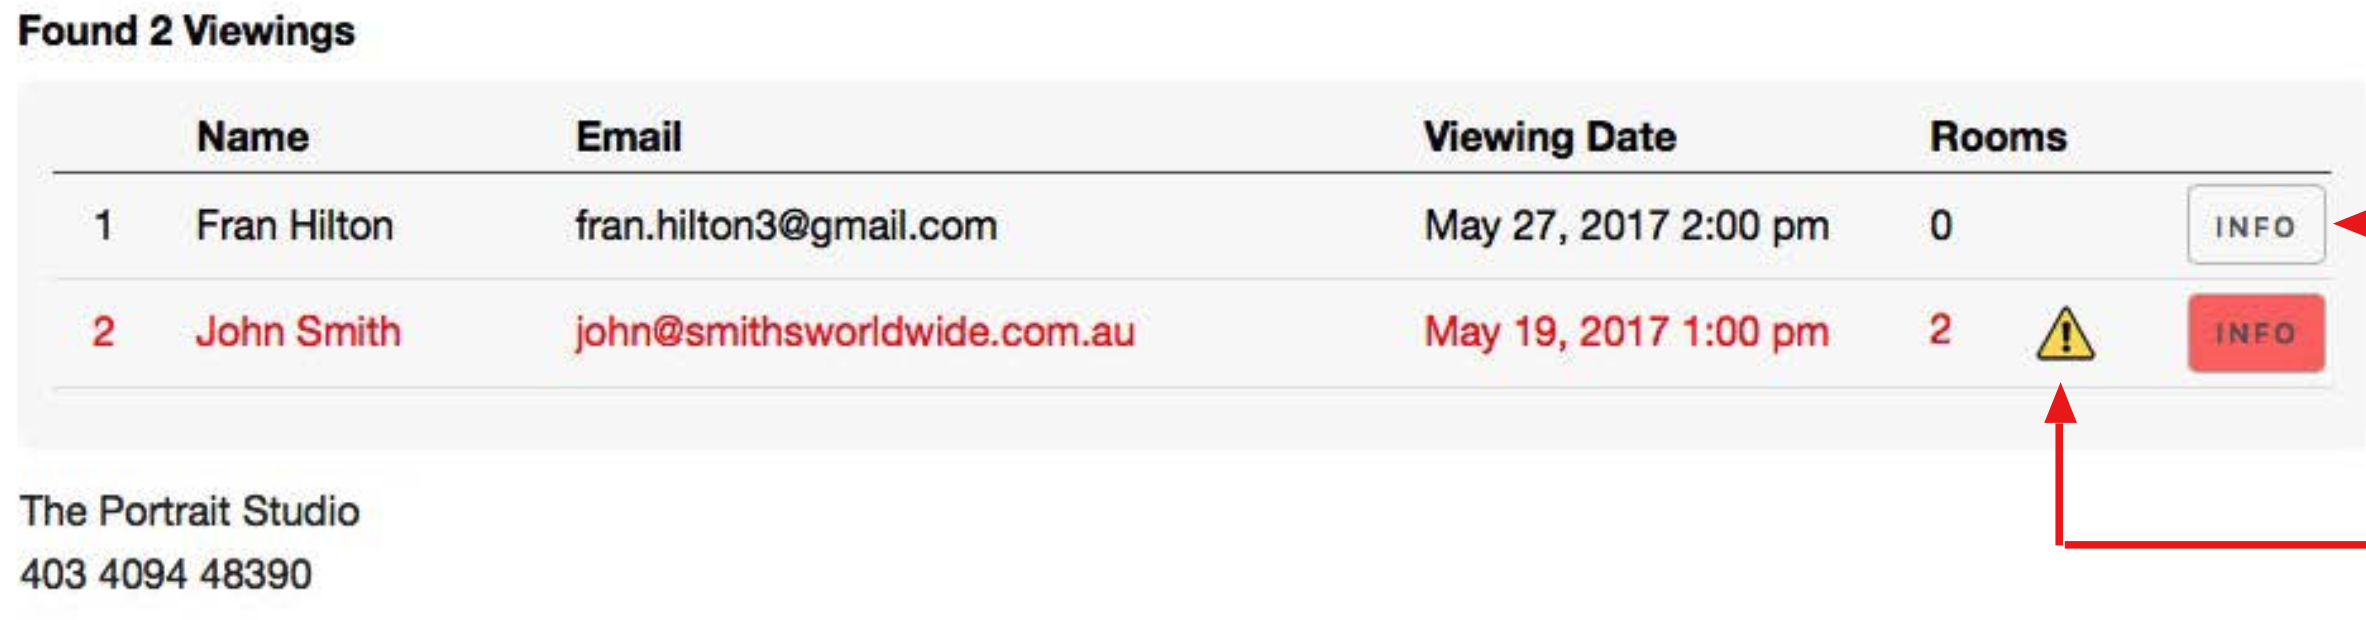
- Upcoming Viewings are listed in black text with past ones shown in red.
- Click the Info button to access the Viewing Info dialog.
A warning sign will be shown next to any viewings that have some un-downloaded images and are scheduled to be removed within the next seven days. You can adjust your Settings so you get automatically notified about these events.
Once in the Management Area, click the house icon ![]() on the top left corner of any page to return to the Home Page.
on the top left corner of any page to return to the Home Page.